Page is loading ...

Customer Service Informaon
Telephone: (800) 323-5565
Fax: (310) 533-3899
Hours: 8:30 AM – 4:30 PM (PST)
Email: Support@SevilleClassics.com
Homepage: www.SevilleClassics.com
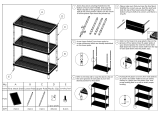
Cauon
Place heavier items on the lower shelves and lighter ones on the top.
Do not stand or climb on the shelving system.
Do not drop heavy items on the system.
Do not move the system while loaded.
112018
Specicaons
Dimensions: 30" W x 14" D x 60" H
Weight capacity Per shelf Overall
On leveling feet
300 lbs. (136 kg.)
1500 lbs. (680.4 kg.)
WEB370
Steel Wire Shelf
30" x 14"
WEB106
8-Pack Shelf Label
Addional parts and accessories are available for purchase online at:
www.SevilleClassics.com
WEB046
Shelving Liners
36" x 18" (2-Pack)
WEB232
S-Hook (6-pack)
View assembly online here:
hps://www.youtube.com/watch?v=N6iRVVqBG-I
5-Tier Black Epoxy Wire Shelving
30" W x 14" D x 60" H
Model #: SHE14309B
Thank you for choosing Seville Classics! We hope that you enjoy your
steel wire shelving! Please read through this guide for parts list, assembly
instrucons, frequently asked quesons and further contact informaon.
112018

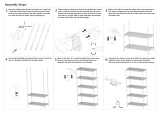
Parts List
B. Top poles (4)
(Plasc cap on end)
Please make sure you have all the parts on this list.
If you’re missing parts, contact us for replacements at
(800) 323-5565 or send an email to Support@SevilleClassics.com
1
D. Shelves (4)
F. Leveling feet (4)
E. Slip sleeves (20)
Assembly Instrucons
STEP 1.
Screw LEVELING FEET (F) into base of
boom poles.
Repeat for all boom poles.
STEP 2.
Snap SLIP SLEEVES (E) around the
grooves on BOTTOM POLES (A) for
your lowest shelf.
TIP! Count the number of grooves
from the boom of the pole to keep
the height consistent.
A. Boom poles (4)
(Threaded end)
C. Connectors (4)
(May be aached to poles)
2
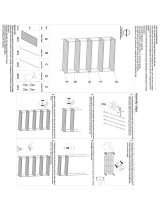
STEP 3.
Fit SHELF (D) over the top of the 4 poles
and over SLIP SLEEVES (E).
Repeat STEPS 2-3 for next shelf.
TIP! If necessary, lightly tap shelves into
place with a rubber mallet.
STEP 4.
Screw CONNECTORS (C) into top of
BOTTOM POLES (A).
Screw TOP POLES (B) to CONNECTORS (C).
TIP! Connectors may be pre-installed.
STEP 5.
Repeat STEPS 2-3 for remaining shelves.
Congratulaons!
Enjoy your now complete
shelving unit.
/