Page is loading ...

www.mt.com
XS204 Delta Range
XS Models – Part 1
Operating Instructions
Excellence Analytical Balances


Table of Contents
Introduction1 5
Symbols and presentations used1.1 6
Safety Information2 7
Explanation of warnings and symbols2.1 7
Product specific safety notes2.2 7
Overview XS Analytical Balance3 9
Installation and Putting into Operation4 10
Unpacking4.1 10
Scope of delivery4.2 11
Selecting a location and leveling the balance4.3 12
Location4.3.1 12
Leveling the balance4.3.2 12
Assembling the balance4.4 13
Connecting the balance4.5 15
Left/right operating of the glass draft shield4.6 16
Setting the reading angle and positioning the terminal4.7 17
Optimise the readability of the terminal4.7.1 17
Remove terminal and place close to the balance4.7.2 17
Transporting the balance4.8 17
Transporting over short distances4.8.1 17
Transporting over long distances4.8.2 18
Below-the-balance weighing4.9 20
Installing the ErgoClip4.10 21
Installing the single-use aluminum weighing pan4.11 22
Installing the SmartGrid cover4.12 22
Maintenance5 24
Cleaning5.1 24
Disposal5.2 24
Technical Data6 25
General data6.1 25
Explanatory notes for the METTLER TOLEDO AC adapter6.2 25
Model-specific data6.3 26
Dimensions6.4 29
Interfaces6.5 30
Specifications of RS232C6.5.1 30
Specifications of "Aux" connection6.5.2 30
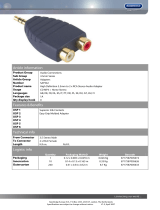
Accessories and Spare Parts7 31
Accessories7.1 31
Spare parts7.2 42
Appendix8 43
MT-SICS Interface Commands and Functions8.1 43
Table of Contents 3


1Introduction
Thank you for choosing a METTLER TOLEDO balance.
The balances of the XS line combine a large number of weighing and adjustment possibilities with exceptionally
convenient operation.
In this chapter you will be given basic information about your balance. Please read right through this chapter
carefully even if you already have experience with METTLER TOLEDO balances. Please pay special attention to
the safety warnings!
The different models have different characteristics regarding equipment and performance. Special notes in the
text indicate where this makes a difference to operation.
The XS line comprises a range of balances which differ from each other in relation to their weighing range and
resolution.
The following features are common to all models of the XS lines:
●
Fully automatic adjustment "FACT" using internal weight.
●
Built-in applications for normal weighing, statistics, formulation, density, percent weighing, piece counting
and LabX Client.
●
Integral RS232C interface.
●
Slot for second interface (optional).
●
Touch-sensitive graphics terminal ("Touch screen") for easy, convenient operation.
A brief word about standards, guidelines, and methods of quality assurance: The balances comply with usual
standards and guidelines. They support standard procedures, specifications, working methods, and reports
according to GLP (Good Laboratory Practice). In this connection, records of working procedures and adjust
ments become very important; for this purpose we recommend you to use a printer from the METTLER TOLEDO
range, since these are optimally adapted to your balance. The balances conform to the applicable standards
and guidelines and possess a EC declaration of conformity. METTLER TOLEDO is certified as manufacturer
according to ISO9001 and ISO14001.
The operating instructions for the XS balances consist of 3 separate documents, whose contents are listed
below.
Part 1, this document
Contents
●
Introduction
●
Safety information
●
Installation and putting into operation
●
Leveling the balance
●
Cleaning and service
●
Technical data
●
Accessories
●
Spare parts
●
Interface commands and MT-SICS functions
Part 2, separate document
Contents: Terminal, System, and Applications
●
Basic principles for using the terminal and the firmware
●
System settings
●
Applications
●
Firmware (Software) updates
●
Error and status messages
5Introduction

6 Introduction
●
Conversion table for weight units
●
Recommended printer settings
Part 3, separate document
Contents: Adjustments, and Tests
●
Adjustments
●
Tests
Finding more information
u www.mt.com/excellence
Firmware version
The operating instructions are based on the initially installed terminal firmware (software) version V 1.02.
1.1Symbols and presentations used
The following conventions apply to the operating instructions: part 1, part 2 and part 3.
Key designations are indicated by a picture or text in double angular parentheses (e.g. [ ] or [On/Off]).
This symbol indicates press key briefly (less than 1.5 s).
This symbol indicates press and hold key down (longer than 1.5 s).
These symbols indicate an instruction:
prerequisites
1
2
…
steps
results

2Safety Information
2.1Explanation of warnings and symbols
Safety notes are indicated by signal words and warning symbols and contain warnings and information about
safety issues. Ignoring safety notes can lead to personal injury, damage to the instrument, malfunctions and
erroneous results.
Signal words
WARNING for a hazardous situation with medium risk, possibly resulting in severe
injuries or death if not avoided.
CAUTION for a hazardous situation with low risk, resulting in damage to the device or
the property or in loss of data or minor or medium injuries if not avoided.
Attention (no symbol)
for important information about the product.
Note (no symbol)
for useful information about the product.
Warning symbols
General hazard Electrical shock
Mandatory signs
Gloves must be worn
2.2Product specific safety notes
Intended use
Your balance is used for weighing. Use the balance exclusively for this purpose. Any other type of use and
operation beyond the limits of technical specifications without written consent from Mettler-Toledo AG, is con
sidered as not intended.
It is not permitted to use the instrument in explosive atmosphere of gases, steam, fog, dust
and flammable dust (hazardous environments).
General safety information
Your instrument meets the state of the art technology and complies with all recognized safety rules, however,
certain hazards may arise in extraneous circumstances. Do not open the housing of the instrument: It does not
contain any parts which can be maintained, repaired or replaced by the user. If you ever have problems with
your instrument, contact your authorized METTLER TOLEDO dealer or service representative.
Always operate and use your balance only in accordance with the operating instructions part1, part2 and
part3.
The instructions for setting up your new balance must be strictly observed.
If the instrument is not used according to the manufacturer’s operating instructions (part1, part2 and
part3), protection of the instrument may be impaired.
7Safety Information

8 Safety Information
Staff safety
In order to use the instrument, you must have read and understood the operating instructions. Keep the operat
ing instructions for further reference.
Never make any modifications to the instrument and use only original spare parts and optional equipment from
METTLER TOLEDO.
Safety notes
WARNING
Risk of electric shock
Use only the original universal AC adapter delivered with your balance, and check that the
voltage printed on it is the same as your local power supply voltage. Only plug the adapter
into a socket which is grounded.
CAUTION
Damage to the balance
a) Only use indoors in dry locations.
b) Do not use pointed objects to operate the keyboard!
The balance is of a very sturdy design, but is still a precision instrument. It must be han
dled with care.
c) Do not open the balance:
The balance contains no user-serviceable parts. In the event of problems, please contact
a METTLER TOLEDO representative.
d) Only use METTLER TOLEDO original accessories and peripheral devices for the balance.
These are specifically designed for the balance.

3Overview XS Analytical Balance
www.mt.com
XS204
Delta Range
1
6
5
2
3
4
7
8
9
10
11
12
14
15
13
1617
18
Overview
1 Terminal (details see Operating Instructions –
Part 2)
2 Display (Touch-sensitive "Touch screen")
3 Operating keys 4 Drip tray
5 Handle for variable operation of the draft-shield
side doors
6 SmartGrid weighing pan
7 Glass draft shield 8 Type name
9 Handle for operation of the draft-shield top door 10 Guide for top door of draft shield and handle for
transport
11 Level indicator 12 Foot screw
13 Slot for second interface (optional) 14 Socket for AC adapter
15 Fastening point for anti-theft device 16 RS232C serial interface
17 Aux 2 (connection for "ErgoSens", hand- or
foot-switch)
18 Aux 1 (connection for "ErgoSens", hand- or
foot-switch)
9Overview XS Analytical Balance

10 Overview XS Analytical Balance
4Installation and Putting into Operation
This chapter explains how to unpack your new balance, and how to set it up and prepare it for operation. When
you have carried out the steps described in this chapter, your balance is ready for operation.
4.1Unpacking
Use the lifting strap to lift the balance out of the packaging carton.
Overview
1 Lifting strap
2 Top packing cushion
3 Operating Instructions and other important documents
4 Balance
5 Set with draft-shield doors and terminal support
6 Set with AC adapter, power supply cable, drip tray, SmartGrid,
SmartGrid cover, set of single-use pans and ErgoClip "Basket"
(basket for small weighing objects)
7 Terminal
Note
The terminal is connected to the balance by a cable!
8 Bottom packing cushion
8
1
2
3
4
5
67
1 Unfasten lifting strap (1).
2 Remove top packing cushion (2).
1 Pull out Operating Instructions (3).
2 Remove set with AC adapter etc. (4).
3 Remove set with draft-shield doors etc. (5).

– Carefully pull the terminal out of the bottom packing cushion and
remove the protective cover.
Note
The terminal is connected to the balance by a cable, so only pull the
terminal just far enough out of the packing cushion to remove the pro
tective cover.
1 Place the terminal on the front of the balance.
2 Hold the balance by the guide or handle, hold the terminal firmly
with your other hand, and pull the balance and terminal together
out of the bottom packing cushion.
1 Place the balance with the terminal in the place where the balance
will be used for weighing.
2 Remove the cover from the balance.
3 Pull the transport protection (9) of the weighing pan support
toward the front and off.
9
Note
Please keep all parts of the packaging. This packaging guarantees best possible protection of your balance for
transportation,
4.2Scope of delivery
The standard scope of delivery contains the following items:
●
Balance with terminal
•
RS232C interface
•
Slot for second interface (optional)
•
Feedthroughs for below-the-balance weighing and for antitheft device
●
Set with draft-shield doors and terminal support
●
SmartGrid
●
SmartGrid cover, chromium-nickel steel
11Installation and Putting into Operation

12 Installation and Putting into Operation
●
Set of single-use aluminum weighing pans (10 pans) for mounting on SmartGrid
●
Drip tray
●
AC adapter with country-specific power cable
●
Protective cover for the terminal
●
Cleaning brush
●
ErgoClip "Basket" (basket for small weighing objects)
●
Production certificate
●
CE declaration of conformity
●
Operating instructions part 1 (this document), part 2 and part 3
●
Instructions for unpacking, re-packing, and setting up
4.3Selecting a location and leveling the balance
4.3.1Location
An optimal location will ensure accurate and reliable operation of the balance. The surface must be able to
safely take the weight of the balance when fully loaded. The following local conditions must be observed:
Note
If the balance is not horizontal at the outset, it must be leveled during commissioning.
●
The balance must only be used indoors and up to a maxi
mum altitude of 4,000 m above sea level.
●
Before switching on the balance, wait until all parts are at
room temperature (+5 to 40°C).
The humidity must be between 10% and 80% non-condens
ing.
●
The power plug must be accessible at all times.
●
Firm, horizontal and vibration-free location.
●
Avoid direct sunlight.
●
No excessive temperature fluctuations.
●
No strong drafts.
Further information can by found in Weighing the Right Way.
4.3.2Leveling the balance
The balances have a level indicator and two adjustable leveling feet to compensate for slight irregularities in the
surface of the weighing bench.

The balance is exactly horizontal when the air bubble is in the mid
dle of the level glass.
1 Adjust the two leveling feet appropriately until the air bubble comes
to rest exactly in the middle of the glass:
Air bubble at "12 o'clock" turn both feet counterclockwise.
Air bubble at "3 o'clock" turn left foot clockwise, right foot counter
clockwise.
Air bubble at "6 o'clock" turn both feet clockwise.
Air bubble at "9 o'clock" turn left foot counterclockwise, right foot
clockwise.
2 The balance must be leveled and adjusted each time it is moved to
a new location.
4.4Assembling the balance
1 Remove the transport protection (1).
2 Insert the drip tray (2).
Push the tray in from the front over the bottom plate as far as the
partition.
– Insert the SmartGrid from the front.
Check that the SmartGrid (1) (2) is correctly hooked in at both
sides.
1 Insert the top door of the draft shield (1) at an angle (slightly less
than 30 degrees) into the guide positioned at the back.
2 Swivel the draft-shield door (2) carefully down, see figure.
13Installation and Putting into Operation

14 Installation and Putting into Operation
The handles (A) must be turned toward the outside to allow instal
lation of the side draft shield doors!
1 Insert the side doors of the draft shield according to the following
instructions, see figure below.
2 Insert the side door at an angle of approx. 30° into the 2 openings,
see figure.
3 Check that the side door is correctly inserted as shown!
4 Swivel the side door up against the balance until it engages with a
click.
5 The side door must run easily, otherwise it is not correctly inserted.
6 Insert the second side door of the draft shield.
The procedure is identical.
7 Push the side doors completely to the back.
1 Insert the front glass (2) of the draft shield.
2 In the bottom part of the balance at the front, move at an angle
from the top toward the bottom until the two hooks of the front
glass of the draft shield lie on the rollers (1).
3 Swivel the front glass of the draft shield up until it engages.
1 Insert the terminal support.
2 First lay the cable in the guide by the terminal support.
3 Insert the terminal support into the opening of the front glass of the
draft shield.
The terminal support must engage with a click.

1 Mount the terminal.
2 Place the terminal in the center of the support.
3 Push it against the balance until it swivels slightly down at the front
by the terminal support.
You can push the cable into the balance.
Attention
The balance and the terminal are not fastened together by the terminal support! When transporting by hand,
always hold the balance and the terminal firmly, see Transporting the balance (page17).
Note
You can also place the terminal free of the terminal support anywhere around the balance where the length of
the cable allows.
4.5Connecting the balance
WARNING
Risk of electric shock
a) To connect the balance, only use the supplied three-core power cord with equipment
grounding conductor.
b) Only connect the balance to a three-pin power socket with earthing contact.
c) Only standardized extension cable with equipment grounding conductor must be used for
operation of the balance.
d) Intentional disconnection of the equipment grounding conductor is forbidden.
The balance is supplied with an AC adapter and country-specific power cord. The AC adapter is suitable for use
with the following voltage range:
100 – 240 VAC, 50/60Hz.
Attention
●
Check whether your local power supply falls within this range. If this is not the case, under no circum
stances connect the AC adapter to the power supply, but contact a METTLER TOLEDO representative.
●
The power plug must be accessible at all times.
●
Prior to use, check the power cord for damage.
●
Route the cable in such a way that it cannot be damaged or cause a hindrance when working.
●
Ensure that no liquid comes into contact with the AC adapter.
15Installation and Putting into Operation

16 Installation and Putting into Operation
Balance and terminal are at the final location.
1 Connect the AC adapter (1) to the connection socket (2) at the rear
of the balance.
2 Connect the AC adapter (1) to the power supply.
The balance performs a self-test after connection to the power sup
ply and is then ready to use.
Note
If the display field remains dark, even though the power supply con
nection functions.
1 First disconnect the balance from the power supply.
2 Open the terminal.
3 Press both buttons (1) on the back of the terminal and open the
upper part of the terminal.
4 Check that the plug for the terminal cable (2) is connected correctly
inside the terminal.
1
1
2
4.6Left/right operating of the glass draft shield
The glass draft shield of your balance can be adapted to the environmental conditions and your weighing style,
as well as to the type of weighing and loading.
The position of the handles determines which door(s) of the draft
shield (left, right, or both) is/are opened.
Try various different combinations by moving the external handles into
the upper or lower position. We recommend you to set up the glass
draft shield so that it only opens on the side where the balance is load
ed. Your balance then works faster, because there are fewer trouble
some currents of air than when both doors of the draft shield are
opened together.

4.7Setting the reading angle and positioning the terminal
4.7.1Optimise the readability of the terminal
Changing the reading angle
1 For a steeper reading angle, pull both levers (1) at the side
upward.
You can then pull the upper part of the terminal slowly upward
until it engages in the desired position. A total of 3 setting posi
tions are available.
2 Move it in an appropriate position.
3 For a flatter reading angle, pull both levers (1) at the side upward,
and press the lower part of the terminal downward.
4 Release both levers and the upper part of the terminal then engages
in the desired position.
1 1
4.7.2Remove terminal and place close to the balance
The terminal is connected to the balance by a cable. So you can arrange your workplace optimally, the terminal
can be removed from the balance and placed separately.
Place the terminal separately
1 Switch the balance off.
2 Carefully lift the terminal off the terminal support.
You can leave the terminal support on the balance or remove it.
3 Pull the cable carefully out from the balance as far as possible.
4 Place the terminal where you want it to be.
Note
The cable can also be led out of the back of the balance. If working
this way would be convenient for you, call your METTLER TOLEDO
dealer who will adapt the balance for you.
4.8Transporting the balance
1 Switch off the balance.
2 The balance must be disconnected from the power supply.
3 Remove any interface cable from the balance.
4.8.1Transporting over short distances
If you wish to move your balance over a short distance to a new location, proceed as follows.
17Installation and Putting into Operation

18 Installation and Putting into Operation
CAUTION
Damage of device
Never lift the balance by the glass draft shield, as this can cause damage!
1 With one hand, hold the balance by the guide for the top door of
the draft shield.
2 With your other hand, hold the terminal. The terminal is not rigidly
fastened to the balance, so you must always hold the balance with
one hand and the terminal with the other.
3 Carefully lift the balance and carry it to its new location, observe
the notes in chapter Location (page12).
4.8.2Transporting over long distances
If you want to transport or ship your balance over long distances, or if it is not certain that the balance will be
transported upright, use the complete original packaging.
Disassemble the following parts
1 Lift the terminal (1) out of the terminal support and place it next to
the support.
2 Pull the terminal support (2) off the balance.
3 Swivel the front glass (3) of the draft shield away from the balance.
4 Carefully fold the side doors (4+5) of the draft shield against the
respective handles and pull the side doors out of the guide.
5 Swivel the front ot the top door (6) of the draft shield up and pull
the door out of the guide.
6 Carefully raise the front of the SmartGrid (7) and lift it out of the
guide.
7 Pull the drip tray (8) toward the front and out.
Pack the draft shield, the intermediate shelf and the terminal support (Pos. 2-6)
– Place these parts in the compartments provided in the original
packaging.
Note
We advise you to place a sheet of paper between the sides glasses
of the draft shield.

Pack the AC adapter, the power supply cable, and the individual parts (steps 7+8)
1 Place the AC adapter and the power supply cable in the packaging.
2 Place the drip tray (8) upside down in the packaging.
3 Place the SmartGrid (7) upside down on the drip tray.
4 Place the ErgoClip "Basket" in the packaging.
CAUTION
Damage of device
These instructions must be followed exactly, otherwise the balance may be damaged when
inserting it into the packing cushions.
1 Push the transport protection over the weighing pan guide.
2 Push the guide of the top draft-shield door completely to the front.
3 Swivel the handle of the side door of the draft shield upward, and
also push this door completely to the front.
Note
For packing both the balance and the terminal, you have a protective
cover in which they were delivered. These are deliberately not shown in
the illustrations so you can see better how the individual items must be
positioned. However, we recommend you to use these protective cov
ers.
1 Place the terminal on the balance (see illustration) and carefully
insert the balance into the bottom packing cushion.
2 Take the terminal and place it in front of the packing cushion on the
table.
– Insert the packing set with the draft-shield glasses into the packing
cushion, see illustration.
19Installation and Putting into Operation

20 Installation and Putting into Operation
– Place the set with the AC adapter in front of the set with the draft-
shield glasses.
– Insert the terminal into the packing cushion as shown in the illus
tration.
1 Now put the top packing cushion in place.
Taking care to position it correctly.
2 Pass the lifting strap around both packing cushions, see illustra
tion.
3 Tighten it until it lies close against the packaging.
You can now lift the packed balance by the lifting strap and
insert it into the transport carton.
4.9Below-the-balance weighing
So that weighings can be carried out below the working surface (below-the-balance weighing), your balance is
provided with a special hanger.
/