
InMail Feature Manual
A50-031762-003 NA
ISSUE 3.5

Copyright
NEC Corporation reserves the right to change the specifications, functions, or features at any time
without notice.
NEC Corporation has prepared this document for use by its employees and customers. The
information contained herein is the property of NEC Corporation and shall not be reproduced without
prior written approval of NEC Corporation.
Pentium is a trademark or registered trademark of Intel Corporation or its subsidiaries in the United
States and other countries.
Copyright 2011 - 2013
NEC Corporation

TABLE OF CONTENTS
Chapter 1 Quick Setup
Section 1 UPGRADE THE INMAIL BOARD...................................................................... 1-1
Section 2 START-UP (DEFAULT) INMAIL CONFIGURATION......................................... 1-2
Section 3 BASIC FUNCTIONS WITHOUT MAIN GREETING........................................... 1-2
Section 4 ENABLE THE MAILBOXES FOR ALL INSTALLED EXTENSIONS.................. 1-2
Section 5 SET UP AUTOMATED ATTENDANT TO ANSWER OUTSIDE CALLS............ 1-3
Section 6 SET UP SIMPLE DAY/NIGHT ANSWERING.................................................... 1-5
Section 7 INMAIL SYSTEM REQUIREMENTS................................................................. 1-5
Section 8 SPECIFICATIONS............................................................................................. 1-5
Section 9 EXAMPLES OF COMMON APPLICATIONS..................................................... 1-5
Chapter 2 Features
Section 1 INTRODUCTION TO INMAIL FEATURES........................................................ 2-1
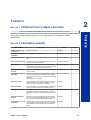
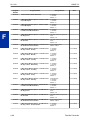
Section 2 FEATURE GLOSSARY..................................................................................... 2-1
Section 3 FEATURE DESCRIPTIONS.............................................................................. 2-7
ACD Delay Announcement......................................................................................... 2-8
Announcement Mailbox............................................................................................. 2-10
Announcement Message........................................................................................... 2-15
Answer Schedule Override ....................................................................................... 2-16
Answer Table............................................................................................................ 2-19
Auto Attendant Direct to Voice Mail........................................................................... 2-26
Auto Erase or Save................................................................................................... 2-28
Auto Time Stamp....................................................................................................... 2-29
Automated Attendant................................................................................................. 2-31
Automated Attendant Transfer.................................................................................. 2-35
Automatic Access to VM by Caller ID........................................................................ 2-36
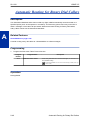
Automatic Routing for Rotary Dial Callers................................................................. 2-40
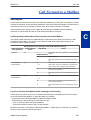
Call Forward to a Mailbox.......................................................................................... 2-41
Caller ID.................................................................................................................... 2-43
Caller ID with Return Call.......................................................................................... 2-45
Calling the Automated Attendant............................................................................... 2-46
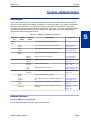
Cascade Message Notification.................................................................................. 2-47
Dial Action Table....................................................................................................... 2-60
Directory Dialing........................................................................................................ 2-65
Directory Dialing Mailbox........................................................................................... 2-75
Distribution List.......................................................................................................... 2-76
Email Notification....................................................................................................... 2-79
Erasing All Messages................................................................................................ 2-92
Exiting a Mailbox....................................................................................................... 2-93
External Transfer....................................................................................................... 2-94
Fax Detection............................................................................................................ 2-96
Find-Me Follow-Me.................................................................................................... 2-97
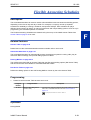
Flexible Answering Schedules................................................................................ 2-101
Flexible Call Routing............................................................................................... 2-102
Flexible Mailbox Numbering Plan............................................................................ 2-103
Forced Unscreened Transfer.................................................................................. 2-106
Getting Recorded Help............................................................................................ 2-107
Go To A Mailbox...................................................................................................... 2-108
Greeting................................................................................................................... 2-110
Group (Shared) Mailbox.......................................................................................... 2-114
ISSUE 3.5
SL1100
InMail Feature Manual i

Guest Mailbox......................................................................................................... 2-120
Hang Up.................................................................................................................. 2-123
Hotel Integration...................................................................................................... 2-124
InMail-Auto Setting.................................................................................................. 2-126
InMail Upload Download Audio............................................................................... 2-129
Instruction Menu...................................................................................................... 2-145
Language Setting.................................................................................................... 2-147
Leaving a Message................................................................................................. 2-150
Listening to Messages............................................................................................. 2-152
Live Monitor............................................................................................................. 2-155
Live Record............................................................................................................. 2-157
Log On to Voice Mail............................................................................................... 2-159
Mailbox Announcement Message........................................................................... 2-161
Mailbox Name......................................................................................................... 2-163
Mailbox Options Menu............................................................................................. 2-165
Mailbox Security Code Delete................................................................................. 2-166
Main Menu............................................................................................................... 2-167
Make Call................................................................................................................ 2-169
Message Count Display.......................................................................................... 2-172
Message Delete...................................................................................................... 2-174
Message Forward.................................................................................................... 2-175
Message Length...................................................................................................... 2-177
Message Listen Mode............................................................................................. 2-179
Message Notification............................................................................................... 2-180
Message Playback Direction................................................................................... 2-186
Message Record..................................................................................................... 2-187
Message Reply........................................................................................................ 2-188
Message Storage Limit............................................................................................ 2-190
Message Waiting Lamp........................................................................................... 2-191
Multiple Company Greetings................................................................................... 2-192
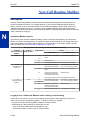
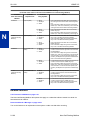
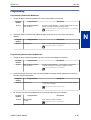
Next Call Routing Mailbox....................................................................................... 2-194
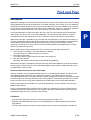
Park and Page......................................................................................................... 2-199
Programming Voice Mail......................................................................................... 2-205
Quick Message........................................................................................................ 2-207
Record and Send a Message.................................................................................. 2-210
Remote Programming............................................................................................. 2-212
Routing Mailbox....................................................................................................... 2-213
Screened Transfer................................................................................................... 2-217
Security Code.......................................................................................................... 2-220
Single Digit Dialing.................................................................................................. 2-222
SL Net..................................................................................................................... 2-224
Station Mailbox........................................................................................................ 2-225
Subscriber Mailbox.................................................................................................. 2-226
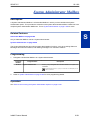
System Administrator.............................................................................................. 2-229
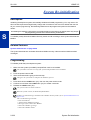
System Administrator Mailbox................................................................................. 2-231
System Re-initialization........................................................................................... 2-232
Time and Date......................................................................................................... 2-234
Time and Date Stamp............................................................................................. 2-235
Transfer to a Mailbox............................................................................................... 2-236
Undefined Routing................................................................................................... 2-237
Unscreened Transfer............................................................................................... 2-238
Voice Mail Overflow................................................................................................. 2-241
Volume Control........................................................................................................ 2-250
SL1100
ISSUE 3.5
ii InMail Feature Manual

Chapter 3 InMail Utility
Section 1 INMAIL UTILITY................................................................................................. 3-1
Section 2 REQUIREMENTS.............................................................................................. 3-1
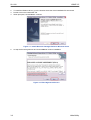
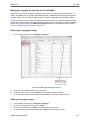
Section 3 INSTALLING RELIANT FILE SYSTEM DRIVER............................................... 3-1
Section 4 INSTALLING THE INMAIL UTILITY................................................................ 3-12
Chapter 4 Soft Key Glossary
ISSUE 3.5 SL1100
InMail Feature Manual iii

LIST OF TABLES
Table 2-1 SL1100 Email Account Information................................................................. 2-79
Table 2-2 Typical SMS Notification (No Wav File)........................................................... 2-85
Table 2-3 Common Email Notification SMTP Server Settings......................................... 2-85
Table 2-4 Some Common Mobile Telephone Service Provider SMS Portals.................. 2-85
Table 2-5 Turn Email Notification On or Off .................................................................... 2-91
Table 2-6 Default Incoming Ringing Tone..................................................................... 2-130
Table 2-7 Message Listen Options................................................................................ 2-152
Table 2-8 Mailbox Main Menu ....................................................................................... 2-167
Table 2-9 Park and Page Call Handling......................................................................... 2-200
Table 2-10 Park and Page Call Handling....................................................................... 2-200
Table 2-11 Recording Your Paging Message................................................................ 2-203
Table 2-12 Setting the Call Handling Options................................................................ 2-203
Table 2-13 Picking Up a Parked Call............................................................................. 2-204
Table 2-14 Dial Action Table Key Action Summary....................................................... 2-222
Table 2-15 System Administrator Options..................................................................... 2-229
Table 2-16 Accessing the System Administrator Options ............................................. 2-230
SL1100 ISSUE 3.5
iv InMail Feature Manual

LIST OF FIGURES
Figure 1-1 InMail Daughter Board with CompactFlash Card Assembly Installed.............. 1-1
Figure 1-2 Remove the InMail CompactFlash Card........................................................... 1-1
Figure 2-1 Example - User Access to Voice Mail............................................................. 2-36
Figure 2-2 Cascade Message Notification Flow Chart..................................................... 2-48
Figure 2-3 Email with Station Name................................................................................ 2-81
Figure 2-4 Email - No Station Name................................................................................ 2-82
Figure 2-5 Email with CID Name..................................................................................... 2-83
Figure 2-6 Email - CO No CID......................................................................................... 2-84
Figure 2-7 InMail User Pro Login Diagram.................................................................... 2-130
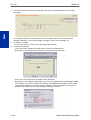
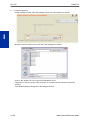
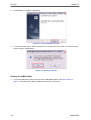
Figure 3-1 Install Wizard for Datalight Reliance Windows Driver...................................... 3-2
Figure 3-2 EULA Agreement Screen................................................................................. 3-2
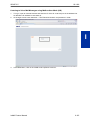
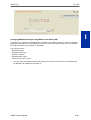
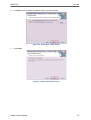
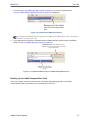
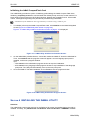
Figure 3-3 Destination Folder Screen................................................................................ 3-3
Figure 3-4 Begin Installation Screen.................................................................................. 3-3
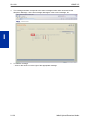
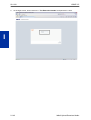
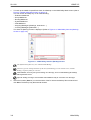
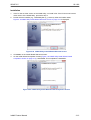
Figure 3-5 Finish Installation Screen................................................................................. 3-4
Figure 3-6 Reboot PC Screen............................................................................................ 3-4
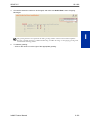
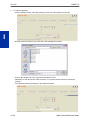
Figure 3-7 Removing the CompactFlash Card from the Blade.......................................... 3-5
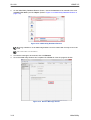
Figure 3-8 InMail Utility Main Screen................................................................................. 3-6
Figure 3-9 Utility Select InMail Card Screen...................................................................... 3-7
Figure 3-10 Updated InMail Portion of InMail Utility Main Screen..................................... 3-7
Figure 3-11 InMail Utility Save As (Backup) Screen.......................................................... 3-8
Figure 3-12 Backup Progress Status Screen..................................................................... 3-9
Figure 3-13 Restore Data Report Screen.......................................................................... 3-9
Figure 3-14 InMail Utility Database Restore.................................................................... 3-10
Figure 3-15 Restore Message Screen............................................................................. 3-10
Figure 3-16 Manage Languages Screen......................................................................... 3-11
Figure 3-17 InMail Utility Initialize Confirmation Screen.................................................. 3-12
Figure 3-18 InMail Utility Initialization Progress Screen................................................... 3-12
Figure 3-19 InMail Utility Install Wizard Welcome Screen............................................... 3-13
Figure 3-20 InMail Utility Install Wizard Install Completion Screen.................................. 3-13
ISSUE 3.5 SL1100
InMail Feature Manual v

MEMO
SL1100 ISSUE 3.5
vi InMail Feature Manual

Quick Setup
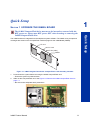
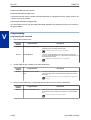
SECTION 1 UPGRADE THE INMAIL BOARD
The InMail CompactFlash drive must never be inserted or removed with the
KSU power on. Always turn KSU power OFF when inserting or removing the
InMail CompactFlash drive.
The InMail software is integrated into the telephone system software. The InMail voice prompts and
messages are stored on the CompactFlash card that plugs into the InMail Board (VMDB) .
CF card
CF Slot (CN2)
CPU card
VMDB
Figure 1-1 InMail Daughter Board with CompactFlash Card Assembly Installed
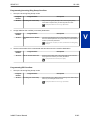
1. Power down the system before removing the InMail CompactFlash card.
• Ensure the system is powered down.
2. Slide out the CompactFlash card. See Figure 1-2 Remove the InMail CompactFlash Card on
page 1-1.
• Be sure to take adequate static precautions.
Figure 1-2 Remove the InMail CompactFlash Card
InMail Feature Manual
1-1
Quick Setup
1

3. Reinstall the CompactFlash card and power up the system.
SECTION 2 START-UP (DEFAULT) INMAIL CONFIGURATION
When you install the InMail Board and turn on the system, InMail has the following default
programming:
• Subscriber Mailboxes are enabled for extensions 101 ~ 164. The mailbox numbers are the same as
the extension numbers.
• The Automated Attendant does not answer outside calls.
• The InMail does not answer internal calls.
SECTION 3 BASIC FUNCTIONS WITHOUT MAIN GREETING
To make the InMail answer, the following programming must be done. The example shown is for a 4-
port InMail. Extension, Group and Pilot Numbers shown can be adjusted as needed per installation
requirements.
Refer to the SL1100 Programming Manual (Separate Issue) for more detailed programming
instructions.
Example
Program Number Description
47-01-17 Set first port of In-Mail to 25.
10-09-01 Verify at least one resource is set to ICM/TRK or Common.
11-07-01 Set TEL Group Pilot 2 to 200.
Never use Group 1, as this is the default group for all extensions.
15-03-01 Set extension 125 ~ 128 to DP.
15-03-03 Set extension 125 ~ 128 to Special.
16-02-01 Put 125 ~ 128 in Group 2.
Assign priorities 1 ~ 4 to 125 ~ 128.
16-01-01 Set Group 2 name to VM Hunt.
16-01-10 Set Group 2 to Busy/No Answer.
45-01-01 Set to Group 2.
With Ver3.0 or higher software, InMail Auto Setting feature is available. (V3.0 or higher)
This feature will automatically program the required InMail settings when an InMail CF is installed into
a SL1100 system. (V3.0 or higher)
Refer to InMail-Auto Setting on page 2-126. (V3.0 or higher)
SECTION 4 ENABLE THE MAILBOXES FOR ALL INSTALLED
EXTENSIONS
Since by default only extensions 101 ~ 164 have Subscriber Mailboxes, you should enable additional
Subscriber Mailboxes for all installed extensions.
To enable additional Subscriber Mailboxes:
SL1100
ISSUE 3.5
1-2
Quick Setup

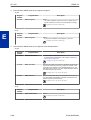
1. In 47-02-01 Mailbox Type, enter 1 to enable a Subscriber Mailbox for each extension.
• To make programming easier, consider associating a mailbox number with a station port. For
example, mailbox 1 should correspond to port 1, which in turn corresponds to extension 101.
2. In 47-02-02 Mailbox Number, select the extension number to be associated with the mailbox you
are programming.
• Normally, mailbox 1 should use Mailbox Number 101, mailbox 2 should use Mailbox Number
102, etc.
3. For Voice Mail access;
• You can optionally use 15-07-01 Programming Function Keys to assign a Voice Mail key (code
751 + 77).
• If you don’t assign the Voice Mail key for Voice Mail access, an extension user can access his
mailbox by the following actions:
- Press Speaker key
- Dial InMail pilot number
- Dial mailbox number
SECTION 5 SET UP AUTOMATED ATTENDANT TO ANSWER
OUTSIDE CALLS
To enable Automated Attendant to answer outside calls, set up Direct Inward Lines (DILs) and
terminate them to InMail.
Automated Attendant enables the following capabilities:
• All calls are answered by Call Routing Mailbox 1 and Dial Action Table 1. This happens because:
- Answer Table 1 Runs Monday-Friday from 8:30 AM to 5:00 PM, and uses Call Routing Mailbox 1.
- At all other times, the Default Mailbox answers - also using Call Routing Mailbox 1.
• Dial Action Table 1 allows outside callers to perform the following actions:
- Dial system extensions (if installed).
- Dial 0 (Operator access code) for an operator (extension 101).
- Dial
*
+ Extension to leave a Quick Message in a mailbox.
- Dial # + Extension to remotely log on to their mailbox.
- Wait on the line to be automatically routed to the operator.
To Set up the Automated Attendant to answer outside calls:
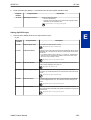
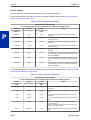
1. Set up trunks as Direct Inward Lines.
Program
Number
Program Name Description
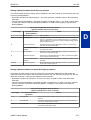
22-02-01 Incoming Call Trunk Setup Assign Service Type 4 to each trunk you want to be a DIL. Make a
separate entry for each Night Service mode.
By default, trunks are Service Type 0 (Normal).
ISSUE 3.5 SL1100
InMail Feature Manual 1-3

2. Have the Direct Inward Lines terminate to InMail (Example; extension 200).
Program
Number
Program Name Description
22-07-01 DIL Assignment For each trunk you designated as a DIL above, enter 200.
Make a separate entry for each Night Service mode.
By default, no DIL destinations are programmed.
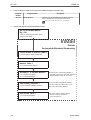
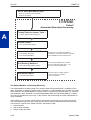
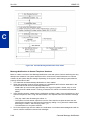
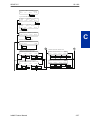
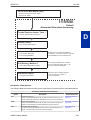
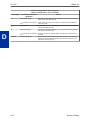
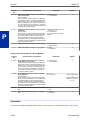
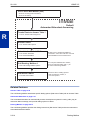
3. Review the default Automated Attendant setup.
Trunks Route to Answer Table 1
47-10-01 Answer Table Assignment
InMail
Default
Automated Attendant Answering
Answer Table 1
47-11 Answer Table Options
Schedule 1 or Default Mailbox
47-12 Answer Schedules
47-11-05 Default Mailbox
Call Routing Mailbox 1
47-08 Call Routing Mailbox Options
All calls route to Call Routing Mailbox 1
Schedule 1 active M-F 8:30 AM - 5:00 PM
Default Mailbox active all other times
From a System Administrator mailbox,
record an Instruction Menu (SA + I) for
the active Call Routing Mailbox.
Dial Action Table 1
47-13 Dial Action Tables
DIL to Voice Mail Master
Eg., 200
22-01-01 Incoming Call Trunk Setup
22-07-01 DIL Setup
Dial Action Table 1 Dialing Options:
Dial an extension number, or
O for the operator
SL1100 ISSUE 3.5
1-4
Quick Setup

SECTION 6 SET UP SIMPLE DAY/NIGHT ANSWERING
After you set up DILs to InMail, Call Routing Mailbox 1 answers outside calls. This is because:
• All trunks by default are assigned to Answer Table 1.
• Answer Table 1, which runs Monday-Friday from 8:30 AM to 5:00 PM, uses Call Routing Mailbox 1.
• The Default Mailbox, which runs at all other times (evenings and weekends), also uses Call Routing
Mailbox 1.
To Set up simple Day/Night Answering:
• In 47-11-03 Default Mailbox Category and in 47-11-03 Default Mailbox Number change the Default
Mailbox for Answer Table 1 to 2.
• From the System Administrator Mailbox:
1. Dial SA + I and record a new Instruction Menu message for Call Routing Mailbox 1.
2. Dial SA + I and record a new Instruction Menu message for Call Routing Mailbox 2.
Monday-Friday from 8:30 AM to 5:00 PM callers hear the Instruction Menu message for Call
Routing Mailbox 1.
Evenings and weekends, callers hear the Instruction Menu message for Call Routing Mailbox 2.
Review the feature Automated Attendant on page 2-31.
SECTION 7 INMAIL SYSTEM REQUIREMENTS
• SL1100 Software
• InMail CompactFlash Drive
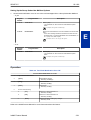
SECTION 8 SPECIFICATIONS
InMail Capacities Note
IP4WW-CFVMS-
C1
InMail 512M CompactFlash Drive (VRS + VM)
(1) 15-Hour CompactFlash Card with software.
IP4WW-CFVML-
C1
InMail 1 GB Drive
(1) 40-Hour CompactFlash Card with software
SL-VM-CHAN-
NEL-2 LIC
Additional InMail Channel License (2 ports)
SL-VM-AD-
VANCE LIC
InMail Advanced Feaqture License (1 license per system)
Mailboxes: Station Mailboxes = 112 (V3.5 Changed)
Routing Mailboxes = 32
Group Mailboxes = 32
Total Mailboxes = 176 (V3.5 Changed)
Number of Mail-
box is increased
to 128 (Station:
112 + Virtual Ex-
tension:16)from
100(Station:84 +
Virtual Extension:
16) (V3.5 or high-
er)
S
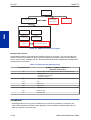
ECTION 9 EXAMPLES OF COMMON APPLICATIONS
The examples below show common applications. The chart in the beginning of each example provides
the following information:
ISSUE 3.5
SL1100
InMail Feature Manual 1-5

• How the relevant programmable options work by default.
• The Application Summary providing the basic steps to set up the application.
Following the chart are the step-by-step instructions for setting up the application.
For more information, refer to the SL1100 Programming Manual.
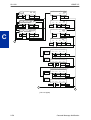
Example 1: Set Up Separate Day and Night Greetings
Default Automated Attendant Answering
All trunks answered by the Automated Attendant route to Answer Table 1.
• Answer Table 1 uses Schedule 1 to answer calls from Monday-Friday from 8:30 AM to 5:00 PM with Call Routing Mailbox 1.
• The Default Mailbox for Answer Table 1 picks up Automated Attendant calls at all other times. The Default Mailbox for An-
swer Table 1 is also Call Routing Mailbox 1.
The greeting that plays to outside callers is the Instruction Menu for the Call Routing Mailbox that answers the call.
Since Schedule 1 and the Default Mailbox both use Call Routing Mailbox 1, the Automated Attendant answers all calls the
same way day and night, with the Instruction Menu for Call Routing Mailbox 1.
Application Summary
Change the Default Mailbox from Call Routing Mailbox 1 to 2.
Record a night Instruction Menu for Call Routing Mailbox 2.
Change the Default Mailbox to Call Routing Mailbox 2.
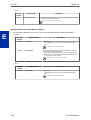
47-11-03 Default Mailbox Number, change the Default Mailbox assignment to 2.
Record the daytime and night Instruction Menus.
1. At extension 101, press Voice Mail key (Code 751 + 77).
2. Dial SA (72) + I (4).
3. Dial 001 (for Call Routing Mailbox 1) + R (7).
4. Record the daytime Instruction Menu message + # twice.
5. Dial I (4).
6. Dial 002 (for Call Routing Mailbox 2) + R (7).
7. Record the night Instruction Menu message + # + hang up.
See the Instruction Menu in this manual.
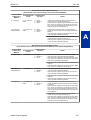
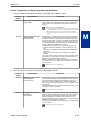
Example 2: Provide Unique Day and Night Dialing Options for Callers
Default Dial Action Table Options
All Call Routing Mailboxes (1 ~ 8 by default) use Dial Action Table 1.
Dial Action Table 1 provides the following dial options:
• Dial extension number.
• Dial 0 for the operator.
• Dial
*
+ extension to leave a Quick Message.
• Dial # + extension to do a Remote Logon to the mailbox.
• Timeout to operator if no digits dialed.
Application Summary
Allow callers at night to dial 0 to leave a message for the operator.
Set up separate day and night greetings.
Following example 1, set up separate day and night Instruction Menus using Call Routing Mailboxes 1
and 2.
SL1100
ISSUE 3.5
1-6
Quick Setup

1. Example of the day Instruction Menu: Thank you for calling. For Sales, dial 102. For Technical
Support, dial 103. To talk to an operator, dial 0. If you know your party’s extension number,
please dial it now.
2. Example of the night Instruction menu: Thank you for calling. Our normal business hours are 8:30
to 5:00, Monday through Friday. To leave us a message, please dial 0 now.
Assign a unique Dial Action Table (2) to the night time Call Routing Mailbox (2).
In 47-08-01 Dial Action Table, assign Dial Action Table 2 to Call Routing Mailbox 2.
Change the dialing options for the night time Dial Action Table (2).
In 47-13-01 InMail Dial Action Table Actions for Dial Action Table 2, make the following changes:
1. For the digits 3 and 4, enter 0 for the Action entry to prevent callers from dialing extensions at
night.
2. For the digit 0, change the Action entry to REC1 (by dialing 3) and the Data entry to 101. This
allows night time callers to dial 0 to leave a message for the operator.
3. Note that the
*
and # entries are left unchanged so that experienced users can still leave Quick
Messages or do Remote Logons at night.
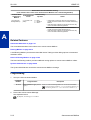
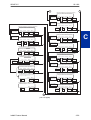
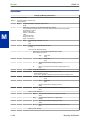
Example 3: Manual Night Mode Control of the Automated Attendant
Default Scheduling Options
There is no manual control of the Automated Attendant.
All calls answered by the Automated Attendant automatically follow the schedule set up by Answer Table 1.
• Answer Table 1 uses Schedule 1 to answer calls from 8:30 AM - 5:00 PM Monday through Friday with Call Routing Mailbox
1.
• The Default Mailbox for Answer Table 1 picks up Automated Attendant calls at all other times.
The Default Mailbox for Answer Table 1 is also Call Routing Mailbox 1.
Application Summary
Set up a programmable key to switch the system into the night mode.
Assign a Group Mailbox to a virtual extension.
Have calls at night route to the virtual extension, which is Fixed Call Forwarded to voice mail.
Set up programmable keys to switch the system into the night mode and back into the day
mode.
Night Mode
1. At the extension used to control the system night mode, press Speaker key + dial 751.
2. Press the programmable function key you want to assign as the day (night mode 1) key.
3. Dial 09 + 1 (for night mode 1).
You hear confirmation beep.
This allows the user to switch the system into the day mode (i.e., night mode 1).
ISSUE 3.5 SL1100
InMail Feature Manual 1-7

Day Mode
1. Press the programmable function key assigned as the night (night mode 2) key.
2. Dial 09 + 2 (for night mode 2).
You hear confirmation beep.
This allows the user to switch the system from the day mode to night mode 2.
3. Press Speaker key to hang up.
Allow the extension to switch the system night mode.
1. In 20-07-01 Manual Night Mode Switching, enter 1 to enable night mode switching in the
extension Class of Service.
By default, this feature is Enabled.
By default all COS have this option enabled. (V3.5 or higher)
2. In 20-06-01 Class of Service for Extensions, assign the extension Classes are disabled.
By default, extension, Extension 101 is Class 15 and other Extensions are Class of Service 1.
Set up a Group Mailbox as a Call Routing Mailbox.
1. In 11-07-01 Department Group Pilot Numbers, assign a pilot number (e.g., 200) to an unused
Department Group (e.g., group 10).
By default, all extensions are assigned to group 1.
2. In 47-03-02 Group Mailbox Number, enter the pilot number assigned in step 1 above.
By default, no Group Mailbox numbers are assigned.
3. In 47-03-03 Group Mailbox Type, enter 1 to assign the Group Mailbox as a Call Routing Mailbox.
By default, Group Mailboxes are assigned as Subscriber Mailboxes (3).
4. In 11-07-01 Department Group Pilot Numbers, press Flash key to remove the assignment made
in step 1 above.
You can use the Department Group for other programming.
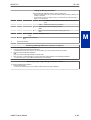
Set up a virtual extension that will handle the switching for the trunk.
1. In 11-04-01 Virtual Extension Numbering, assign the Group Mailbox Number in step 2 as the
extension number for a virtual extension port.
For example, assign extension 200 to virtual extension port 1.
By default, there are no virtual extension numbers assigned.
SL1100 ISSUE 3.5
1-8
Quick Setup

Terminate the trunk to the virtual extension in the night mode.
1. In 22-07-01 DIL Assignment, assign the trunk to the virtual extension (e.g., 200) in night mode 2.
When the extension user presses the night key, the trunk follows this routing.
By default, there are no DIL assignments set up.
2. Check the setting of 22-02-01 Incoming Call Trunk Setup to be sure the trunk is set up as a Direct
Inward Line (4).
By default, trunk types are set to normal (0).
Fixed Call Forward the virtual extension to Voice Mail.
1. In 24-09-01 (V3.5 or higher) Fixed Call Forwarding, enable immediate Fixed Call Forwarding to
the InMail Master Number (200).
For example, for virtual extension 300 enter 3 for Call Forward Type and 200 for the destination.
By default, Fixed Call Forwarding is not set up.
Record the Instruction Menu for the Group Call Routing Mailbox.
1. At extension 101, press Voice Mail key.
2. Dial SA (72) + I (4).
3. Dial the number of the Group Call Routing Mailbox (e.g., 400) + R (7).
4. Record the Instruction Menu message + # + hang up.
See Instruction Menu on page 2-145 in this manual.
When the system is in the day mode, the trunk is normally answered by InMail and follows the
programmed Answer Table.
When the extension user presses the night mode 2 key, the trunk is answered by the programmed Call
Routing Mailbox, overriding the Answer Table assignment.
ISSUE 3.5 SL1100
InMail Feature Manual 1-9

MEMO
SL1100 ISSUE 3.5
1-10
Quick Setup

Features
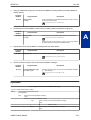
SECTION 1 INTRODUCTION TO INMAIL FEATURES
If you are not familiar with the InMail features, review the Feature Glossary on page 2-1.
This chapter provides detailed information on the InMail features. The features are listed
alphabetically.
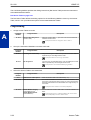
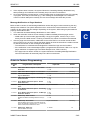
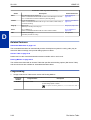
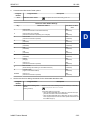
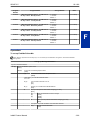
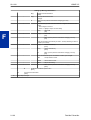
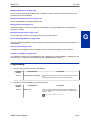
SECTION 2 FEATURE GLOSSARY
Feature Name Description Usage Note
Administrator Security
Code Control
See Security Code. Voice Mail
Alternate Next Call Rout-
ing Mailbox
See Next Call Routing Mailbox. Voice Mail
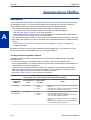
Announcement Mailbox Mailbox that allows a recorded greeting to play to call-
ers.
Automated Attendant
Announcement Message The message that the System Administrator records for
a specific Announcement Mailbox.
Automated Attendant
Answer Table Determines how the Automated Attendant answers
outside calls on each trunk, according to the time of the
day and day of the week that the call is ringing.
Automated Attendant
Answering Schedule
Override
Enables an alternate greeting and alternate dialing op-
tions for callers.
Automated Attendant
Auto Attendant Direct to
Voice Mail
Auto Attendant Direct to Voice Mail sends Automated
Attendant calls directly to an extension user's mailbox.
Their phone does not ring for calls from the Automated
Attendant.
See Greeting in this glossary.
Automated Attendant
Auto Erase or Save When a mailbox user completely listens to a new mes-
sage and then exits their mailbox, InMail either auto-
matically archives or deletes the message.
Voice Mail
Auto Time Stamp After a user listens to a message, InMail can optionally
announce the time and date the message was left.
Voice Mail
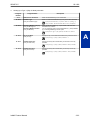
Automated Attendant The Automated Attendant can automatically answer
the telephone system incoming calls, play an Instruc-
tion Menu message, and provide dialing options to call-
ers.
Automated Attendant
Automated Attendant
Transfer
While on a trunk call, an extension user can transfer
the trunk call to the Automated Attendant so the caller
can use the Automated Attendant dialing options.
Voice Mail
Automatic Access to VM
by Caller ID
InMail mailbox can be associated with a specific caller
ID (CID) number. When the CID number is presented
to the InMail it will automatically log the user into their
mailbox.
Voice Mail
InMail Feature Manual 2-1
Features
2

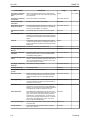
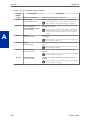
Feature Name Description Usage Note
Automatic Call Distribu-
tion Delay Announce-
ment
With the appropriate hardware and system licenses,
the SL1100 InMail can be used to store two ACD Delay
Announcements.
System (V1.5 Added)
Automatic Call Routing
to a Mailbox
See Go to a Mailbox in this glossary. Automated Attendant
Automatic Message
Erase/Save
See Auto Erase or Save in this glossary. Voice Mail
Automatic Routing for
Rotary Dial Callers
If an Automated Attendant caller does not dial any dig-
its, InMail automatically routes them to a specified op-
tion (such as the operator or a mailbox).
Automated Attendant
Call Forward to a Mail-
box
An extension user can forward calls to their mailbox. Voice Mail
Call Routing Mailbox The mailbox associated with an Answer Table that
specifies which dialing options (Dial Action Table) and
announcements are available to Automated Attendant
callers.
Automated Attendant
Caller ID A telephone company service that provides a caller's
number and optional name. The telephone system can
pass this information to InMail to enable Caller ID with
Return Call.
System
Caller ID with Return Call See Make Call and Time and Date Stamp. Voice Mail
Calling (Logging On to) a
Mailbox
See Log On to Voice Mail. Voice Mail
Calling the Automated
Attendant
Automated Attendant callers can use various InMail
features and then return to the Automated Attendant
for additional dialing options.
Automated Attendant
Cascade Message Notifi-
cation
If an extension user receives a new message in their
mailbox, Cascading Message Notification calls them, at
up to five preset destinations, to let them know a new
voice mail message has arrived.
Voice Mail
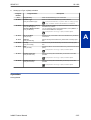
Day, Night, and Holiday
Greetings
See Flexible Answering Schedules. Automated Attendant
Deleting a Message See Message Delete. Voice Mail
Deleting Mailbox Securi-
ty Code
See Mailbox Security Code Delete. Maintenance
Dial Action Table Defines the dialing options for a Call Routing Mailbox
chosen by the active Answer Table, which in turn pro-
vides those dialing options to Automated Attendant
callers.
Automated Attendant
Directory Dialing Directory Dialing allows an Automated Attendant caller
to reach an extension by dialing the first few letters in
the extension user's name.
Automated Attendant
Distribution List A Distribution List shows extensions that receive a
message you record and send to a single Distribution
Mailbox. Any message left in the Distribution Mailbox is
automatically sent to all the mailboxes in the list.
Voice Mail
Email Notification Email Notification automatically sends an email notifi-
cation when a Subscriber Mailbox receives a new mes-
sage. The email can optionally include the recorded
message as a .wav file attachment. To hear the mes-
sage, the email recipient double-clicks the .wav attach-
ment to have the message play in their .wav player
(such as Windows Media Player).
Voice Mail
Erasing All Messages Lets the System Administrator delete mailbox messag-
es system-wide.
Maintenance
Exiting a Mailbox An extension user can exit their mailbox by dialing a
code or by hanging up.
Voice Mail
SL1100 ISSUE 3.5
2-2
Features
Page is loading ...
Page is loading ...
Page is loading ...
Page is loading ...
Page is loading ...
Page is loading ...
Page is loading ...
Page is loading ...
Page is loading ...
Page is loading ...
Page is loading ...
Page is loading ...
Page is loading ...
Page is loading ...
Page is loading ...
Page is loading ...
Page is loading ...
Page is loading ...
Page is loading ...
Page is loading ...
Page is loading ...
Page is loading ...
Page is loading ...
Page is loading ...
Page is loading ...
Page is loading ...
Page is loading ...
Page is loading ...
Page is loading ...
Page is loading ...
Page is loading ...
Page is loading ...
Page is loading ...
Page is loading ...
Page is loading ...
Page is loading ...
Page is loading ...
Page is loading ...
Page is loading ...
Page is loading ...
Page is loading ...
Page is loading ...
Page is loading ...
Page is loading ...
Page is loading ...
Page is loading ...
Page is loading ...
Page is loading ...
Page is loading ...
Page is loading ...
Page is loading ...
Page is loading ...
Page is loading ...
Page is loading ...
Page is loading ...
Page is loading ...
Page is loading ...
Page is loading ...
Page is loading ...
Page is loading ...
Page is loading ...
Page is loading ...
Page is loading ...
Page is loading ...
Page is loading ...
Page is loading ...
Page is loading ...
Page is loading ...
Page is loading ...
Page is loading ...
Page is loading ...
Page is loading ...
Page is loading ...
Page is loading ...
Page is loading ...
Page is loading ...
Page is loading ...
Page is loading ...
Page is loading ...
Page is loading ...
Page is loading ...
Page is loading ...
Page is loading ...
Page is loading ...
Page is loading ...
Page is loading ...
Page is loading ...
Page is loading ...
Page is loading ...
Page is loading ...
Page is loading ...
Page is loading ...
Page is loading ...
Page is loading ...
Page is loading ...
Page is loading ...
Page is loading ...
Page is loading ...
Page is loading ...
Page is loading ...
Page is loading ...
Page is loading ...
Page is loading ...
Page is loading ...
Page is loading ...
Page is loading ...
Page is loading ...
Page is loading ...
Page is loading ...
Page is loading ...
Page is loading ...
Page is loading ...
Page is loading ...
Page is loading ...
Page is loading ...
Page is loading ...
Page is loading ...
Page is loading ...
Page is loading ...
Page is loading ...
Page is loading ...
Page is loading ...
Page is loading ...
Page is loading ...
Page is loading ...
Page is loading ...
Page is loading ...
Page is loading ...
Page is loading ...
Page is loading ...
Page is loading ...
Page is loading ...
Page is loading ...
Page is loading ...
Page is loading ...
Page is loading ...
Page is loading ...
Page is loading ...
Page is loading ...
Page is loading ...
Page is loading ...
Page is loading ...
Page is loading ...
Page is loading ...
Page is loading ...
Page is loading ...
Page is loading ...
Page is loading ...
Page is loading ...
Page is loading ...
Page is loading ...
Page is loading ...
Page is loading ...
Page is loading ...
Page is loading ...
Page is loading ...
Page is loading ...
Page is loading ...
Page is loading ...
Page is loading ...
Page is loading ...
Page is loading ...
Page is loading ...
Page is loading ...
Page is loading ...
Page is loading ...
Page is loading ...
Page is loading ...
Page is loading ...
Page is loading ...
Page is loading ...
Page is loading ...
Page is loading ...
Page is loading ...
Page is loading ...
Page is loading ...
Page is loading ...
Page is loading ...
Page is loading ...
Page is loading ...
Page is loading ...
Page is loading ...
Page is loading ...
Page is loading ...
Page is loading ...
Page is loading ...
Page is loading ...
Page is loading ...
Page is loading ...
Page is loading ...
Page is loading ...
Page is loading ...
Page is loading ...
Page is loading ...
Page is loading ...
Page is loading ...
Page is loading ...
Page is loading ...
Page is loading ...
Page is loading ...
Page is loading ...
Page is loading ...
Page is loading ...
Page is loading ...
Page is loading ...
Page is loading ...
Page is loading ...
Page is loading ...
Page is loading ...
Page is loading ...
Page is loading ...
Page is loading ...
Page is loading ...
Page is loading ...
Page is loading ...
Page is loading ...
Page is loading ...
Page is loading ...
Page is loading ...
Page is loading ...
Page is loading ...
Page is loading ...
Page is loading ...
Page is loading ...
Page is loading ...
Page is loading ...
Page is loading ...
Page is loading ...
Page is loading ...
Page is loading ...
Page is loading ...
Page is loading ...
Page is loading ...
Page is loading ...
Page is loading ...
Page is loading ...
Page is loading ...
Page is loading ...
Page is loading ...
Page is loading ...
Page is loading ...
Page is loading ...
Page is loading ...
Page is loading ...
Page is loading ...
Page is loading ...
Page is loading ...
Page is loading ...
Page is loading ...
Page is loading ...
Page is loading ...
Page is loading ...
Page is loading ...
Page is loading ...
Page is loading ...
Page is loading ...
Page is loading ...
Page is loading ...
Page is loading ...
Page is loading ...
Page is loading ...
Page is loading ...
Page is loading ...
Page is loading ...
Page is loading ...
Page is loading ...
Page is loading ...
Page is loading ...
-
 1
1
-
 2
2
-
 3
3
-
 4
4
-
 5
5
-
 6
6
-
 7
7
-
 8
8
-
 9
9
-
 10
10
-
 11
11
-
 12
12
-
 13
13
-
 14
14
-
 15
15
-
 16
16
-
 17
17
-
 18
18
-
 19
19
-
 20
20
-
 21
21
-
 22
22
-
 23
23
-
 24
24
-
 25
25
-
 26
26
-
 27
27
-
 28
28
-
 29
29
-
 30
30
-
 31
31
-
 32
32
-
 33
33
-
 34
34
-
 35
35
-
 36
36
-
 37
37
-
 38
38
-
 39
39
-
 40
40
-
 41
41
-
 42
42
-
 43
43
-
 44
44
-
 45
45
-
 46
46
-
 47
47
-
 48
48
-
 49
49
-
 50
50
-
 51
51
-
 52
52
-
 53
53
-
 54
54
-
 55
55
-
 56
56
-
 57
57
-
 58
58
-
 59
59
-
 60
60
-
 61
61
-
 62
62
-
 63
63
-
 64
64
-
 65
65
-
 66
66
-
 67
67
-
 68
68
-
 69
69
-
 70
70
-
 71
71
-
 72
72
-
 73
73
-
 74
74
-
 75
75
-
 76
76
-
 77
77
-
 78
78
-
 79
79
-
 80
80
-
 81
81
-
 82
82
-
 83
83
-
 84
84
-
 85
85
-
 86
86
-
 87
87
-
 88
88
-
 89
89
-
 90
90
-
 91
91
-
 92
92
-
 93
93
-
 94
94
-
 95
95
-
 96
96
-
 97
97
-
 98
98
-
 99
99
-
 100
100
-
 101
101
-
 102
102
-
 103
103
-
 104
104
-
 105
105
-
 106
106
-
 107
107
-
 108
108
-
 109
109
-
 110
110
-
 111
111
-
 112
112
-
 113
113
-
 114
114
-
 115
115
-
 116
116
-
 117
117
-
 118
118
-
 119
119
-
 120
120
-
 121
121
-
 122
122
-
 123
123
-
 124
124
-
 125
125
-
 126
126
-
 127
127
-
 128
128
-
 129
129
-
 130
130
-
 131
131
-
 132
132
-
 133
133
-
 134
134
-
 135
135
-
 136
136
-
 137
137
-
 138
138
-
 139
139
-
 140
140
-
 141
141
-
 142
142
-
 143
143
-
 144
144
-
 145
145
-
 146
146
-
 147
147
-
 148
148
-
 149
149
-
 150
150
-
 151
151
-
 152
152
-
 153
153
-
 154
154
-
 155
155
-
 156
156
-
 157
157
-
 158
158
-
 159
159
-
 160
160
-
 161
161
-
 162
162
-
 163
163
-
 164
164
-
 165
165
-
 166
166
-
 167
167
-
 168
168
-
 169
169
-
 170
170
-
 171
171
-
 172
172
-
 173
173
-
 174
174
-
 175
175
-
 176
176
-
 177
177
-
 178
178
-
 179
179
-
 180
180
-
 181
181
-
 182
182
-
 183
183
-
 184
184
-
 185
185
-
 186
186
-
 187
187
-
 188
188
-
 189
189
-
 190
190
-
 191
191
-
 192
192
-
 193
193
-
 194
194
-
 195
195
-
 196
196
-
 197
197
-
 198
198
-
 199
199
-
 200
200
-
 201
201
-
 202
202
-
 203
203
-
 204
204
-
 205
205
-
 206
206
-
 207
207
-
 208
208
-
 209
209
-
 210
210
-
 211
211
-
 212
212
-
 213
213
-
 214
214
-
 215
215
-
 216
216
-
 217
217
-
 218
218
-
 219
219
-
 220
220
-
 221
221
-
 222
222
-
 223
223
-
 224
224
-
 225
225
-
 226
226
-
 227
227
-
 228
228
-
 229
229
-
 230
230
-
 231
231
-
 232
232
-
 233
233
-
 234
234
-
 235
235
-
 236
236
-
 237
237
-
 238
238
-
 239
239
-
 240
240
-
 241
241
-
 242
242
-
 243
243
-
 244
244
-
 245
245
-
 246
246
-
 247
247
-
 248
248
-
 249
249
-
 250
250
-
 251
251
-
 252
252
-
 253
253
-
 254
254
-
 255
255
-
 256
256
-
 257
257
-
 258
258
-
 259
259
-
 260
260
-
 261
261
-
 262
262
-
 263
263
-
 264
264
-
 265
265
-
 266
266
-
 267
267
-
 268
268
-
 269
269
-
 270
270
-
 271
271
-
 272
272
-
 273
273
-
 274
274
-
 275
275
-
 276
276
-
 277
277
-
 278
278
-
 279
279
-
 280
280
-
 281
281
-
 282
282
-
 283
283
-
 284
284
-
 285
285
-
 286
286
-
 287
287
-
 288
288


Ask a question and I''ll find the answer in the document
Finding information in a document is now easier with AI
Related papers
Other documents
-
Vizio V-NE-HVM-E 3/03 User manual
-
LG-Ericsson LDK-60 User manual
-
ESI IVX S-Class User manual
-
Panasonic KX-TVA200 Operating instructions
-
-
Siemens Recording Equipment 300 User manual
-
Frontier Enhanced User guide
-
-
Toshiba CTX28 User manual
-
Samsung Svm-800 User manual