LG Electronics USA BEJHSTND-3951-G User manual
- Category
- Public displays
- Type
- User manual
This manual is also suitable for

HP LD4235 and HP LD4735
Digital Signage Displays
User Guide

© 2014 Hewlett-Packard Development
Company, L.P. The information contained
herein is subject to change without notice.
The only warranties for HP products and
services are set forth in the express warranty
statements accompanying such products and
services. Nothing herein should be construed
as constituting an additional warranty. HP shall
not be liable for technical or editorial errors or
omissions contained herein.
This document contains proprietary
information that is protected by copyright. No
part of this document may be photocopied,
reproduced, or translated to another language
without the prior written consent of Hewlett-
Packard Company.
Microsoft and Windows are U.S. registered
trademarks of the Microsoft group of
companies.
First Edition (January 2014)
Document Part Number: 749846-001

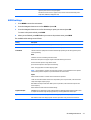
About this guide
This guide provides information on setting up the display, troubleshooting, and technical specifications.
WARNING! Text set off in this manner indicates that failure to follow directions could result in bodily harm
or loss of life.
CAUTION: Text set off in this manner indicates that failure to follow directions could result in damage to
equipment or loss of information.
NOTE: Text set off in this manner provides important supplemental information.
iii

iv About this guide

Table of contents
1 Product features ........................................................................................................................................... 1
HP Digital Signage models .................................................................................................................................... 1
Accessories ............................................................................................................................................................ 2
Optional accessories .............................................................................................................................................. 2
2 Safety and maintenance guidelines ................................................................................................................ 3
Important safety information ............................................................................................................................... 3
Maintenance guidelines ......................................................................................................................................... 3
Cleaning the display ............................................................................................................................ 4
3 Assembling and preparing .............................................................................................................................. 5
Using the IR receiver .............................................................................................................................................. 6
Portrait layout ....................................................................................................................................................... 7
Using the security system ..................................................................................................................................... 7
Mounting on a wall ................................................................................................................................................. 8
Securing the product to a wall (optional) ........................................................................................... 9
4 Remote control ........................................................................................................................................... 10
Remote control buttons ...................................................................................................................................... 11
5 Using the display ......................................................................................................................................... 13
Connecting to a Digital Signage media player or computer ............................................................................... 13
RGB/VGA connection ......................................................................................................................... 14
DisplayPort connection ..................................................................................................................... 15
HDMI connection ............................................................................................................................... 16
IR receiver connection ....................................................................................................................... 17
LAN/VOE connection ......................................................................................................................... 18
Connecting the display using LAN/VOE .......................................................................... 18
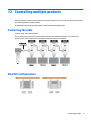
Connecting multiple displays to one player ................................................................... 19
Connecting multiple displays with Video Over Ethernet (VOE) ................... 19
Connecting multiple displays with Tile Mode .............................................. 19
Adjusting the screen ............................................................................................................................................ 22
Selecting an image mode .................................................................................................................. 22
Customizing image options .............................................................................................................. 22
Customizing computer display options ............................................................................................ 23
Adjusting sound ................................................................................................................................................... 23
v

Selecting a sound mode .................................................................................................................... 23
Customizing sound options .............................................................................................................. 24
Using additional options ...................................................................................................................................... 24
Using the input list ............................................................................................................................ 24
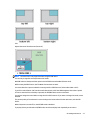
Adjusting aspect ratio ....................................................................................................................... 24
16:9 : This selection will allow you to adjust the picture horizontally, in linear
proportion, to fill the entire screen (useful for viewing 4:3 formatted DVDs). ............. 25
Just Scan : This Selection will allow you to view the best quality picture without
loss of the original picture in high resolution image. .................................................... 25
1:1 : The aspect ratio is not adjusted from the original. (Only Display Port PC,
HDMI PC, RGB PC) ............................................................................................................ 26
4:3 : This selection will allow you to view a picture with an original 4:3 aspect
ratio, black bars will appear on both the left and right of the screen. .......................... 26
Zoom : This selection will allow you to view the picture without any alteration,
while filling the entire screen. However, the top and bottom of the picture will be
cropped. .......................................................................................................................... 26
Cinema Zoom : Choose Cinema Zoom when you want to enlarge the picture in
correct proportion. Note: When enlarging or reducing the picture, the image may
become distorted. ........................................................................................................... 27
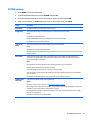
6 Customizing settings ................................................................................................................................... 28
Accessing main menus ........................................................................................................................................ 28
PICTURE settings ............................................................................................................................... 29
Picture Mode options ...................................................................................................... 30
Advanced control ............................................................................................................ 30
AUDIO settings .................................................................................................................................. 31
TIME settings ..................................................................................................................................... 32
OPTION settings ................................................................................................................................ 33
Picture ID ........................................................................................................................................... 38
NETWORK settings ............................................................................................................................ 38
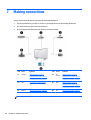
7 Making connections ..................................................................................................................................... 40
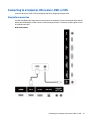
Connecting to a Computer, HD receiver, DVD, or VCR ......................................................................................... 41
DisplayPort connection ..................................................................................................................... 41
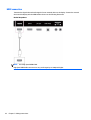
HDMI connection ............................................................................................................................... 42
Component connection ..................................................................................................................... 43
Connecting to the LAN ......................................................................................................................................... 44
Connecting to a USB ............................................................................................................................................ 44
Daisy chain displays ............................................................................................................................................. 45
vi

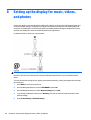
8 Setting up the display for music, videos, and photos ...................................................................................... 46
Network status .................................................................................................................................................... 48
Connecting USB storage devices ......................................................................................................................... 48
Browsing files ...................................................................................................................................................... 50
Supported file format ....................................................................................................................... 51
Playing videos ...................................................................................................................................................... 52
Viewing photos .................................................................................................................................................... 55
Listening to music ................................................................................................................................................ 57
Using PIP/PBP ...................................................................................................................................................... 59
9 Troubleshooting .......................................................................................................................................... 61
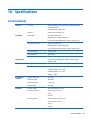
10 Specifications ........................................................................................................................................... 63
42-inch models .................................................................................................................................................... 63
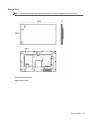
Dimensions ........................................................................................................................................ 65
47-inch models .................................................................................................................................................... 66
Dimensions ........................................................................................................................................ 68
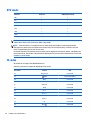
Recognizing preset display resolutions .............................................................................................................. 69
DTV mode ............................................................................................................................................................. 70
IR codes ................................................................................................................................................................ 70
11 Agency regulatory notices .......................................................................................................................... 72
Federal Communications Commission notice ..................................................................................................... 72
Modifications ..................................................................................................................................... 72
Cables ................................................................................................................................................ 72
Declaration of Conformity for products marked with the FCC logo (United States only) .................................. 72
Canadian notice ................................................................................................................................................... 73
Avis Canadien ....................................................................................................................................................... 73
European Union regulatory notice ...................................................................................................................... 73
German ergonomics notice ................................................................................................................................. 74
Japanese notice ................................................................................................................................................... 74
Korean notice ....................................................................................................................................................... 74
Power cord set requirements .............................................................................................................................. 74
Japanese power cord requirements ................................................................................................. 74
Product environmental notices ........................................................................................................................... 75
Materials disposal ............................................................................................................................. 75
Disposal of waste equipment by users in private households in the European Union ................... 75
Chemical substances ......................................................................................................................... 75
HP recycling program ........................................................................................................................ 75
Restriction of Hazardous Substances (RoHS) ................................................................................... 75
vii

Turkey EEE regulation ....................................................................................................................... 76
Ukraine Restriction of Hazardous Substances ................................................................................. 76
12 Controlling multiple products ..................................................................................................................... 77
Connecting the cable ........................................................................................................................................... 77
RS-232C configurations ...................................................................................................................................... 77
Communication parameter ................................................................................................................................. 78
Command reference list ...................................................................................................................................... 78
Transmission / Receiving protocol ...................................................................................................................... 80
Transmission ..................................................................................................................................... 80
Acknowledgement ............................................................................................................................ 80
01. Power (Command: k a) .............................................................................................. 80
02. Input Select (Command: x b) .................................................................................... 81
03. Aspect Ratio (Command: k c) .................................................................................... 81
04. Energy Saving (Command: j q) .................................................................................. 82
05. Picture Mode (Command: d x) ................................................................................... 82
06. Contrast (Command: k g) .......................................................................................... 82
07. Brightness (Command: k h) ...................................................................................... 83
08. Sharpness (Command: k k) ....................................................................................... 83
09. Color (Command: k i) ................................................................................................ 83
10. Tint (Command: k j) ................................................................................................... 83
11. Color Temperature (Command: x u) ......................................................................... 84
12. H Position (Command: f q) ........................................................................................ 84
13. V Position (Command: f r) ......................................................................................... 84
14. H Size (Command: f s) ............................................................................................... 85
15. Auto Configuration (Command: j u) .......................................................................... 85
16. Balance (Command: k t) ............................................................................................ 85
17. Sound Mode (Command: d y) .................................................................................... 85
18. Treble (Command: k r) .............................................................................................. 86
19. Bass (Command: k s) ................................................................................................. 86
20. Speaker (Command: d v) ........................................................................................... 86
21. Volume Mute (Command: k e) .................................................................................. 86
22. Volume Control (Command: k f) ............................................................................... 87
23. Time 1(Year/ Month/ Day) (Command: f a) .............................................................. 87
24. Time 2(Hour/ Minute/ Second) (Command: f x) ....................................................... 87
25. Off Timer(Repeat Mode/ Time) (Command: f e) ....................................................... 88
26. On Timer(Repeat Mode/ Time) (Command: f d) ....................................................... 89
27. On Timer Input (Command: f u) ................................................................................ 91
28. Sleep Time (Command: f f) ....................................................................................... 92
29. Power On Delay (Command: f h) ............................................................................... 92
30. Automatic Standby (Command: m n) ....................................................................... 92
viii

31. Auto Off (Command: f g) ........................................................................................... 93
32. Language (Command: f i) .......................................................................................... 93
33. ISM mode (Command: j p) ......................................................................................... 94
34. Auto-Switch Input Select (Command: m i) ............................................................... 94
35. Auto-Switch Input Select (Command: m j) ............................................................... 94
36. Reset (Command: f k) ............................................................................................... 95
37. Tile Mode (Command: d d) ........................................................................................ 95
38. Tile Mode Check (Command: d z) .............................................................................. 95
39. Tile ID (Command: d i) ............................................................................................... 96
40. Tile H Position (Command: d e) ................................................................................ 96
41. Tile V Position (Command: d f) ................................................................................. 96
42. Tile H Size (Command: d g) ....................................................................................... 97
43. Tile V Size (Command: d h) ....................................................................................... 97
44. Natural Mode (In Tile Mode) (Command : d j) ........................................................... 97
45. DPM Select (Command: f j) ....................................................................................... 98
46. Temperature Value (Command: d n) ........................................................................ 98
47. Remote Controller Lock/ Key Lock (Command: k m) ............................................... 98
48. Key (Command: m c) ................................................................................................. 99
49. OSD Select (Command: k l) ....................................................................................... 99
50. Elapsed time return (Command: d l) ........................................................................ 99
51. Serial No.Check (Command: f y) ............................................................................... 99
52. S/W Version (Command: f z) ................................................................................... 100
53. White Balance Red Gain (Command: j m) ............................................................... 100
54. White Balance Green Gain (Command: j n) ............................................................. 100
55. White Balance Blue Gain (Command: j o) ............................................................... 100
56. Backlight (Command: m g) ..................................................................................... 101
ix

x

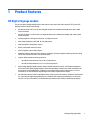
1 Product features
HP Digital Signage models
The HP LCD digital signage displays have a wide-aspect active matrix thin-film transistor (TFT) panel. The
displays features include the following:
●
HP LD4235 model, 106.7 cm (42-inch diagonal) widescreen viewable area display with 1920 x 1080
native resolution
●
HP LD4735 model, 119.28 cm (47-inch diagonal) widescreen viewable area display with 1920 x 1080
native resolution
●
Viewing angles of 178 degrees horizontal, 178 degrees vertical
●
VGA, HDMI, DisplayPort, VOE, USB, IR, and audio inputs
●
VGA, DisplayPort, and speaker outputs
●
RS232, LAN, and IR external controls
●
External speaker option audio support
●
USB built-in player, Network utility software, video daisy-chaining using DP and VGA, group IR for tiling
(daisy-chain via RS232); Video-over-Ethernet (VOE)
●
Support VESA compliant mounting interface:
◦
HP LD4235: 200 x 200 mm (7.87 x 7.87 in) hole pattern
◦
HP LD4735: 400 x 400 mm (15.75 x 15.75 in) hole pattern
●
Network Sign Manager (NSM) software utility provided that allows remote, centralized management
and control of HP digital signage displays. Users have the ability to monitor and send commands to all
the network connected displays in a subnet from a central location such as a data center. For more
information, see the HP Network Sign Manager User Guide provided with the display.
●
HP Video Over Ethernet (VOE) compatibility that provides a system of software, hardware, and firmware
for connecting HP Digital Signage Displays on a network with computers/media players on the same
network. For more information, see the HP Video Over Ethernet User Guide provided with the display.
HP Digital Signage models 1

Accessories
●
Software and documentation disc
●
Remote control (includes AAA batteries)
●
Power cord
●
DisplayPort cable
●
HDMI cable
●
RGB (VGA) cable
●
IR receiver
Optional accessories
Optional accessories (purchased separately) might vary depending on the model.
●
Stand kit
●
Speaker kit
●
Wall mount kit
2 Chapter 1 Product features

2 Safety and maintenance guidelines
Important safety information
A power cord is included with the display. If another cord is used, use only a power source and connection
appropriate for this display.
WARNING! To reduce the risk of electric shock or damage to the equipment:
• Do not disable the power cord grounding feature. The grounding plug is an important safety feature.
• Plug the power cord in a grounded (earthed) outlet that is easily accessible at all times.
• Disconnect power from the product by unplugging the power cord from the electrical outlet.
For your safety, do not place anything on power cords or cables. Arrange them so that no one can
accidentally step on or trip over them. Do not pull on a cord or cable. When unplugging from the electrical
outlet, grasp the cord by the plug.
To reduce the risk of serious injury, read the Safety and Comfort Guide. It describes proper workstation,
setup, posture, and health and work habits for computer users, and provides important electrical and
mechanical safety information. This guide is located on the Web at
www.hp.com/ergo and/or on the
documentation disc, if one is included with the display.
CAUTION: For the protection of the display, as well as the media player/computer, connect all power cords
for the media player/computer and its peripheral devices (such as a display, printer, scanner) to some form of
surge protection device such as a power strip or Uninterruptible Power Supply (UPS). Not all power strips
provide surge protection; the power strips must be specifically labeled as having this ability. Use a power
strip whose manufacturer offers a Damage Replacement Policy so you can replace the equipment, if surge
protection fails.
Use the appropriate and correctly sized furniture designed to properly support your display.
WARNING! Displays that are inappropriately situated on dressers, bookcases, shelves, desks, speakers,
chests, or carts can fall over and cause personal injury.
Care should be taken to route all cords and cables connected to the display so that they cannot be pulled,
grabbed, or tripped over.
CAUTION: Do not place the device in a location where water may drip and/or splash on the device.
Do not place an object that contains water, such as a flower vase, on the device.
Maintenance guidelines
To enhance the performance and extend the life of the display:
●
Do not open the display cabinet or attempt to service this product yourself. Adjust only those controls
that are covered in the operating instructions. If the display is not operating properly or has been
dropped or damaged, contact an authorized HP dealer, reseller, or service provider.
●
Use only a power source and connection appropriate for this display, as indicated on the label/back
plate of the display.
●
Be sure the total ampere rating of the products connected to the outlet does not exceed the current
rating of the electrical outlet, and the total ampere rating of the products connected to the cord does
Important safety information 3

not exceed the rating of the cord. Look on the power label to determine the ampere rating (AMPS or A)
for each device.
●
Install the display near an outlet that you can easily reach. Disconnect the display by grasping the plug
firmly and pulling it from the outlet. Never disconnect the display by pulling the cord.
●
Turn the display off when not in use. You can substantially increase the life expectancy of the display by
using a screen saver program and turning off the display when not in use.
CAUTION: Burn-in or image sticking might occur on displays which display the same static image on
the screen for prolonged periods of time. To avoid burn-in or image sticking and to prolong the life of
the display, you should activate one of the four ISM selections in the OSD, activate a screen-saver
application, periodically cycle between static information and moving images, or turn off the display
when it is not in use for prolonged periods of time.
●
Slots and openings in the cabinet are provided for ventilation. These openings must not be blocked or
covered. Never push objects of any kind into cabinet slots or other openings.
●
Do not drop the display or place it on an unstable surface.
●
Do not allow anything to rest on the power cord. Do not walk on the cord.
●
Keep the display in a well-ventilated area, away from excessive light, heat or moisture.
●
When removing the display base, you must lay the display face down on a soft area to prevent it from
getting scratched, defaced, or broken.
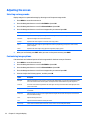
Cleaning the display
1. Turn off the display and unplug the power cord from the back of the unit.
2. Dust the display by wiping the screen and the cabinet with a soft, clean antistatic cloth.
3. For more difficult cleaning situations, use a 50/50 mix of water and Isopropyl alcohol.
CAUTION: Spray the cleaner onto a cloth and use the damp cloth to gently wipe the screen surface. Never
spray the cleaner directly on the screen surface. It might seep behind the bezel and damage the electronics.
CAUTION: To clean the display screen or cabinet, do not use cleaners that contain any petroleum-based
materials such as benzene or thinner or any volatile substance. These chemicals might damage the display.
4 Chapter 2 Safety and maintenance guidelines

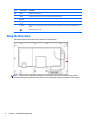
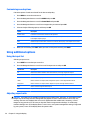
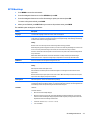
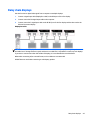
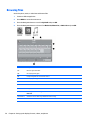
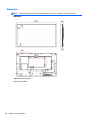
3 Assembling and preparing
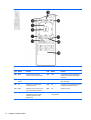
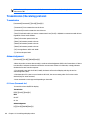
Item Connection panel Description
(1) HDMI Connects voice or audio input cable.
DP IN Connects DisplayPort in cable to the display.
DP OUT Connects DisplayPort out cable to the display.
LAN/VOE Connects a local area network cable.
SPEAKER OUT Connects optional external speakers to the display.
AUDIO IN Connects an audio cable to the display.
RGB/AV COMPONENT OUT Connects an RGB/AV component out cable to the display.
RGB/AV COMPONENT IN Connects an RGB/AV component in cable to the display.
RS-232C OUT Connects an RS-232C out cable to the display.
RS-232C IN Connects an RS-232C in cable to the display.
USB Connects a USB cable to the display.
IR IN Connects an IR cable to the display.
5

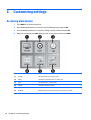
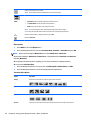
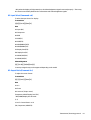
Item Screen marks Description
(2) INPUT Changes the input source.
MENU Accesses the main menus, or saves your input and exits the menus.
Moves the selection up and down.
Adjusts the volume level.
AUTO/SET Displays the current signal and mode. Press this button to adjust the screen automatically (RGB mode
only).
Turns the power on or off.
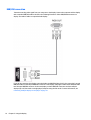
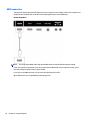
Using the IR receiver
This allows a remote control sensor to be placed in a custom location.
NOTE: The IR receiver is made with a magnet. If it is attached to the side or the bottom of the product,
external shocks may cause the IR receiver to fall. It is recommended to attach it to the back of the product.
6 Chapter 3 Assembling and preparing

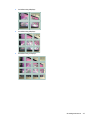
Portrait layout
To install in portrait orientation, rotate the display counterclockwise 90 degrees when looking at it from the
front.
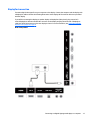
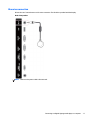
Using the security system
The security system connector is located at the back of the display.
Connect the security system cable between the display and a table.
NOTE: The security system is separately purchased. You can obtain additional accessories from most
electronics stores.
Portrait layout 7

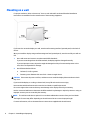
Mounting on a wall
For proper ventilation, allow a clearance of 10 cm on each side and from the wall. Detailed installation
instructions are available from the manufacturer of the mounting equipment..
If you intend to mount the display to a wall, attach a wall mounting interface (optional parts) to the back of
the set.
When you install the display using a wall mounting interface (optional parts), attach it carefully so it will not
fall.
1. Use a wall mount and screws in accordance with VESA Standards.
If you use screws longer than the VESA standard, the display might be damaged internally.
If you use improper screws, the product might be damaged and drop from mounted position. In this
case, HP is not responsible for damage.
2. Use VESA standard as follows:
●
785 mm (31 inch) or greater
●
Fastening screw: Diameter 6.0 mm x Pitch 1.0 mm x Length 10 mm
CAUTION: Disconnect the power cord first, and then move or install the display. Otherwise electric shock
may occur.
If you install the display on a ceiling or slanted wall, it may fall and result in severe injury.
Use an authorized HP wall mount and contact the local dealer or qualified personnel.
Do not over tighten the screws as this may cause damage to the display and void your warranty.
Use the screws and wall mounts that meet the VESA standard. Any damages or injuries by misuse or using an
improper accessory are not covered by the warranty.
NOTE: The wall mount bracket is optional. You can obtain additional accessories from your local dealer.
The length of screws may differ depending on the wall mount. Be sure to use the proper length.
For more information, refer to the manufacturer’s instructions supplied with the wall mount.
8 Chapter 3 Assembling and preparing

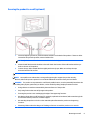
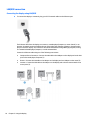
Securing the product to a wall (optional)
1. Insert and tighten eye-bolts or product brackets and bolts on the back of the product. If there are bolts
inserted at the eye-bolts position, remove the bolts first.
NOTE: Eye-bolts or wall brackets are not included with the display.
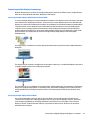
2. Mount the wall brackets with the bolts to the wall. Match the location of the wall bracket and the eye-
bolts on the rear of the product.
3. Connect the eye-bolts and wall brackets tightly with a sturdy rope. Make sure to keep the rope
horizontal with the flat surface.
CAUTION: Make sure that children do not climb on or hang on the product.
NOTE: Use a platform or cabinet that is strong and large enough to support the product securely.
Brackets, bolts and ropes are optional. You can obtain additional accessories from your local dealer.
WARNING! If a product is not positioned in a sufficiently stable location, it can be potentially hazardous due
to falling. Many injuries, particularly to children, can be avoided by taking simple precautions such as:
●
Using cabinets or stands recommended by the manufacturer of the product.
●
Only using furniture that can safely support the product.
●
Ensuring the product is not overhanging the edge of the supporting furniture.
●
Not placing the product on tall furniture (for example, cupboards or bookcases) without anchoring both
the furniture and the product to a suitable support.
●
Not standing the product on cloth or other materials placed between the product and supporting
furniture.
●
Educating children about the dangers of climbing on furniture to reach the product or its controls.
Mounting on a wall 9

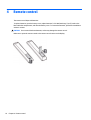
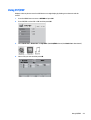
4 Remote control
The remote control ships with batteries.
To replace batteries, open the battery cover, replace batteries (1.5 V AAA) matching (+) and (-) ends to the
label inside the compartment, and close the battery cover. To remove the batteries, perform the installation
actions in reverse.
CAUTION: Do not mix old and new batteries, as this may damage the remote control.
Make sure to point the remote control to the remote control sensor on the display.
10 Chapter 4 Remote control
Page is loading ...
Page is loading ...
Page is loading ...
Page is loading ...
Page is loading ...
Page is loading ...
Page is loading ...
Page is loading ...
Page is loading ...
Page is loading ...
Page is loading ...
Page is loading ...
Page is loading ...
Page is loading ...
Page is loading ...
Page is loading ...
Page is loading ...
Page is loading ...
Page is loading ...
Page is loading ...
Page is loading ...
Page is loading ...
Page is loading ...
Page is loading ...
Page is loading ...
Page is loading ...
Page is loading ...
Page is loading ...
Page is loading ...
Page is loading ...
Page is loading ...
Page is loading ...
Page is loading ...
Page is loading ...
Page is loading ...
Page is loading ...
Page is loading ...
Page is loading ...
Page is loading ...
Page is loading ...
Page is loading ...
Page is loading ...
Page is loading ...
Page is loading ...
Page is loading ...
Page is loading ...
Page is loading ...
Page is loading ...
Page is loading ...
Page is loading ...
Page is loading ...
Page is loading ...
Page is loading ...
Page is loading ...
Page is loading ...
Page is loading ...
Page is loading ...
Page is loading ...
Page is loading ...
Page is loading ...
Page is loading ...
Page is loading ...
Page is loading ...
Page is loading ...
Page is loading ...
Page is loading ...
Page is loading ...
Page is loading ...
Page is loading ...
Page is loading ...
Page is loading ...
Page is loading ...
Page is loading ...
Page is loading ...
Page is loading ...
Page is loading ...
Page is loading ...
Page is loading ...
Page is loading ...
Page is loading ...
Page is loading ...
Page is loading ...
Page is loading ...
Page is loading ...
Page is loading ...
Page is loading ...
Page is loading ...
Page is loading ...
Page is loading ...
Page is loading ...
Page is loading ...
-
 1
1
-
 2
2
-
 3
3
-
 4
4
-
 5
5
-
 6
6
-
 7
7
-
 8
8
-
 9
9
-
 10
10
-
 11
11
-
 12
12
-
 13
13
-
 14
14
-
 15
15
-
 16
16
-
 17
17
-
 18
18
-
 19
19
-
 20
20
-
 21
21
-
 22
22
-
 23
23
-
 24
24
-
 25
25
-
 26
26
-
 27
27
-
 28
28
-
 29
29
-
 30
30
-
 31
31
-
 32
32
-
 33
33
-
 34
34
-
 35
35
-
 36
36
-
 37
37
-
 38
38
-
 39
39
-
 40
40
-
 41
41
-
 42
42
-
 43
43
-
 44
44
-
 45
45
-
 46
46
-
 47
47
-
 48
48
-
 49
49
-
 50
50
-
 51
51
-
 52
52
-
 53
53
-
 54
54
-
 55
55
-
 56
56
-
 57
57
-
 58
58
-
 59
59
-
 60
60
-
 61
61
-
 62
62
-
 63
63
-
 64
64
-
 65
65
-
 66
66
-
 67
67
-
 68
68
-
 69
69
-
 70
70
-
 71
71
-
 72
72
-
 73
73
-
 74
74
-
 75
75
-
 76
76
-
 77
77
-
 78
78
-
 79
79
-
 80
80
-
 81
81
-
 82
82
-
 83
83
-
 84
84
-
 85
85
-
 86
86
-
 87
87
-
 88
88
-
 89
89
-
 90
90
-
 91
91
-
 92
92
-
 93
93
-
 94
94
-
 95
95
-
 96
96
-
 97
97
-
 98
98
-
 99
99
-
 100
100
-
 101
101
-
 102
102
-
 103
103
-
 104
104
-
 105
105
-
 106
106
-
 107
107
-
 108
108
-
 109
109
-
 110
110
-
 111
111


LG Electronics USA BEJHSTND-3951-G User manual
- Category
- Public displays
- Type
- User manual
- This manual is also suitable for
Ask a question and I''ll find the answer in the document
Finding information in a document is now easier with AI
Other documents
-
HP LD5535 55-inch LED Digital Signage Display User guide
-
-
HP LD4730 User manual
-
-
-
Bell'O HDK2612 Datasheet
-
HP LD4210 User manual
-
Aluratek ADPF01F Datasheet
-
LG 86BH5C-B User manual
-
LG 88BH7D-B User manual