Xerox M24 Administration Guide

Category
Multifunctionals
Type
Administration Guide
SA Guide -- WorkCentre M24
Product Overview
Start Install Steps
WorkCentre M24 SA Guide
Network
Connectivity
Print Drivers
Enabling
Scanning
Scan to E-mail
and Fax
Internet Services Trouble shooting
Trademarks
& Notices
Welcome to the WorkCentre M24 guide for System Administrator's.
This guide will help you install printing and other optional services on your network.
Click here
to begin.
Click here
for a Quick Install page.
(Use your browser's Print function to print it for reference.)
Click here
for instructions on using this guide.
file:///C|/0-web/boxster/WorkCentreM24-System-Analyst-Guide/index.htm [9/4/03 8:32:24 AM]
Product Overview
WorkCentre M24 Product Overview
Standard Features
Options
file:///C|/0-web/boxster/WorkCentreM24-System-Analyst-Guide/main/Specifications.htm [9/4/03 8:32:26 AM]
Standard Features
Standard Features
Printer engine with Integrated controller
Scanner with Stand
Duplex Automatic Document Feeder (DADF)
Standard High Capacity A4 Tray
Electronic Pre-Collation (EPC)
Face-Up Output Tray
Offset Catch Tray
Scan to mailbox
600x600; 600x1200 & 1200x1200 printing resolution -
200x200; 300x300 & 600x600 copying resolution
EA1 toner - No Oil Required! - No Streaks
SRA3 / 12x19", 64x220 gsm / 16-110 lb index media - Full Bleeds on A3/11x17"
Up to 3,140 sheet capacity
Excellent Reliability of 3 calls/year at 7K AMPV; 1.2 hours MSH
45 sec warm-up; 7 sec color FCOT
Fuser Belt Module
Token Ring - Not Available
Return to Product Overview Menu Proceed to Options
file:///C|/0-web/boxster/WorkCentreM24-System-Analyst-Guide/main/StdFeatures.htm [9/4/03 8:32:26 AM]
Options
Options
1000 Sheet Finisher (stapler)
Base Machine with stand (see below)
Tandem Tray (see below)
Three Tray Module (see below)
Base Machine with Stand
(Shown with optional
DADF and Finisher.)
Three Tray Module Tandem Tray Module
Return to Product Overview Menu
file:///C|/0-web/boxster/WorkCentreM24-System-Analyst-Guide/main/options.htm [9/4/03 8:32:27 AM]
SA Guide -- WorkCentre M24
Welcome to the WorkCentre M24 guide for System Administrator's.
This guide will help you install printing and other optional services on your network.
Click here
to begin.
Click here
for a Quick Install page.
(Use your browser's Print function to print it for reference.)
Click here
for instructions on using this guide.
file:///C|/0-web/boxster/WorkCentreM24-System-Analyst-Guide/main/GuidePage.htm [9/4/03 8:32:27 AM]
Step 1 - Install
Installation
Step 1. Connect one end of a Category 5 twisted pair cable to a live network drop. Connect the opposite end
of the cable to the RJ-45 socket at the rear of the Printer.
Click to continue
file:///C|/0-web/boxster/WorkCentreM24-System-Analyst-Guide/main/Install_1.htm [9/4/03 8:32:27 AM]
Step 2 - Install
Installation
Step 2. Set the printer's power switch to ON and wait until the Main (multiple tabbed) screen is displayed.
Click to continue
file:///C|/0-web/boxster/WorkCentreM24-System-Analyst-Guide/main/Install_2.htm [9/4/03 8:32:27 AM]
Step 3 - Install
Step 3.
Follow the procedure outlined below to print a Settings List.
To print a copy of this procedure, go to the Network Connectivity tab of the guide and select
Settings List.
You can then use your browser's Print function to print the procedure.
Settings List
To print a Settings List, with the Printer switched ON, perform the following steps:
1. Press the Machine Configuration (Confirmation) button. This is the lowest of the three square
buttons to the immediate left of the Control Panel’s numeric keypad.
2. Press the Billing Meter/Print Report Tab on the Control Panel’s touch screen. This is the second Tab
from the left side of the screen.
3. Press the Print Report/List button. This is the lowest of the two buttons displayed vertically on the
touch screen.
4. Press the Copy Mode Settings button. This is the center button in the upper row of three buttons
displayed horizontally on the touch screen.
5. Press the Square (Settings List) button displayed by itself on the screen.
6. Press the large, green, Start button, located to the immediate right of the Control Panel’s numeric
keypad.
7. The printing process will be graphically displayed on the touch screen. Upon receipt of the Settings List,
note that the three page print is formatted into two columns with horizontal ruled lines indicating four
distinct data display areas on the print. The first area displays System Settings. The second area
displays Copy Settings. The third area displays Print Settings. The fourth area displays
Communication Settings.
Click to continue
file:///C|/0-web/boxster/WorkCentreM24-System-Analyst-Guide/main/Install_3.htm [9/4/03 8:32:27 AM]
Step 4 - Install
Step 4:
Network
Connectivity
All of the instructions referenced below are obtained by first opening the Network
Connectivity Tab. Use the Back function of your browser to return to this step, should you
go to any of the referenced procedures now.
Refer to the Settings List and verify that the appropriate ports and protocols are enabled for your Network
environment.
Verify the following:
The TCP/IP protocol stack should be enabled to support communicating with the Printer's Internet
Services. The Printer should also have a valid IP Address, Subnet Mask, and Gateway. If this is not the
case, select NOS Selection Menu, click TCP/IP Protocol Configuration, and follow the instructions
supplied.
If Internet Services on the Printer is shown as "disabled" on the Settings List, follow the instructions to
Enable Internet Services.
If you will be using SNMP Management software with this printer, select SNMP Configuration and
follow the instructions supplied.
If you will be using the Parallel Port and wish to view or change its configuration, select Parallel Port
Configuration and follow the instructions supplied.
Follow the instructions referenced for performing necessary configurations.
Click to continue
file:///C|/0-web/boxster/WorkCentreM24-System-Analyst-Guide/main/Install_4.htm [9/4/03 8:32:28 AM]
Network Connectivity Menu
Network
Connectivity
Install Steps A1
Settings List A6
Ethernet Speed Setting A2
Enable Internet Services A9
Parallel Port Configuration A7
SNMP Configuration A8
NOS Selection Menu
Changing the Administrator Password A10
file:///C|/0-web/boxster/WorkCentreM24-System-Analyst-Guide/main/NetConnectMenu.htm [9/4/03 8:32:28 AM]
Installation Steps
Installation Steps A1
Step 1. Connect one end of a Category 5 twisted pair cable to a live network drop. Connect the opposite end
of the cable to the RJ-45 socket at the rear of the Printer.
Step 2. Set the printer's power switch to ON and wait until the Main (multiple tabbed) screen is displayed.
Step 3. Select "Settings List" under the Network Connectivity Tab of this guide and print a Settings List using
the instructions supplied.
Step 4. Referring to the Settings List, determine if the appropriate ports and protocols are enabled for your
Network environment.
To support communicating with the Printer's Internet Services, a series of internal Web Pages
that enable the configuration of operating settings, the TCP/IP protocol stack should be enabled.
The Printer should also have a valid IP Address, Subnet Mask, and Gateway displayed. If this is
not the case, select NOS Selection and click TCP/IP Protocol Configuration under the
Network Connectivity Tab of this guide and follow the instructions supplied.
As some Network Environment settings can only be configured through use of Internet Services
on the Printer, if this tool is shown as "disabled" on the Settings List, follow the instructions to
Enable Internet Services under the Network Connectivity Tab of this guide.
If you will be using SNMP Management software with this printer, select SNMP Configuration
under the Network Connectivity Tab of this guide and follow the instructions supplied.
If you will be using the Parallel Port and wish to view or change its configuration, select Parallel
Port Configuration under the Network Connectivity Tab and follow the instructions supplied.
Step 5. Under the Network Connectivity Tab, select "NOS Selection," then select your Network Operating
System for printer installation instructions specific to your network environment. If you will be installing the
printer in a Client/Server environment, make sure to have your Server's Operating System Manual available to
refer to when required.
Step 6. Select the Print Drivers Tab of this guide for the instructions required to set up individual desktop
workstations to communicate with the printer.
Step 7. To enable a feature, such as Scanning to the Printer's Hard Drive, select the Enabling Scanning Tab
and select the feature from the menu list for configuration instructions.
Note:
For comprehensive information on the use of Internet Services as a browser-based, workstation tool for
configuring your printer, select the Internet Services Tab of this guide and click on relevant topics from the
menu list.
file:///C|/0-web/boxster/WorkCentreM24-System-Analyst-Guide/Pages/A1_InstallSteps.htm [9/4/03 8:32:28 AM]
Settings List
Settings List A6
To print a Settings List, with the Printer switched ON, perform the following steps:
1. Press the Machine Status button. This is the lowest of the three square buttons to the immediate left
of the Control Panel’s numeric keypad.
2. Press the Billing Meter/Print Report Tab on the Control Panel’s touch screen. This is the second Tab
from the left side of the screen.
3. Press the Print Report/List button. This is the lowest of the two buttons displayed vertically on the
touch screen.
4. Press the Copy Mode Settings button. This is the center button in the upper row of three buttons
displayed horizontally on the touch screen.
5. Press the Square (Settings List) button displayed by itself on the screen.
6. Press the large, green, Start button, located to the immediate right of the Control Panel’s numeric
keypad.
7. The printing process will be graphically displayed on the touch screen. Upon receipt of the Settings List,
note that the three page print is formatted into two columns with horizontal ruled lines indicating four
distinct data display areas on the print. The first area displays System Settings. The second area
displays Copy Mode Settings. The third area displays Print Mode Settings. The fourth area displays
Communication Settings.
file:///C|/0-web/boxster/WorkCentreM24-System-Analyst-Guide/Pages/a6_configreport.htm [9/4/03 8:32:29 AM]
Ethernet Speed Setting
Ethernet Speed Setting A2
The Printer's Ethernet Interface has speed settings of 10 BASE-T/100 BASE-TX (Auto sensing), 100 BASE-
TX, and 10 BASE-T. By default the Ethernet Port Configuration will be set to 10 BASE-T/100 BASE-TX (Auto
sensing).
To Change the Network Speed
Go to your Printer
1. Press the rectangular Access button on the Printer Control Panel, located directly above and slightly to
the right of the numeric keypad.
2. Press the "1" key on the numeric keypad five consecutive times. (This is the factory default
"password.")
3. Press the rectangular Confirm button on the touch screen.
4. Press the System Settings button (the right-hand button of the two buttons displayed on the touch
screen). Note: If you press the left button by mistake, the Main menu will be displayed and you will have
to start over at step one above.
5. Press the System Settings button (the top left button displayed on screen).
6. Press the Network Settings button (the top right button displayed on screen).
7. Press the Protocol Settings button (the right-hand button) to access the Protocols Menu display.
Note: If you press the left-hand button by mistake you will be in the Ports Menu and will have to press
the Close button to return to the two-button selection screen.
8. When the Protocol Settings Menu displays, press the horizontal line selection labeled Ethernet Board
Setting.
9. Press the Change Settings button in the lower right corner of the touch screen.
10. On the Settings screen note which one of the three square buttons is highlighted as the current setting
for Ethernet speed. The available settings are 10 BASE-T/100 BASE-TX (Auto sensing), 100 BASE-TX,
and 10 BASE-T. The default setting is 10 BASE-T/100 BASE-TX (Auto sensing).
11. To change settings, press your setting of choice, then click the Save button (upper right-hand button) on
the touch screen.
12. To exit the Settings screen, without making any changes, click the Cancel button (upper left-hand
button) on the touch screen.
13. To exit the Protocol Settings Menu, returning to the Printer's Main screen, press the rectangular Close
button in the upper right corner of the Protocol Settings Menu screen. Next, press the rectangular Close
button in the upper right corner of the Ports and Protocols selection (two-button) screen. Press the
rectangular Close button in the upper right corner of the five-button screen containing the Network
Settings button. Finally, press the rectangular Exit button in the upper right corner of the four-button,
System Settings screen.
14. Note that if you changed any settings in the Protocol Settings menu, the Printer will automatically reboot
to register and enable your new settings.
file:///C|/0-web/boxster/WorkCentreM24-System-Analyst-Guide/Pages/A2_Speed.htm [9/4/03 8:32:29 AM]
Enable Internet Services (HTTP)
Enable Internet Services (HTTP) A9
Internet Services are a series of Web (HTML) Pages located within the Printer enabling network communication
settings to be conveniently configured from a web browser running on a remotely located workstation.
For further details on the many functions provided by the Internet Services Web Pages, click on the Internet
Services Tab on the Main Page of this System Administrator's guide.
To access Internet Services Settings at the Printer
1. Press the rectangular Access button on the Printer Control Panel, located directly above and slightly to
the right of the numeric keypad.
2. Press the "1" key on the numeric keypad five consecutive times. (This is the factory default
"password.")
3. Press the rectangular Confirm button on the touch screen.
4. Press the System Settings button (the right-hand button of the two buttons displayed on the touch
screen). Note: If you press the left button by mistake, the Main menu will be displayed and you will have
to start over at step one above.
5. Press the System Settings button (the top left button displayed on screen).
6. Press the Network Settings button (the top right button displayed on screen).
7. Press the Port Settings button (the left-hand button) to access the Port Settings Menu display. Note: If
you press the right-hand button by mistake, you will be in the Protocol Settings Menu and will have to
press the Close button to return to the two-button selection screen.
8. When the Port Settings menu displays, press the down arrow key to view additional selections.
9. Press the Internet Services selection line on the Port Settings menu screen.
10. Press the Change Settings button in the lower right corner of the Port Settings Menu screen.
11. When the Internet Service Selection Menu displays, note that you have only one setting selection on a
single, numbered horizontal line, with the current status of this setting shown. The Close button in the
upper right corner of the screen returns you to the Port Settings Menu. After pressing the horizontal line
selection, to access available settings press the Change Settings button in the lower right corner of the
touch screen.
Internet Services (HTTP) Enablement
1. On the Internet Services Selection Menu, press the horizontal selection line labeled Port Status.
2. Press the Change Settings button.
3. On the Settings screen, note which of the two square buttons is highlighted as the current setting for
Internet Services Enablement. The available settings are Enabled or Disabled. In order to use Internet
Services, this setting MUST be enabled.
4. To change settings, press your setting of choice, then click the Save button (upper right-hand button) on
the touch screen.
5. To exit the Settings screen, without making any changes, click the Cancel button (upper left-hand
button) on the touch screen.
Exiting the Internet Services Selection Menu
file:///C|/0-web/boxster/WorkCentreM24-System-Analyst-Guide/Pages/A9_Enable_InetSvcs.htm (1 of 2) [9/4/03 8:32:29 AM]
Enable Internet Services (HTTP)
To exit the Internet Service Selection Menu, which returns you to the Port Settings menu, press the rectangular
Close button in the upper right corner of the touch screen.
Exiting the Port Settings Menu and returning to the Printer's Main Menu
1. To exit the Port Settings Menu, returning to the Printer's Main screen, press the rectangular Close
button in the upper right corner of the Port Settings Menu screen.
2. Press the rectangular Close button in the upper right corner of the Ports and Protocols selection (two-
button) screen.
3. Press the rectangular Close button in the upper right corner of the five-button screen containing the
Network Settings button.
4. Finally, press the rectangular Exit button in the upper right corner of the four-button, System Settings
screen.
Note: If you changed any settings in the Port Settings menu, the Printer will automatically reboot to register
and enable your new settings.
file:///C|/0-web/boxster/WorkCentreM24-System-Analyst-Guide/Pages/A9_Enable_InetSvcs.htm (2 of 2) [9/4/03 8:32:29 AM]
Parallel Port Configuration
Parallel Port Configuration A7
To view or change the settings of the Printer's parallel port, perform the following steps:
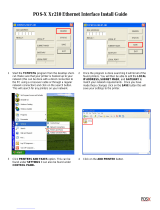
To access Parallel Port Settings at the Printer
1. Press the rectangular Access button on the Printer Control Panel, located directly above and slightly to
the right of the numeric keypad.
2. Press the "1" key on the numeric keypad five consecutive times. (This is the factory default
"password.")
3. Press the rectangular Confirm button on the touch screen.
4. Press the System Settings button (the right-hand button of the two buttons displayed on the touch
screen). Note: If you press the left button by mistake, the Main menu will be displayed and you will have
to start over at step one above.
5. Press the System Settings button (the top left button displayed on screen).
6. Press the Network Settings button (the top right button displayed on screen).
7. Press the Port Settings button (the left-hand button) to access the Port Settings Menu display. Note: If
you press the right-hand button by mistake, you will be in the Protocol Settings Menu and will have to
press the Close button to return to the two-button selection screen.
8. Press the line labeled Parallel on the Port Settings Menu screen.
9. Press the Change Settings button in the lower right corner of the Port Settings Menu screen.
10. When the Parallel Port Selections Menu displays, note that you have a choice of setting selections by
numbered horizontal lines, with the current status of each setting shown. The up and down arrow keys
provide access to additional selections and return you to the current selections display. The Close
button in the upper right corner of the screen returns you to the Port Settings Menu. After pressing a
horizontal line selection, to access available settings press the Change Settings button in the lower right
corner of the touch screen.
Port Status (Parallel Port Enablement)
1. On the Parallel Port Selections Menu, press the horizontal selection line labeled Port Status.
2. Press the Change Settings button.
3. On the Settings screen, note which of the two square buttons is highlighted as the current setting for
Parallel Port Enablement. The available settings are Enabled or Disabled.
4. To change settings, press your setting of choice, then click the Save button (upper right-hand button) on
the touch screen.
5. To exit the Settings screen, without making any changes, click the Cancel button (upper left-hand
button) on the touch screen.
Print Mode
1. On the Parallel Port Selections Menu, press the horizontal selection line labeled Print Mode.
2. Press the Change Settings button.
3. On the Settings screen, note which one of the displayed buttons is highlighted as the current setting for
Parallel Print Mode. This setting informs the Controller of the Page Description Language (PDL) being
used by your print jobs. The available settings are Auto (default), PostScript, HP-GL/2, PCL, and TIFF.
Auto enables the Controller to automatically detect and select the appropriate PDL.
file:///C|/0-web/boxster/WorkCentreM24-System-Analyst-Guide/Pages/A7_ParallelPort.htm (1 of 3) [9/4/03 8:32:30 AM]
Parallel Port Configuration
4. To change settings, press your selection of choice, then click the Save button (upper right hand button)
on the touch screen.
5. To exit the Settings Selection screen, without making any changes, click the Cancel button (upper left-
hand button) on the touch screen.
PJL (Printer Job Language)Setting
1. On the Parallel Port Selections Menu, press the horizontal selection line labeled PJL.
2. Press the Change Settings button.
3. On the Settings screen, note which of the two square buttons is highlighted as the current setting for
Job Control Language. This is the setting that enables the Controller's job processing parameters to be
modified by HP PJL. The available settings are Enabled or Disabled.
4. To change settings, press your setting of choice, then click the Save button (upper right-hand button) on
the touch screen.
5. To exit the Settings screen, without making any changes, click the Cancel button (upper left-hand
button) on the touch screen.
Auto Eject time (Parallel Port Timeout)
1. On the Parallel Port Selections Menu, press the horizontal selection line labeled Auto Eject Time.
2. Press the Change Settings button.
3. On the Settings screen, note the current display in seconds for the Parallel Port Timeout. This is the
length of time that the Controller will wait for an end of job command before printing the current job. Up
and down selection arrows are provided for modification of the timeout value in the increments shown.
4. To change settings, use the up or down selection arrow, then click the Save button (upper right-hand
button) on the touch screen.
5. To exit the Settings screen, without making any changes, click the Cancel button (upper left-hand
button) on the touch screen.
Adobe Communication Protocol
1. On the Parallel Port Selections Menu, press the horizontal selection line labeled Adobe
Communication Protocol.
2. Press the Change Settings button.
3. On the Settings screen, note which button is highlighted as the current setting for Adobe
Communication Protocol. The available settings are Standard, Binary, and TBCP.
4. To change settings, select the setting to, then click the Save button (upper right-hand button) on the
touch screen.
5. To exit the Settings screen, without making any changes, click the Cancel button (upper left-hand
button) on the touch screen.
Bi-directional Communications
1. Select the down arrow on the screen to see this setting.
2. On the Parallel Port Selections Menu, press the horizontal selection line labeled Bi-directional
Communications.
3. Press the Change Settings button.
file:///C|/0-web/boxster/WorkCentreM24-System-Analyst-Guide/Pages/A7_ParallelPort.htm (2 of 3) [9/4/03 8:32:30 AM]
Parallel Port Configuration
4. On the Settings screen, note which of the two square buttons is highlighted as the current setting for Bi-
directional Communications. The available settings are Enabled or Disabled. To support high speed, bi-
directional parallel communications, select the Enabled setting.
5. To change settings, press your setting of choice, then click the Save button (upper right-hand button) on
the touch screen.
6. To exit the Settings screen, without making any changes, click the Cancel button (upper left-hand
button) on the touch screen.
Input to Prime
1. Select the down arrow on the screen to see this selection.
2. On the Parallel Port Selections Menu, press the horizontal selection line labeled Input Prime.
3. On the Settings screen, note which of the two square buttons is highlighted as the current setting for
Parallel Input to Prime. The available settings are Enabled or Disabled. In support of bi-directional
communications, input to prime enables or disables the communication of a control signal over the
parallel port (which is client (workstation) dependent). When in doubt, select the Enabled setting.
4. To change settings, press the setting of choice, then click the Save button (upper right-hand button) on
the touch screen.
5. To exit the Settings screen, without making any changes, click the Cancel button (upper left-hand
button) on the touch screen.
Exiting the Parallel Port Selections Menu
To exit the Parallel Port Selections Menu, which returns you to the Port Settings Menu, press the rectangular
Close button in the upper right corner of the touch screen.
Exiting the Port Settings Menu and returning to the Printer's Main Menu
1. To exit the Port Settings Menu, returning to the Printer's Main screen, press the rectangular Close
button in the upper right corner of the Ports Menu screen.
2. Press the rectangular Close button in the upper right corner of the Ports and Protocols selection (two-
button) screen.
3. Press the rectangular Close button in the upper right corner of the five-button screen containing the
Network Settings button.
4. Finally, press the rectangular Exit button in the upper right corner of the four-button, System Settings
screen.
Note: If you changed any settings in the Port Settings menu, the Printer will automatically reboot to register
and enable your new settings.
file:///C|/0-web/boxster/WorkCentreM24-System-Analyst-Guide/Pages/A7_ParallelPort.htm (3 of 3) [9/4/03 8:32:30 AM]
SNMP Configuration
SNMP Configuration A8
SNMP (Simple Network Management Protocol) provides a method to remotely monitor and diagnose printer
performance on the network. Once SNMP has been enabled at the printer, SNMP Management software,
running on a host computer connected to the network, polls the printer's agents for operating information and
responds to traps from the printer regarding specific events. Examples of such events might be notifications
from the printer that it is low on toner, or low on paper.
To view or change the Printer's SNMP setting, perform the following steps:
To access SNMP Settings at the Printer
1. Press the rectangular Access button on the Printer Control Panel, located directly above and slightly to
the right of the numeric keypad.
2. Press the "1" key on the numeric keypad five consecutive times. (This is the factory default
"password.")
3. Press the rectangular Confirm button on the touch screen.
4. Press the System Settings button (the right-hand button of the two buttons displayed on the touch
screen). Note: If you press the left button by mistake, the Main menu will be displayed and you will have
to start over at step one above.
5. Press the System Settings button (the top left button displayed on screen).
6. Press the Network Settings button (the top right button displayed on screen).
7. Press the Port Settings button (the left-hand button) to access the Port Settings Menu display. Note: If
you press the right-hand button by mistake, you will be in the Protocol Settings Menu and will have to
press the Close button to return to the two-button selection screen.
8. When the Port Settings menu displays, press the down arrow key to view additional selections.
9. Press the SNMP selection line on the Port Settings Menu screen.
10. Press the Change Settings button in the lower right corner of the Port Settings Menu screen.
11. When the SNMP Selection Menu displays, note that you have only one setting selection on a single,
numbered horizontal line, with the current status of this setting shown. The Close button in the upper
right corner of the screen returns you to the Port Settings Menu. After pressing the horizontal line
selection, to access available settings press the Change Settings button in the lower right corner of the
touch screen.
Port Status (SNMP Enablement)
1. On the SNMP Selection Menu, press the horizontal selection line labeled Port Status.
2. Press the Change Settings button.
3. On the Settings screen, note which of the two square buttons is highlighted as the current setting for
SNMP Enablement. The available settings are Enabled or Disabled. For SNMP to function, it must be
set to Enabled.
4. To change settings, press your setting of choice, then click the Save button (upper right-hand button) on
the touch screen.
5. To exit the Settings screen, without making any changes, click the Cancel button (upper left-hand
button) on the touch screen.
Exiting the SNMP Selection Menu
file:///C|/0-web/boxster/WorkCentreM24-System-Analyst-Guide/Pages/A8_SNMP.htm (1 of 2) [9/4/03 8:32:31 AM]
SNMP Configuration
To exit the SNMP Selection Menu, which returns you to the Port Settings Menu, press the rectangular Close
button in the upper right corner of the touch screen.
Exiting the Port Settings Menu and returning to the Printer's Main Menu
1. To exit the Port Settings Menu, returning to the Printer's Main screen, press the rectangular Close
button in the upper right corner of the Port Settings Menu screen.
2. Press the rectangular Close button in the upper right corner of the Ports and Protocols selection (two-
button) screen.
3. Press the rectangular Close button in the upper right corner of the five-button screen containing the
Network Settings button.
4. Finally, press the rectangular Exit button in the upper right corner of the four-button, System Settings
screen.
Note: If you changed any settings in the Port Settings menu, the Printer will automatically reboot to register
and enable your new settings.
Configuring SNMP Community Names with Internet Services
1. Open your Web browser and enter the TCP/IP address of the Printer in the Address or Location field.
Press Enter.
2. Click the Properties button or Tab.
3. Click the plus symbol (+) to the left of the Protocol Settings file folder.
4. Select SNMP in the directory tree.
5. Enter a name for the Community Name (Read-Only). This is the password for SNMP GET requests
from the SNMP Manager to the Agent in the Printer.
6. Enter a name for the Community Name (Read-Write). This is the password for SNMP SET requests
from the SNMP Manager to the Agent in the Printer.
Caution: If you change the GET and/or SET Community Names, you must also change the names in all
network applications that are communicating by SNMP with this Printer.
7. Enter a name for the Community Name (Trap Notification). This is the default password for SNMP
TRAPS sent from the device to the Manager by SNMP.
8. Optionally enter the System Administrator's name for packet identification purposes.
9. Click the Apply New Settings button to accept the changes, or the Restore Settings button to return
the settings to their previous values.
Note: Changes to settings will not be applied until you restart the Printer.
file:///C|/0-web/boxster/WorkCentreM24-System-Analyst-Guide/Pages/A8_SNMP.htm (2 of 2) [9/4/03 8:32:31 AM]
  • Page 1 1
  • Page 2 2
  • Page 3 3
  • Page 4 4
  • Page 5 5
  • Page 6 6
  • Page 7 7
  • Page 8 8
  • Page 9 9
  • Page 10 10
  • Page 11 11
  • Page 12 12
  • Page 13 13
  • Page 14 14
  • Page 15 15
  • Page 16 16
  • Page 17 17
  • Page 18 18
  • Page 19 19
  • Page 20 20
  • Page 21 21
  • Page 22 22
  • Page 23 23
  • Page 24 24
  • Page 25 25
  • Page 26 26
  • Page 27 27
  • Page 28 28
  • Page 29 29
  • Page 30 30
  • Page 31 31
  • Page 32 32
  • Page 33 33
  • Page 34 34
  • Page 35 35
  • Page 36 36
  • Page 37 37
  • Page 38 38
  • Page 39 39
  • Page 40 40
  • Page 41 41
  • Page 42 42
  • Page 43 43
  • Page 44 44
  • Page 45 45
  • Page 46 46
  • Page 47 47
  • Page 48 48
  • Page 49 49
  • Page 50 50
  • Page 51 51
  • Page 52 52
  • Page 53 53
  • Page 54 54
  • Page 55 55
  • Page 56 56
  • Page 57 57
  • Page 58 58
  • Page 59 59
  • Page 60 60
  • Page 61 61
  • Page 62 62
  • Page 63 63
  • Page 64 64
  • Page 65 65
  • Page 66 66
  • Page 67 67
  • Page 68 68
  • Page 69 69
  • Page 70 70
  • Page 71 71
  • Page 72 72
  • Page 73 73
  • Page 74 74
  • Page 75 75
  • Page 76 76
  • Page 77 77
  • Page 78 78
  • Page 79 79
  • Page 80 80
  • Page 81 81
  • Page 82 82
  • Page 83 83
  • Page 84 84
  • Page 85 85
  • Page 86 86
  • Page 87 87
  • Page 88 88
  • Page 89 89
  • Page 90 90
  • Page 91 91
  • Page 92 92
  • Page 93 93
  • Page 94 94
  • Page 95 95
  • Page 96 96
  • Page 97 97
  • Page 98 98
  • Page 99 99
  • Page 100 100
  • Page 101 101
  • Page 102 102
  • Page 103 103
  • Page 104 104
  • Page 105 105
  • Page 106 106
  • Page 107 107
  • Page 108 108
  • Page 109 109
  • Page 110 110
  • Page 111 111
  • Page 112 112
  • Page 113 113
  • Page 114 114
  • Page 115 115
  • Page 116 116
  • Page 117 117
  • Page 118 118
  • Page 119 119
  • Page 120 120
  • Page 121 121
  • Page 122 122
  • Page 123 123
  • Page 124 124
  • Page 125 125
  • Page 126 126
  • Page 127 127
  • Page 128 128
  • Page 129 129
  • Page 130 130
  • Page 131 131
  • Page 132 132
  • Page 133 133
  • Page 134 134
  • Page 135 135
  • Page 136 136
  • Page 137 137
  • Page 138 138
  • Page 139 139
  • Page 140 140
  • Page 141 141
  • Page 142 142
  • Page 143 143
  • Page 144 144
  • Page 145 145
  • Page 146 146
  • Page 147 147
  • Page 148 148
  • Page 149 149
  • Page 150 150
  • Page 151 151
  • Page 152 152
  • Page 153 153
  • Page 154 154
  • Page 155 155
  • Page 156 156
  • Page 157 157
  • Page 158 158
  • Page 159 159
  • Page 160 160
  • Page 161 161
  • Page 162 162
  • Page 163 163
  • Page 164 164
  • Page 165 165
  • Page 166 166
  • Page 167 167
  • Page 168 168
  • Page 169 169
  • Page 170 170
  • Page 171 171
  • Page 172 172
  • Page 173 173
  • Page 174 174
  • Page 175 175
  • Page 176 176
  • Page 177 177
  • Page 178 178
  • Page 179 179
  • Page 180 180
  • Page 181 181
  • Page 182 182
  • Page 183 183
  • Page 184 184
  • Page 185 185
  • Page 186 186
  • Page 187 187
  • Page 188 188
  • Page 189 189
  • Page 190 190
  • Page 191 191
  • Page 192 192
  • Page 193 193
  • Page 194 194
  • Page 195 195
  • Page 196 196
  • Page 197 197
  • Page 198 198
  • Page 199 199
  • Page 200 200
  • Page 201 201
  • Page 202 202
  • Page 203 203
  • Page 204 204
  • Page 205 205
  • Page 206 206
  • Page 207 207
  • Page 208 208
  • Page 209 209
  • Page 210 210
  • Page 211 211
  • Page 212 212
  • Page 213 213
  • Page 214 214
  • Page 215 215
  • Page 216 216
  • Page 217 217
  • Page 218 218
  • Page 219 219
  • Page 220 220
  • Page 221 221
  • Page 222 222
  • Page 223 223
  • Page 224 224
  • Page 225 225
  • Page 226 226
  • Page 227 227
  • Page 228 228

Xerox M24 Administration Guide

Category
Multifunctionals
Type
Administration Guide

Ask a question and I''ll find the answer in the document

Finding information in a document is now easier with AI