Designing Fire Oriflamme RIVER ROCK Getting Started Manual
- Category
- Computer desks
- Type
- Getting Started Manual
This manual is also suitable for

(800) 445-4559 www.designingre.com
Fax: 651-305-6347 customerservice@designingre.com
Getting Started Guide
• Assembly Instructions
• User Guide
• Table Top Maintenance
• Warranty Information
INSTALLERS:Please leave the instruction manual with the consumer for future reference.
© 2015 Designing Fire, Inc. All Rights reserved

VERTICAL
TANK ASSEMBLY
INSTRUCTIONS
ALL TABLE TOPS
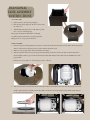
1. Remove the base and top from packaging
2. Place the four plastic plugs into the four corners at the
top of the base.
3. With the help of another person, set the table top on the
base so it rests on the four plugs.
YOU MUST PURCHASE A STANDARD PROPANE TANK
TO OPPERATE THE UNIT.
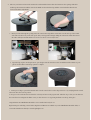
TABLE ASSEMBLY
1. Place the propane tank vertically into the frame.
2. Take the regulator and hook it up to the propane tank or tanks, making sure the hose forms a U-shape and the connection is
fastened tightly. A click or pop noise should be heard to indicate that the QCC valve is fully seated to the OPD valve on the
propane tank.
* If needed use a pair of pliers to ensure the proper seal is achieved.
* ONE PROPANE TANK IS ONLY REQUIRED FOR OPERATION OF THE UNIT, BUT THE USE OF TWO PROPANE
TANKS IS OPTIONAL FOR ENHANCING YOUR OUTDOOR EXPERIENCE FOR AN EXTENDED DURATION

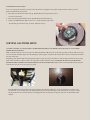
5. Reach your hand through the opening under the control valve and pull the venturi tube over the end cap of the control
valve. The tube fits loosely on the end cap for safety and oxygen flow. Simply sliding the venturi tube either direction on
the orifice will adjust air/fuel mixture. No need to use the set screw to adjust vents.
6. Open the bags of glass. For design burners, pour the glass into the center for Section A until that is full. Continue to pour
glass in Sections B & C until design pattern is complete.
Congratulations! Your Oriflamme Fire Table is now assembled and ready for use.
Replacement parts including: Control Valve, Regulator and Burner are available at your local Oriflamme Fire Table dealer, or
contact the manufacturer directly at www.designingfire.com.
4. Take out your burner and notice the venturi tube underneath the burner. Place the burner into the opening of the table
and line up the venturi tube with the control valve. Make sure the tube is lined up with the control valve flow. Flex tube can
be moved for minor adjustments.
7. Before proceeding to operate the firetable make sure the control valve is in the off position. Do so by varifying that the control
valve reads off at the 9 o’clock position.
8. Now proceed to reach into the base from the side entry and turn on the propane tank. After this step is done you can then turn
the control knob on and ignite the flame source you have chosen to use by placing the flame over the top of the glass.

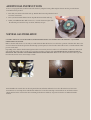
ADDITIONAL INSTRUCTIONS
To access your propane tank you must remove the burner by using the burner puller and place burner onto the provided burner
stand. Instructions provided.
1. First slide your Venturi tube off the end cap. Find the first burner clip which is located
above the control valve.
2. Once you have fastened all three burner clips lift the burner off the table top.
3. When your Oriflamme Fire Table is not in use, cover the burner and glass with
the included protective lid to keep out debris, children, and pets.
NATURAL GAS INSTALATION
CAUTION: NATURAL GAS INSTALATIONS, OTHER MODIFICATIONS AND REPAIRS MUST BE DONE BY A QUALIFIED
PROFESSIONAL INSTALLER.
Inline to the Fire table needs to be an easily accessible ball valve that will need to be used for the operation of the fire table. Due to the
excessive amount of volume and pressure the natural gas system requires, it is hard on the control valve to leave a constant amount of line
pressure on the valve.
Depending on the distance that the natural gas line will to be ran it may need to be either a û” or Ê” hard line it will need to have a ball
valve in line that will be easily accessible to be used before and after operation of the unit FAILURE TO DUE SO WILL RESULT IN
FAILURE OF THE CONTROL VALVE FROM PROLONG EXCESSIVE PRESSURE. Failure of the control valve will result in a gas leak
from the unit, and can cause serious injury or death.
From the Ball to the control valve on the side panel of the unit a flex line will need to be used to allow the base to have some
movement in case it is bumped into. The flex line will need to be rated for natural gas. Now included is an 18” flex hose that is
already attached to the convertor that has a 3/8 fitting (ball valve not included). See pictures below for recommended install
method.

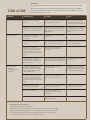
PROBLEM POSSIBLE CAUSE SOLUTION NOTES
Propane tank does not fill Propane tank was not purged
properly
Take it to an authorized propane station
and re-purge the propane tank
The purging process requires
that all air is removed from the
propane tank prior to the first fill
The OPD float valve on the propane
tank has been activated, closing the
valve and not allowing the tank to fill.
Without the burner, attach the regulator
to the propane tank, turn the control
valve on for a few seconds to reset the
OPD float valve
The OPD float valve is a safety
device which is activated when the
propane tank has been filled too
quickly
Smelling propane Bleed valve screw on the side of the
propane tank valve assembly
is not tight.
Use a flat blade screwdriver to tighten
the set screw
Control valve is not completely
shut off
To shut it off, push in the control knob
and completely turn it to the right
The far left position on the control
valve lowest burnsetting.
Venturi tube is obstructed or
obstructed with possible spide nest,
dirt and or debris. Occassional
propane odors are to be expected
when utilizing any propane burning
appliance.
Take out the straight portion of
the venturi tube and remove the
obstruction
Venturi tube is not correctly
positioned on the control valve or
obstructed with possible spide nest,
dirt and or debris
Slide the venturi tube completely over
the control valve assembly. The vents
should be in the EAST / WEST position.
The vents are on the end of the
straight tube.
Flame problems:
- NO flame
- Intermittent flame
- Low flame
The tank was not purged properly,
it contains of mixture of air and
propane. The result is intermittent
flame, or flame extinguishes in a
short period of time.
Burn off remaining propane and
re-purge the tank
The purging process requires
that ALL air is removed from the
propane tank prior to the first fill
to ensure maximum efficiency.
In cooler temperatures, the liquid
propane does not convert quickly
enough to a gas therefore causing it
to “freeze” the outside of the propane
tank
Turn down the flame slightly to where
the control valve is not wide open
The regulator was not properly
attached to the propane tank
Disconnect the regulator and re connect
it properly to the propane tank
Brand new component may need
additional tools to tighten
Venturi tube is obstructed Take out the straight portion of
the venturi tube and remove the
obstruction
Flame setting too low Turn control know to the right for a
higher flame setting
CHECKING FOR POSSIBLE LEAKS
1. Remove the table top burner from the base.
2. Make sure the regulator is hooked up to the propane tank with the control valve turned OFF
3. Turn the propane tank ON. Wait a few seconds a smell for possible leaks where the regulator
hose is attached to the control valve or where the regulator is attached to the propane tank.
4. Use soapy water and apply to these areas to verify the leak source.
USER GUIDE
WARNING:
If propane is leaking from the fire table, turn off propane tank valve. Use caution as liquid
propane can cause frost burn on bare skin. Liquid propane leaks are caused by overfilled
propane tanks. Remove tank and return to propane dealer for proper re-filling. See propane
instructions sheet on how to solve.

DIANGONAL
TANK ASSEMBLY
INSTRUCTIONS
ALL TABLE TOPS
1. Remove the base and top from packaging
2. Place the four plastic plugs into the four corners at the
top of the base.
3. With the help of another person, set the table top on the
base so it rests on the four plugs.
The propane tank must be filled before continuing
assembly. Propane tank must be properly purged and
filled prior to use. See propane instructions
TABLE ASSEMBLY
1. Place the propane tank diagonally into the frame, set the front bracket into the front pin of the frame. Rotate the propane
tank 45º and slide the back bracket of the propane tank into the frame sleeve.
2. Make sure your propane tank is lined up with the control valve.
3. Take the regulator and hook it up to the propane tank, making sure the hose forms a U-shape and the connection is
fastened tightly. A click or pop noise should be heard to indicate that the QCC valve is fully seated to the OPD valve on the
propane tank.
* If needed use a pair of pliers to ensure the proper seal is achieved.
4. Take out your burner and notice the venturi tube underneath the burner. Place the burner into the opening of the table
and line up the venturi tube with the control valve. Make sure the tube is lined up with the control valve flow. Flex tube can
be moved for minor adjustments.

5. Reach your hand through the opening under the control valve and pull the venturi tube over the end cap of the control
valve. The tube fits loosely on the end cap for safety and oxygen flow. Simply sliding the venturi tube either direction on
the orifice will adjust air/fuel mixture. No need to use the set screw to adjust vents.
6. Open the bags of glass. For design burners, pour the glass into the center for Section A until that is full. Continue to pour
glass in Sections B & C until design pattern is complete.
Congratulations! Your Oriflamme Fire Table is now assembled and ready for use.
Replacement parts including: Propane Tank, Control Valve, Regulator and Burner are available at your local Oriflamme Fire
Table dealer, or contact the manufacturer directly at www.designingfire.com.
7. To ignite your Oriflamme Fire Table reach underneath and turn the propane tank valve ON. Push the control knob in and
turn it to the left to the ON position. You will hear a light click on the high position. After turning the knob a quarter turn at
the 9 o’clock position propane will begin flowing into the burner.
8. Take your igniter and light it on top of glass. NEVER light your table from underneath.

ADDITIONAL INSTRUCTIONS
To access your propane tank table you must remove the burner by using the burner puller and place burner onto the provided
burner stand. Instructions provided.
1. First slide your Venturi tube off the end cap. Find the first burner clip which is located
above the control valve.
2. Once you have fastened all three burner clips lift the burner off the table top.
3. When your Oriflamme Fire Table is not in use, cover the burner and glass with
the included protective lid to keep out debris, children, and pets.
NATURAL GAS INSTALATION
CAUTION: NATURAL GAS INSTALATIONS, OTHER MODIFICATIONS AND REPAIRS MUST BE DONE BY A QUALIFIED
PROFESSIONAL INSTALLER.
Inline to the Fire table needs to be an easily accessible ball valve that will need to be used for the operation of the fire table. Due to the
excessive amount of volume and pressure the natural gas system requires, it is hard on the control valve to leave a constant amount of line
pressure on the valve.
Depending on the distance that the natural gas line will to be ran it may need to be either a û” or Ê” hard line it will need to have a ball
valve in line that will be easily accessible to be used before and after operation of the unit FAILURE TO DUE SO WILL RESULT IN
FAILURE OF THE CONTROL VALVE FROM PROLONG EXCESSIVE PRESSURE. Failure of the control valve will result in a gas leak
from the unit, and can cause serious injury or death.
From the Ball to the control valve on the side panel of the unit a flex line will need to be used to allow the base to have some
movement in case it is bumped into. The flex line will need to be rated for natural gas. Now included is an 18” flex hose that is
already attached to the convertor that has a 3/8 fitting (ball valve not included). See pictures below for recommended install
method.

PROBLEM POSSIBLE CAUSE SOLUTION NOTES
Propane tank does not fill Propane tank was not purged
properly
Take it to an authorized propane station
and re-purge the propane tank
The purging process requires
that all air is removed from the
propane tank prior to the first fill
The OPD float valve on the propane
tank has been activated, closing the
valve and not allowing the tank to fill.
Without the burner, attach the regulator
to the propane tank, turn the control
valve on for a few seconds to reset the
OPD float valve
The OPD float valve is a safety
device which is activated when the
propane tank has been filled too
quickly
Smelling propane Bleed valve screw on the side of the
propane tank valve assembly
is not tight.
Use a flat blade screwdriver to tighten
the set screw
Control valve is not completely
shut off
To shut it off, push in the control knob
and completely turn it to the right
The far left position on the control
valve lowest burnsetting.
Venturi tube is obstructed or
obstructed with possible spide nest,
dirt and or debris. Occassional
propane odors are to be expected
when utilizing any propane burning
appliance.
Take out the straight portion of
the venturi tube and remove the
obstruction
Venturi tube is not correctly
positioned on the control valve or
obstructed with possible spide nest,
dirt and or debris
Slide the venturi tube completely over
the control valve assembly. The vents
should be in the EAST / WEST position.
The vents are on the end of the
straight tube.
Flame problems:
- NO flame
- Intermittent flame
- Low flame
The tank was not purged properly,
it contains of mixture of air and
propane. The result is intermittent
flame, or flame extinguishes in a
short period of time.
Burn off remaining propane and
re-purge the tank
The purging process requires
that ALL air is removed from the
propane tank prior to the first fill
to ensure maximum efficiency.
In cooler temperatures, the liquid
propane does not convert quickly
enough to a gas therefore causing it
to “freeze” the outside of the propane
tank
Turn down the flame slightly to where
the control valve is not wide open
The regulator was not properly
attached to the propane tank
Disconnect the regulator and re connect
it properly to the propane tank
Brand new component may need
additional tools to tighten
Venturi tube is obstructed Take out the straight portion of
the venturi tube and remove the
obstruction
Flame setting too low Turn control know to the right for a
higher flame setting
CHECKING FOR POSSIBLE LEAKS
1. Remove the table top burner from the base.
2. Make sure the regulator is hooked up to the propane tank with the control valve turned OFF
3. Turn the propane tank ON. Wait a few seconds a smell for possible leaks where the regulator
hose is attached to the control valve or where the regulator is attached to the propane tank.
4. Use soapy water and apply to these areas to verify the leak source.
USER GUIDE
WARNING:
If propane is leaking from the fire table, turn off propane tank valve. Use caution as liquid
propane can cause frost burn on bare skin. Liquid propane leaks are caused by overfilled
propane tanks. Remove tank and return to propane dealer for proper re-filling. See propane
instructions sheet on how to solve.

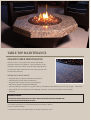
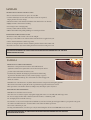
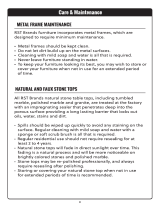
GRANITE TABLE MAINTENANCE
Granite is a dense, coarse-grained stone and one of the hardest
materials on earth. Its luster, hardness, colors and variations are all
indications of the stone’s mineral composition and origin. Most have
pits and fissures that are inherent to the stone and are part of its rich
natural texture and beauty.
GENERAL FACTS ABOUT GRANITE:
•Thegranitetabletop is hard and durable and is resistant to
scratching when properly sealed and maintained.
•Thegranitetabletopisheatresistant and can withstand
temperatures upwards of 1800 degrees Fahrenheit.
•To prevent staining and scratches, use a granite sealer as per the MFG recommendations. Be sure to wipe up spills immediately.
•Thepitsandfissuresarerandompronounced markings common to some stones and cannot be removed during
fabrication.
MAINTAINING THE GRANITE:
UPON RECEIVING YOUR NEW GRANITE TABLE SEAL IT WITH A GRANITE SEALER FOUND AT YOUR LOCAL HARDWARE STORE.
SEAL GRANITE AT THE BEGINING AND END OF THE SEASON.
•Useamildsoapandwateroraprofessional natural stone cleaner for daily use.
•Donotuseabrasive cleaners.
•To ensure the beauty of your granite table top, it should be sealed twice a year.
TABLE TOP MAINTENANCE

SAVANNA/TUSCAN STONE MAINTENANCE
The Tuscan stone top achieves the appearance of real stone with the use of
Century Stone natural iron oxides and quartz concrete overlay. Each table is
hand stained using iron oxides. These oxides are water based colorants, not
solid colors like paints. The oxides mixed with water and applied by hand
give the table a “natural” look.
Colors will vary from table to table because the stain is translucent and
texture varies because each table is hand troweled. Please be aware that
the “tone” of the color will be the same, but the exact shade may vary.
Different texture surfaces may also affect table colors. We cannot guarantee a match to any existing table or sample. Our goal is to
“complement or blend” the chosen color or sample and assure you the best quality table.
•Do not place anything with a “rubber compound” on the table. This can permanently mark the surface.
•Placeatrayunderallpottedplants. Oxides and minerals in pots and soil can discolor the table top.
•To ensure complete protection for your Tuscan table top, we recommend the full cover available for purchase. MAINTAINING
THE TUSCAN STONE:
•Wipedowntabletop regularly with a damp cloth.
•Wipeupspillsimmediately.
•Use“SimpleGreen•” or a natural citrus cleaner and sponge for difficult areas.
•Use“Dawn•” dishwashing liquid and water for grease or oil spots.
•Use “Mr.CleanMagicEraser•” for small, hard to clean areas.
UPON RECEIVING YOUR NEW TABLE SEAL IT WITH A STONE SEALER FOUND AT YOUR LOCAL HARDWARE STORE. SEAL STONE AT THE
BEGINING AND END OF THE SEASON.
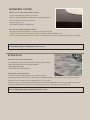
VENETIAN
GENERAL FACTS ABOUT MARBLE STONE:
•Marbleisanaturalstone formed over millions of years
• The crystalline properties of the minerals give the marble is distinctive
colors, veining and graining.
• The surface has been filled, polished and sealed creating a uniform,
general non-porous surface.
• Veining, hairline cracks and color variations are part of the intrinsic
beauty of marble
MAINTAINING THE MARBLE STONE:
•Protect marble surface from scratching, staining and etching.
•Keepsurface free of debris and sharp objects
•Wipeupspillsimmediately
•Avoidcontactwithchemicals(particularlyacidbasedmaterials)
•CleanwithpHneutralproducts
•Afteraperiodofuse,applyapenetratingsealerto prevent contaminants from being absorbed intothestone.•Renewthe
surface on polished marble by buffing with special stone polish.
• Do not use marble polish on matte finish marble.
UPON RECEIVING YOUR NEW TABLE SEAL IT WITH A STONE SEALER FOUND AT YOUR LOCAL HARDWARE STORE. SEAL STONE AT THE
BEGINING AND END OF THE SEASON.

SANTA FE
GENERAL FACTS ABOUT NATURAL SLATE:
•Slateisanaturalstoneandnotwopiecesareeveralike
• Consists of thin layers of stone and as the layers of slate are separated,
unique patterns and colors emerge
• Natural unevenness and variation in authentic slate which adds to its diversity
•Highlyresistanttoabrasionandcracking
•Norustingbecauseofitshighpurity
•Densityofslatemakesitidealforoutdoors
•Harderthanmarbleandspalling(flaking)isanormal part of slate
MAINTAINING THE NATURAL SLATE:
•Resistant to stains, will not fade or discolor in sunlight.
•Slatetopissealedwithastone sealer and this sealer should be re-applied each year.
•Canbecleanedwithwaterormildsoapywater.
•Donotusevinegar, abrasive cleaners, furniture polish or cleaners that contain acid.
•Shouldbestoredinadrylocationduringtheoffseasonandnotrestingonitsside
UPON RECEIVING YOUR NEW TABLE SEAL IT WITH A STONE SEALER FOUND AT YOUR LOCAL HARDWARE STORE. SEAL STONE AT THE
BEGINING AND END OF THE SEASON.
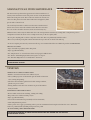
SAHARA
GENERAL FACTS ABOUT TRAVERTINE:
• Travertine is a unique natural stone that is rich with historical
significance and has been quarried for over two thousand years and is a
product of the earth’s water and carbon cycles.
• It is formed by minerals dissolving in ground water and then being
deposited on the earth’s surface by rivers, natural springs, or geysers.
•The two minerals that make up 99% of travertine are calcite and gypsum
which are colorless.
• Beautiful tones come from traces of yellow sulfur, brown iron compounds, and organic pigments.
• The texture of travertine is partly the result of gas bubbles trapped between layers of stone.
• Each piece has its own distinct character, adding beauty and unique style to any décor.
MAINTAINING THE TRAVERTINE:
•NEVERrestorstandthisstoneonitsside!
•Sincethisstoneissealed,itrequires only regular wiping with water or occasionally with mild soapy water.
•Do not use vinegar, cleaners that contain acid, abrasive cleaners, or furniture polish.
•Donothigh-pressurewashthisstonetop.
• If a stain does occur, it can be easily removed with fine (0) steel wool or finer grit sand paper. If this step is required at any point
the surface area affected needs to be treated with a stone sealer for further protection.
•Useastonesealertwiceperyear.
•For long-term maintenance, store the top in a dry location during the off season and DO NOT rest it on its side.
UPON RECEIVING YOUR NEW TABLE SEAL IT WITH A STONE SEALER FOUND AT YOUR LOCAL HARDWARE STORE. SEAL STONE AT THE
BEGINING AND END OF THE SEASON.

HAMMERED COPPER
GENERAL FACTS ABOUT HAMMERED COPPER:
•Copperisminedandextruded into copper sheets
• Sheets are shaped and hammered with a dark acid-etched finish applied
•Tops can be formed onto outdoor substrates
•18gaugecopper is used
•Specialfinishisappliedtomaintainpatina
MAINTAINING THE HAMMERED COPPER:
• Top requires regular wiping with water or mild soapy water with soft cloth
•Vinegar, cleaners that contain acid abrasive cleaners or furniture polish should NOT be used
•Acidicfoodandcontaminateswillcausethetabletobecomebrighterbutwillcorrectitselfthroughouttimeintheelements
Upon receiving your new Hammered Copper table seal it with a Carnauba Wax found at your local hardware store. It is recommended that the table
is sealed right away and again in the beginning and end of the season too.
RIVER ROCK
GENERAL FACTS ABOUT RIVER ROCK:
•Isaculminationofscienceandhumanhandscreatingbeatyforalifetime
• Made of metal alloy that is from recycled alluminum
•Highly durable from cracking
•Isabeautifulsmoothartisanproduct
MAINTAINING THE RIVER ROCK:
• Top requires regular wiping with warm water or mild soapy water
•Useafineautomotivewaxorbabyoiltomaintainglossonfinish.Thefinishisstainresistanttolotionsandinsectrepellents,
however, it is best to clean the surface as quickly after exposure as possible.
•Storage:Itisbesttostorethisproductindoorsduringsevereweather.DONOTrollthetoponitsedge,rathercarrythetopto
its storage location and store vertically. A soft cover will also keep your top clean and protected during storage.
Upon receiving your newRiver Rock table seal it with a fine automotive wax or baby oil found at your local hardware store. It is recommended that the
table is sealed right away and again in the beginning and end of the season too.

WARRANTY
TABLE TOP
Designing Fire, Inc. offers a (2) year, (2) year COMMERCIAL warranty on table tops valid only with proper maintenance from date of delivery. This limited
warranty covers craftsmanship and structural components of the table top. Designing Fire, Inc., at manufacturer’s option, will repair or replace any table top
found to be defective during this warranty period. Warranty is void if any of the following occurs: 1) Incorrect installation by retailer or customer 2) damage
caused by accidents, 3) misuse, 4) alterations made by anyone other than Designing Fire Inc. manufacturers.
Note: This warranty does not apply to the use of another manufacturer’s table top, nor does it apply to the incorrect installation of the table top onto the
base, by the retail store or customer. This warranty does not apply to any damage caused by shipping, accidents, fading, staining, natural weathering, misuse,
alterations or repairs.
COMPONENTS
Designing Fire, Inc. offers a (2) year, (2) year COMMERCIAL, functional warranty only with proper maintenance from date of delivery for all working
components of the table such as the control valve and regulator. Designing Fire, Inc. will, at manufacturer’s option, repair or replace any Designing Fire, Inc.
component that has failed functionally during normal use and proper maintenance.
FRAME & BURNER
Designing Fire, Inc. offers a (10) year, (10) year COMMERCIAL, structural warranty only with proper maintenance from date of delivery. Designing Fire Inc. will,
at manufacturer’s option, repair or replace any Designing Fire, Inc. frame that has failed structurally during normal use and proper maintenance.
FINISH
Powder Coat: Designing Fire, Inc. offers a (2) year, (2) year COMMERCIAL, warranty against blistering or peeling of the frame finish under normal use and
proper maintenance. Designing Fire, Inc., at manufacturer’s option, will refinish or replace your powder coated materials if either of the above occurs within a
(2) year period from the date of purchase. Occasional rust seepage from crevices and hidden unfinished surfaces inherent in some ornate designs is considered
not a finish failure. Extra care and maintenance is required in coastal areas which are
1) Cover when not in use
2) Wipe down witha mild solution regularly.
3) If you can, store out of the elements when not in use
NOT COVERED UNDER WARRANTY
•Thiswarrantydoesnotapplyto any damage caused by shipping, accidents, fading, staining natural weathering, misuse, alterations or repairs. No other person
is authorized to assume liability on behalf of Designing Fire, Inc., and in no event shall Designing Fire, Inc. be liable for contributory or subsequent damage
related to merchandise purchased from Designing Fire, Inc.
•Anyfailurecausedbyunreasonableuseorabuse
•Rustseepageorbleedingfromcracksorcrevices
•Rustand/oroxidationofframe resulting from exposed metals that have been scratched, chipped or not properly maintained by the guidelines listed in the
care instructions
•NormalfadingoftheOriflammeFire Table
•Customer’s own material choices
•Accidentaldamageorelementdamagesuchasfire,wind,rain,orsun
•Permanent stains caused by lotions, oils, or other substances
•Discoloringofthefireglassdueto unreasonable use
MAINTENANCE INSTRUCTIONS
•OriflammeFire Table should be inspected before initial use, and regularly inspected and cleaned.
•OriflammeFire Table should be kept clean and free of dirt build up. Clean with mild soap and water. Wipe spills quickly to avoid surface staining, scrubbing
with soft sponge or rag. See complete details for table top maintenance in table top care instructions page.
•Neverleavetablestandinginwater.
•Coverorstoreyourtablewhennotinuseforextendedperiodsoftime.
•Tampering is dangerous and will void all warranties. Any component that is found to be faulty must be replaced with an approved component.
•Examinetheburnerandventuritubeto make sure that there is no lint or dirt in these areas.
TABLE RETURN GUIDELINES
PRIOR AUTHORIZATION from the manufacturing or manufacturers’ representative is required. You must be the original purchaser and be able to provide
proof of purchase when you make a claim. To submit a warranty claim, contact our warranty department at (800) 445-4559, via fax, (651) 305-6347 and/or via email at
[email protected]; or you may contact your local dealer.
If the complaint is covered by warranty, Designing Fire, Inc. will arrange for freight pick-up and pay the surface freight to and from manufacturing. The
consumer is responsible for freight charges to and from the manufacturing if beyond the timeframe stated above. Return of the Oriflamme Fire Table must be
packaged for freight pick up. Oriflamme Fire Tables must have been used only for residential use as defined in the original purchase order.

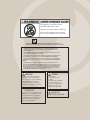
This appliance can produce carbon
monoxide which has no odor.
Using it in an enclosed space can kill you.
Never use this appliance in an enclosed
space such as a camper, tent, car or home.
•Childrenandadultsshouldbealertedtothehazardsofhigh
surface temperature and should stay away to avoid burns or
clothing ignition.
• Young children should be carefully supervised when they are in
the area of the Oriflamme Fire Table.
•Clothingorotherflammablematerials should not be hung from
the appliance, or placed on or near the Oriflamme Fire Table.
•Anyguardorotherprotectivedeviceremoved for servicing the
appliance must be replaced prior to operating the Oriflamme Fire
Table.
•Installationandrepair should be done by a qualified service
person. The Oriflamme Fire Table should be inspected before use
and at least annually by a qualified service person. More frequent
cleaning may be required as necessary. It is imperative that the
control compartment, burners and circulating air passageways of
the Oriflamme Fire Table be kept clean.
FAILURE TO FOLLOW THESE INSTRUCTIONS MAY RESULT IN AN
EXPLOSION OR FIRE THAT MAY CAUSE PROPERTY DAMAGE, SERIOUS
WARNING
Improper installation, adjustment,
alteration, service or maintenance
can cause injury or property damage.
Read the installation, operating
and instructions thoroughly before
installing or servicing this equipment.
WARNING
Do not store or use gasoline or other
flammable vapors and liquids in the
vicinity of this or any other appliance.
An LP-cylinder not connected for use
shall not be stored in the vicinity of
this or any other appliance.
DANGER
If you smell gas:
1. Shut off the gas to the
appliance.
2. Extinguish any open flame.
3. If odor continues, keep
away from the appliance and
immediately call your gas
supplier or fire department.
WARNING
FOR OUTDOOR USE

1-800-445-4559 www.designingfire.com
-
 1
1
-
 2
2
-
 3
3
-
 4
4
-
 5
5
-
 6
6
-
 7
7
-
 8
8
-
 9
9
-
 10
10
-
 11
11
-
 12
12
-
 13
13
-
 14
14
-
 15
15
-
 16
16


Designing Fire Oriflamme RIVER ROCK Getting Started Manual
- Category
- Computer desks
- Type
- Getting Started Manual
- This manual is also suitable for
Ask a question and I''ll find the answer in the document
Finding information in a document is now easier with AI
Other documents
-
Element Fireglass 43755466 User manual
-
Crosley Furniture CF6006-BK User manual
-
Simpli Home NL-WEST-WH-20 Installation guide
-
 RST Brands OP-PSCLB5MFT-GY-K User manual
-
Amazonia HD_CANN2LOTGR Operating instructions
-
 Kingston Brass HKVPB36WQA1 User manual
-
Barclay Products 7-712GPBL User manual
-
Home Styles 5523-953 Assembly Instructions
-
 Granite Gold GG0084 User manual
-
MS International LPEBMMIX1212POL User manual


