

1. GENERAL TERMS
The following information gives an instructive view on how
to handle the Quick Release Coupling QR-03 and the
assembly process.
The specified regulations have to be obeyed all time to
ensure a proper performance of the equipment.
Krontec GmbH accepts no liability for any damage caused
by improper handling whilst working with the QR steering
wheel system system.


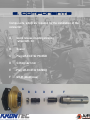
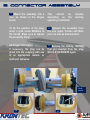
3. Connector Assembly
Push the spacer onto the
plug QR-03-ST22 PN-MOD up to
its stop.
2. Mount the O-Ring 12x1mm
onto the plug QR-03-ST22-PN
MOD.
The O-Ring ensures the
clearance that is necessary
between the components, so the
plug will sit 100% correctly.
After the assembly is completed,
the O-Ring can be removed from
the plug again!
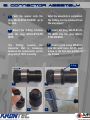
3. Insert the plug QR-03-ST-22-
PN MOD into the plug QR-03-
ST22-SN MOD.
4. Insert a grub screw M3x6mm
into the weld boss QR-33. Just
screw in the first two pitches of
the thread.
1 2
3 4
O-Ring
1
23
4

5. Push the plug QR-03-ST22-
SN MOD up against block into
the malecounterpart.
6. The slot of the connector
should aim onto the flat face of
the QR-detail!
Tighten the grub screw (hand
tight), that get inserted during
step 4.
Focus on the Orientation of the
connectors slot.
7. Insert the plug QR-03-ST-22-
PN MOD into the plug QR-03-
ST22-SN MOD.
8. Push the female part QR-03
onto the
assembly.
3. Connector Assembly
5
6
7
5 6
7 8
8
Flat

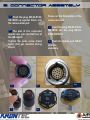
9. Mount the assembly into a
vice, as shown in the images
below.
To fix the position of the plug,
insert a grub screw M3x6mm to
the thread. Make sure to tighten
the assembly firmly!
Additional information:
If necessary, the plug can be
glued into the coupling with use
of an appropriate instant- or
multi-part adhesive.
This should be decided
depending on the existing
operating conditions!
10. Remove the assembly from
the vice again. Female and Male
part can now be disconnected.
11. Remove the O-Ring 12x1mm
that got inserted from the plug
QR-03-ST22-PN MOD again.
3. Connector Assembly
9
10
11
9
10 11
Grub
screw

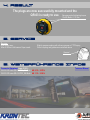
The plugs are now successfully mounted and the
QR-03 is ready to use.
4. Result
Recommended tightening torque
12x M5 Bolts: 4 –5 Nm
5. Service
Service:
After every race: Slightly grease coupling with silicone grease or PTFE spray
After 5.000km/ Half season/ Upon need: Clean coupling and grease as mentioned above
Grease!
6. Weiterführende Infos
Connector Datasheet (page 21-23):
QR-30-22P uses QR-03-ST22_PN-Mod = AS 6 12 –35 P N
QR-33-22P uses QR-03-ST22_SN-Mod = AS 1 12 –35 S N
Technical Manual
-
 1
1
-
 2
2
-
 3
3
-
 4
4
-
 5
5
-
 6
6
-
 7
7


Deutsch QR-33-22P Assembly Instructions
- Type
- Assembly Instructions
- This manual is also suitable for
Ask a question and I''ll find the answer in the document
Finding information in a document is now easier with AI
Other documents
-
SULLAIR ShopTek ST22 Operation & Maintenance Manual
-
Carl Valentin SPE User manual
-
Eurotherm TU2170 User manual
-
-
BLACK DECKER GL200 User manual
-
Texas Instruments Series 2000 Reader System User guide
-
BLACK+DECKER GL200 User manual
-
Carl Valentin DPM III XI User manual
-
GOBLIN Goblin 500 Sport Owner's manual
-
dixell IC100CX Series Owner's manual