Page is loading ...

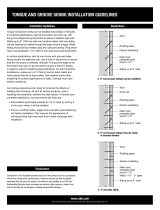
Siding wider than 6 inches
requires two face nails to ade-
quately secure the tongue and
groove siding. The nails should
be spaced 2 1/2 – 3" apart and
should penetrate 1 1/2” into
solid wood.
Bevel
Beginning with the bottom
course, use a starter strip to
allow for proper spacing.
Overlap the undercourse by
no less than 1 inch. Nail 1 1/2"
into stud. Be careful not to nail
through two overlapping
pieces of siding, since this will
cause splitting.
Nailing
Channel
Channel siding installation
is similar to bevel. However,
a 1/8" expansion gap
between courses must be
left to allow the siding to
expand with the moisture
conditions. Once again, take
care not to nail through two
courses of siding.
Stud
Sheathing
Building
Paper
Cedar siding
up to 6 inches
wide
Extra nail
Siding
wider than
6 inches
Stud
Sheathing
Building
Paper
Nail 1" +
from bottom
(to clear top
of preceding
siding layer)
Wood
Starter Strip
Stud
1/8" expansion
gap
Nails penetrate
solid wood
1 1/2"
Nails 2 1/2"–
3" apart
Wood
Starter Strip
IMPORTANT–Installation Guidelines
Moisture Content & Nailing – Western Red Cedar Siding has outstanding performance and
durability when installed correctly. Two of the most important installation steps are acclimatizing and correct nailing.
Moisture Content
Western Red Cedar gains and loses moisture due to
atmospheric moisture. It may shrink or swell until it
reaches equilibrium with the level of moisture in the air.
Keep wood dry by storing under cover. To
adequately acclimate, stack the siding on
evenly spaced, vertically aligned
stickers in an area of good air
flow, allowing 4-6 inches
ground clearance. Refer
to WRCLA web site
(www.wrcla.com) for
drying times in vari-
ous conditions and
parts of the country.
Nail Types/Points & Shanks
Stainless steel nails are preferable. Hot dipped galvanized
and high tensile strength aluminum are also corrosion
resistant and can be used when installing Red Cedar.
Other nails may react with the natural preservatives in
cedar and cause staining.
“Splitless” siding nails have blunt heads and thin shanks,
which reduces the chance of splitting. Nails with ring or
spiral shanks have greater holding power. Pre-drill when
nailing close to edges.
Tongue & Groove
Starting with the bottom course
work up with the groove edge facing
down to ensure weather tight fit.
Nail 1 1/2" into the stud. Siding up
to 6 inches wide in normal weather
conditions can be toe nailed as
shown in this diagram.
Windy or extreme
weather conditions
usually requires two
nails as shown in the
diagram. Blind nail
siding by toe nailing
in tongue and add
one face nail to
secure the siding.
/

