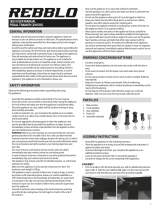
Tunturi FitRace 40 HR Owner's manual

Category
Fitness, gymnastics & weight training
Type
Owner's manual
Attention, Achtung, Attention, Attentie
- Please read this Owner’s manual before assembling this product.
- Bitte lesen Sie dieses Handbuch durch, bevor Sie mit er Montage dieses Produkts beginnen.
- Veuillez lire ce manuel avant de commencer le montage de ce produit.
- Leest u deze handleiding voordat u dit apparaat installeert.
www.tunturi.com
User manual
Benutzerhandbuch
Manuel de l’utilisateur
Gebruikershandleiding
Serial number
Seriennummer
Numéro de série
Serienummer
Serial number:
CE EN957
Class HC
MADE IN CHINA
MAX input:
MAX USER WEIGHT: 135 KGS
HOME USE
FitRace 40HR
3
FitRace 40HR
A
4
FitRace 40HR
B
5
FitRace 40HR
C
100 cm
100 cm
100 cm
100 cm
D-0
6
FitRace 40HR
D-1
7
FitRace 40HR
D-2
8
FitRace 40HR
D-3
9
FitRace 40HR
D-4
10
FitRace 40HR
E-1
E-1
11
FitRace 40HR
F-1
F-2
12
FitRace 40HR
F-3A
F-3B
13
English
Index
Welcome ............................................................13
Safety warnings ................................................ 13
Description (g. A) 14
Package contents (g. B & C) 14
Assembly (g. D) 14
Workouts ...........................................................14
Exercise Instructions 14
Use ..................................................................... 15
Use our dual function pedal (g. F3) 15
Replacing the battery (Fig. E-2) 15
Console (Fig. E-1) ............................................. 15
Explanation of buttons 16
Opperation 16
Cleaning and maintenance .............................. 16
Defects and malfunctions 16
Warranty ............................................................ 17
Additional information 17
Declaration of the manufacturer ..................... 17
Disclaimer ......................................................... 17
Welcome
Welcome to the world of Tunturi New Fitness!
Thank you for purchasing this piece of Tunturi
equipment. Tunturi offers a wide range of home fitness
equipment, including crosstrainers, treadmills, exercise
bikes and rowers. The Tunturi equipment is suitable for
the entire family, no matter what fitness level. For more
information, please visit our website www.tunturi.com
Safety warnings
WARNING
Read the safety warnings and the instructions.
Failure to follow the safety warnings and the
instructions can cause personal injury or damage
to the equipment. Keep the safety warnings and
the instructions for future reference.
- The equipment is suitable for domestic use only.
The equipment is not suitable for commercial use.
- Max. usage is limited to 3 hrs a day.
- The use of this equipment by children or persons
with a physical, sensory, mental or motorial
disability, or lack of experience and knowledge can
give cause to hazards. Persons responsible for their
safety must give explicit instructions or supervise
the use of the equipment.
- Before starting your workout, consult a physician to
check your health.
- If you experience nausea, dizziness or other
abnormal symptoms, immediately stop your
workout and consult a physician.
- To avoid muscular pain and strain, start each
workout by warming up and finish each workout by
cooling down. Remember to stretch at the end of
the workout.
- The equipment is suitable for indoor use only. The
equipment is not suitable for outdoor use.
- Only use the equipment in environments with
adequate ventilation. Do not use the equipment in
draughty environments in order not to catch a cold.
- Only use the equipment in environments with
ambient temperatures between 10 °C and 35 °C.
Only store the equipment in environments with
ambient temperatures between 5 °C and 45 °C.
- Do not use or store the equipment in humid
surroundings. The air humidity must never be more
than 80%.
- Only use the equipment for its intended purpose.
Do not use the equipment for other purposes than
described in the manual.
- Do not use the equipment if any part is damaged or
defective. If a part is damaged or defective, contact
your dealer.
- Keep your hands, feet and other body parts away
from the moving parts.
- Keep your hair away from the moving parts.
- Wear appropriate clothing and shoes.
- Keep clothing, jewellery and other objects away
from the moving parts.
- Make sure that only one person uses the equipment
at a time.
The equipment must not be used by persons
weighing more than 135 kg (300 lbs).
- Do not open equipment without consulting your
dealer.
14
English
Description (fig. A)
Your upright bike is a piece of stationary fitness
equipment used to simulate cycling without causing
excessive pressure to the joints.
Package contents (fig. B & C)
- The package contains the parts as shown in fig. B.
- The package contains the fasteners as shown in fig.
C. Refer to the section “Description”
NOTE
If a part is missing, contact your dealer.
Assembly (fig. D)
WARNING
Assemble the equipment in the given order.
Carry and move the equipment with at least two
persons.
CAUTION
Place the equipment on a firm, level surface.
Place the equipment on a protective base to
prevent damage to the floor surface.
Allow at least 100 cm of clearance around the
equipment.
Refer to the illustrations for the correct assembly
of the equipment.
Workouts
The workout must be suitably light, but of long
duration. Aerobic exercise is based on improving
the body’s maximum oxygen uptake, which in turn
improves endurance and fitness. You should perspire,
but you should not get out of breath during the
workout.
To reach and maintain a basic fitness level, exercise at
least three times a week, 30 minutes at a time. Increase
the number of exercise sessions to improve your fitness
level. It is worthwhile to combine regular exercise with
a healthy diet. A person committed to dieting should
exercise daily, at first 30 minutes or less at a time,
gradually increasing the daily workout time to one hour.
Start your workout at low speed and low resistance to
prevent the cardiovascular system from being subjected
to excessive strain.
As the fitness level improves, speed and resistance can
be increased gradually. The efficiency of your exercise
can be measured by monitoring your heart rate and
your pulse rate.
Exercise Instructions
Using your fitness trainer will provide you with several
benefits, it will improve your physical fitness, tone
muscle and in conjunction with a calorie controlled diet
help you lose weight.
The warming up phase
This stage helps get the blood flowing around the body
and the muscles working properly. It will also reduce
the risk of cramp and muscle injury. It is advisable to do
a few stretching exercises as shown below. Each stretch
should be held for approximately 30 seconds, do not
force or jerk your muscles into a stretch - if it hurts,
STOP
The exercise phase
This is the stage where you put the effort in. After
regular use, the muscles in your legs will become
more flexible. Work to your but it is very important to
maintain a steady tempo throughout.
The rate of work should be sufficient to raise your heart
beat into the target zone shown on the graph below.
200
180
160
140
120
100
80
20 25 30 35 40 45 50 55 60 65 70 75
85 %
70 %
AGE
MAXIMUM
COOL DOWN
HEART RATE
TARGET ZONE
This stage should last for a minimum of 12 minutes
though most people start at about 15-20 minutes
The cool down phase
This stage is to let your Cardiovascular System and
muscles wind down. This is a repeat of the warm
up exercise e.g. reduce your tempo, continue for
approximately 5 minutes. The stretching exercises
should now be repeated, again remembering not to
force or jerk your muscles into the stretch.
As you get fitter you may need to train longer and
harder. It is advisable to train at least three times a
week, and if possible space your workouts evenly
throughout the week.
Muscle toning
To tone muscle while on your fitness trainer you will
need to have the resistance set quite high. This will
put more strain on our leg muscles and may mean you
cannot train for as long as you would like. If you are also
trying to improve your fitness you need to alter your
training program. You should train as normal during the
warm up and cool down phases, but towards the end
of the exercise phase you should increase resistance
making your legs work harder. You will have to reduce
your speed to keep your heart rate in the target zone.
15
English
Weight loss
The important factor here is the amount of effort you
put in. The harder and longer you work the more
calories you will burn. Effectively this is the same as if
you were training to improve your fitness, the difference
is the goal.
Use
Adjusting the support feet
The equipment is equipped with 4 support feet. If
the equipment is not stable, the support feet can be
adjusted.
- Turn the support feet as required to put the
equipment in a stable position.
- Tighten the lock-nuts to lock the support feet.
Adjusting the horizontal seat position
The horizontal seat position can be adjusted by setting
the seat to the required position.
- Loosen the seat adjustment knob.
- Move the seat to the required position.
- Tighten the seat adjustment knob.
Adjusting the vertical seat position
The vertical seat position can be adjusted by setting the
seat tube to the required position. With the leg almost
straight, the arch of the foot must touch the pedal at its
lowermost point.
- Loosen the seat tube adjustment knob.
- Move the seat tube to the required position.
- Tighten the seat tube adjustment knob.
Adjusting the handlebar
The handlebar can be adjusted according to the height
and the exercise position of the user.
- Loosen the handlebar adjustment knob.
- Move the handlebar to the required position.
- Tighten the handlebar adjustment knob.
Adjusting resistance (Fig. F-1)
To increase or decrease resistance, turn the
adjustment knob at the top of the handlebar support
tube clockwise (+ direction) to increase resistance
and Distanceer-clockwise (- direction) to decrease
resistance.
Emergency break knob (Fig. F-2)
To apply the brake, press down on the brake tension
knob.
Use our dual function pedal (Fig. F3)
Attaching Cleats to Your Shoes:
If you have questions it is recommended that you
consult a bicycle dealer for assistance, or refer to your
shoe manufacturer’s instructions.
When fixing the cleat the lateral centre line should be
under the centre of the ball of the foot. Adjust forward
and backward via the slots in the shoe sole. Adjust
laterally via play between cleat washer and cleat.
Tighten cleats very firmly. Cleat position can be fine-
tuned, according to personal preference, after trial use.
It may take time to find your optimum cleat set-up.
Toe Clips:
All standard toe clips can be attached to the pedals.
Use fixing hardware and installation instructions
supplied with toe clips and ensure the attachment
screws are firmly tightened before use.
To Use Pedals:
Engage cleated shoes in pedals by placing cleat
between bindings while pushing down.
Disengage by twisting heel outwards away from
exercise bike.
Binding tension is adjustable and should be set so that
cleat and shoe do not disengage when pedalling. Use
an Allen key to turn tension adjusting screws, clockwise
to increase binding tension, counter-clockwise to
decrease binding tension.
Replacing the battery (Fig. E-2)
The console is equipped with 1 CR2032 (3Volt) battery
at the rear of the console.
- Remove the console.
- Remove the old batteries.
- Insert the new batteries. Make sure that battery
match the (+) and (-) polarity markings.
- Mount the console.
Console (Fig. E-1)
CAUTION
Keep the console away from direct sunlight.
Dry the surface of the console when it is covered
with drops of sweat.
Do not lean on the console.
Only touch the display with the tip of your finger.
Make sure that your nails or sharp objects do not
touch the display.
16
English
NOTE
The console switches to standby mode when the
equipment is not used for 4 minutes.
Explanation Display functions
RPM
Display the rotations per minute.
Range: 0 ~ 999 RPM.
Without any signal being transmitted into the monitor
for 4 seconds during workout, RPM will display “0”
Time
Automatically accumulates workout time when
exercising.
Display range: 00:00 ~ 99:59.
Speed
Displays current training speed.
Range 0.0 ~ 99.9 / Units: KM/H.
Without any signal being transmitted into the monitor
for 4 seconds during workout, RPM will display “0”.
Distance
Automatically accumulates the distance from exercise
when exercising.
Range 0.0 ~ 999.9 / Units: KM.
Calories
Automatically accumulates calories burnt when
exercising.
Range: 0 ~ 9999 / Units: K.Cal.
NOTE
This data is a rough guide for comparison of
different exercise sessions which cannot be used
in medical treatment
Pulse
- Current pulse will display after 6 seconds when
detected by the console.
- Without any pulse signal for 6 seconds, console will
display “P”.
- Pulse alarm will sound when current pulse is over
the target pulse.
- Range: 0-30 ~ 230 BPM.
Explanation of buttons
Mode/ Reset
- Press Mode/ Reset button to select console
functions.
- Push and hold for 3 seconds in, stop Mode/ Reset,
to reset: Time, Distance, Calories.
Opperation
Power on
- Press any key to power on the console when being
in sleep mode..
- Start pedalling to power on the console when being
in sleep mode.
Power off
Without any signal being transmitted into the monitor
for 4 minutes the monitor will enter SLEEP mode
automatically. ( Active training data will be lost )
Workout setting
- Press MODE/ RESET key to select the function of
TIME, DISTANCE, CALORIES, and PULSE. Use SET
key for setting and press MODE/ RESET key for
confirmation.
- For instance the time set-up, when the time value
is blinking, you can use UP and DOWN (DIAL) to
adjust the number. Press SET key for confirmation
and skip to next set-up. The set-up of DISTANCE,
CALORIES and PULSE is the same as TIME set-up.
- Once the workout begins and the console picks up
the exercise signal, the value of SPEED, RPM, TIME,
DISTANCE and CALORIES will count up on the
display.
- If a target is set for a specific value, that value will
countdown, till target is reached.
Cleaning and maintenance
The equipment does not require special maintenance.
The equipment does not require recalibration when
it is assembled, used and serviced according to the
instructions.
WARNING
Do not use solvents to clean the equipment.
Clean the equipment with a soft, absorbent cloth
after each use.
Regularly check that all screws and nuts
are tight.
If necessary, lubricate the joints.
Defects and malfunctions
Despite continuous quality control, defects and
malfunctions caused by individual parts can occur in the
equipment. In most cases, it will be sufficient to replace
the defective part.
- If the equipment does not function properly,
immediately contact the dealer.
17
English
- Provide the model number and the serial number of
the equipment to the dealer. State the nature of the
problem, conditions of use and purchase date.
Warranty
Tunturi purchaser‘s warranty
Warranty terms
The consumer is entitled to the applicable legal
rights stated in the national legislation concerning the
commerce of consumer goods. This warranty does not
restrict these rights. The Purchaser’s Warranty is only
valid if the item is used in an environment approved by
Tunturi New Fitness BV for that particular equipment.
The product-specific approved environment is stated in
the Owner’s Manual provided with your equipment.
Warranty conditions
The warranty conditions commence from the date of
purchase. Warranty conditions may vary per Distancery,
so please consult your local dealer for the warranty
conditions.
Warranty coverage
Under no circumstances shall Tunturi New Fitness
BV or the Tunturi Distributor be liable by virtue of
this warranty or otherwise for any special, indirect,
secondary or consequential damages of any nature
arising out of any use or inability to use this equipment.
Warranty limitations
This warranty covers manufacturing defects in the
fitness equipment as originally packed by Tunturi
New Fitness BV. The warranty shall apply only under
conditions of normal, recommended use of the product
as described in the Owner’s Manual and providing that
Tunturi New Fitness BV’s instructions for installation,
maintenance and use have been complied with. Neither
Tunturi New Fitness BV’s nor the Tunturi Distributors’
obligations apply to defects due to reasons beyond
their control. The warranty applies only to the original
purchaser and is valid only in Distanceries where
Tunturi New Fitness BV has an authorised importer.
The warranty does not extend to fitness equipment
or components that have been modified without the
consent of Tunturi New Fitness BV. Defects resulting
from normal wear, misuse, abuse, corrosion, or damage
incurred during loading or transportation are not
covered.
The warranty does not cover sounds or noises emitted
during use where these do not substantially impede the
use of the equipment and where they are not caused
by a fault in the equipment. The warranty does not
cover defects arising from the failure to carry periodic
maintenance as outlined within the Owner’s Manual
for the product. Furthermore, the warranty does not
cover defects arising from usage and storage within
an unsuitable environment as described within the
Owner’s Manual which should be indoors, dry, dust
and grit free and within a temperature range of +15°C
to +35°C. The warranty does not cover maintenance
activities, such as cleaning, lubricating, and normal part
adjustments, nor installation
procedures that customers can accomplish themselves,
such as changing uncomplicated meters, pedals and
other similar parts not requiring any dismantling/
reassembling of the fitness equipment. Warranty
repairs carried out by other than authorised Tunturi
representatives are not covered.
Failure to follow the instructions given in the Owner’s
Manual will invalidate the product’s warranty.
Additional information
Packaging disposal
Government guidelines ask that we reduce the amount
of waste material disposed of in land fill sites. We
therefore ask that you dispose of all packaging waste
responsibly at public recycling centres.
End of life disposal
We at Tunturi hope you enjoy many years of enjoyable
use from your fitness trainer. However, a time will come
when your fitness trainer will come to the end of its
useful life. Under ‘European WEEE Legislation you are
responsible for the appropriate disposal of your fitness
trainer to a recognised public collection facility.
Declaration of the
manufacturer
Tunturi New Fitness BV declares that the product is in
conformity with the following standards and directives:
EN 957 (HC), 89/336/EEC. The product therefore
carries the CE label.
04-2018
Tunturi New Fitness BV
Purmerweg 1
1311 XE Almere
The Netherlands
Disclaimer
© 2018 Tunturi New Fitness BV
All rights reserved.
The product and the manual are subject to change.
Specifications can be changed without further notice.
18
Deutch
Willkommen
Willkommen in der Welt von Tunturi!
Danke, dass Sie dieses Gerät von Tunturi erworben
haben. Tunturi bietet eine breite Palette an Heim-
Fitnessgeräten wie beispielsweise Crosstrainer,
Laufbänder, Trainingsfahrräder und Rudergeräte an. Die
Tunturi Geräte sind für die ganze Familie geeignet -
ganz egal, wie fit man ist. Weitere Informationen finden
Sie auf unserer Website unter www.tunturi.com
Deutsch
Diese deutsche Bedienungsanleitung ist ine
Übersetzung des englischen Textes. Es können keine
Rechte auf diese Übersetzung abgeleitet werden.
Index
Willkommen ......................................................18
Warnhinweise zur Sicherheit ........................... 18
Beschreibung (Abb. A) 19
Verpackungsinhalt (Abb. B & C) 19
Zusammenbau (Abb. D) 19
Trainings............................................................ 19
Trainingsanleitung 19
Gebrauch ........................................................... 20
Verwendung unseres Doppelfunktions-
pedals (Abb. F3) 20
Erneuerung der Batterie (Abb. E-2) 21
Konsole (Abb. E-1) ........................................... 21
Erläuterung der Anzeigefunktionen 21
Erläuterung der Schalter 21
Bedienung 22
Reinigung und Wartung ................................... 22
Störungen und Fehlfunktionen 22
Garantie ............................................................. 22
Zusätzliche Informationen ............................... 23
Herstellererklärung........................................... 23
Haftungsausschluss ........................................ 23
Warnhinweise zur
Sicherheit
WARNUNG
Lesen Sie die Warnhinweise zur Sicherheit und
die Anweisungen. Werden die Warnhinweise
zur Sicherheit und die Anweisungen nicht
befolgt, kann dies zu Personenverletzungen
und Schäden am Gerät führen. Bewahren
Sie die Warnhinweise zur Sicherheit und die
Anweisungen zur künftigen Bezugnahme auf.
- Das Gerät ist nur für den Hausgebrauch geeignet.
Das Gerät ist nicht für den gewerblichen Gebrauch
geeignet.
- Die maximale Verwendung ist auf 3 Stunden pro
Tag beschränkt
- Wenn dieses Gerät von Kindern oder Personen
mit körperlicher, sensorischer, geistiger oder
motorischer Behinderung verwendet wird, oder
wenn nicht genügend Erfahrung und Kenntnisse
vorhanden sind, kann dies zu Gefahrensituationen
führen. Personen, die für deren Sicherheit
verantwortlich sind, müssen klare Anweisungen
geben oder den Gebrauch des Geräts
beaufsichtigen.
- Bevor Sie Ihr Training starten, nehmen Sie
Kontakt mit einem Arzt auf, um Ihre Gesundheit
kontrollieren zu lassen.
- Falls Sie Übelkeit, ein Schwindelgefühl oder
andere anormale Symptome verspüren, hören Sie
unverzüglich mit Ihrem Training auf und wenden Sie
sich an einen Arzt.
- Um einen Muskelkater zu vermeiden, starten Sie
jedes Training mit Aufwärmen und beenden Sie es
mit Abkühlen. Denken Sie daran, sich am Ende des
Trainings zu dehnen.
- Das Gerät ist nur für den Gebrauch in
geschlossenen Räumen geeignet. Das Gerät ist
nicht für den Gebrauch im Freien geeignet.
- Verwenden Sie das Gerät nur in Umgebungen mit
ausreichender Belüftung. Verwenden Sie das Gerät
nicht in zugiger Umgebung, damit Sie sich nicht
erkälten.
- Verwenden Sie das Gerät nur in Umgebungen mit
Umgebungstemperaturen zwischen 10 °C und 35
°C. Lagern Sie das Gerät nur in Umgebungen mit
einer Umgebungstemperatur zwischen 5 °C und 45
°C.
- Verwenden und lagern Sie das Gerät nicht in
feuchten Umgebungen. Die Luftfeuchtigkeit darf
niemals 80% überschreiten.
- Verwenden Sie das Gerät nur bestimmungsgemäß.
Verwenden Sie das Gerät nicht für einen anderen
als für den in diesem Handbuch beschriebenen
Zweck.
19
Deutch
- Verwenden Sie das Gerät nicht, falls Teile
beschädigt oder defekt sind. Ist ein Teil beschädigt
oder defekt, wenden Sie sich an Ihren Händler.
- Halten Sie Ihre Hände, Füße und andere Körperteile
von den beweglichen Teilen fern.
- Halten Sie Ihr Haar von den beweglichen Teilen
fern.
- Tragen Sie entsprechende Kleidung und Schuhe.
- Halten Sie Kleidung, Schmuck und andere
Gegenstände von den beweglichen Teilen fern.
- Vergewissern Sie sich, dass das Gerät nur von
einer Person auf einmal verwendet wird. Das Gerät
darf nicht von Personen verwendet werden, deren
Gewicht 135 kg (300 lbs) überschreitet.
- Öffnen Sie das Gerät nicht, ohne vorher mit Ihrem
Händler zu sprechen.
Beschreibung (Abb. A)
Ihr Standfahrrad ist ein ortsgebundenes Fitnessgerät,
das zur Simulation des Fahrradfahrens verwendet wird,
ohne dabei einen übermäßigen Druck auf die Gelenke
auszuüben.
Verpackungsinhalt (Abb. B & C)
- Die Verpackung enthält die in Abb. B dargestellten
Teile.
- Die Verpackung enthält die Befestigungsteile
gemäß Abb. C. Siehe Abschnitt “Beschreibung”.
HINWEIS
Fehlt ein Teil, wenden Sie sich an Ihren Händler.
Zusammenbau (Abb. D)
WARNUNG
Bauen Sie das Gerät in der angegebenen
Reihenfolge zusammen.
Tragen und bewegen Sie das Gerät mit
mindestens zwei Personen.
VORSICHT
Stellen Sie das Gerät auf festen, ebenen Boden.
Stellen Sie das Gerät auf eine schützende
Unterlage, um Schäden am Bodenbelag zu
vermeiden.
Sorgen Sie rund um das Gerät für einen Freiraum
von mindestens 100 cm.
Der richtige Zusammenbau des Geräts geht aus
den Abbildungen hervor.
Trainings
Das Training muss leicht und geeignet, aber von
langer Dauer sein. Aerobic-Übungen basieren auf der
Verbesserung der maximalen Sauerstoffaufnahme
des Körpers, was wiederum die Ausdauer und Fitness
verbessert. Sie sollten während des Trainings zwar ins
Schwitzen, aber nicht außer Atem kommen.
Um eine Basisfitness zu erreichen und zu halten,
üben Sie mindestens drei mal pro Woche 30 Minuten
lang an einem Stück. Erhöhen Sie die Anzahl der
Übungssitzungen, um Ihre Fitness zu verbessern.
Es lohnt sich, die regelmäßigen Übungen mit einer
gesunden Diät zu kombinieren. Personen, die Diät
machen, sollten täglich zuerst 30 Minuten oder weniger
an einem Stück üben und die tägliche Trainingszeit
allmählich auf eine Stunde verlängern. Beginnen
Sie Ihr Training mit niedriger Geschwindigkeit und
geringem Widerstand, um zu vermeiden, dass das
Herzkreislaufsystem einer übermäßigen Belastung
ausgesetzt wird. Mit sich verbessernder Fitness können
Geschwindigkeit und Widerstand allmählich erhöht
werden. Die Wirksamkeit Ihrer Übungen kann durch
Überwachung der Herzfrequenz und Ihrer Pulsfrequenz
gemessen werden.
Trainingsanleitung
Die Verwendung des Fitnesstrainers wird Ihnen viele
Vorteile bieten: Er verbessert Ihre körperliche Fitness,
formt die Muskeln und hilft Ihnen, in Verbindung mit
einer kalorienreduzierten Diät, Gewicht zu verlieren.
Die Aufwärm-Phase
Der Blutkreislauf wird angeregt und die
Muskelfunktionen werden unterstützt. Außerdem wird
das Risiko von Krämpfen und Muskelverletzungen
gesenkt. Sie sollten, wie unten angezeigt, einige
Dehnungsübungen machen. Sie sollten weder die
Dehnungsbewegung erzwingen noch die Muskeln
dabei ruckweise bewegen - wenn Sie Schmerzen
haben, sollten Sie AUFHÖREN.
Die Trainings-Phase
In dieser Phase strengen Sie sich an. Nach
regelmäßiger Verwendung werden die Muskeln in Ihren
Beinen beweglicher. In dieser Phase ist es sehr wichtig,
immer ein gleichmäßiges Tempo beizubehalten. Die
Anstrengung sollte ausreichen, um Ihren Herzschlag bis
in die Zielzone zu erhöhen, die im folgenden Diagramm
dargestellt ist.
20
Deutch
200
180
160
140
120
100
80
20 25 30 35 40 45 50 55 60 65 70 75
85 %
70 %
ALTER
MAXIMAL
ABKÜHLEN
PULS
ZIELZONE
Diese Phase sollte mindestens 12 Minuten dauern; die
meisten Menschen beginnen mit ca. 15 bis 20 Minuten.
Die Abkühlungs-Phase
Sie dient der Entspannung Ihres Herz-Kreislaufsystems
und Ihrer Muskeln. Dabei werden die Aufwärmübungen
wiederholt, reduzieren Sie zum Beispiel Ihr Tempo
und machen Sie ca. 5 Minuten weiter. Jetzt sollten
die Dehnübungen wiederholt werden. Denken Sie
wiederum daran, weder die Dehnungsbewegung
zu erzwingen noch die Muskeln dabei ruckweise zu
bewegen. Wenn Sie fitter werden, kann es sein, dass
Sie länger und härter trainieren müssen. Sie sollten
mindestens drei Mal die Woche trainieren und, falls
möglich, Ihre Trainingseinheiten gleichmäßig über die
Woche verteilen.
Muskelformung
Um Ihre Muskeln beim Training auf dem Fitnesstrainer
zu formen, müssen Sie den Widerstand ziemlich
hoch einstellen. Dadurch werden die Beinmuskeln
mehr angestrengt und Sie können möglicherweise
nicht so lange trainieren, wie Sie möchten. Wenn Sie
außerdem Ihre Fitness verbessern möchten, müssen
Sie Ihr Trainingsprogramm ändern. Sie sollten in den
Aufwärm- und Abkühlphasen normal trainieren, jedoch
gegen Ende der Trainingsphase den Widerstand
erhöhen, damit Ihre Beine härter arbeiten müssen. Sie
müssen die Geschwindigkeit verringern, damit Ihre
Herzfrequenz in der Zielzone bleibt.
Gewichtsabnahme
Der wichtige Faktor ist, wie sehr Sie sich anstrengen. Je
härter und je länger Sie trainieren, desto mehr Kalorien
verbrennen Sie. Dies ist im Grunde dasselbe, wie wenn
zur Verbesserung Ihrer Fitness trainieren, nur das Ziel ist
ein anderes.
Gebrauch
Einstellen der Stützfüße
Das Gerät hat 4 Stützfüße. Steht das Gerät nicht stabil,
kann es mit den Stützfüßen eingestellt werden.
- Drehen Sie die Stützfüße wie erforderlich, um das
Gerät in eine stabile Position zu bringen.
- Ziehen Sie die Sicherungsmuttern an, um die
Stützfüße zu sichern.
HINWEIS
Die Maschine steht am stabilsten, wenn alle Stützfüße
vollständig eingeschraubt sind. Nivellieren Sie die
Maschine daher, indem Sie alle Stützfüße vollständig
Eindrehen, bevor Sie die entsprechenden Füße zur
Stabilisierung der Maschine wieder herausdrehen.
Einstellen der horizontalen Sitzposition
Die horizontale Sitzposition kann durch Einstellen des
Sitzes auf die erforderliche Position eingestellt werden.
- Lösen Sie den Sitzeinstellknopf.
- Bewegen Sie den Sitz in die erforderliche Position..
- Ziehen Sie den Sitzeinstellknopf an.
Einstellen der vertikalen Sitzposition
Die vertikale Sitzposition kann durch Einstellen des
Sitzrohrs auf die erforderliche Position eingestellt
werden. Wenn das Bein fast gerade ist, muss das
Fußgewölbe das Pedal am untersten Punkt berühren.
- Lösen Sie den Sitzrohreinstellknopf.
- Bewegen Sie das Sitzrohr in die erforderliche
Position.
- Ziehen Sie den Sitzrohreinstellknopf an.
Einstellen des Handgriffs
Der Handgriff kann auf die Höhe und Übungsposition
des Benutzers eingestellt werden.
- Lösen Sie den Handgriffeinstellknopf.
- Bewegen Sie den Handgriff in die erforderliche
Position.
- Ziehen Sie den Handgriffeinstellknopf an.
Widerstand einstellen (Abb. F-1)
Zum erhöhen oder verringern des Widerstands.
Drehen Sie den Widerstands Taste am Lenker in der +
(Uhrzeigersinn) oder – (gegen den Uhrzeigersinn)
Notbremsknopf (Abb. F-2)
Um zu bremsen, drücken Sie auf den Bremszugknopf.
Verwendung unseres
Doppelfunktionspedals (Abb. F3)
Pedalplatten an Ihren Schuhen anbringen
Bei Fragen sollten Sie sich an einen Radhändler oder
Ihren Schuhhersteller wenden.
Wenn Sie die Pedal-platten anbringen, sollte sich die
zentrale seitliche Linie unter der Mitte des Fußballens
befinden. Die Horizontalleinstellung erfolgt über die
Ösen in der Schuhsole. Die Seiteneinstellung erfolgt
über das Spiel zwischen Scheibe und Stollen. Pedal-
platten gut festziehen. Die Pedal-platten Position kann
genau eingestellt werden, je nach persönlicher Vorliebe
und nach einem Testlauf. Es kann einige Zeit dauern,
bevor Sie Ihre optimale Position gefunden haben.
  • Page 1 1
  • Page 2 2
  • Page 3 3
  • Page 4 4
  • Page 5 5
  • Page 6 6
  • Page 7 7
  • Page 8 8
  • Page 9 9
  • Page 10 10
  • Page 11 11
  • Page 12 12
  • Page 13 13
  • Page 14 14
  • Page 15 15
  • Page 16 16
  • Page 17 17
  • Page 18 18
  • Page 19 19
  • Page 20 20
  • Page 21 21
  • Page 22 22
  • Page 23 23
  • Page 24 24
  • Page 25 25
  • Page 26 26
  • Page 27 27
  • Page 28 28
  • Page 29 29
  • Page 30 30
  • Page 31 31
  • Page 32 32
  • Page 33 33
  • Page 34 34
  • Page 35 35
  • Page 36 36
  • Page 37 37
  • Page 38 38
  • Page 39 39
  • Page 40 40

Tunturi FitRace 40 HR Owner's manual

Category
Fitness, gymnastics & weight training
Type
Owner's manual

Ask a question and I''ll find the answer in the document

Finding information in a document is now easier with AI