Page is loading ...

IntelliRupter
®
PulseCloser
®
Fault Interrupter
Outdoor Distribution (15.5 kV, 27 kV, and 38 kV)
July 20, 2020
© S&C Electric Company 2008-2020, all rights reserved
Instruction Sheet 766-540
Operation
Table of Contents
Section Page Section Page
Introduction
Qualified Persons .......................... 2
Read this Instruction Sheet ................... 2
Retain this Instruction Sheet. . . . . . . . . . . . . . . . . . . 2
Proper Application .......................... 2
Special Warranty Provisions ................... 2
Safety Information
Understanding Safety-Alert Messages ........... 4
Following Safety Instructions .................. 4
Replacement Instructions and Labels ........... 4
Safety Precautions ......................... 5
Overview
Applicable Software ......................... 6
Modes of Operation ......................... 6
Operating Levers and Indicators
Opening and Closing Interrupters ............... 7
Manual Hot Line Tag .........................10
Manual Ground Trip Block (if furnished) ..........11
Electronically Applied Hot Line Tag .............12
Status Indicator .............................13
Hot Line Tag Indicator ........................14
Opening and Closing the Disconnect ............14
Operation Using IntelliLink® Setup Software
Starting IntelliLink Setup Software ..............16
Operation Screen ...........................16
SCADA Operation
Enabling SCADA Operation .................. 22
Metering .................................. 23
Saving and Loading a Setup Configuration
Saving a Setup Configuration ................. 25
Loading a Setup Configuration ................ 26
Viewing Screens and Help Tile ................ 26
Using Snapshots ........................... 26
Updating Firmware ........................ 27
Battery Management System
Battery Management ....................... 30
Battery Care and Maintenance ................31

2 S&C Instruction Sheet 766-540
Introduction
Qualified Persons
WARNING
Only qualified persons who are knowledgeable in the installation, operation, and
maintenance of overhead and underground electric distribution equipment, along
with all associated hazards, may install, operate, and maintain the equipment covered
by this publication. A qualified person is someone who is trained and competent in:
• The skills and techniques necessary to distinguish exposed live parts from nonlive
parts of electrical equipment
• The skills and techniques necessary to determine the proper approach distances
corresponding to the voltages to which the qualified person will be exposed
• The proper use of special precautionary techniques, personal protective equipment,
insulated and shielding materials, and insulated tools for working on or near exposed
energized parts of electrical equipment
These instructions are intended ONLY for such qualified persons. They are not
intended to be a substitute for adequate training and experience in safety procedures
for this type of equipment.
Read this
Instruction Sheet
NOTICE
Thoroughly and carefully read this instruction sheet and all materials included in
the product’s instruction handbook before installing or operating the IntelliRupter
PulseCloser Fault Interrupter. Familiarize yourself with the Safety Information
and Safety Precautions on pages 4 and 5. The latest version of this publication is
available online in PDF format at sandc.com/en/support/product-literature/.
Retain this
Instruction Sheet
This instruction sheet is a permanent part of the IntelliRupter® fault interrupter.
Designate a location where you can easily retrieve and refer to this publication.
Proper Application
WARNING
The equipment in this publication is only intended for a specific application. The
application must be within the ratings furnished for the equipment. Ratings for the
IntelliRupter fault interrupter are listed in the ratings table in Specification Bulletin
766-31.
The standard warranty contained in S&C’s standard conditions of sale, as set forth in
Price Sheets 150 and 181, applies to the IntelliRupter fault interrupter, except that the
rst paragraph of the said warranty is replaced by the following:
(1) General: The seller warrants to the immediate purchaser or end user for a period of
10 years from the date of shipment that the equipment delivered will be of the
kind and quality specified in the contract description and will be free of defects of
workmanship and material. Should any failure to conform to this warranty appear
under proper and normal use within 10 years after the date of shipment, the seller
agrees, upon prompt notification thereof and confirmation that the equipment has
been stored, installed, operated, inspected, and maintained in accordance with
the recommendations of the seller and standard industry practice, to correct the
nonconformity either by repairing any damaged or defective parts of the equipment
or (at the seller’s option) by shipment of necessary replacement parts. The seller’s
warranty does not apply to any equipment that has been disassembled, repaired,
or altered by anyone other than the seller. This limited warranty is granted only
to the immediate purchaser or, if the equipment is purchased by a third party for
installation in third-party equipment, the end user of the equipment. The seller’s
duty to perform under any warranty may be delayed, at the seller’s sole option, until
the seller has been paid in full for all goods purchased by the immediate purchaser.
No such delay shall extend the warranty period.
Special Warranty
Provisions

S&C Instruction Sheet 766-540 3
Introduction
Replacement parts provided by the seller or repairs performed by the seller
under the warranty for the original equipment will be covered by the above special
warranty provision for its duration. Replacement parts purchased separately will
be covered by the above special warranty provision.
For equipment/services packages, the seller warrants for a period of one year
after commissioning that the IntelliRupter fault interrupter will provide auto-
matic fault isolation and system reconfiguration per agreed-upon service levels.
The remedy shall be additional system analysis and reconfiguration of the
IntelliTeam® SG Automatic Restoration System until the desired result is achieved.
Warranty of the IntelliRupter fault interrupter is contingent upon the installa-
tion, configuration, and use of the control or software in accordance with S&C’s
applicable instruction sheets.
This warranty does not apply to major components not of S&C manufacture,
such as batteries and communication devices. However, S&C will assign to imme-
diate purchaser or end user all manufacturer’s warranties that apply to such major
components.
Warranty of equipment/services packages is contingent upon receipt of ade-
quate information on the user’s distribution system, sufficiently detailed to prepare
a technical analysis. The seller is not liable if an act of nature or parties beyond
S&C’s control negatively impact performance of equipment/services packages; for
example, new construction that impedes radio communication, or changes to the
distribution system that impact protection systems, available fault currents, or
system-loading characteristics.

4 S&C Instruction Sheet 766-540
Understanding
Safety-Alert Messages
Following
Safety Instructions
Replacement
Instructions and
Labels
Several types of safety-alert messages may appear throughout this instruction sheet
and on labels attached to the IntelliRupter PulseCloser Fault Interrupter. Familiarize
yourself with these types of messages and the importance of these various signal words:
DANGER
“DANGER” identifies the most serious and immediate hazards that will result
in serious personal injury or death if instructions, including recommended
precautions, are not followed.
WARNING
“WARNING” identifies hazards or unsafe practices that can result in serious
personal injury or death if instructions, including recommended precautions, are
not followed.
CAUTION
“CAUTION” identifies hazards or unsafe practices that can result in minor
personal injury if instructions, including recommended precautions, are not
followed.
NOTICE
“NOTICE” identifies important procedures or requirements that can result in
product or property damage if instructions are not followed.
If you do not understand any portion of this instruction sheet and need assistance,
contact your nearest S&C Sales Office or S&C Authorized Distributor. Their
telephone numbers are listed on S&C’s website sandc.com, or call the S&C Global
Support and Monitoring Center at 1-888-762-1100.
NOTICE
Read this instruction sheet thoroughly and carefully
before installing or operating the IntelliRupter
PulseCloser Fault Interrupter.
If you need additional copies of this instruction sheet, contact your nearest S&C Sales
Ofce, S&C Authorized Distributor, S&C Headquarters, or S&C Electric Canada Ltd.
It is important that any missing, damaged, or faded labels on the equipment be
replaced immediately. Replacement labels are available by contacting your nearest
S&C Sales Office, S&C Authorized Distributor, S&C Headquarters, or S&C Electric
Canada Ltd.
Safety Information

S&C Instruction Sheet 766-540 5
Safety Precautions
DANGER
IntelliRupter PulseCloser Fault Interrupters operate at high voltage. Failure to
observe the precautions below will result in serious personal injury or death.
Some of these precautions may differ from your company’s operating procedures
and rules. Where a discrepancy exists, follow your company’s operating procedures
and rules.
1. QUALIFIED PERSONS. Access to an IntelliRupter
fault interrupter must be restricted only to qualified
persons. See the “Qualified Persons” section on
page 2.
2. SAFETY PROCEDURES. Always follow safe operating
procedures and rules.
3. PERSONAL PROTECTIVE EQUIPMENT. Always use
suitable protective equipment, such as rubber gloves,
rubber mats, hard hats, safety glasses, and flash
clothing, in accordance with safe operating procedures
and rules.
4. SAFETY LABELS. Do not remove or obscure any of
the “DANGER,” “WARNING,” “CAUTION,” or “NOTICE”
labels.
5. OPERATING MECHANISM AND BASE. IntelliRupter
fault interrupters contain fast-moving parts that can
severely injure fingers. Do not remove or disassemble
operating mechanisms or remove access panels on the
IntelliRupter fault interrupter base unless directed by
S&C Electric Company.
6. ENERGIZED COMPONENTS. Always consider all
parts live until de-energized, tested, and grounded. The
integrated power module (IPM) contains components
that can retain a voltage charge for many days after the
IntelliRupter fault interrupter has been de-energized
and can derive a static charge when in close proximity
to a high-voltage source. Voltage levels can be as high
as the peak line-to-ground voltage last applied to the
unit. Units that have been energized or installed near
energized lines should be considered live until tested
and grounded.
7. GROUNDING. The IntelliRupter fault interrupter base
must be connected to a suitable earth ground at the
base of the utility pole, or to a suitable building ground
for testing, before energizing an IntelliRupter fault
interrupter, and at all times when energized.
The ground wire(s) must be bonded to the system
neutral, if present. If the system neutral is not resent,
proper precautions must be taken to ensure that the
local earth ground, or building ground, cannot be
severed or removed.
8. VACUUM INTERRUPTER POSITION. Always confirm
the Open/Close position of each interrupter by visually
observing its indicator.
Interrupters, terminal pads, and disconnect blades
on disconnect style models may be energized with
the interrupters in any position.
Interrupters, terminal pads, and disconnect blades
on disconnect style models may be energized from
either side of the IntelliRupter fault interrupter.
9. MAINTAINING PROPER CLEARANCE. Always
maintain proper clearance from energized components.

6 S&C Instruction Sheet 766-540
Overview
WARNING
Serious risk of personal injury or death may result from contact with electric
distribution equipment when electrical isolation and grounding procedures
are not followed. The equipment described in this document must be operated and
maintained by qualified persons who are thoroughly trained and understand any
hazards that may be involved. This document is written only for such qualified
persons and is not a substitute for adequate training and experience in safety
procedures for accessing high-voltage equipment.
WARNING
These instructions do NOT replace the need for utility operation standards. Any
conflict between the information in this document and utility practices should be
reviewed by appropriate utility personnel and a decision made as to the correct
procedures to follow.
The IntelliRupter fault interrupter operates at primary voltage levels. High voltage
may be present during certain disruptions in the wiring system or grounding system
because of a problem in the IntelliRupter fault interrupter itself. For this reason,
access to the fault interrupter should be treated with the same safety precautions
that would be applied when accessing other high-voltage lines and equipment.
Follow all locally approved safety procedures when working on or around the fault
interrupter.
Before attempting to access an existing fault interrupter installation, check
carefully for visible or audible signs of electrical or physical malfunction (do
this before touching or operating the fault interrupter or any other part of the
installation). These warning signs include such things as smoke, fire, open
fuses, crackling noises, loud buzzing, etc. If a malfunction is suspected, treat all
components of the installation, including the fault interrupter and associated
mounting hardware, as though they were elevated to primary (high) voltage.
Whenever you are manually reconfiguring the circuit (for example, during repairs),
follow your company’s operating procedures to disable automatic operation of the
IntelliTeam® SG Automatic Restoration System. This prevents any unexpected
operation of a team member.
You can disable the IntelliTeam SG Automatic Restoration System by selecting the
Prohibit Restoration option in any member of the team to be disabled.
This instruction sheet is used with software version IntelliRupterECInstaller-7.3.x.exe.
The “x” can indicate any number from 0 to 255. Other related software component
version information is found on the Setup>General>Revisions screen.
IntelliRupterECInstaller-7.3.x.exe is the name of the installer le available at the S&C
Automation Customer Support Portal.
Applicable Software
Operating Levers—Hookstick-operated levers are provided for manually opening and
closing the interrupters and for applying and removing a hot line tag. A separate lever,
if provided, blocks tripping on ground overcurrent elements. The integrated disconnect
on disconnect-style models is also hookstick-operated. See Figures 1 and 2 on page 7.
Single-Phase or Three-Phase Tripping—Each operation of the overcurrent circuit-
testing sequence can be congured for either Single-Phase Trip or Three-Phase Trip
mode. The last test operation species whether a Single-Phase Lockout operation is
acceptable or a Three-Phase Lockout operation is required.
IntelliLink® Setup Software—IntelliRupter fault interrupters can be congured and
operated locally from the safety and security of a vehicle parked near the base of the
pole by means of a secure Wi-Fi communication link to a laptop computer.
SCADA Operation—When furnished with a suitable user-specied radio, IntelliRupter
fault interrupters can be operated by a SCADA system using DNP 3.0 Protocol.
IntelliLink Remote Setup Software—IntelliRupter fault interrupters can be
congured and interrogated remotely using a desktop computer over a communication
system using DNP 3.0 Protocol.
Modes of Operation

S&C Instruction Sheet 766-540 7
Operating Levers and Indicators
Figure 1. The 15.5-kV and 27-kV IntelliRupter fault interrupter operating levers and indicators.
Figure 2. The 38-kV IntelliRupter fault interrupter operating levers and indicators.
Disconnect operating lever
Interrupter
OPEN/
CLOSED
indicator
Interrupter
OPEN/CLOSE/READY
lever
HOT LINE TAG and
STATUS indicators
HOT LINE
TAG and
GROUND
TRIP BLOCK
levers
Opening and Closing
Interrupters
READY—In the Ready state, the left and right sections of the OPEN/CLOSE/READY
lever are in the upper position. The IntelliRupter fault interrupter uses the congured
protection prole.
OPEN (a nd LOCK-OPEN)—When the right section of the OPEN/CLOSE/READY lever
is moved to this position, the three interrupter actuators are mechanically opened.
Disconnect
operating
lever
Interrupter
OPEN/
CLOSED
indicator
Interrupter
OPEN/CLOSE/READY
lever
HOT LINE TAG and
STATUS indicators
HOT LINE
TAG and
GROUND
TRIP
BLOCK
levers

8 S&C Instruction Sheet 766-540
Operating Levers and Indicators
A mechanical block is inserted into each actuator mechanism that prevents closing,
even if a malfunction causes the actuator closing coil to be energized. The lever can be
tagged or padlocked in the Open position. Moving the lever back to the Ready position
removes the mechanical block from the actuators.
CLOSE—When the left section of the OPEN/CLOSE/READY lever is moved to the
Close position, the IntelliRupter fault interrupter uses the closing protection prole to
electrically close the interrupters. This is a momentary contact and a spring forces the
lever to return to the Ready position when the lever is released.
Opening Interrupters—Control power is not required. Follow these steps to open the
interrupters:
STEP 1. Insert a hookstick into the hole in the right section of the OPEN/CLOSE/READY
lever. See Figure 3 on page 9.
STEP 2. Pull down on the right lever section. The three interrupters will open.
STEP 3. If desired, tag or padlock the lever in this position. See Figure 4 on page 9.
STEP 4. Check the interrupter OPEN/CLOSE indicator. See Figure 5 on page 9. They
should show an “O” indication.
Closing Interrupters—Control power is required. Follow these steps to close the
interrupters:
STEP 1. Remove the tag or lock on the OPEN/CLOSE/READY lever, if applicable.
STEP 2. If the lever is not already in the Ready position, then insert a hookstick into the
hole in the right lever section and push up on the right lever section. This places
the OPEN/CLOSE/READY lever in the Ready position.
STEP 3. Remove the hookstick and insert it into the hole in the left lever section. To use
the First Closing Prole feature, pull down once on the left lever section. The
three interrupters will close.
STEP 4. To use the Second Closing Prole feature, pull down twice on the left lever
section within the time set for the Manual Lever Closing Delay timer.
STEP 5. Check the interrupter OPEN/CLOSE indicators. See Figures 5 and 6 on page 9.
They should show the “I” indication.

S&C Instruction Sheet 766-540 9
Figure 3. Opening and closing the interrupters with a hookstick.
Ready position
Interrupters
open and are
mechanically
blocked from
closing
Momentary
command to
electrically
close
Operating Levers and Indicators
Figure 4. The interrupters locked open.
Figure 5. The 15.5-kV and 27-kV interrupter OPEN/CLOSED indicator, one at each pole.
Indicator showing
pole closed
Indicator showing
pole open
Figure 6. The 38-kV interrupter OPEN/CLOSED indicator, one at each pole.
Indicator showing
pole closed
Indicator showing
pole open
Interrupters open and
locked, mechanically
blocked from closing

10 S&C Instruction Sheet 766-540
Operating Levers and Indicators
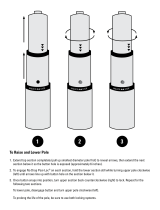
Figure 7. Pull down with a hookstick to manually apply the Hot Line Tag mode or to
manually apply the Ground Trip Block mode.
Manually Applying a Hot Line Tag
Follow these steps to manually apply a hot line tag:
STEP 1. Insert the hookstick into the ring on the HOT LINE TAG lever. See Figure 7.
STEP 2. Pull down on the lever. If desired, tag or lock it in this position. See Figure 8 on
page 11.
STEP 3. Observe the amber HOT LINE TAG indicator on the protection and control
module. See Figure 9 on page 13. When the Hot Line Tag mode is applied, the
indicator will ash amber for a ½ second every 2 seconds.
The Hot Line Tag mode can be set locally using the HOT LINE TAG lever or remotely
using a SCADA or IntelliLink software command. The Hot Line Tag mode is normally
removed using the same method by which it was applied; however, the HOT LINE TAG
lever can be used to remove electronically set tags as well. The Hot Line Tag mode will
only be cleared when all manually set and electronically set tags have been cleared. This
approach satises NESC 442.E requirements, which allow local removal of a remotely
set Hot Line Tag mode if local indication of the electronically set Hot Line Tag mode
is provided.
To locally apply the Hot Line Tag mode, pull down on the HOT LINE TAG lever.
It can be “tagged “ in this position using conventional procedures. See Figure 8 on
page 11. To remove the locally set Hot Line Tag mode, push up on the HOT LINE TAG
lever.
To remove a SCADA- or IntelliLink software-applied Hot Line Tag mode when a local
Hot Line Tag mode has also been applied, push up on the HOT LINE TAG lever. Then,
pull down and push up on the HOT LINE TAG lever once, without delay. To remove a
SCADA- or IntelliLink software-applied tag when a local Hot Line Tag mode has not
been applied, pull down and push up on the HOT LINE TAG lever twice, without delay.
The HOT LINE TAG indicator is located on the protection and control module. See
Figure 9 on page 13. When the Hot Line Tag mode is set, the HOT LINE TAG indicator
flashes for a ½ second every 2 seconds. Any trip in the Hot Line Tag profile will be per-
formed as a Three-Phase Trip operation. When the Hot Line Tag mode is removed,
the HOT LINE TAG indicator is off.
Manual Hot Line Tag

S&C Instruction Sheet 766-540 11
Operating Levers and Indicators
Figure 8. The Hot Line Tag mode manually applied and “tagged.”
The Ground Trip Block mode can be set locally with the GROUND TRIP BLOCK lever
or remotely using a SCADA or IntelliLink software command. The Ground Trip Block
mode can only be removed by the method used to set it and (unlike the Hot Line Tag
mode) the manual lever cannot remove the Ground Trip Block mode set by SCADA or
IntelliLink software.
To locally apply the Ground Trip Block mode, pull down on the GROUND TRIP
BLOCK lever. It can be tagged using conventional procedures. To remove a locally applied
Ground Trip Block mode, push up on the GROUND TRIP BLOCK lever. When the Ground
Trip Block is either set or removed, the STATUS indicator will light at 100% brightness for
10 seconds to indicate the GROUND TRIP BLOCK lever command has been received.
See Figure 9 on page 13.
Manual Ground Trip
Block (if furnished)
Clearing a Manually Applied Hot Line Tag
Follow these steps to clear a manually applied Hot Line Tag mode:
STEP 1. Remove the tag or lock on the HOT LINE TAG lever, if applicable.
STEP 2. Insert the hookstick into the ring on the HOT LINE TAG lever and push up on
the lever.
STEP 3. Observe the amber HOT LINE TAG indicator. When the Hot Line Tag mode is
cleared, the HOT LINE TAG indicator will be off.

12 S&C Instruction Sheet 766-540
Operating Levers and Indicators
Clearing an Electronically Applied Hot Line Tag
A Hot Line Tag mode applied by an IntelliLink command, by a SCADA command, or by
an IntelliLink Remote software command is normally removed using the same method by
which it was applied. However, the hookstick lever can be used to remove electronically
set Hot Line Tag mode as well.
Follow these steps to clear an electronically applied Hot Line Tag mode when it was
applied manually:
STEP 1. Observe the amber HOT LINE TAG indicator on the protection and control
module. See Figure 9 on page 13. When a hot line tag is applied, the indicator
will ash for a ½ second every 2 seconds.
STEP 2. Insert the hookstick into the ring on the HOT LINE TAG lever. Push up on the
lever, then pull down and push up the lever once, without delay. See Figure 7
on page 10.
STEP 3. Observe the HOT LINE TAG indicator. When the Hot Line Tag mode is cleared,
the indicator will be off.
Follow these steps to clear an electronically applied Hot Line Tag mode when it was
not applied manually:
STEP 1. Observe the amber HOT LINE TAG indicator on the protection and control
module. See Figure 9 on page 13. When a Hot Line Tag mode is applied, the
indicator will ash for a ½ second every seconds.
STEP 2. Insert the hookstick into the ring on the HOT LINE TAG lever. Pull down and
push up on the lever twice, without delay. See Figure 7 on page 10.
STEP 3. Observe the HOT LINE TAG indicator. When the Hot Line Tag mode is cleared,
the indicator will be off.
An electronically set Hot Line Tag mode can be removed using the HOT LINE TAG
lever. This procedure satises NESC 442E requirements, which allow local removal of
an electronically set Hot Line Tag mode when local indication of the electronic tag is
provided.
Electronically Applied
Hot Line Tag
Ground Trip Block removed—In this mode, the Overcurrent Protection feature
will operate normally. When a Ground Overcurrent Protection element is configured
for the active profile, it will respond to a fault event. When a Ground Overcurrent
Protection element is not configured in the active profile, removing the Ground Trip
Block mode does not create a ground TCC nor does it enable the element.
Ground Trip Block set—Enabling the Ground Trip Block mode will immediately
disable and reset all selected elements, even when they were timing for a fault when the
GROUND TRIP BLOCK lever was moved. The GROUND TRIP BLOCK lever is effective
for any profile: all General profiles, both Closing profiles, and the Hot Line Tag mode.
The elements available for selection are: Ground, Negative Sequence, and Sensitive
Earth Overcurrent elements. When the GROUND TRIP BLOCK lever is configured to
block circuit testing, circuit testing will immediately terminate. When the test sequence
was in the middle of an open interval when circuit testing was terminated, the sequence
will immediately go to the Lockout state. When the test sequence was not in an open inter-
val when the test sequence was terminated, the next trip will result in a Lockout state.
When the GROUND TRIP BLOCK lever is configured for an alternate General profile, the
designated General profile becomes the active profile unless the unit is testing. When
the unit is testing, the alternate General profile does not become active until the active
test sequence has completed. Closing profiles and Hot Line Tag profiles are not affected
by the position of the GROUND TRIP BLOCK lever. SCADA or IntelliLink software com-
mands to change the General profile while using the Alternate profile are accepted, but the
IntelliRupter fault interrupter will not revert to the commanded general profile until the
GROUND TRIP BLOCK lever has been returned to the unblocked position.

S&C Instruction Sheet 766-540 13
Figure 9. The HOT LINE TAG and STATUS indicators on the protection and control module.
Operating Levers and Indicators
The white STATUS indicator on the protection and control module indicates the
operational status of the IntelliRupter fault interrupter. See Figure 9.
Observe the flashing sequence to determine the operational status of an IntelliRupter
fault interrupter:
Off:
• The IntelliRupter fault interrupter is not powered.
• An internal error occurred and the IntelliRupter fault interrupter is not functioning
correctly.
On continuously:
• The Remote Operation mode is in the Disabled state (when congured by the user).
On continuously for 10 seconds, then ashes for a ½ second every 30 seconds:
• The IntelliRupter fault interrupter has just been energized.
• The Wi-Fi connection has just been terminated.
• The OPEN/CLOSE/READY lever has been moved from the Ready to Open position
(and lock), from the Ready to Close position, or from the Open (and lock) to Ready
position.
• The GROUND TRIP BLOCK lever has been moved to the Set state or to the Removed
state.
Flashes for a ½ second every 30 seconds:
• This is the normal operational state.
Flashes 3 times (½ second on, ½ second off) every 30 seconds:
• The Automatic Restoration mode is in the Ready state. This applies to the Loop
Restoration mode or the IntelliTeam SG mode.
Pulses dim to bright:
• The Wi-Fi connection to a local laptop computer is operating.
Flashes for ½ second every second:
• Any Error state is active.
• The Settings Mismatch state is active.
• The Battery Low, Battery Bad, or Battery Disconnected state is active (when
congured by the user).
Status Indicator

14 S&C Instruction Sheet 766-540
Operating Levers and Indicators
The hookstick-operated three-pole disconnect on disconnect-style models cannot be
operated until the interrupters have been opened and the OPEN/CLOSE/READY lever is
in the Locked position.
Opening the Disconnect
Follow these steps to open the visible disconnect:
STEP 1. Insert a hookstick into the hole in the right section of the OPEN/CLOSE/READY
lever. See Figure 3 on page 9.
STEP 2. Pull down on the right lever section. The three interrupters will open.
STEP 3. If desired, tag or lock the OPEN/CLOSE/READY lever in this position. See
Figure 4 on page 9.
STEP 4. Check the interrupter OPEN/CLOSED indicators. See Figures 5 and 6 on
page 9. They should show a O indication.
STEP 5. Insert the hookstick into the right hole of the DISCONNECT operating lever,
above the O. See Figure 10. Pull down on the lever. The disconnect will open.
STEP 6. If desired, tag or lock the DISCONNECT operating lever in this position. The
interrupters may be operated with the disconnect in the Open position.
Opening and Closing
the Disconnect
The HOT LINE TAG indicator (amber LED) shows the Hot Line Tag mode status. See
Figure 9 on page 13.
Off:
• All Hot Line Tag mode settings have been removed.
Flashes for a ½ second every 2 seconds:
• The Hot Line Tag mode has been applied.
Hot Line Tag
Indicator
Pull down with a hookstick
to close the disconnect
Pull down with a hookstick
to open the disconnect
The disconnect can be tagged
or locked in the open position
Figure 10. The DISCONNECT operating lever in the Locked-Open state.

S&C Instruction Sheet 766-540 15
Operating Levers and Indicators
Closing the Disconnect
Follow these steps to close the visible disconnect:
STEP 1. Remove the tags or locks on the DISCONNECT operating lever and the OPEN/
CLOSE/READY lever, if applicable. See Figure 4 on page 9, and Figure 10 on
page 14.
STEP 2. Insert a hookstick into the hole in the right section of the OPEN/CLOSE/READY
lever. See Figure 3 on page 9.
STEP 3. Pull down on the right lever section. The three interrupters will open.
STEP 4. Insert the hookstick into the left hole of the disconnect operating lever, above
the I. See Figure 10 on page 14. Pull down on the lever. The disconnect will
close.
STEP 5. Insert a hookstick into the hole in the right lever section of the OPEN/CLOSE/
READY lever.
STEP 6. Push up on the right lever section.
STEP 7. Remove the hookstick and insert it into the hole in the left lever section.
STEP 8. To use the First Closing prole, pull down once on the left lever section. The
three interrupters will close.
To use the Second Closing profile, pull down twice on the left lever section (within
the time set for the Manual Lever Closing Delay timer).
STEP 9. Check the interrupter OPEN/CLOSE indicators. See Figures 5 and 6 on page 9.
They should show the “I” indication.

16 S&C Instruction Sheet 766-540
Operation Using IntelliLink® Setup Software
After the IntelliRupter fault interrupter and the computer have been congured and set
up for Wi-Fi communication, connection is automatically accomplished with IntelliLink
Setup Software.
To connect to an IntelliRupter fault interrupter with IntelliLink Setup Software, see
the “Wi-Fi Connection to an IntelliRupter with IntelliLink” section in Instruction Sheet
766-571, “IntelliRupter® PulseCloser® Fault Interrupter: Software Installation.”
Starting IntelliLink
Setup Software
NOTICE
With software later than version 7.3.100, the default passwords for all user
accounts, including the Admin account, must be changed before the IntelliLink
software can connect to and configure a control. See Instruction Sheet
766-530, “IntelliRupter® PulseCloser® Fault Interrupter: Protection and
Communication Setup,” for more information.
After password verication, the Operation screen opens. It presents IntelliRupter fault
interrupter status information and is used to operate the device. See Figure 11. User-
assigned IntelliRupter fault interrupter identication information, the Connected to:
and Location: options, are shown at the top of every screen.
An electronic representation of the IntelliRupter fault interrupter OPEN/CLOSE/
READY lever side is shown. Poles 1, 2, and 3 are displayed left to right (in this case labeled
1, 2, and 3). The upper terminal pads are labeled Y1, Y2, Y3, and the lower terminal pads
are labeled X1, X2, X3.
Phase-to-ground or phase-to-phase voltage at each terminal pad is shown on the
associated pole-unit, and the voltage units are user-assigned.
NOTICE
Because the IntelliRupter fault interrupter voltage sensors are high-impedance
sensing devices, they will indicate a presence of voltage on the Y-side terminals
when the optional disconnect is installed and open. The voltage reading is an
artifact of leakage current resulting from parasitic capacitance; therefore, the
readings can be quite variable from unit to unit and pole to pole. Humidity and other
weather-related conditions add to the variability at a given unit.
Figure 11. The IntelliRupter fault interrupter Operation screen.
Operation Screen

S&C Instruction Sheet 766-540 17
Operation Using IntelliLink® Setup Software
Measured current at each pole-unit is displayed below the lower terminal pad
voltage, along with an arrow indicating the three-phase power-flow direction. When the
arrow points right, current is flowing from the upper to the lower terminal pad. When
the arrow points left, current is flowing from the lower to upper terminal pad. Current
flow is determined by the Three-Phase Directional Power element, so all arrows point
the same way. Reported current is zero and directional arrows are not shown when the
IntelliRupter fault interrupter is in the Open state.
Each interrupter position is shown at the bottom in the Open or Closed state.
When the IntelliRupter fault interrupter has tripped open because of a fault, the Status
box at each pole-unit will show more information:
• TESTING—Displays when the IntelliRupter fault interrupter is in the Open state
and still testing
• TESTING-SEF—Displays when the IntelliRupter fault interrupter is in the Open
state and still testing for a sensitive earth fault
• PICKUP—Displays when one of the elements has exceeded its pickup value and is
timing to trip
Additionally:
–OC displays when timing began because of an Overcurrent condition
–VOLTS displays when timing began because of a Voltage condition
–FREQ displays when timing began because of a Frequency condition
–GOC displays when timing began because of a Ground Overcurrent condition
–NSOC displays when timing began because of a Negative Sequence condition
–SECT displays when timing began because of a Sectionalizing condition
–SEF displays when timing began because of a Sensitive Earth Fault condition
• LOCKED OPEN—Displays when the OPEN/CLOSE/READY lever is locked open
• LOCKOUT—Displays when the IntelliRupter fault interrupter has completed testing
and gone to the Lockout state
Additionally:
–PulseClosing displays when the test using PulseClosing® Technology issued a
Fault condition and has gone to the Lockout state
–OC displays when tripping was because of an Overcurrent condition
–VOLTS displays when tripping was because of a Voltage condition
–FREQ displays when tripping was because of a Frequency condition
–SECT displays when tripping was because of a Sectionalizing condition
–SEF displays when tripping was because of a Sensitive Earth Fault condition
• Close Blkd-Sync Check—Displays when the IntelliRupter fault interrupter was
attempting to close, the Sync Check mode was in operation, and there was a difference in
frequency, voltage magnitude, or voltage angle between the X and Y sides that exceeded
the settings in the Closing prole that resulted in the IntelliRupter fault interrupter
not closing
• Close Blkd Pulse Inop—Displays when the IntelliRupter fault interrupter was
attempting to close and did not, the test using PulseClosing Technology was not
available, and the user setting for Conventional Close If PulseClosing Not
Available mode was set to the No state
• Close Blkd No Energy—Displays when the IntelliRupter fault interrupter was
attempting to close and did not because of insufcient storage-capacitor energy
• Fault-PulseClosing—Displays when the IntelliRupter fault interrupter has completed
the test using PulseClosing Technology and gone to lockout

18 S&C Instruction Sheet 766-540
Operation Using IntelliLink® Setup Software
• SETTINGS MISMATCH—Displays when the settings in the control are incompatible
with the settings in the base memory module, no settings are active, and protection and
restoration functions are not active (This can happen when a control with an updated
setpoint le is placed into an IntelliRupter fault interrupter base that previously had
an older, incompatible setpoint le in the base memory module. Issuing the Apply
settings command will remove this condition, and the previous settings stored in the
base memory module will be overwritten and lost.)
When the Lockout state was caused by an Overcurrent condition, the current occur-
ring at each pole-unit at the time of the initial trip will be shown. A fault flag in the form of
a red lightning bolt will be shown at the pole-unit(s) at which the Overcurrent condition
was sensed by the phase element to indicate the direction of the fault. The fault flags
are also available as DNP Status points that are described in Instruction Sheet 766-560,
“IntelliRupter® Pulse Closer® Fault Interrupter: DNP Points List and Implementation.”
The fault flag will be set in response to an Overcurrent event for any phase that has
timed beyond 20% of trip when an Overcurrent element has tripped, or for any phase that
was timing when a Ground Overcurrent element tripped. When a Ground Overcurrent
element trips and none of the phases are picked up, a fault flag will be set for each phase.
Control Status Indicator
This indicator has the same ashing sequence as the white STATUS indicator on the
protection and control module. See the “Status Indicator” section on page 13. The Control
Status message box displays one of the following:
• OKAY—Displays when the IntelliRupter fault interrupter is functioning normally
• ALARM—Displays when the IntelliRupter fault interrupter is functioning normally
but maintenance is required (for example, a Wi-Fi Intrusion alarm is active)
• WARNING —Displays when some function has been lost, but the IntelliRupter
fault interrupter can function in a limited capacity (For example, a Battery Low or
Battery Bad st a te.)
• ERROR—Displays when the IntelliRupter fault interrupter cannot function properly
and may not be able to open or close
• MAINT MODE—Displays when the IntelliRupter fault interrupter cannot function
properly, and an application program needs to be loaded
Model
This displays the IntelliRupter fault interrupter line-voltage rating.
Disconnect Indicator
On Disconnect-Style IntelliRupter fault interrupters, the message box shows whether the
disconnect is in the Open or Closed state For Non-Disconnect-Style IntelliRupter fault
interrupters, the message box displays “Not Installed.”
Loop Restoration or Communication Enhanced Coordination Status
Indicators
• The Loop Restoration status indicator is displayed when the Loop Restoration
mode is used.
• The Communication Enhanced Coordination status indicator is displayed when
the Communication Enhanced Coordination mode is used.
• The No status indicator is displayed for the Radial Conguration mode.
Loop Restoration Status
Ready Indicator
The Ready status is indicated when:
• The IntelliRupter fault interrupter is in the Closed state and has a
Normally Closed conguration.
• The IntelliRupter fault interrupter is in the Open state, has a Normally Open
conguration, and is not in the Locked-Out mode.

S&C Instruction Sheet 766-540 19
Operation Using IntelliLink® Setup Software
• The OPEN/CLOSE/READY lever is in the Ready position.
• A General prole is active (for example, the Hot Line Tag mode is not applied).
• The Loop Restoration feature is enabled on both the Operation screen and for the
presently active General prole.
• The IntelliRupter fault interrupter is not in an Error state.
Timing Indicator
The Timing indicator shows when the Loop Restoration timers are running. If the
Timing indicator is in the On state, the IntelliRupter fault interrupter is testing and some
of the conditions for the Ready status may not be valid.
Reconfigured Indicator
The Loop Restoration Recongured status is indicated when:
• An IntelliRupter fault interrupter congured for a Normally Closed operation is
opened by a Loop Restoration operation
• An IntelliRupter fault interrupter is congured for a Normally Closed operation but
is serving load in the opposite direction because of a Loop Restoration operation
• An IntelliRupter fault interrupter congured for a Normally Closed operation is
closed by a Loop Restoration operation
Communication Enhanced Coordination (CEC) Status
Ready Indicator
The Ready status is indicated with red text when the IntelliRupter fault interrupter is a
member of a CEC Pair, CEC mode is enabled, the correct General prole is active, and
there are no Error conditions.
To enable CEC status information to the Operations screen, both the Coordination
Mode setpoint in one or more of the general profiles must be set to the Communica-
tion Enhanced Coordination feature found on the Setup>Protection>General Profile
1-4>Direction 1 Current>TCC’s for Coordination screen, and the Mode of Opera-
tion setpoint must be set to the IntelliTeam SG feature found on the Setup>General>
Site-Related screen.
Shift X Indicator
Communication Enhanced Coordination Shift for X Terminal—On when the
IntelliRupter fault interrupter has shifted to the slower curve for the X terminal.
Otherwise, off.
Shift Y Indicator
Communication Enhanced Coordination Shift for Y Terminal—On when the
IntelliRupter has shifted to the slower curve for the Y terminal. Otherwise, off.
OPEN and CLOSE Buttons
These buttons issue an Open or Close command when device operation is authorized.
Single-Phase Operation Buttons
When “Single-Phase Operation Is Active” is displayed and device operation is authorized,
one phase can be manually operated by selecting that phase and clicking on the Open
or Close button.
1-Phase Operation
This function enables or blocks both manual and automatic Single-Phase operations.

20 S&C Instruction Sheet 766-540
Operation Using IntelliLink® Setup Software
Ground Trip
When blocked, this function prevents the IntelliRupter fault interrupter from tripping
because of a Ground Overcurrent element. It is commonly used when work is performed
on one phase, that would be seen as a larger-than-normal load imbalance. This function
does not activate a Ground Overcurrent element if one has not been set up in the active
prole.
Test on Backfeed
When enabled, this function allows the use of PulseClosing Technology or close
testing after an initial trip when there is voltage on both sides of the IntelliRupter fault
interrupter. Testing is usually blocked in applications involving distributed generation
to prevent closing on the other generator if it has not yet tripped ofine. When the Test
on Backfeed feature is blocked, the IntelliRupter fault interrupter does not immediately
go to the Lockout state after tripping but instead waits for the voltage to go away on one
side before resuming the specied time periods in the test sequence. If voltage on both
sides stays on for an interval of 5 minutes, the IntelliRupter fault interrupter goes to the
Lockout state. When congured to block testing, the Test on Backfeed function is only
enforced when all three poles are open; it is not enforced when in a Pole Mismatch state.
Hot Line Tag
The Hot Line Tag mode can be applied by clicking on the On button; the “IntelliLink”
indication will be displayed. When the Hot Line Tag mode is applied by SCADA, the
“SCADA” indication will be displayed. When the Hot Line Tag mode is applied using the
HOT LINE TAG lever, the “Lever” indication will be displayed. When the External Trip
option is present and the Hot Line Tag mode is applied by the External Trip interface,
“External” will be displayed. The “External” indication will not be displayed on the
Operation screen unless the option is present. The Hot Line Tag mode is normally
removed using the same method by which it was applied. However, a second operation
of the HOT LINE TAG lever will clear an electronically set Hot Line Tag mode.
Ground Trip Block Lever
This eld indicates the position of the GROUND TRIP BLOCK lever.
Ground Trip Block External
When the External Trip option is present, this eld indicates the External Interface
Ground Trip Block input is active when “On” is displayed.
Maintenance Mode External
When the External Trip option is present, this eld indicates the External Interface
Maintenance Mode input is active when “On” is displayed.
External Port Linked (R2 control only)
When the External Trip option is present, this eld indicates the External Port data
ow is active when “On” is displayed.
Circuit Testing
When enabled, this function allows for the use of PulseClosing Technology or close testing
after the initial trip. When blocked, the IntelliRupter fault interrupter goes immediately
to the Lockout state after tripping.
Sensitive Earth Trip
When enabled, this function allows the IntelliRupter fault interrupter to trip for a
Sensitive Earth Overcurrent element. This function does not activate a Sensitive
Earth Overcurrent element if one has not been setup in the active prole.
Clear Latched Overcurrent Button
Clears the Latch Overcurrent indications if set when this button is activated.
/