Brandt IF-330X Owner's manual
- Category
- Kitchen & houseware accessories
- Type
- Owner's manual
This manual is also suitable for

MANUAL DE INSTALACIÓN Y USO
Placa
MANUAL DE INSTALAÇÃO E UTILIZAÇÃO
Placa de cozinha
INSTALLATION AND USER MANUAL
Hotplate
GUIDE D'INSTALLATION ET D’UTILISATION
Table de cuisson
INSTALLATIONS – UND BEDIENUNGSANLEITUNG
Kochstelle
IF330 16/4/07 15:17 Página 1

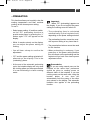
SAFETY GUIDELINES
50
EN
This hotplate is designed for domestic use
only. These hotplates are for cooking food
and drink only, and none of their
components contain asbestos.
Residual heat
The cooking zones of the hotplate may
remain hot for a few minutes after use.
An “H” will appear on the display while
they are still hot. Do not touch these
areas while the “H” is lit up.
Child safety system
Your hotplate has a child safety system
which blocks its functioning during or
after the cooking process (see the
section on using the child safety
system). Remember to unblock the
safety system before using the appliance
again.
For pacemaker and active implant users
The functioning of the hotplate complies
with current electromagnetic interference
regulations, and it also totally complies
with legal requirements (89/336/EEC
directives).
To prevent any interference occurring
between your hotplate and a pacemaker,
the pacemaker must be designed and
regulated in accordance with the
applicable standard.
To this effect we can only guarantee
the conformity of our own product.
With regard to pacemaker conformity
and any incompatibilities that may
arise, please consult the pacemaker
manufacturer or your doctor.
• Electrical hazard
Always ensure that no electrical
appliance cables near the hotplate are in
contact with the cooking zones.
If you should note any damage to the glass
surface of the hotplate, disconnect the
appliance immediately to avoid risk of
electric shock.
To do this, remove the fuses or switch off the
circuit-breaker. Do not use the hotplate
again until the glass top has been replaced.
••RESPECTING THE
ENVIRONMENT
• The packaging materials for this
appliance can be recycled. If you recycle
them you will contribute to protecting the
environment. Please place them in the
municipal recycling bins provided for this
purpose.
• Your appliance also contains a large
number of recyclable materials. It is
marked with this symbol to show that when
the appliance reaches the end of its working
life you should not dispose of it with other
waste. By doing so you will help your
manufacturer to correctly recycle its
materials in compliance with European
directive 2002/96/EC concerning waste
electrical and electronic equipment. Please
contact either your town council or the shop
where you purchased the product to find out
where the nearest collection points for used
appliances are.
• Thank you for helping to protect the
environment.
IF330 16/4/07 15:17 Página 50

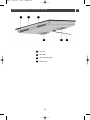
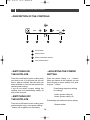
DESCRIPTION OF THE HOTPLATE
51
EN
Air inlet
Air outlet
Vitro-ceramic glass
Power cord
A
B
C
D
B C B
A A D
IF330 16/4/07 15:17 Página 51

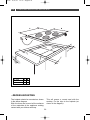
1/ INSTALLING YOUR HOTPLATE
52
EN
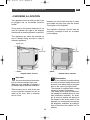
••RECESS-MOUNTING
The hotplate should be mounted as shown
in the above diagram.
Stick the foam seal around all the surfaces
of the underside of the appliance making
contact with your kitchen worktop.
This will ensure a correct seal with the
worktop. Fix the clips to the hotplate (as
shown in the diagram).
IF - 330 AB
With frame 61,5 52
Without frame 61 51
6,4
4cm
4cm
ventilation space
4cm
4cm
49
56
A
B
A
IF330 16/4/07 15:17 Página 52

1/ INSTALLING YOUR HOTPLATE
53
EN
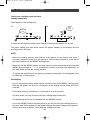
••CHOOSING A LOCATION
Your appliance must be fitted so that it can
be plugged into an accessible electrical
socket.
There must be a minimum distance of 4 cm
(area A) between the edge of the hotplate
and the wall (or partition) beside it or behind it.
This appliance can easily be mounted on
top of a kitchen fitting, an oven or a built-in
domestic appliance.
However you must check that the air inlets
and outlets are kept clear (see the section
“Description of the hotplate”).
The hotplate’s electronic circuits must be
cooled by a draught of fresh air, as shown
in the diagram.
Important:
You must ensure that the hotpla-
te’s air inlets are always kept clear.
Wherever your hotplate is installed, it
will always require sufficient ventilation.
There must be an air inlet at the rear
of your induction hotplate and an air
outlet at the front, with a minimum
size of 5 mm.
Some advice:
If your hotplate is installed above
an oven, its thermal safety devices will
prevent it from being used at the same
time as the oven in pyrolytic mode.
The hotplate is equipped with a safety
system to prevent overheating.
This safety device may be activated if
the hotplate is installed above an oven
with insufficient insulation, for exam-
ple. A series of dashes will appear on
the display in the control areas. If this
happens, we recommend you improve
the hotplate’s ventilation by making a
hole in the side of the cabinet it is ins-
talled in.
40mm min.
50mm
50mm
5mm min.
Hotplate above an oven
Hotplate above a drawer
5mm min.
IF330 16/4/07 15:17 Página 53

1 / INSTALLING YOUR HOTPLATE
54
EN
••ELECTRICAL CONNECTION
These hotplates must be connected to the
mains supply with a plug and socket compl-
ying with publication CIS 60083 or an omni-
polar cut-off device in compliance with the
applicable regulations for electrical
installations.
When the hotplate is powered, or Blue after
an prolonged electricity cut, a code will light
up on the control panel. You should wait
around 30 seconds until this information
disappears before using the hotplate. (It is
normal for this to appear on the display: it is
for use by the after-sales servicing staff if
the need should arise. It is not intended for
the hotplate user.)
400V 2N -16A electrical connection
Separate the 2 phase wires L1 and
L2 before connecting the hotplate.
If the power cord is damaged, for safety
reasons it must be replaced by either the
manufacturer, the after-sales servicing
staff or a similarly qualified person.
If a 400 V 2N three-phase type connection
is being used, in case of hotplate malfunc-
tioning check that the neutral wire is
correctly connected.
N
Brown
L1 L2
Black/grey
Green/
yellow
Green/
yellow
Green/
yellow
Black/grey
Black/grey
Brown
Blue
Brown
Blue
Blue
Neutral Phase Earth
N1 L1 L2
Neutral
N2N1
32A
Neutral Phase
L1
Phase
EarthEarth
220-240V connection
2x230V 2L+2N -16A connection
Separate the wires before connection.
IF330 16/4/07 15:17 Página 54

2 / USING YOUR HOTPLATE
55
EN
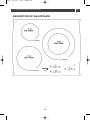
••DESCRIPTION OF THE HOTPLATE
IF330 16/4/07 15:17 Página 55

2 / USING YOUR HOTPLATE
56
EN
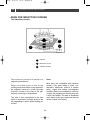
The induction principle is based on a
magnetic phenomenon.
When you stand a pan on one of the
cooking zones and switch on the appliance,
the hotplate’s electronic circuits generate
“induced” currents in the base of the pan,
instantly increasing its temperature.
This heat is then transmitted to the food
which is simmered or brought quickly to the
boil depending on which power setting you
choose.
Pans.
Most pans are compatible with induction
cookers. Only pans made of glass, ear-
thenware, aluminium (without a special
base), copper and certain non-magnetic
stainless steels are unsuitable for induction
cooking. We suggest you choose pans with
a thick, flat bottom. The heat is distributed
much better in this type of pan and the food
will be cooked more evenly.
••PANS FOR INDUCTION COOKING
The induction principle
Inductor
Electronic circuit
Induced currents
A
B
C
A
B
C
IF330 16/4/07 15:17 Página 56

2 / USING YOUR HOTPLATE
57
EN
••WHICH COOKING ZONE
SHOULD BE USED WITH
WHICH PAN?
Some tips:
To check whether a pan is suitable for
induction cooking:
Place the pan on one of the cooking zones
and turn the power setting to 4.
If the display remains steady, the pan is
compatible.
If it flashes, the pan cannot be used for
induction cooking.
You can also use a magnet with the pan. If
it “sticks” to the bottom of the pan, the pan
is suitable for induction cooking.
Cooking zone* Pan size
16 cm 10...18 cm
18 cm 12...22 cm
21 cm 18...24 cm
28 cm 12...32 cm
*varies according to model
IF330 16/4/07 15:17 Página 57

2 / USING YOUR HOTPLATE
58
EN
••SWITCHING ON
THE HOTPLATE
Press the on/off button for the cooking zone
you wish to use. A 0 will flash and you will
hear a beep to indicate that the zone has
been switched on. You can then choose the
desired power setting.
If you do not select a power setting, the
cooking zone will automatically switch off
after a few seconds.
••SWITCHING OFF
THE HOTPLATE
Press the on/off button for the cooking zone
you have been using, or the power setting “-
” button until 0 appears on the display.
••ADJUSTING THE POWER
SETTING
Press the power setting + or – buttons.
When you switch on the hotplate, you can
turn it directly to power setting 12 by pres-
sing the “-” button.
Preselecting the power settings
for cooking:
• button (power setting 6)
• button (power setting 10)
Preselecting the maximum power setting:
• Booster button
••DESCRIPTION OF THE CONTROLS
On/off button.
Power buttons
Power preselection buttons
Time switch buttons
A
B
C
D
A B C D
IF330 16/4/07 15:17 Página 58

2 / USING YOUR HOTPLATE
59
EN
Important:
•When “PC” (preheating) appears on
the display, if you do not adjust the power
setting the cooking zone will switch off.
• The preheating time is calculated
automatically by the hotplate itself,
depending on the power setting selected.
• The preheating function cannot be used
with a power setting of any lower than 6.
• The preselection buttons cannot be used
for this function.
• When preheating is underway, if you
press any of the power setting buttons
this will cancel out the preheating and the
hotplate will go back into classic power
adjustment mode.
Some advice:
If you are using several pans on the
hotplate at the same time, preference
should be given to cooking zones on
different sides of the hotplate. If you use
cooking zones on the same side, using the
booster button in one zone will
automatically limit the power of the other
zone shown on the display. This automatic
limitation also applies to the preheating
function.
••PREHEATING
This function allows you to quickly raise the
cooking temperature and then continue
cooking at the chosen power setting.
To use it:
• Select power setting 12 and then switch
on the “PC” preheating function to
provide extra power by pressing the “+”
button again. “PC” will appear on the
display.
• While it remains steady on the display,
you can adjust the power setting for
cooking.
• You will hear a beep to confirm the
adjustment.
• “PC” and the power setting selected will
alternate on the display. This is the
“preheating” phase.
• At the end of the automatic preheating
cycle, the hotplate display will only show
the cooking power you have preselected.
It is now functioning in classic cooking
mode.
IF330 16/4/07 15:17 Página 59

2 / USING YOUR HOTPLATE
60
EN
••SETTING THE TIME
SWITCHES
Each cooking zone has its own time switch,
which can be started up as soon as the par-
ticular cooking zone is switched on. To start
up a time switch or alter it, press the time
switch “+“ or “-” button. To make it easier to
adjust very long cooking times, you can
turn it directly to 99 minutes by pressing the
“-” button at the start. When the cooking
time has elapsed, a 0 will appear on the dis-
play and a beep will sound. To erase this
information, press any of the control but-
tons for the particular cooking zone. If none
of the buttons are pressed, it will stop auto-
matically after a few moments. To stop the
time switch manually, press the “+” and “-”
buttons at the same time, or use the “-” but-
ton to return to 0.
••USING THE “CHILD SAFETY”
SYSTEM
Your hotplate is equipped with a safety
system which prevents the control buttons
from working the appliance when it is swit-
ched off (for cleaning, for example) or when
cooking is underway (so that your settings
cannot be altered). For safety reasons, only
the “stop” buttons are always enabled, which
means you can switch off a cooking zone
even when it is blocked.
How do I use the blocking system?
Press and hold down the block button until
the LED above it lights up and you hear a
confirmation beep.
Hotplate blocked during functioning
The display for the cooking zones being
used will alternate between the power set-
ting and the block symbol
If you press the power setting or time switch
buttons of the cooking zones in use, the
block LED will light up. It will switch off after
a few seconds.
Only the “stop” button is always enabled.
For the cooking zones that are not in use,
the symbol and the LED light up when
you press the “on/off” buttons. This will
disappear from the display after a few
seconds.
The hotplate is blocked when it is stop-
ped
The LED above the block button is switched
off. If you briefly press this button, it will light
up. The LED lights up when you press an
on/off button of any of the cooking zones.
How do I unblock it?
Press the block button until the LED swit-
ches off. You will hear two confirmation
beeps.
Some advice : Remember to unblock
your hotplate before using it again (see the
section on “Using the Child Safety
System”).
IF330 16/4/07 15:17 Página 60

2 / USING YOUR HOTPLATE
61
EN
••USING THE MEMO BUTTON
This button enables you to store the whole
cooking cycle for a particular dish in the
memory. Only one memory cycle can be
used with the hotplate at any one time.
How to memorise a cooking cycle:
Place the pan on the cooking zone.
Press
briefly
Press
briefly
Press
briefly
2/
1/
3/
4/
Adjust the first power setting
Each new adjustment will be recorded
together with its duration.
The dot will flash while
you are recording the
setting
IF330 16/4/07 15:17 Página 61

2 / USING YOUR HOTPLATE
62
EN
How to use a cooking cycle you have
already memorised:
Place the pan on the cooking zone.
Press
briefly
Press
briefly
A steady dot will appear and the power settings memorised will appear one by one.
The power setting and time switch values will appear steadily on the display, and the
cooking process will begin.
NOTE
• When the cooking process has finished, 0 will appear on the display and every 5
seconds a beep will sound for a few moments. To erase this information, press any of
the control buttons for the “MEMO” cooking zone.
• When you use the MEMO system, you can return to normal functioning at any time (exit
MEMO) by pressing the “-”, “+” or “preselection” buttons to change your adjustment, or
the “stop” button to stop the cooking process.
• To replace the data stored in the memory, proceed as described in the paragraph «How
to memorise a cooking cycle».
Functioning:
• Up to 5 successive cooking stages can be recorded in the same “MEMO” cooking cycle.
After the fifth phase, the word “no” will appear on the display and the stage will not be
recorded.
• Each stage must last a minimum of 10 seconds for it to be recorded.
• The time switch can only be used at the last cooking stage memorised.
• The preheating function is not available with the “MEMO” function.
• Use of the “MEMO” function will take priority if you are using the two cooking zones on
the same side of the hotplate. At high power settings, the power setting of the opposite
cooking zone may be limited. If this happens, a beep will sound.
1/
2/
IF330 16/4/07 15:17 Página 62

2 / USING YOUR HOTPLATE
63
EN
••SAFETY SYSTEMS DURING
FUNCTIONING
Residual heat
After intensive use of the hotplate, the coo-
king zones that have just been used may
remain hot for several minutes. An “H” will
appear on the display while it is still hot. Do
not touch these zones while the “H” is on
the display.
Temperature limiter
Each cooking zone is equipped with a
safety sensor which constantly monitors the
base of the pan. If you accidentally leave an
empty pan on a cooking zone that is swit-
ched on, the sensor will automatically adapt
the hotplate power setting to prevent any
risk of damage to the pan or the hotplate.
“Small objects” safety system
Any single small-sized object (forks, spo-
ons, rings, etc.) placed on the hotplate will
not be detected as a pan. The display will
flash and the power will not be switched on.
Important:
Several small-sized objects placed on
a cooking zone at the same time may be
detected as a pan.
The power setting display will remain on
steadily and it may heat up the objects.
Boilover protection
The hotplate will switch off,
a special symbol (shown on
the right) will appear on the
display or a beep will sound
(depending on the model), if
any of these 3 cases occur:
• A liquid boils over onto the control buttons.
• A wet cloth is placed on the buttons.
• A metal object is placed on the control
buttons.
Clean the hotplate or remove the object and
start up the cooking process again.
Auto-Stop system
If you are cooking and forget to switch off
the hotplate, its “Auto-stop system” safety
function will automatically switch off the
cooking zone you have left on after a preset
time has elapsed (from 1 – 10 hours depen-
ding on the power setting selected). If this
safety system is triggered, the symbols
“AS” or “A” will appear on the control area
display and a beep will sound for around 2
minutes to indicate that the zone has been
switched off. To stop the beep, simply press
any of the control buttons. A double confir-
mation beep will sound.
BIP-BIP
IF330 16/4/07 15:17 Página 63

EN
64
3 / ROUTINE MAINTENANCE OF YOUR HOTPLATE
••HOTPLATE CARE
Avoid any knocks from pans:
The vitro-ceramic glass surface is very
hard-wearing, but it is not unbreakable.
Do not place hot pan lids directly on the
hotplate, as a “suction” effect may occur
which will damage the vitro-ceramic top.
Avoid scraping it with kitchen utensils as
this could eventually cause the decorative
part of the vitro-ceramic top to be worn off.
Do not stand pans on the frame or the
embellisher (depending on the model).
Avoid pans with a rough or bumpy base:
particles may become stuck to them and
cause stains or scratches to the hotplate.
These defects will not cause your hotplate
to break down or function incorrectly, and
they are therefore excluded from the
guarantee.
Do not store maintenance products or
flammable substances in the kitchen fitting
under the hotplate.
Never heat up unopened tins of food as
they could explode. This precaution applies
to all forms of cooking.
Never use aluminium foil for cooking. Never
stand products wrapped in aluminium foil or
on an aluminium tray on the hotplate, as the
aluminium will melt and cause permanent
damage to your cooker.
Never store any objects on top of the
hotplate (accidental switch-on, scratches,
etc. could occur).
Never use a steam cleaner with the
hotplate, as the steam jet could damage it.
IF330 16/4/07 15:17 Página 64

EN
65
3 / ROUTINE MAINTENANCE OF YOUR HOTPLATE
cream
special delicate kitchen
dishwashing sponge
powder
abrasive sponge
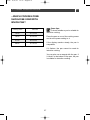
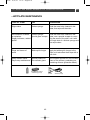
••HOTPLATE MAINTENANCE
TYPE OF STAIN
Slight stains
Accumulation of baked-
on splashes.
Sugary boilovers, melted
plastic.
Rings and traces of
scale.
Shiny metallic stains.
Day-to-day maintenance.
USE
Kitchen sponge
Kitchen sponge.
Special glass scraper
White spirit vinegar.
Special product for
vitro-ceramic glass.
PROCEDURE
Soak the area to be cleaned in hot
water, then wipe off the stain.
Soak the area to be cleaned in hot
water, use a special scraper for remo-
ving the worst of the stain, rub it with
the rough side of a kitchen sponge and
then wipe clean.
Apply hot white spirit vinegar to the
stain, let it take effect then wipe with a
soft cloth.
Use a special product for vitro-ceramic
glass on the surface, preferably one
containing silicone (protective effect).
IF330 16/4/07 15:17 Página 65

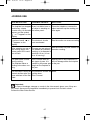
4 / SPECIAL MESSAGES AND TROUBLESHOOTING
66
EN
YOU NOTICE THAT:
The display lights up.
The installation cuts out.
Only one side is working.
The hotplate smells
strange the first time you
use it.
••ON START-UP
POSSIBLE CAUSES:
This is normal.
The electrical connection
of the hotplate is defective.
New appliance.
SOLUTION:
The display will switch off by itself
after 30 seconds.
Check the electrical connection.
See the corresponding section.
Boil a pan of water on each coo-
king zone for _ an hour.
YOU NOTICE THAT:
The hotplate is not wor-
king and the luminous
displays on the button
panel remain off.
The hotplate is not
working and a different
message appears on the
display.
The hotplate is not wor-
king. The symbol
appears on the display.
••ON SWITCH-ON
POSSIBLE CAUSES:
No power is reaching the
appliance. The power
supply or power cord is
defective.
The electronic circuit is
not working correctly.
The hotplate is blocked.
SOLUTION:
Check the fuses and the electric cir-
cuit-breaker.
Call the After-Sales Service.
See the section on using the child
safety system.
IF330 16/4/07 15:17 Página 66

4 / SPECIAL MESSAGES AND TROUBLESHOOTING
67
EN
YOU NOTICE THAT:
The hotplate has stopped
functioning, a beep
sounds every 10 seconds
approx. and the symbol
or F7 appears on the
display.
A series of small or
F7 appears on the
display.
After switching on one of
the cooking zones, the
button panel LEDs conti-
nue to flash.
The pans make a noise
during cooking.
The hotplate makes a
clicking noise when coo-
king.
The fan keeps running for
several minutes after you
have switched off the hot-
plate.
••DURING USE
Important:
In case of breakage, damage or cracks in the vitro-ceramic glass, even if they are
very small, disconnect the appliance immediately to prevent risk of electric shock.
Contact the After-Sales Service.
POSSIBLE CAUSES:
A pan has boiled over or
an object is standing on
the button panel.
The electronic circuits
have overheated.
The pan you are using is
not suitable for induction
cooking, or its diameter is
less than 12 cm (10 cm
for a 16 cm ring).
This is normal with cer-
tain types of pans. It is
caused by the power pas-
sing from the hotplate to
the pan.
The electronic circuits are
cooling down.
This is normal.
SOLUTION:
Clean the hotplate or remove the
object and start up the cooking pro-
cess again.
See the section on recess-mounting.
See the section on pans suitable for
induction cooking.
Nothing can be done about this. It
will not damage either the hotplate
or the pan.
None.
IF330 16/4/07 15:17 Página 67

EN
68
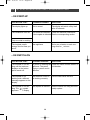
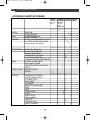
5 / COOKING CHART
SOUPS
FISH
SAUCES
VEGETABLES
MEAT
FRIED FOOD
SUNDRY
BROTHS
THICK STEWS
COURT-BOUILLON
DEEP FROZEN
THICK FLOUR-BASED SAUCE
BUTTER SAUCE WITH EGGS
(BEARNAISE, HOLLANDAISE)
ENDIVES, SPINACH
DRIED VEGETABLES
BOILED POTATOES
RISSOLÉE POTATOES
SAUTEED POTATOES
THAWING FROZEN VEGETABLES
THINLY SLICED MEAT
PAN-FRIED STEAK
GRILLED MEAT (CAST IRON
GRILL)
DEEP-FROZEN
FRESH
PRESSURE COOKER
(AFTER WHISTLING)
STEWED FRUIT
PANCAKES
CUSTARD
MELTED CHOCOLATE
JAM
MILK
FRIED EGGS
PASTA
BABY FOOD
(BAIN MARIE)
HOTPOT
CREOLE RICE
RICE PUDDING
••COOKING CHART BY DISHES
FRYING
BRINGING
TO THE
BOIL
bo 12 11 10 9 8 7 6 5 4 3 2 1
bo 12 11 10 9 8 7 6 5 4 3 2 1
bo 12 11 10 9 8 7 6 5 4 3 2 1
COOKING/
BROWNING
KEEPING
ON THE
BOIL
SIMMERING
COOKING/
STEWING
KEEPING
WARM
IF330 16/4/07 15:17 Página 68
-
 1
1
-
 2
2
-
 3
3
-
 4
4
-
 5
5
-
 6
6
-
 7
7
-
 8
8
-
 9
9
-
 10
10
-
 11
11
-
 12
12
-
 13
13
-
 14
14
-
 15
15
-
 16
16
-
 17
17
-
 18
18
-
 19
19
-
 20
20


Brandt IF-330X Owner's manual
- Category
- Kitchen & houseware accessories
- Type
- Owner's manual
- This manual is also suitable for
Ask a question and I''ll find the answer in the document
Finding information in a document is now easier with AI
Other documents
-
Whirlpool CHI 6640F IN User guide
-
Siemens EH601FK17E/01 User manual
-
-
Siemens ED611BSB5E/01 User manual
-
-
Siemens ED877FA70(00) Operating instructions
-
-
Siemens ED711FA65(00) User manual
-
Bosch PVQ795GA6(00) User guide
-