Signature Hardware 248996 Installation guide

Category
Sanitary ware
Type
Installation guide
SEBASTIAN TUB FAUCET INSTALLATION
GETTING STARTED
BEFORE YOU BEGIN
We recommend consulting a professional if you are
unfamiliar with installing plumbing fixtures. Signature
Hardware accepts no liability for any damage to the
faucet, plumbing, bathtub, floor, or for personal injury
during installation.
Observe all local plumbing and building codes.
Unpack and inspect the faucet for shipping damage. If
any damage is found, contact our Customer Relations
team at 1-866-855-2284.
Ensure that you have gathered all the required
materials that are needed for the installation.
For these instructions, it is assumed that the old
faucet has been completely removed and any
necessary repairs or modifications to the water
supply have been completed.
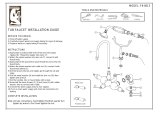
TOOLS AND MATERIALS:
Plumbers
Tape
Thread
Sealant
Adjustable
Wrench
Phillips
Screwdriver
1Sebastian Tub Faucet Installation Instructions
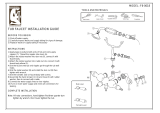
TABLE OF CONTENTS
This faucet is available in multiple installation
configurations. Proceed to the page relative to your
installation type.
Deck-Mount Installation...................................Page 2
Freestanding Installation..................................Page 3
Inner Tub Wall Installation.................................Page 3
Bathroom Wall Installation...............................Page 4
Final Assembly.....................................................Page 5
Basin Wrench
SEBASTIAN TUB FAUCET INSTALLATION
DECK-MOUNT INSTALLATION
3A. Attach the faucet body to the installed deck
couplers. Apply thread sealant or plumbers tape to the
threads before tightening. Tighten firmly using an
adjustable wrench, then finish tightening the lock nuts,
securing the faucet to the deck.
Tip: Wrap the nuts with a soft cloth before using an
adjustable wrench to tighten, to avoid scratching the
decorative finish.
1A. Attach the provided threaded shanks into the
base of each deck coupler, as shown. Apply thread
sealant or plumber’s tape to the threads before
attaching. Tighten firmly.
2A. Insert each of the deck couplers into their
prepared mounting holes. From underneath, slide the
metal washer onto each threaded shank, followed by
the lock nut. Thread the lock nut onto the shank until
hand-tight. Do not fully tighten yet.
2Sebastian Tub Faucet Installation Instructions
STEP 1: FAUCET MOUNTING
PROCEED TO STEP 2 ON PAGE 5 FOR FINAL
ASSEMBLY INSTRUCTIONS.
SEBASTIAN TUB FAUCET INSTALLATION
3Sebastian Tub Faucet Installation Instructions
2C. Insert the faucet into its prepared mounting
holes. From behind, thread the lock nuts onto the
threaded shanks to secure the faucet to the tub.
1C. Attach the wall-mount couplers to the back of the
faucet body. Apply plumber’s tape or thread sealant
to the threads before attaching. Tighten firmly using
an adjustable wrench.
Tip: Wrap the nuts with a soft cloth before using an
adjustable wrench to tighten, to avoid scratching the
decorative finish.
INNER TUB WALL INSTALLATION
PROCEED TO STEP 2 ON PAGE 5 FOR FINAL
ASSEMBLY INSTRUCTIONS.
PROCEED TO STEP 2 ON PAGE 5 FOR FINAL
ASSEMBLY INSTRUCTIONS.
FREESTANDING INSTALLATION
1B. If not already prepared, install the freestanding
tub supply lines into the floor. Refer to the supply line’s
installation instructions for guidance.
2B. Apply plumber’s tape or thread sealant to the
threaded outlets on the back of the faucet body.
Attach the faucet to the installed supply lines.
Tighten firmly using an adjustable wrench.
Tip: Wrap the nuts with a soft cloth before using an
adjustable wrench to tighten, to avoid scratching the
decorative finish.
SEBASTIAN TUB FAUCET INSTALLATION
4Sebastian Tub Faucet Installation Instructions
PROCEED TO STEP 2 ON PAGE 5 FOR FINAL
ASSEMBLY INSTRUCTIONS.
BATHROOM WALL INSTALLATION
2D. Apply plumber’s tape or thread sealant to the
exposed threads of the pipe nipples installed in the
wall. Attach the provided wall mount couplers to the
pipe nipple. Tighten firmly using an adjustable
wrench.
Tip: Wrap the nuts with a soft cloth before using an
adjustable wrench to tighten, to avoid scratching the
decorative finish.
1D. Before faucet installation, two 1/2” pipe nipples
should be installed into the wall as part of rough-in
procedures. The pipe nipple should extend approxi-
mately 1/2” beyond the finished wall to make the
connection to the faucet.
3D. Apply plumber’s tape or thread sealant to the
threaded outlets on the back of the faucet body.
Attach the faucet body to the installed wall mount
couplers. Tighten the lock nut firmly using an adjust
able wrench.
SEBASTIAN TUB FAUCET INSTALLATION
2. Using the provided flexible hose, attach the hand
shower to its outlet on the hand shower cradle. Insert
one of the provided rubber washers into each end of
the hose before attaching. Tighten firmly.
1. Attach the hand shower cradle to the outlet on the
top of the faucet body, as shown. Ensure that the
rubber washer is inserted into the base of the cradle
before attaching. Tighten firmly using an adjustable
wrench.
5Sebastian Tub Faucet Installation Instructions
4. Once installation is complete, turn the faucet on
for appoximately 60 seconds to check for any leaks,
and to ensure that hot and cold water are running
appropriately. Divert water flow to the hand shower
for testing as well.
3. To complete the installation. connect the water
supply lines (not included) to the faucet’s inlets.
Note: This step only applies to deck-mount and inner
tub wall nstallation.
STEP 2: FINAL ASSEMBLY
60 sec
  • Page 1 1
  • Page 2 2
  • Page 3 3
  • Page 4 4
  • Page 5 5

Signature Hardware 248996 Installation guide

Category
Sanitary ware
Type
Installation guide

Ask a question and I''ll find the answer in the document

Finding information in a document is now easier with AI