Page is loading ...
CANDY HOOVER GROUP S.R.L. • Via Privata Eden Fumagalli • 20047 Brugherio Milano Italy
HOBS
USER INSTRUCTIONS
GB
OCAK
KULLANMA KILAVUZU
TR
• HVD 640 C
02
İÇİNDEKİLER
TR
GÜVENLİK UYARILARI
1. Genel Uyarılar
2. Kurulum
3. Ankastre Montaj
4. Elektrik Bağlantısı
5. Gösterim
6. Ocak Pişirme Kaplarıyla İlgili Bilgiler
7. Kullanım
8. Temizlik ve Bakım
9. Sorun Giderme
10. Satış Sonrası Servis
11. Çevrenin Korunması
12. Garanti Belgesi
.............................................................10
.........................................................................10
....................................................................................10
.........................................................................11
......................................................................11
....................................................................................11
.........................................12
.....................................................................................12
......................................................................13
..........................................................................14
................................................................14
...............................................................14
........................................................................15
CONTENT
GB
SAFETY INSTRUCTIONS
1. General Warnings
2. Installation
3. Built-in
4. Electrical connexion
5. Presentation
6. Hob cookware advice
7. Use
8. Cleaning and maintenance
9. Problem solving
10. Aftercare
11 Protection of the environment.
.............................................................05
......................................................................06
.................................................................................06
.......................................................................................06
..................................................................06
.............................................................................07
................................................................07
.............................................................................................07
.........................................................09
........................................................................09
..................................................................................09
..................................................09

Identification Plate (located under the hob's bottom casing)
Tanım etiketi ( Ocağın alt gövdesinde bulunan)
LAYOUT
1
LAYOUT
2
LAYOUT
3
2300
W
1200
+
1000
W
1200
W
1200
W
1800
W
2500
W
1200
W
1200
W
1800
W
1800
W
1800
W
D
Seal / Sünger
GB- It is forbidden to fit the hob above a non-ventilated oven.
TR- Havalandırma sistemi olmayan ankastre fırınların üzerine
ocak kurulumu yasaktır.
03
50
mm
10
mm
mini
500
X
50
500
X
10
PRODUCT CODE / CODE PRODUIT
SERIAL N° / NUMERO DE SERIE /
SERİ NUMARASI
Min.15 cm
04
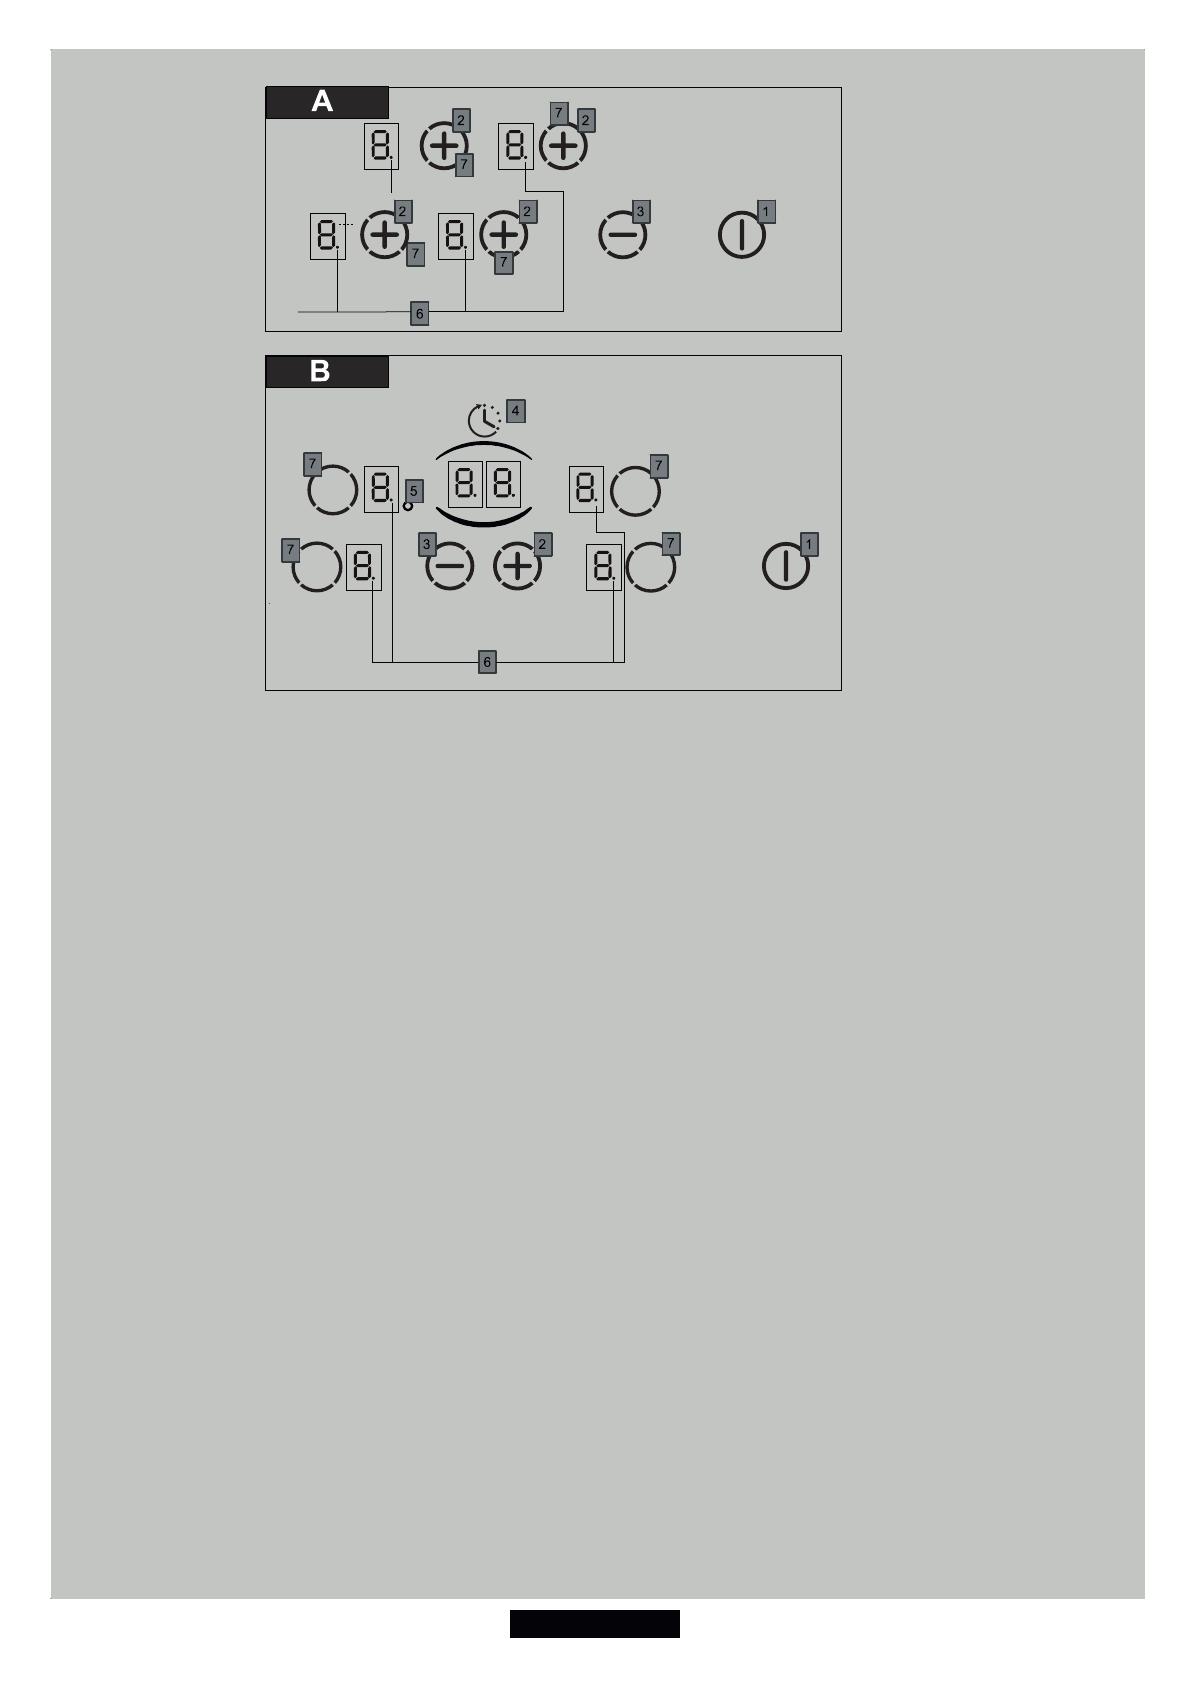
E
According to model / Modele göre
1. ON / OFF - AÇ/ KAPA
2. " + "
3. " - "
4. TIMER / ZAMANLAYICI
5. Additional cooking zone led / İlave pişirme gözü lambası
6. Cooking zone programming indicator / Pişirme gözü programlayıcısı
7. Selection of the zone / Pişirme gözü seçilmesi

READ THE INSTRUCTIONS BOOKLET CAREFULLY TO MAKE THE MOST OF YOUR HOB.
We recommend you keep the instructions for installation and use for later reference, and before
installing the hob, note its serial number in case you need to get help from the after sales service.
• Warning : the appliance and its accessible parts become hot during use. Care should be taken to
avoid touching heating elements.
• Childen under 8 Year of age must be kept away from the appliance unless they are continuously
supervised.
• This appliance can be used by children aged from 8 years and above and persons with reduced
physical, sensory or mental capabilities or lack of experience and knowledge if they have been
given supervision or instruction concerning use of the appliance in a safe way and understand the
hazards involved.
• Children should be supervised to ensure that they do not play with the appliance.
• Cleaning and user maintenance shall not be made by children without supervision.
•Warning : unattended cooking on a hob with fat or oil can be dangerous and may result in fire.
• Never try to extinguish a fire with water, but switch off the appliance and then cover flame e.g.
with a lid or a fire blanket.
• Warning : danger of fire: do not store items on the cooking surfaces.
• Warning : if the surface is cracked, switch off the appliance to avoid the possibility of electric
shock.
• Never use a steam or high pressure spray to clean the appliance.
• This appliance is not intended to be operated by means of an external timer or separate remote-
control system.
• If present do not to stare into halogen lamp hob elements.
• The means for disconnection must be incorporated in the fixed wiring in accordance with the
wiring rules.
• The instructions state the type of cord to be used, taking into account the temperature of the rear
surface of the appliance.
• If the supply cord is damaged, it must be replaced by manufacturer, its service agent or similarly
qualified persons in order to avoid a hazard.
• It is strongly recommended to keep children away from the cooking zones while they are in
operation or when they are switched off, so long as the residual heat indicator is on, in order to
prevent the risks of serious burns.
• Aluminium foil and plastic pans must not be placed on heating zones.
• After every use, some cleaning of the hob is necessary to prevent the build up of dirt and grease.
If left, this is recooked when the hob is used and burns giving off smoke and unpleasant smells,
not to mention the risks of fire propagation.
• CAUTION: In order to avoid a hazard due to inadvertent resetting of the thermal cutout, this
appliance must not be supplied through an external switching device, such as a timer, or
connected to a circuit that is regularly switched on and off by the utility.
• Do not touch the heat zones during operation or for a while after use.
• Never cook food directly on the glass ceramic hob. Always use the appropriate cookware.
• Always place the pan in the centre of the unit that you are cooking on.
• Do not use the surface as a cutting board.
• Do not slide cookware across the hob.
• Do not store heavy items above the hob. If they drop onto the hob, they may cause damage.
• Do not use the hob as a working surface.
• Do not use the hob for storage of any items.
SAFETY INSTRUCTIONS
05 GB
1. GENERAL WARNINGS
This equipment, in the parts intended to come into contact with
food, complies with the regulations laid down in EEC directives
89/109.
By placing the mark on this product, we are confirming
compliance to all relevant European safety, health and
environmental requirements which are applicable in legislation for
this product.
We are constantly striving to improve product quality and as such may
modify appliances to incorporate the latest technical improvements.
06 GB
2. INSTALLATION
Installing a domestic appliance can be a complicated
operation which if not carried out correctly, can seriously
affect consumer safety. It is for this reason that the task
should be undertaken by a professionally qualified person
who will carry it out in accordance with the technical
regulations in force. In the event that this advice is ignored
and the installation is carried out by an unqualified person,
the manufacturer declines all responsibility for any technical
failure of the product whether or not it results in damage to
goods or injury to individuals.
3. BUILT-IN
The furniture in which your hob will be installed and all adjacent
furniture, should be made from materials that can withstand high
temperatures. In addition, all decorative laminates should be fixed
with heat-resistant glue.
Installation (Fig. B / D):
. A watertight seal is supplied with the hob.
Before fitting:
- turn the hob upside down, with the glass surface facing
downwards.
Make sure the glass is protected.
- fit the seal round the hob.
- make sure that it is correctly fitted to avoid any leakage into the
supporting cabinet.
Leave a gap of at least 5 cm between the appliance and the
vertical sides of the adjacent furniture.
If, when installing the hob, the lower hob face is adjacent to an
area normally accessible when handling or cleaning, fit a
partition 1 cm below the base of the hob to avoid any risk of
scorching or damage.
When installing the hood above a cooker top, please consult the
installation instructions advising on the correct distance required
from the cooker top.
If it is installed on a cabinet above a cooker top , the minimum
distance requires is 70 cm.
4. ELECTRICAL CONNECTION
"The installation must conform to the standard directives."
The manufacturer declines all responsibility for any damage that
may be caused by unsuitable or unreasonable use.
Warning:
we cannot be held responsible for any incident or its
consequences that may arise during the use of an appliance
not linked to the earth, or linked to an earth whose continuity
is defective.
• Always check before any electrical operation, the supply tension
shown on the electricity meter, the adjustment of the circuit-
breaker, the continuity of the connection to earth to the
installation and that the fuse is suitable.
• The electrical connection to the installation should be made
according to the rated power of the appliance, this should be
made via an Omni pole cut-out switch.
If the appliance has a socket outlet, it must be installed so that the
socket outlet is accessible.
• The yellow/green wire of the power supply cable must be
connected to the earth of both power supply and appliance
terminals.
• Any queries regarding the power supply cord should be referred
to After Sales Service or a qualified technician.
ATTENTION:
should it be necessary to replace the supply cord, connect the wire
in accordance with the following colours/codes:
BLUE - NEUTRAL (N)
BROWN - LIVE (L)
YELLOW-GREEN - EARTH ( )
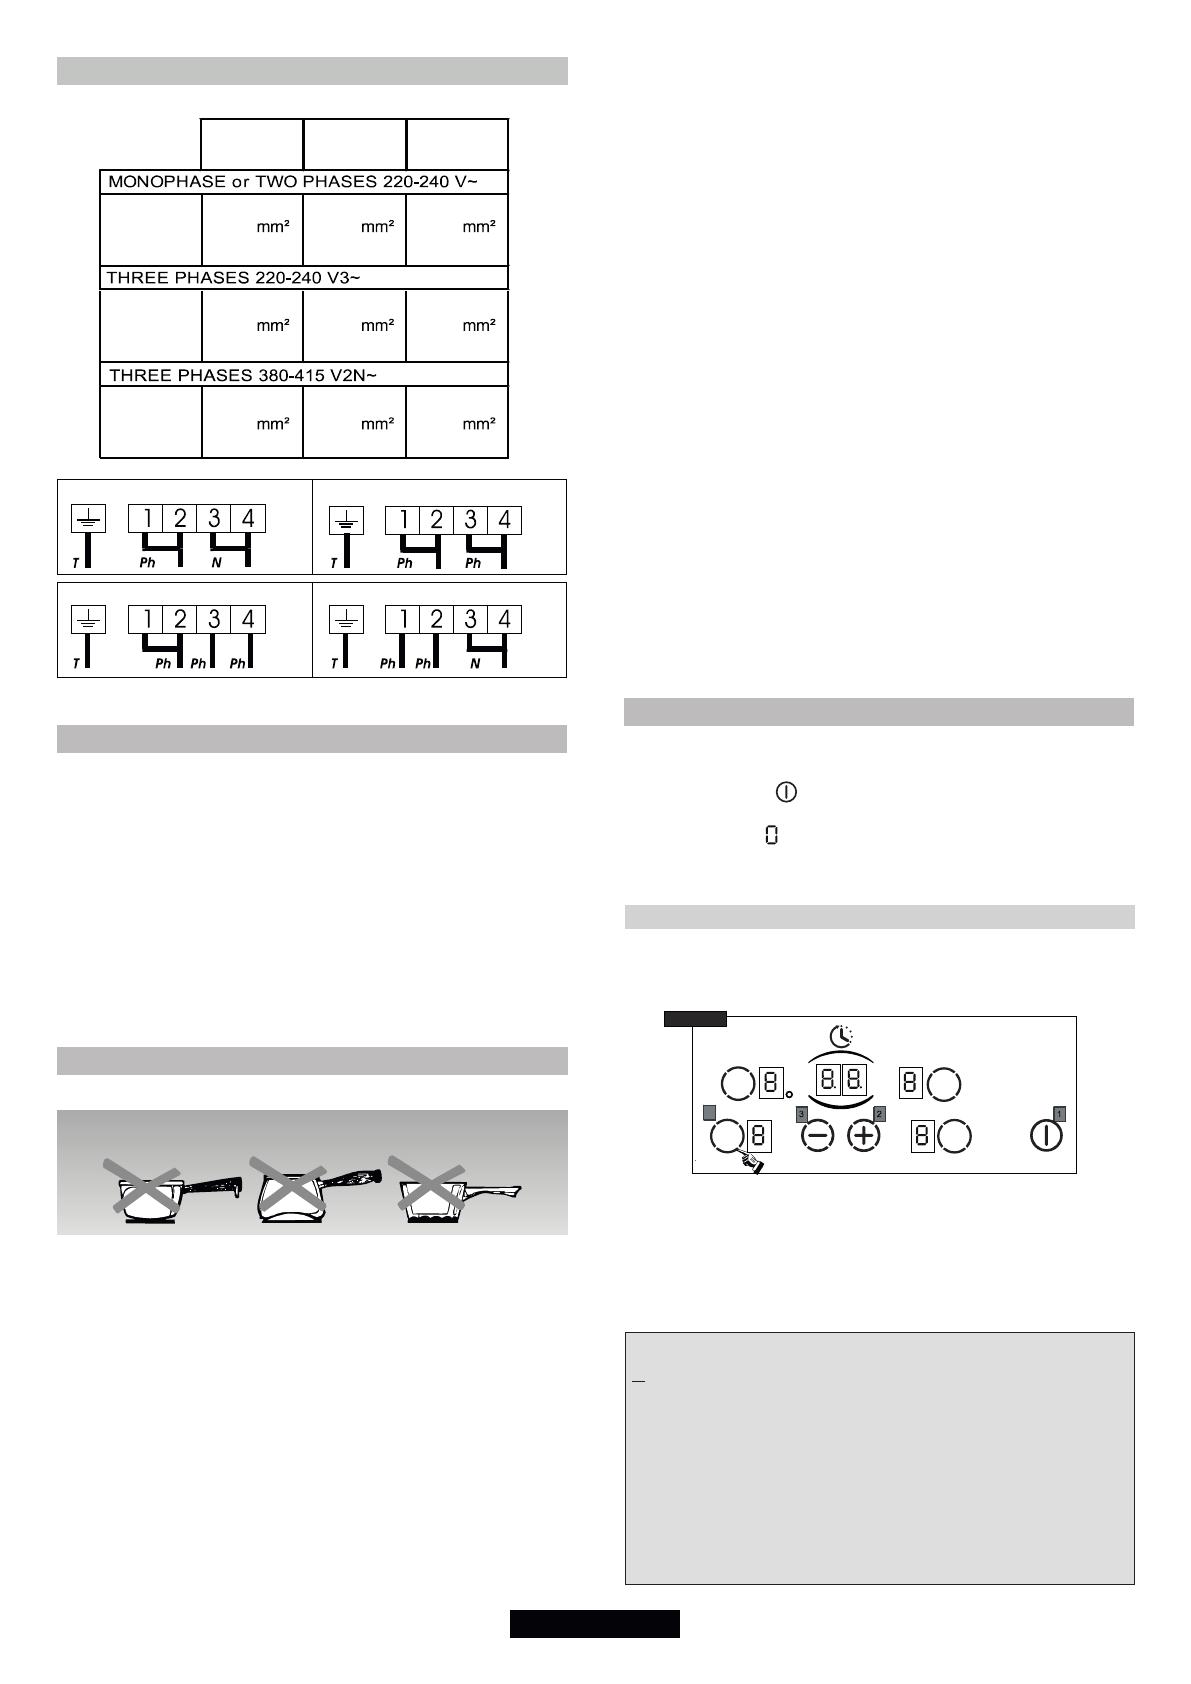
The hob is fitted with a power supply cord which allows it to be
connected only to a power supply of 220-240 V between phases
or between phase and neutral.
. Connect to a socket.
It is however possible to connect the hob to :
. Three phase 220-240 V3~
. Three phase 380-415 V2N~
To proceed to the new connection, you must adhere the
following instructions.
- Before making the connection, make sure that the installation is
protected by a suitable fuse, and that it is fitted with wires of a
large enough section to supply the appliance normally.
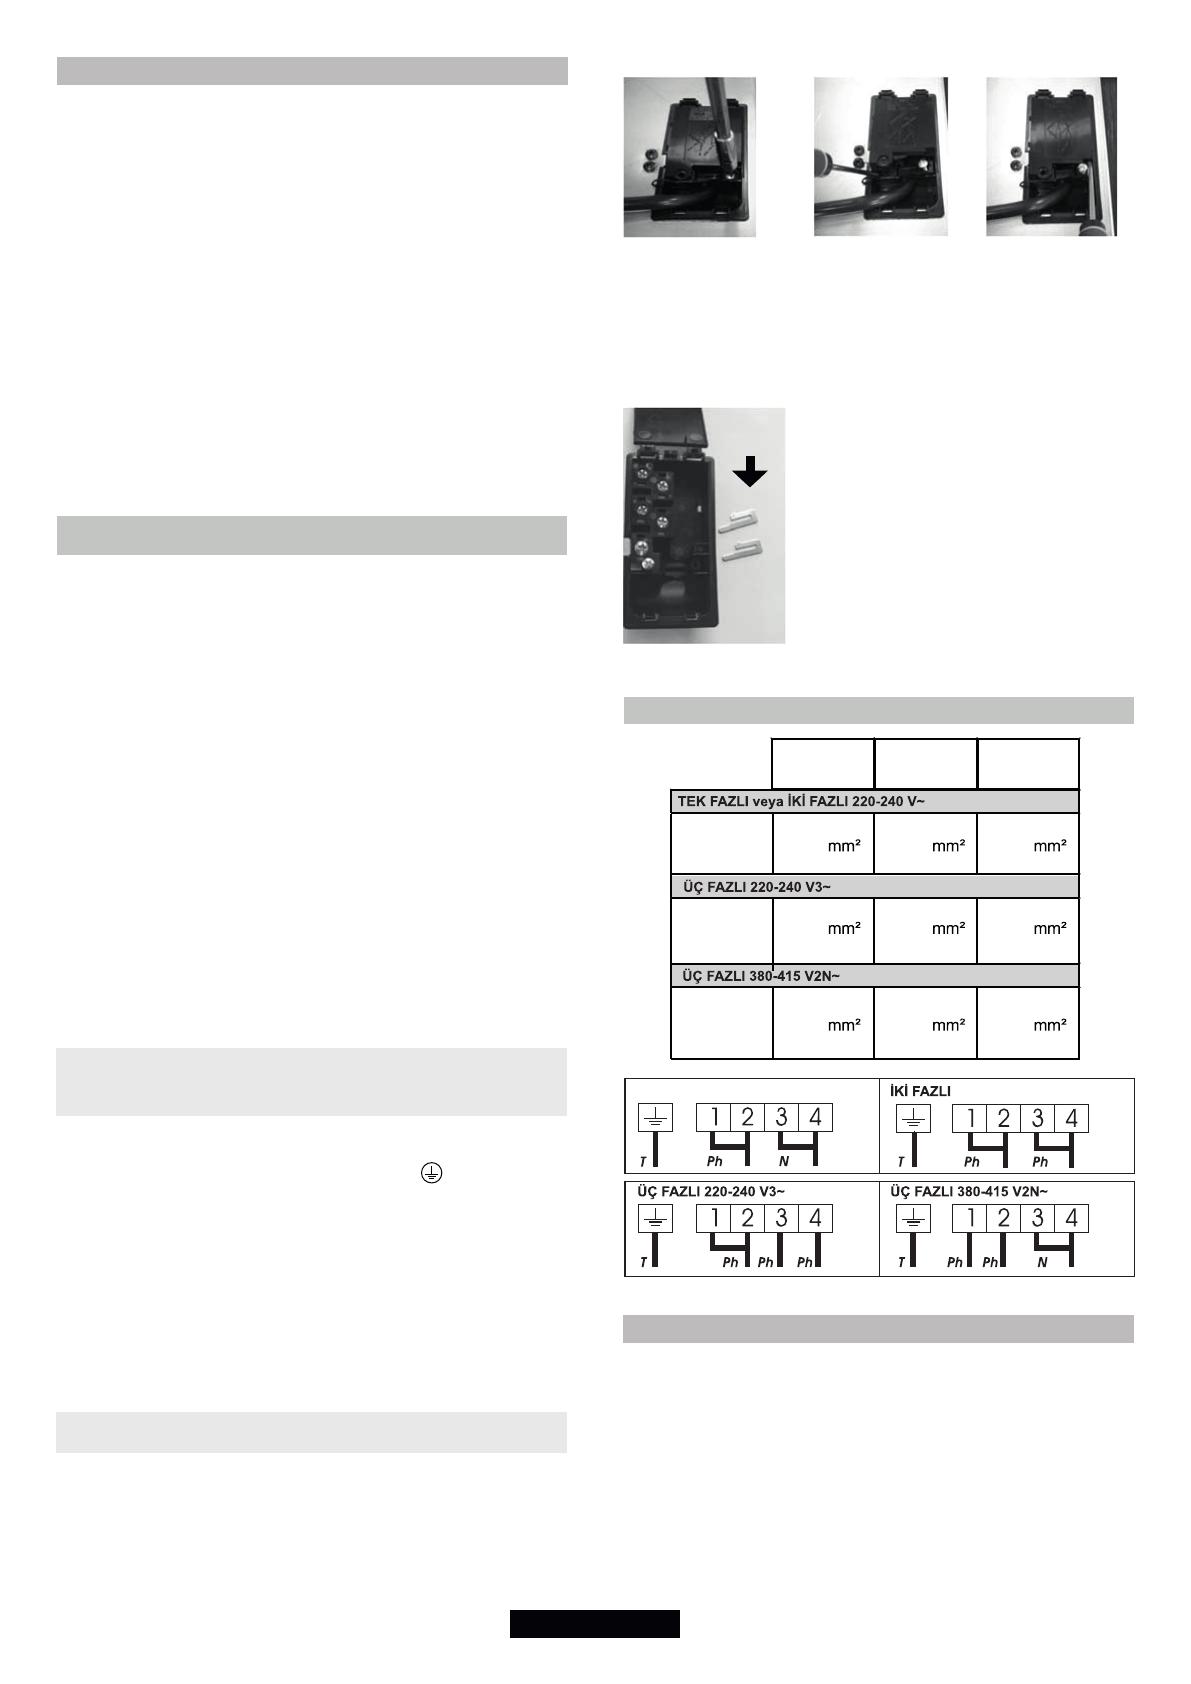
- Turn over the hob, glass side against the work top, taking
care to protect the glass.
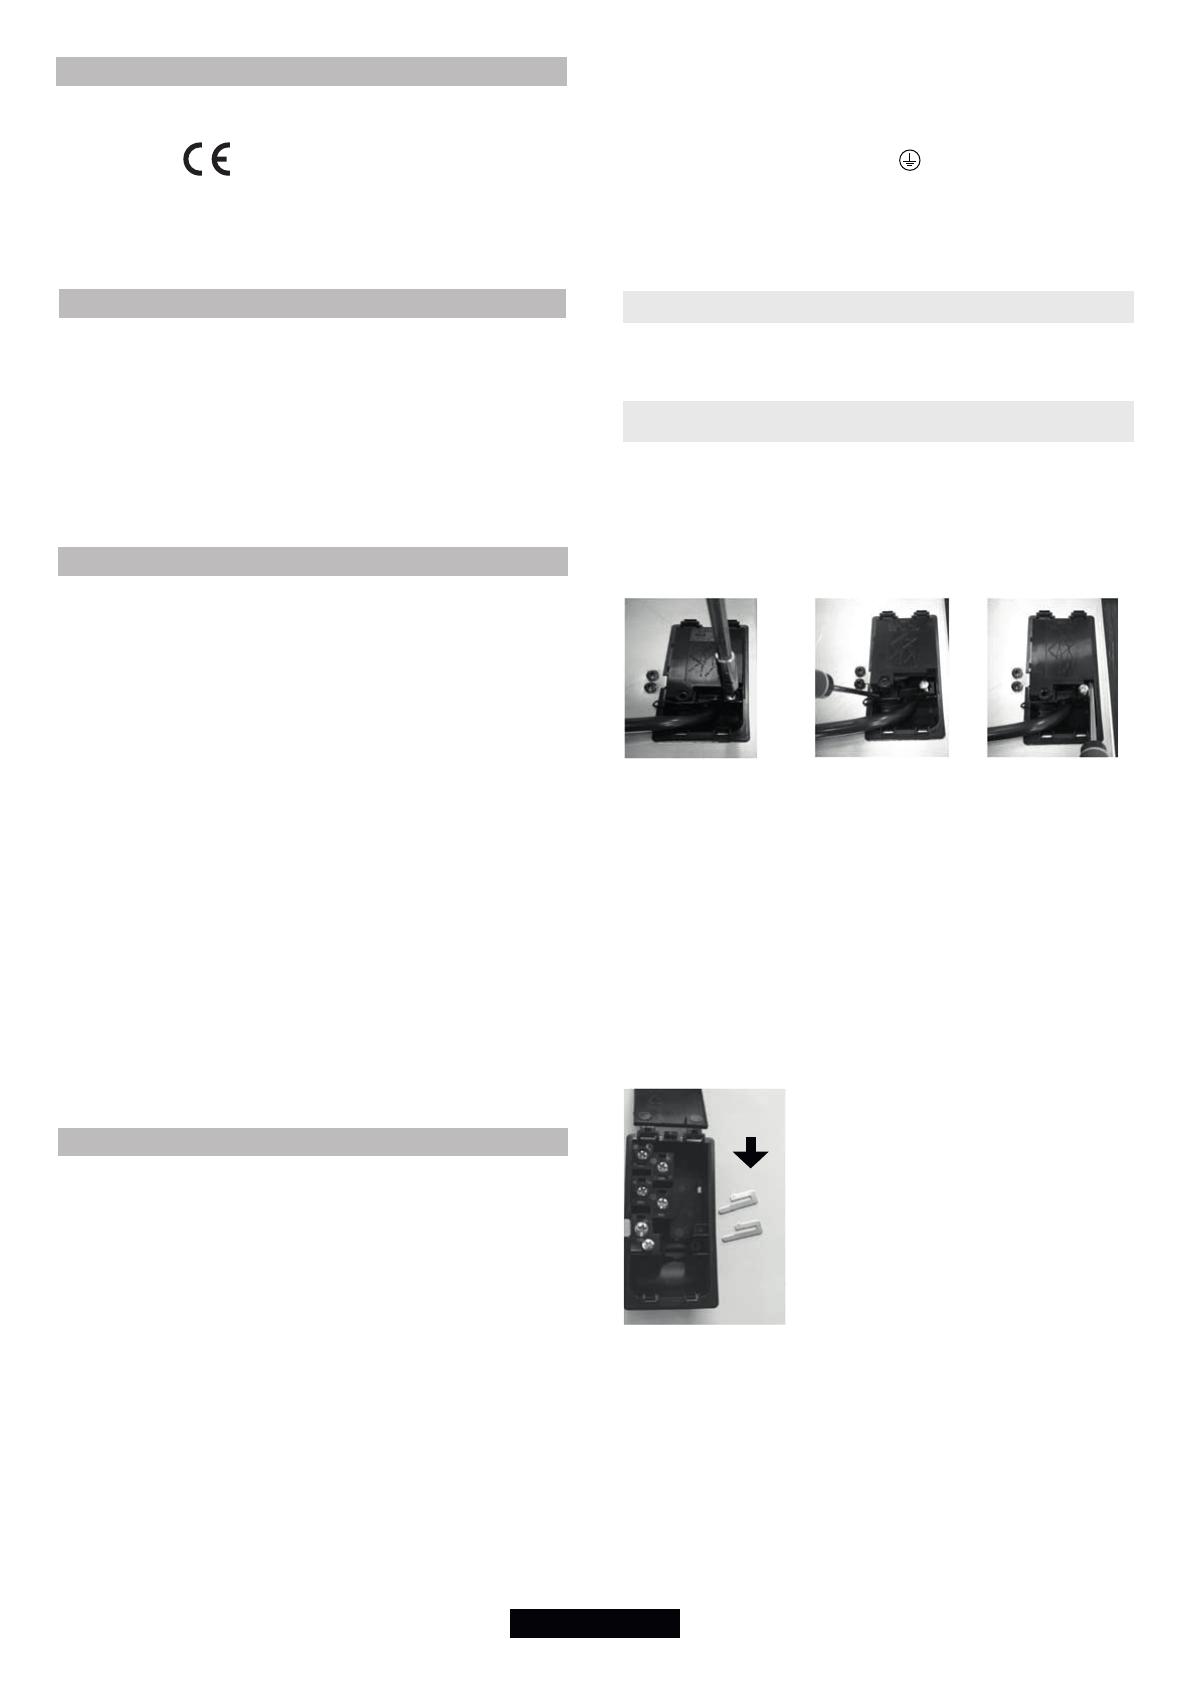
Open the cover in the following sequence:
1 2 3
. unscrew the cable clamp "1",
. find the two tabs located on the sides,
. put the blade of a flat screw-driver in front of each tab "2" e "3",
push in and press,
. remove the cover.
To release the power supplying cord.
. remove the screws retaining the terminal block which contains
the shunt bars and the conductors of the supply cord,
. Pull out the supply cord.
Operations to be carried out to make a new connection :
- Choose the power supply cable in accordance with the
recommendations in the table.
- Pass the power supply cable into the clamp.
Note: make sure the terminal board screws are tight.
SHUNT
- Strip the end of each conductor of the
supply cord on a 10 mm length, by taking in
account the requested length of the cord
for the connection to the terminal block.
- According to the installation and with the
help of shunt bars which you should have
recovered in the first operation, fix the
conductor as shown on the chart.
- Fix the cover.
- Screw the cable clamp.
07 GB
Connection to the terminals on the terminal block
LAY OUT
“ 3 ”
LAY OUT
“ 2 ”
Cable
HO5V2V2F
3x2,5 3x2,5 3x2,5
Cable
HO5V2V2F
4x1,5 4x1,5 4x1,5
Cable
HO5V2V2F
4x1,5 4x1,5 4x1,5
LAY OUT
“ 1 ”
N = Neutral T = Earth
Monophase 220-240 V~
Two phases 220-240 V2~
Three phases 220-240 V3~ Three phases 380-415 V2N~
5. PRESENTATION
• Hilight zone :
a metallic conductor strip is spread uniformly over the whole
surface unit. It is effective within 3 seconds and is suitable for
steady, homogeneous and also sustained cooking.
The glass-ceramic hob benefits from greater heat output which is
generated by the hilight cooking zones thereby accelerating the
cooking process. Modifications to the design of the hob have not
affected the capacity of the glass to withstand high temperatures,
but they have improved controllability.
With the "Sprinter" facility, reduced cooking times of up to 15% can
be achieved, depending upon the method of cooking and the type
of saucepans being used.
6. HOB COOKWARE ADVICE
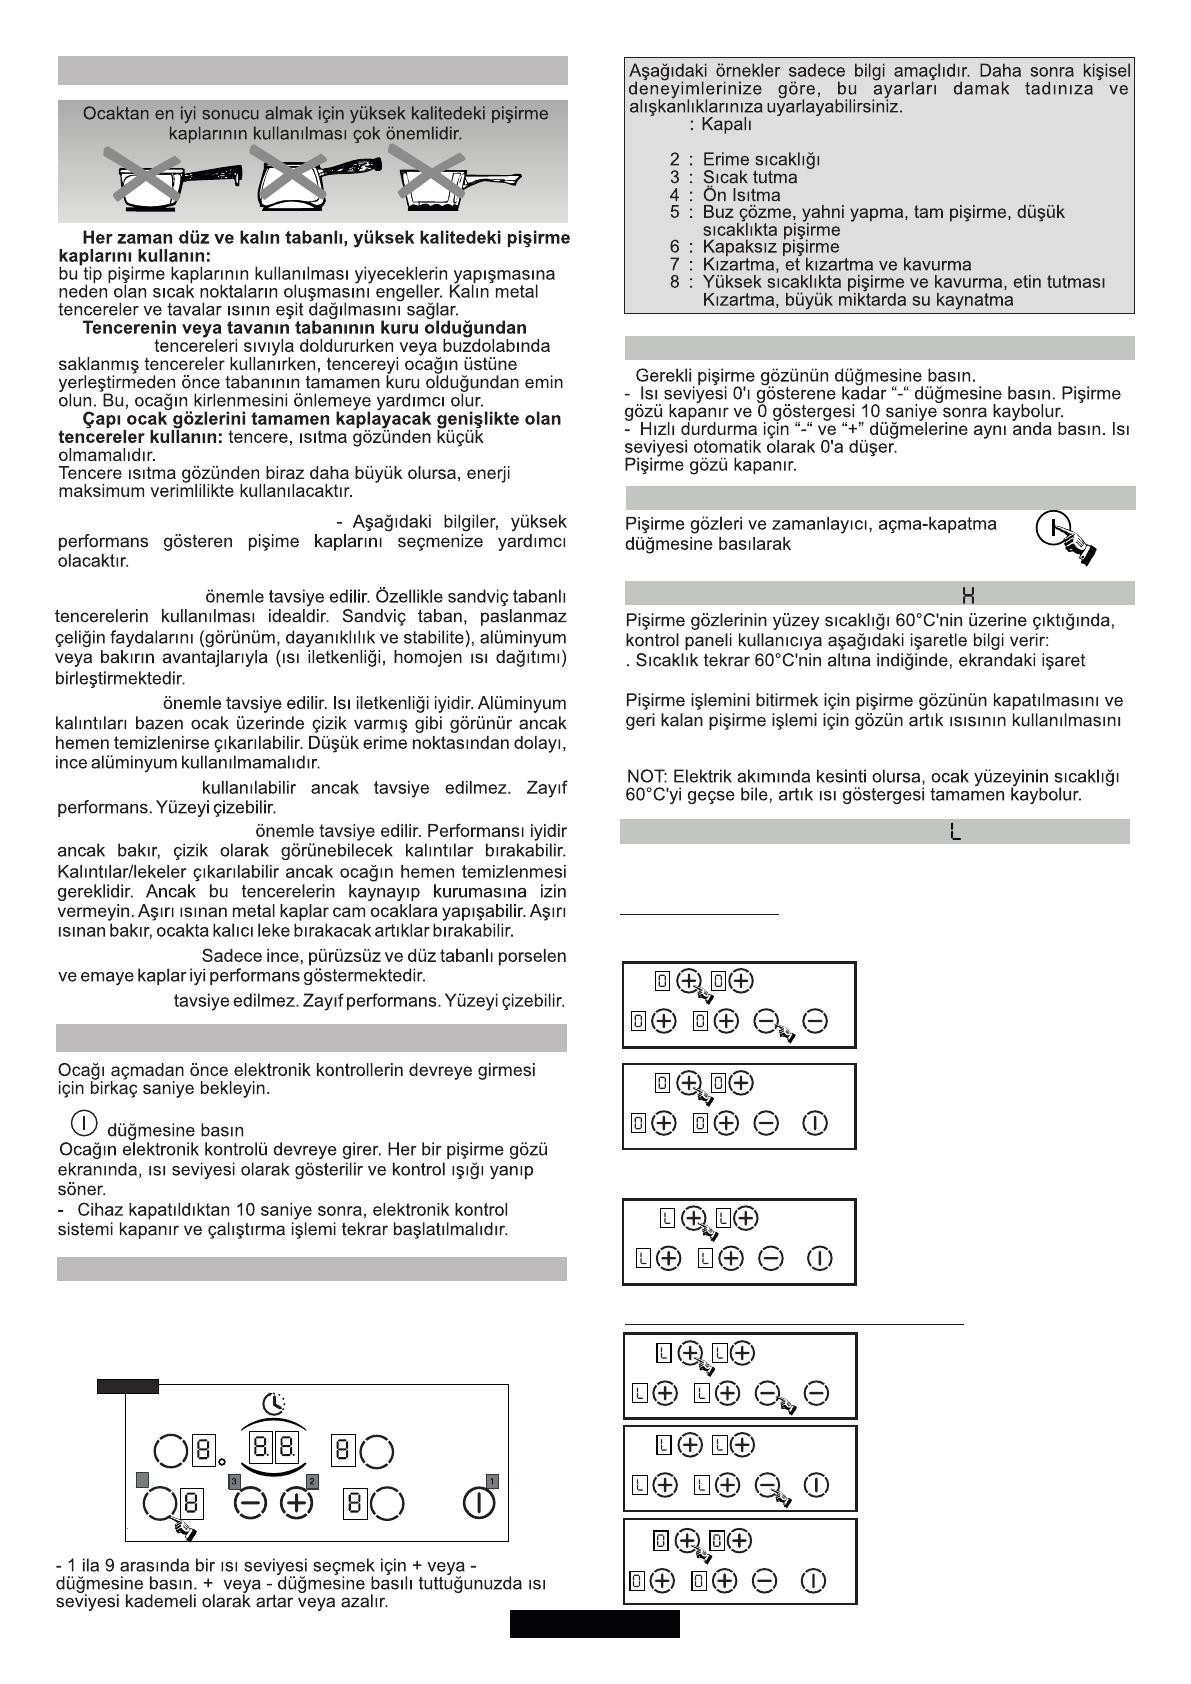
Using good quality cookware is critical for setting
the best performance from your hob.
Always use good quality cookware with perfectly flat and
thick bases :
using this type of cookware will prevent hot spots that cause food
to stick. Thick metal pots and pans will provide an even
distribution of heat.
Ensure that the base of the pot or pan is dry : when filling pans
with liquid or using one that has been stored in the
refrigerator, ensure that the base of the pan is completely dry
before placing it on the hob. This will help to avoid staining the hob.
Use pans whose diameter is wide enough to completely cover
the surface unit : the size of the pan should be no smaller than the
heating area.
If it is slightly wider the energy will be used at its maximum
efficiency.
Ph = Phase
THE CHOICE OF COOKWARE - The following information will
help you to choose cookware which will give good performance.
Stainless Steel : highly recommended. Especially good with a
sandwich clad base. The sandwich base combines the benefits of
stainless steel (appearance, durability and stability) with the
advantages of aluminium or copper (heat conduction, even heat
distribution).
Aluminium : heavy weight recommended. Good conductivity.
Aluminium residues sometimes appear as scratches on the hob,
but can be removed if cleaned immediately.
Because of its low melting point, thin aluminium should not be
used.
Cast Iron : usable, but not recommended. Poor performance.
May scratch the surface.
Copper Bottom / stoneware: heavy weight recommended.
Good performance, but copper may leave residues which can
appear as scratches. The residues can be removed, as long as
the hob is cleaned immediately. However, do not let these pots
boil
dry. Overheated metal can bond to glass hobs. An overheated
copper pot will leave a residue that will permanently stain the hob.
Porcelain/enamel : Good perfomance only with a thiny smooth,
flat base.
Glass-ceramic : not recommended. Poor performance. May
scratch the surface.
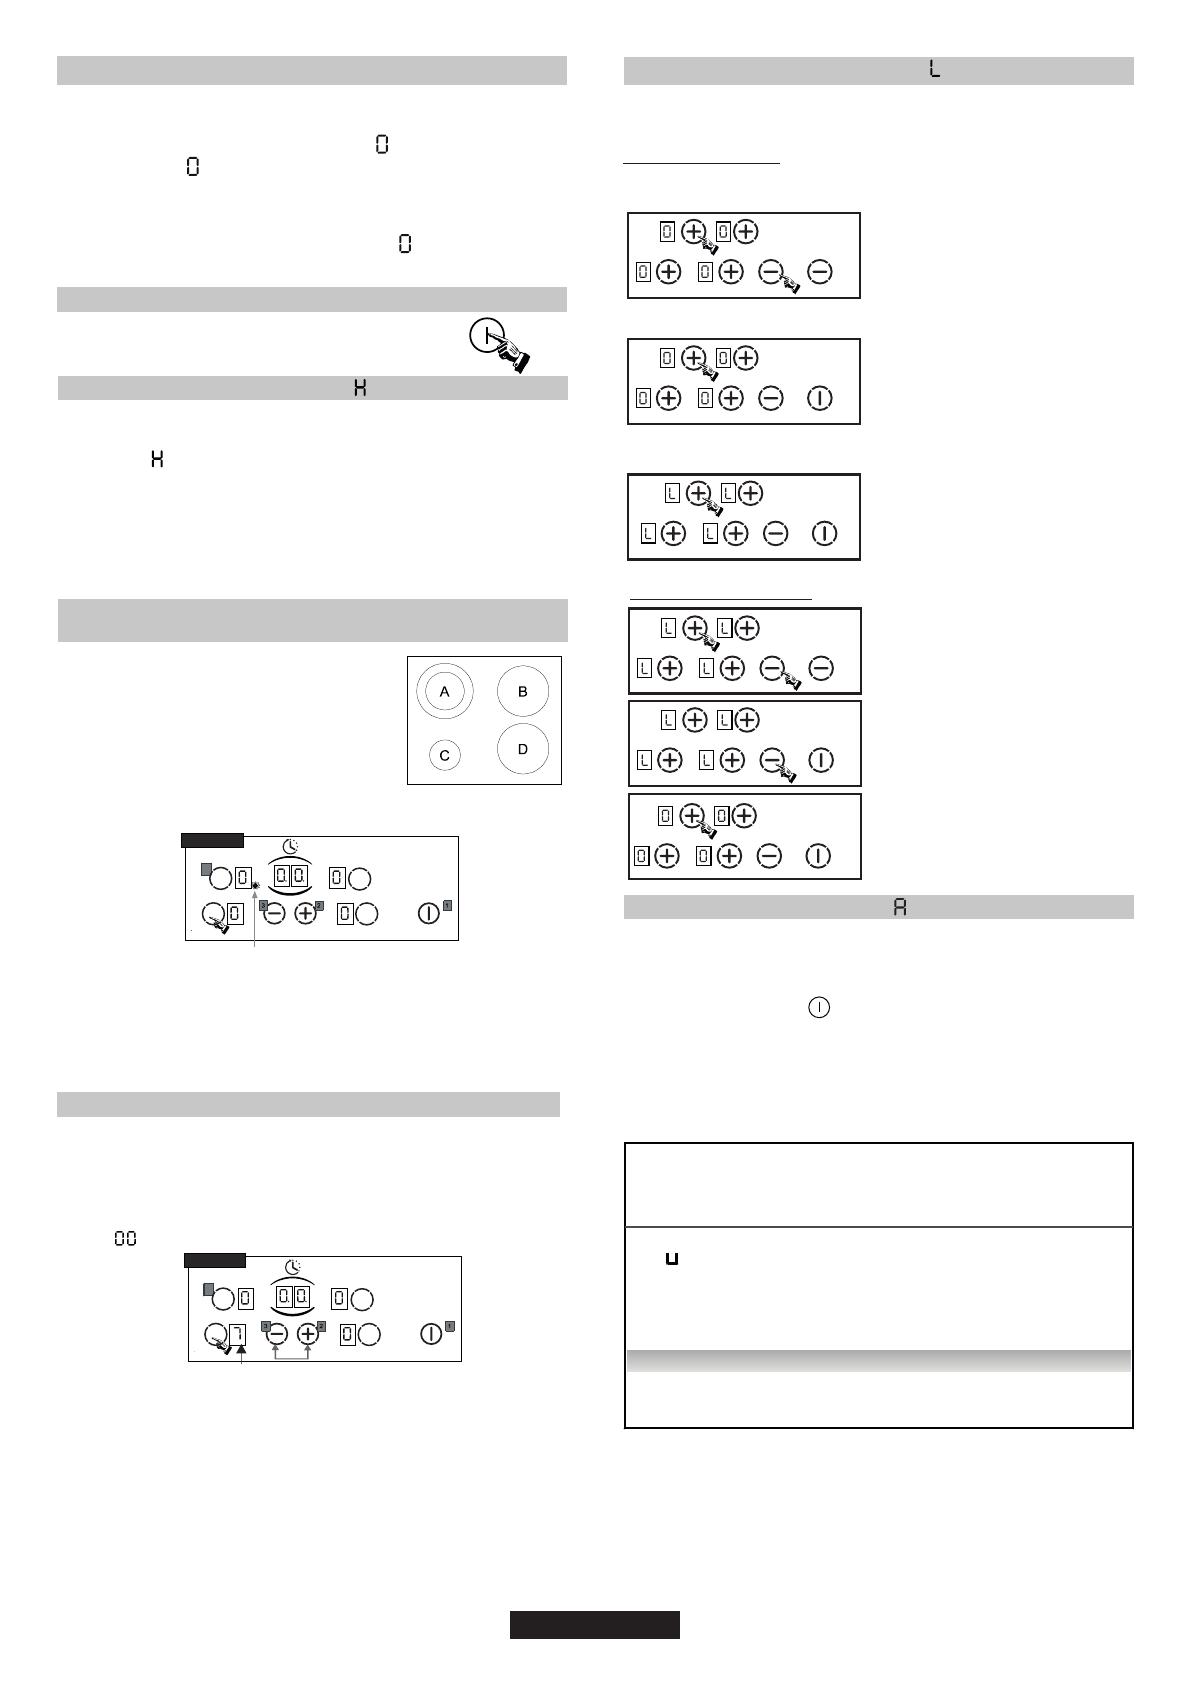
7. USE
• After powering up the hob, wait some seconds to activate the
electronic controls.
- Press the button . The corresponding indicator lights.
Electronic control of the hob is activated : in each display zone, the
heat level shows .
- After 20 seconds whithout use, the electronic control goes off and
the starting operation has to be repeated.
. STARTING A COOKING ZONE
- Press the selection button of the required cooking zone.
The "0" of the corresponding zone stays lighted when the light of the
others "0" is reduced.
- Press the - or + button to select a heat level between 1 and 9.
Hold down the + or - button and the heat level increases or
decreases gradually.
The following examples are for information only. Personal experience
should then let you adapt these settings to your taste and habits.
0 : Off
U -1 : Dissolving
2 : Melting
3 : Keeping hot
4 : Heating up
5 : Thawing, stewing, full cooking, low temperature
cooking
6 : Cooking without lid
7 : Frying, meat browning and roasting
8 : High temperature cooking and roasting, seizing
9 : Frying, boiling large quantities of water.......
TYPE
B
77
08 GB
STOPPING A COOKING ZONE
- Press the selection button of the required cooking zone.
- Press the "-" button to display heat level . Now the zone goes
off, the indicator goes off after 10 seconds.
- To stop rapidly, press simultaneously the "-" and the
respective cooking zone selection.
The heat level automatically goes down to . The cooking
zone goes off.
GENERAL STOP
The cooking zones and the timer can be stopped
at any moment by pressing the On-Off button.
RESIDUAL HEAT INDICATOR
The control panel tells the user when the surface temperature of
the cooking zones exceeds about 60°C, by the following
displaying: . When the temperature goes back below 60°C, the
display goes off.
For ending the cooking, we advise switching off the cooking zone
and using the residual heat of the zone to finish cooking gently.
N.B. After a cut in the current, the residual heat indicator
disappears completely, even if the surface temperature exceeds
60°C.
. OPERATING THE ADDITIONAL COOKING ZONE
(TWO ZONES)
The cooking zone with two zones is
fitted certain models .............................
>
It is active in totality when the cooking zone is in function ; the
control led of the additional cooking is displayed.
To desactivate the additional cooking zone :
- Press again on the additional cooking zone touch. The Led goes
off when it is desactivated.
To re-activate the additional cooking zone :
- Press on the cooking zone button. The Led is active again.
PROGRAMMING A COOKING ZONE (according to the model)
Every cooking zone can be programmed for a maximum time of 99
minutes.
- Start the required zone by following the previous instructions.
- Press on simultaneously the touch "-" and "+" to activate the
timer, " " is displayed.
- Press again on the "+" button to select a time in minutes
between 0 and 99 minutes or press on the "-" button to decrease
the time between 30 minutes and 0. The timer control led near
the level is displayed.
--> the programmed time can be modified at any moment.
When the time is run, the cooking zone goes off automatically and
an audible beep sounds for 1 minute, press a button to stop it.
--> If any zone is activated, the timer can be used alone, as
reminder, it will ring at the end of the programmed time.
Example
LED
TYPE
B
LED
7
TYPE
B
7
LOCKING BUTTON OPERATION
. FAST HEATER OPERATION
Every cooking zone on the hob is equipped with a fast heater for
raising the cooking zone’s temperature faster.
Starting the fast heater
- Press the on/off button .
- Start the required zone, press the " + " button to obtain position
"9", release the button briefly and press again the " + " button ;
the display alternates showing "A" "fast heater" and "9" heat
level.
- If necessary reduce to the required heat position, the display
alternates showing "A" "fast heater" and the new heat position.
Cooking
position
Power
released
(%)
Time
of
fast
heater
(minutes)
Maximum
operating
time
before
automatic
cut
off*
0
:
0
%
:
0
:
0
H
: 2.5
% : 0 : 2
H
1
:
3
%
:
1
:
6
H
2
:
6
%
:
3
:
6
H
3
:
11
%
:
5
:
5
H
4
:
16
%
:
6,5
:
5
H
5
:
19
%
:
8,5
:
4
H
6
:
32
%
:
2,5
:
1,5
H
7
:
45
%
:
3
,
5
:
1
,
5
H
8
:
65
%
:
4,5
:
1,5
H
9
:
100
%
: 0
:
1,5
H
E.g. 1800 W zone at position 6 = 32% of 1800 W power released
When the "Fast heater" is on, the zone supplies 1800 W power for 2.5
minutes, and adjusts to 576 W after this time.
* For increased safety, the cooking zones cut off automatically if they
are left on too long. The cut off depends on the heat level used.
To desactivate the fast heater
- Switch on the cooking zone, press the " - " button to come back
to a normal heat level, decrease to the heat level required or to
« 0 " to stop the cooking zone.
The locking function prevents the accidental activation of the hob
by children, and it is also useful during the cleaning of the hob.
TO LOCK THE HOB. (Example for hob with 4 zones)
Press the ON/OFF button and then (only after this operation the
child lock can be activated)
Press simultaneously the minus key
and the top left selection key, until
you hear the beep sound; if you do
not feel a beep sound, switch OFF
the hob and repeat all the operation
of setting.
After press again the top left
selection key.
This operation procedure must take
place within 10 sec, and no other key
than the one described above may
pressed; otherwise the input will be
cancelled for not being completed.
All displays show an “L” for
LOCKED (=child lock against
unintentional activation) – if a
cooking zone is at stage “hot, “L”
and “H” appear alternately.
TO UNLOCK THE HOB
For unlock the control unit, it is
necessary that the minus key and
the top left selection key (cooking
zone back left) are pressed
simultaneously and subsequently
pressing the minus key again.
The looking is now removed and the
Touch Control returns to STAND BY
mode.

8. CLEANING AND MAINTENANCE
. Before carrying out any maintenance work on the hob, allow it
to cool down.
. Only products, (creams and scrapers) specifically designed for
glass ceramic surfaces should be used. They are obtainable
from hardware stores.
. Avoid spillages, as anything which falls on to the hob surface
will quickly burn and will make cleaning more difficult.
. It is advisable to keep away from the hob all substances which
are liable to melt, such as plastic items, sugar, or sugar-based
products.
MAINTENANCE:
- Place a few drops of the specialised cleaning product on the
hob surface.
- Rub any stubborn stains with a soft cloth or with slightly damp
kitchen paper.
- Wipe with a soft cloth or dry kitchen paper until the surface is
clean.
If there are still some stubborn stains:
- Place a few more drops of specialised cleaning fluid on the
surface.
- Scrape with a scraper, holding it at an angle of 30° to the hob,
until the stains disappear.
- Wipe with a soft cloth or dry kitchen paper until the surface is
clean.
- Repeat the operation if necessary.
A FEW HINTS:
Frequent cleaning leaves a protective layer which is essential to
prevent scratches and wear. Make sure that the surface is clean
before using the hob again. To remove marks left by water, use a
few drops of white vinegar or lemon juice. Then wipe with
absorbent paper and a few drops of specialised cleaning fluid.
The glass ceramic surface will withstand scraping from flat-
bottomed cooking vessels, however, it is always better to lift them
when moving them from one zone to another.
NB:
- Do not use a sponge which is too wet.
- Never use a knife or a screwdriver.
- A scraper with a razor blade will not damage the surface, as long
as it is kept at an angle of 30°.
- Never leave a scraper with a razor blade within the reach of
children.
- Never use abrasive products or scouring powders.
• The metal surround : to safely clean the metal surround wash
with soap and water, rinse, then dry with a soft cloth.
30° Maxi
09 GB
9. PROBLEM SOLVING
The cooking zones do not simmer or only fry gently
Only use flat-bottomed pans. If light is visible between the pan
and the hob, the zone is not transmitting heat correctly.
The pan bottom should fully cover the diameter of the selected
zone.
The cooking is too slow
Unsuitable pans are being used. Only use flatbottomed
utensils, that are heavy and have a diameter at least the same
as the cooking zone.
Small scratches or abrasions on the hob's glass surface
Incorrect cleaning or rough-bottomed pans are used; particles
like grains of sand or salt get between the hob and the bottom
of the pan. Refer to the "CLEANING" section; make sure that
pan bottoms are clean before use and only use smooth
bottomed pans. Scratches can be lessened only the cleaning is
done correctly.
Metal marks
Do not slide aluminium pans on the hob. Refer to the cleaning
recommendations.
You use the correct materials, but the stains persist.
Use a razor blade and follow the "CLEANING" section.
Dark stains
Use a razor blade and follow the "CLEANING" section.
Light surfaces on the hob
Marks from an aluminium or copper pan, but also mineral, water
or food deposits; they can be removed using the cream cleaner.
Caramelisation or melted plastic on the hob.
Refer to the "CLEANING" section.
The hob does not operate or certain zones don't work
The shunts are not positioned correctly on the terminal board.
Have a check made that the connection is done he control panel
is locked. Unlock the hob.
The hob does not cut off.
The control panel is locked. Unlock the hob.
The hob stops automatically
A spill covers at least two buttons for more than 10 seconds; the
hob switches to safety, and an audible beep sounds. Clean up
the spill or remove the object.
The cooking zones stop automatically if they are left
on for too long. Refer to the section, "operating time".
Frequency of on/off operations for cooking zones
The on-off cycles vary according to the required heat level:
- low level: short operating time,
- high level: long operating time.
"H" display, residual heat indicator, blinking.
The electronic temperature is too high. A technician should
verify the fitting in compliance with the recommendations.
10. AFTERCARE
Before calling out a Service Engineer please check the
following:
— that the plug is correctly inserted and fused;
If the fault cannot be identified switch off the appliance — do not
tamper with it — call the Aftercare Service Centre. The appliance
is supplied with a guarantee certificate that ensures that it will be
repaired free of charge at the Service Centre.
11. PROTECTION OF THE ENVIRONMENT
This appliance is marked according to the
European directive 2012/19/EU on Waste
Electrical and Electronic Equipment (WEEE).
WEEE contains both polluting substances
(which can cause negative consequences for
the environment) and basic components
(which can be re-used). It is important to have
WEEE subjected to specific treatments, in
order to remove and dispose properly all
pollutants, and recover and recycle all materials.
Individuals can play an important role in ensuring that WEEE
does not become an environmental issue; it is essential to
follow some basic rules:
• WEEE shall not be treated as household waste.
• WEEE shall be handed over to the relevant collection points
managed by the municipality or by registered companies. In
many countries, for large WEEE, home collection could be
present.
• When you buy a new appliance, the old one may be returned
to the retailer who has to collect it free of charge on a one-to-
one basis, as long as the equipment is of equivalent type and
has the same functions as the supplied equipment.
10 TR
• UYARI: Cihaz ve aparatları kullanım sırasında ısınır. Isınmış parçalara dokunmaktan kaçınınız.
• 8 yaşın altındaki çocukları cihazdan uzakta tutmalı ve sürekli denetlemelisiniz.
• Bu cihaz, 8 yaş ve üzeri çocuklar ve fiziksel, duyusal veya zihinsel yetenekleri veya bilgi ve tecrübe
açısından yetersiz kişiler tarafından ancak yetişkin bir bireyin denetiminde ve cihazın nasıl
kullanılacağına dair verilen talimatların uygulanması durumunda ve oluşabilecek tehlikleri kavradıkları
takdirde güvenle kullanılabilir.
• Çocuklar cihazla oynamamalıdırlar.
• Cihazın temizlik ve bakımı gözetmen olmaksızın çocuklar tarafından yapılmamalıdır.
• UYARI: Sadece yağın ocak üzerinde bırakılması tehlikeli olabilir ve yangına neden olabilir.
• Yangını HİÇBİR ZAMAN su ile söndürmeyin, cihazı kapatınız ve kapak gibi bir aparatla yada yangın
battaniyesi ile alevi örterek kontrol altına alınız.
• UYARI: Yangın tehlikesi: Ocak yüzeyini bir takım malzemelerinizi depolamak için kullanmayınız, yüzeyi
boş bırakınız.
• UYARI: Yüzey kırık ise elektrik çarpması olasılığını önlemek için, cihazı kapatınız.
• Fırını temizlemerken buharlı temizleyiciler kullanmayınız.
• kapağa dökülen artıklar temizliğe başlamadan önce çıkarılmalıdır.
• Ocak yüzey kapağını kapatmadan önce soğumasına izin verilmelidir.
• Eğer varsa, halojen lambaya uzun süre bakmayınız.
• Cihaz, harici bir zamanlayıcı veya ayrı uzaktan kumanda sistemi ile kontrol edilmeye uygun değildir.
• Bağlantının sağlanamaması kablolama kurallarına göre kabloların bağlanmamasından
kaynaklanmıştır.
• Talimatlarda kullanılacak prizin tipi cihazın arka kısmındaki sıcaklık düşünülerek belirtilmelidir.
• Elektrik kablosu hasar görürse, olası bir tehlikeyi önlemek için kablo, üretici, yetkili servis veya benzeri
kalifiye personel tarafından değiştirilmelidir.
• Uyarı: Termal ısı kesici dikkatsizce yerleşiminden doğacak zararları engellemek için, bu cihaz kaynağı
zamanlayıcı veya sürekli açık ya da kapalı olacak devre gibi dış devre cihazlarına bağlanmamalıdır.
GÜVENLİK UYARILARI
1. GENEL UYARILAR
Bu ekipman, gıdalarla temas ettiği parçalarda, 89/109 sayılı EEC Direktifinde öngörülen düzenlemelere uygundur.
işareti ile bu cihazın, Avrupa direktiflerine uygunluğunun ve yasa tarafından belirlenmiş güvenlik, sağlık ve çevresel
gerekliliklerin yerine getirilmesinin bize ait olduğunu kabul ediyoruz.
Ürün kalitesini artırmak için çalışmalarımızı sürdürüyoruz ve en son teknolojik yenilikleri uygulamak için çalışıyoruz.
2. KURULUM
Evde kullanıma yönelik bir cihazın kurulumu doğru şekilde yapılmazsa müşterinin güvenliğini ciddi biçimde etkileyebilecek
karmaşık bir işlem olabilir. Bu nedenle, bu işlem mesleki yeterliliğe sahip bir kişi tarafından yürürlükteki teknik mevzuata
uygun olarak gerçekleştirilmelidir. Bu önerinin göz ardı edilmesi ve kurulumun yetkisiz bir kişi tarafından yapılması
durumunda üretici, ister ürünlerin, ister kişilerin zarar görmesiyle sonuçlansın, ürünün hiçbir teknik arızasında sorumluluk
kabul etmez.
"Montaj, standart direktiflere uygun olarak yapılmalıdır." Üretici,
uygunsuz veya makul olmayan kullanımlardan ötürü meydana
gelebilecek hiçbir zararın sorumluluğunu üstlenmez.
Uyarı:
Toprak bağlantısı yapılmamış veya bağlantısının devamlılığı
hatalı olan bir toprağa balanmış cihazların kullanımı
sırasında meydana gelebilecek olaylardan veya bu
olayların sonuçlarından ötürü sorumluluk kabul
edilmemektedir.
• Elektrikli bir cihazı çalıştırmadan önce her zaman elektrik
sayacında gösterilen şebeke gerilimini, devre kesici ayarını,
tesisatın toprak bağlantının sürekliliği ve sigortanın
uygunluğunu kontrol edin.
• Elektrik tesisatına yapılacak bağlantı, topraklı fişi olan bir priz
veya çok kutuplu bir devre kesici şalter üzerinden yapılmalıdır.
Cihazda bir priz çıkışı varsa, cihazın montajı priz çıkışının
erişilebilir olacağı şeklinde yapılmalıdır.
• Güç kablosunun sarı?yeşil teli, hem güç kaynağının hem de
cihaz terminallerinin topraklama hattına bağlanmalıdır.
• Güç kablosuyla ilgili sorular, Satış Sonrası Servise veya
ehliyetli bir elektik teknisyenine yöneltilmelidir.
DİKKAT:
Elektrik kablosunun değiştirilmesi gerekirse, kabloyu aşağıdaki
renklere / kodlara göre bağlayın:
MAVİ - NÖTR (N)
KAHVERİNGİ - AKTİF (L)
SARI-YEŞİL - TOPRAK ( )
3. ANKASTRE MONTAJ
11 TR
Ocağın yerleştiği mobilya ve yakınında bulunan diğer tüm
mobilyalar yüksek sıcaklıklara dayanabilecek malzemelerden
üretilmiş olmalıdır. Buna ek olarak, tüm dekoratif kaplamalar,
ısıya dayanıklı yapıştırıcıyla yapıştırılmalıdır.
Montaj (Şek. B/D):
Ocakla birlikte su geçirmez bir conta verilmektedir.
Yerleştirmeden önce:
- Ocağı, cam yüzey aşağı gelecek şekilde ters çevirin.
Camın korunduğundan emin olun.
- Contayı ocağın çevresine yerleştirin.
-Destekleme kabine herhangi bir sızıntı olmaması için, contanın
doğru bir şekilde takıldığından emin olun.
• Cihaz ile yanındaki mobilyaların dikey yüzeyleri arasında en az
5cm 'lik bir boşluk bırakın.
• Ocağı yerleştirirken, ocağın alttaki yüzü normalde kullanım veya
temizlik sırasında erişebilir bir alana yakınsa, yanma veya zarar
görme riskini ortadan kaldırmak için ocağın altında bir 1 cm'lik
boşluk bırakın.
4. ELEKTRİK BAĞLANTISI
Ocak güç kablosuyla teçhiz edilmiştir ve bu kablo sadece fazlar
arasında veya faz ile nötr arasında 220-240V güç kaynağına
bağlanabilir.
• Güç kablosunu prize takın, doğru sigorta değerleri için tabloya
bakmalısınız.
Ancak ocağı aşağıdaki şekilde bağlamak da mümkündür;
- Üç fazlı 220-240 V3~
- Üç fazlı 380-415 V2N~
Bağlantıya devam etmek için aşağıdaki talimatları
uygulamanız gerekmektedir.
• Bağlantıyı yapmadan önce, ilgili tablodan kontrol ederek,
tesisatın uygun bir sigortayla korunduğundan (tabloya bakın)
ve cihazı normal güçle besleyerek yeterlikte ve kalınlıkta
kablolarla teçhiz edildiğinden emin olun.
• Ocağı, cama dikkat ederek cam kısmı tezgaha karşı gelecek
şekilde çevirin.
- Kablo tutucu "1" i sökün,
- Kenarlarda bulunan iki tırnağın yerini tespit edin,
- Düz tornavidanın ağzını "2" ve "3" no' lu tırnakları üzerine getirin,
ittirerek sokun ve bastırın,
- Kapağı çıkartın.
Güç kablosunu çıkarmak için:
- Şant çubuklarının ve elektrik kablosunun iletken uçlarının
bulunduğu terminal blokunu tutan vidaları
sökün,
- Güç kablosunu kablo tutucusunun içindin
geçirin.
- Terminal bloğuna bağlantı için gereken kablo
uzunluğunu hesaba katarak elektrik
kablosunun iletken olan her bir ucundan 10
mm kadar sıyırın.
- Tesisata uygun olarak ve ilk işlemde hazır
hale getirdiğiniz şant çubuklarının yardımıyla,
iletkeni tabloda gösterildiği şekilde sabitleyin.
- Kapağı yerine takın.
- Kablo tutucuyu vidalayın.
Not: Terminal boku vidalarının sıkıldığından emin olun.
ŞANT
Aşağıdaki sırayla kapağı açın:
1 2 3
Terminal blokundaki terminallere bağlantı
Ph = Phase
N = Neutral T = Earth
220-240 V2~
TEK FAZLI 220-240 V~
Hilight gözü:
Metal bir iletken şerit, tüm ocak yüzeyine eşit bir şeklide yayılarak
yerleştirilmiştir. 3 saniye içerisinde etkili hale gelir ve yiyecekelerin
ve yemeklerin sabit, homojen ve ayrıca sürekli olarak pişirilmesi
için uygundur.
Cam seramik ocak. hilight pişirme gözlerinin ürettiği daha yüksek
ısı enerjisinden faydalanır ve böylece pişirme süreci hızlandırılmış
olur. Ocağın tasarımıyla ilgili yapılan değişiklikler cam seramiğin
sıcaklığa dayanma kapasitesini etkilememiş, ocağın kontrol
edilebilirliğini artırmıştır.
"2" Sprinter özelliğiyle, pişirme süreleri, pişirme yöntemine ve
kullanılan pişirme kaplarına bağlı olarak %15'e kadar
düşürebilmektedir.
5. GÖSTERİM
LAY OUT
“ 3 ”
LAY OUT
“ 2 ”
Kablo
HO5V2V2F
3x2,5 3x2,5 3x2,5
HO5V2V2F
4x1,5 4x1,5 4x1,5
HO5V2V2F
4x1,5 4x1,5 4x1,5
LAY OUT
“ 1 ”
Kablo
Kablo
12 TR
6. OCAK PİŞİRME KAPLARIYLA İLGİLİ BİLGİLER
emin olun:
PİŞİRME KAPLARININ SEÇİMİ
Paslanmaz Çelik:
Alüminyum:
Dökme Demir:
Bakır Taban / Sert Çini:
Porselen/emaye:
Cam seramik:
7. KULLANIM
-
• PİŞİRME GÖZÜNÜN AÇILMASI
TYPE
B
77
0
1 : )
9 :
• PİŞİRME GÖZÜNÜN DURDURULMASI
-
• GENEL DURDURMA
istenilen herhangi bir
zamanda durdurulabilir.
• ARTIK ISI GÖSTERGESİ
kaybolur.
tavsiye ederiz
- Gerekli pişirme bölgesi seçim düğmesine basın. Karşılık gelen
pişirme ekranında "0" ışığı yanır, diğer bölümlerin ışığı azalır.
• KİLİTLEME TUŞU KULLANIMI
Kilitleme işlevi, çocuklar tarafından ocağın yanlışlıkla çalıştırılmasını
önler ve ocağın temizliği sırasında da kullanışlıdır.
Ocağı kilitlemek için: (4 bölgeli ocak örneği)
ON/OFF (AÇMA/KAPAMA) düğmesine basın ve ardından (çocuk
kilidi sadece bu işlemden sonra etkinleştirilebilir)
Bip sesini duyuncaya kadar eksi
tuşuna ve sol üst seçim tuşuna aynı
anda basın. Bip sesi duymazsanız
ocağı KAPATIN ve tüm ayar işlemini
tekrar edin.
Daha sonra tekrar sol üst seçim
tuşuna basın.
Bu işlem prosedürü 10 sn içerisinde
gerçekleştirilmelidir ve yukarıda
açıklanan dışında hiçbir tuşa
basılmamalıdır. Aksi takdirde, giriş
tamamlanmadığı için iptal edilecektir.
Tüm ekranlarda KİLİTLİ mesajı
olarak “L” gösterilir (=yanlışlıkla
çalıştırmaya karşı çocuk kilidi) –
pişirme bölgesi “hot" (sıcak)
aşamasında olması halinde
dönüşümlü olarak “L” ve “H”
Ocağın kilidini devre dışı bırakmak için:
Kontrol ünitesinin kilidini devre dışı
bırakmak için aynı anda eksi tuşuna
ve sol üst seçim tuşuna (pişirme
bölgesi sol arka) basılması ve
sonrasında tekrar eksi tuşuna
basılması gerekir.
Artık kilit kaldırılır ve Dokunmatik
Kontrol STAND BY (BEKLEME)
moduna geri döner.

İki gözlü (bölgeli) ocak gözleri belirli
modellerde bulunmaktadır. ......................
>
Herbir pişirme gözü maksimum 99 dakika süreyle
programlanabilir.
- Önceki talimatları izleyerek, gerekli pişirme alanını çalıştırın.
- Aynı anda "-" ve "+" tuşlarına basarak zamanlayıcı çalıştırın
" " görünecektir.
LED
TYPE
B
LED
7
TYPE
B
7
• İLAVE PİŞİME GÖZÜNÜN ÇALIŞTIRILMASI
(İKİ GÖZLÜ)
• BİR PİŞİRME GÖZÜNÜN PROGRAMLANMASI (modele göre)
• HIZLI ISITICI İŞLEMİ
Ocak üzerindeki her bir pişirme gözünde pişirme gözünün
sıcaklığını hızlandıran bir hızlı ısıtıcı bulunmaktadır.Hızlı ısıtıcının
çalıştırılması:
- Açma/Kapatma düğmesine basın.
- İstenilen pişirme gözlerini açın, "9" konumuna gelmek için "+"
düğmesine basın, kısa süreyle “-” düğmesinden parmağınızı
çekin ve tekrar basın; ekranda sırayla A "Hızlı ısıtıcı" ibaresi ve
“9” ısı seviyesi gösterilecektir.
- Gerekirse, sıcaklığı istenen seviyeye düşürün, ekran sırayla
"A" "hızlı ısıtıcı" simgesini ve yeni ısı seviyesini gösterecektir.
Örn. 6. konumda 1800 W gözü = 1800 W sağlanan gücün %32'si.
"Hızlı ısıtıcı" açıldığında, pişirme gözü 2,5 dakika boyunca 1800W
güç sağlar ve bu sürenin sonunda 576W'ye ayarlanır.
* Güvenliğin artırılması için, ocak gözleri çok uzun süre açık
kalırsa otomatik olarak kapatılır. Otomatik kapanma zamanı
kullanılan ısı seviyesine bağlıdır.
Hızlı ısıtıcıyı devreden çıkarmak için
- Pişirme gözünü açın, normal sıcaklık seviyesine gelmek için "-"
düğmesine basın, istenen sıcaklık seviyesine ayarlayın veya
pişirme gözünü kapatmak için "0"a düşürün.
0 : 0 % : 0 : 0 H
1 : 3 % : 1 : 6 H
2 : 6 % : 3 : 6 H
3 : 11 % : 5 : 5 H
4 : 16 % : 6,5 : 5 H
5 : 19 % : 8,5 : 4 H
6 : 32 % : 2,5 : 1,5 H
7 : 45 % : 3,5 : 1,5 H
8 : 65 % : 4,5 : 1,5 H
9 : 100 % : 0 : 1,5 H
Pişirme
konumu
/seviyesi
Sağlanan
güç
(%)
Hızlı ısıtıcı
süresi
(dakika
cinsinden)
Otomatik
kapanma
öncesinde
maksimum
çalıştırma süresi*
8. TEMİZLİK VE BAKIM
Ocakla ilgili herhangi bir bakım çalışması yapmadan önce,
ocağın soğumasını bekleyin.
Sadece seran yüzeyler için özel olarak tasarlanmış ürünler
(kremler ve spatulalar) kullanılmalıdır. Bu tür ürünler hırdavat
dükkanlarından temin edilebilir.
Ocak yüzeyine dökülen şeyler çabucak yanıp temizleme işlemini
daha da zorlaştırdığı için ocak yüzeyine herhangi bir şeyin
dökülmemesine dikkat edin.
Plastik eşyalar, şeker veya şeker bazlı ürünler gibi erimeye
eğilimli tüm maddeleri ocağınızdan uzak tutmanız tavsiye edilir.
BAKIM:
-Ocak üzerine özel temizlik malzemesinden birkaç damla dökün.
-Varsa inatçı lekeleri yumuşak bir bezle veya hafif nemlendirilmiş
bir kâğıt havluyla
ovalayın.
-Ocak yüzeyi temizlenene kadar yumuşak bir bezle veya kâğıt
havluyla silin.
Halen çıkmayan inatçı lekeler varsa:
-Ocak yüzeyine özel temizleme sıvısından birkaç damla daha
dökün.
-Bir spatulayı ocak yüzeyine 30°'lik açıyla tutun ve lekeler
kaybolana kadar kazıyın.
-Ocak yüzeyi temizlenene kadar yumuşak bir bezle veya kâğıt
havluyla silin.
-Gerekirse işlemi tekrar edin.
BİRKAÇ İPUCU:
Sık sık temizlik yapmak, çizikleri ve yıpranmayı önleme açısından
büyük önem taşıyan koruyucu bir tabakanın oluşmasını sağlar.
Ocağı tekrar kullanmadan önce yüzeyinin temiz olduğundan emin
olun. Su izlerini gidermek için birkaç damla beyaz sirke veya limon
suyu kullanın. Ardından, özel temizleme sıvısından birkaç damla
dökerek emici bir kâğıt havluyla ocak yüzeyini silin.
Cam seramik yüzey, altı düz kaplardan kaynaklanabilecek
çizilmelere karşı dayanıklıdır; ancak yine de bu kapları bir
gözden diğerine taşırken kaldırmanız her zaman için daha iyidir.
13 TR
İlave pişirme gözü lambası yandığında, tüm pişirme bölgesi aktif
demektir.
• İlave pişirme bölgesini devre dışı bırakmak için;
- Tekrar ilave pişirme gözünün düğmesine basın. Pişirme gözü
durduğunda, ekrandaki led söner.
• İlave pişirme bölgesini yeniden çalıştırmak;
- Pişirme bölgesi düğmesine basın. Bölge aktif olduğunda
yeniden led yanar.
- Yeniden "+" tuşuna basarak 0 ve 99 dakika arasında bir süre
seçin ya da "-" tuşuna basarak 30-0 dakika arasında bir süre
seçin. Zamanlayıcı kontrol led ışığı yanında süre görünecektir.
Programlanmış olan süre, zamanlayıcı seçim düğmesine
basılarak istenilen anda değiştirilebilir. Zaman çalışmaya
başlayınca, pişirme alanı otomatik olarak kapanır ve 1 dakika
boyunca bip sesi duyulur.
PROBLEM SOLVING
10. SATIŞ SONRASI SERVİS
SORUN GİDERME
. Sadece tabanı düz olan tencereleri veya tavaları
kullanın.Tencere/tava ve ocak arasında ışık görülebiliyorsa,
pişirme gözü ısıyı doğru bir şekilde iletmemektedir.
. Tencere veya tava tabanları seçilen ocak gözünün çapını tam
olarak kaplamalıdır.
Yemekler çok yavaş pişiyor
Uygunsuz tencereler kullanılmaktadır. Sadece ağır olan ve en
azından pişirme gözüyle aynı çapta olan tabanı düz kapları
kullanın.
Ocağın cam yüzeyindeki küçük çizikler veya aşınmalar
Yanlış temizlik işlemleri veya kaba altlı tencereler
kullanılmaktadır; tencere ile ocak arasına kum veya tuz tanesi
gibi parçacıklar girmektedir. “TEMİZLİK” bölümüne bakın;
tencere tabanlarının kullanılmadan önce temiz olmasına dikkat
edin ve sadece pürüzsüz ve düz tabanlı tencereler kullanın.
Çizikler sadece temizlik işlemleri doğru yapılırsa azaltılabilir.
Metal işaretler
Alüminyum tencereleri ocağın üzerinde kaydırmayın. Temizlik
önerilerine bakın.
Doğru malzemeler kullanmanıza rağmen lekeler çıkmıyor. Bir
spatula kullanın ve "TEMİZLİK" bölümündeki talimatlara bakın.
Koyu lekeler
. Bir spatula kullanın ve "TEMİZLİK" bölümündeki talimatlara
bakın. Ocak üzerindeki açık renkli yüzeyler
Mineral, su veya yemek tortusunun yanı sıra alüminyum ve
bakır tencerelerin bıraktığı izlerdir; bu izler veya lekeler temizlik
kremiyle çıkarılabilir.
Ocak üzerindeki yanmış şeker kalıntıları veya erimiş plastik
malzemeler.
“TEMİZLİK” bölümüne bakın.
Ocak çalışmıyor veya bazı gözler yanmıyor
Şant çubukları, terminal blokuna doğru takılmamıştır.
Bağlantının verilen tavsiyelere uygun olarak yapılıp
yapılmadığını kontrol edin.
Dokunmatik kontrol düğmeleri olan ocaklar: önemli miktarda
dökülme söz konusudur veya bir nesne en az 10 saniye, en az
iki düğmeyi kapatmıştır. Döküntüyü temizleyin veya nesneyi
çıkarın.
Kontrol paneli kilitlidir. Ocağın kilidini açın.
Ocak kapanmıyor.
Kontrol paneli kilitlidir. Ocağın kilidini açın.
Ocak otomatik olarak duruyor
Bir döküntü, 10 saniyeden daha fazla süreyle en az iki
düğmeyi kapatmıştır, ocak emniyet kilidine geçer ve bip sesi
duyulur. Döküntüyü temizleyin veya nesneyi çıkarın.
. Ocak gözleri çok uzun süre açık kalırsa otomatik olarak durur.
“Çalıştırma süresi” bölümüne bakın.
Ocak gözleri için açıp kapatma sıklığı
Açma-kapatma döngüleri gerekli ısı seviyesine göre değişir:
- düşük seviye: kısa çalıştırma süresi,
- yüksek seviye: uzun çalıştırma süresi.
“H” görünüyor, artık ısı göstergesi yanıp sönüyor
Elektronik sıcaklık çok yüksektir. Bir teknisyen, kurulumun
tavsiyeler doğrultusunda yapıldığını doğrulamalıdır.
Servis Mühendisi çağırmadan önce lütfen aşağıdaki
kontrolleri yapın:
— fiş doğru şekilde takılmış ve yerine oturmuş; Hata tespit
edilemezse, cihazı kapatın (kurcalamayın), Satış Sonrası
Servis Merkezini arayın. Cihaz, Servis Merkezinde ücretsiz
olarak onarılmasını sağlayan bir garanti sertifikasıyla birlikte
verilir.
11. ÇEVRENİN KORUNMASI
Pişirme gözleri kaynatma yapmıyor veya yetersiz kızartma
yapıyor.
Bu cihaz, Atık Elektrikli ve Elektronik Cihazlar
(AEEE) hakkındaki 2012/19/EU Avrupa Birliği
Yönergesine uygun biçimde işaretlenmiştir.
AEEE, hem kirletici maddeleri (bunlar çevre
üzerinde olumsuz etkilere neden olabilir) hem de
temel bileşenleri (bunlar yeniden kullanılabilir)
içerir. Tüm kirleticilerin düzgün bir şekilde bertaraf
edilmesi ve atılması ve tüm malzemelerin geri
kazanılıp ve dönüştürülmesi için AEEE'nin özel işlemlere tabi
tutulması önemlidir.
Kişiler, AEEE'nin bir çevre sorununa dönüşmemesini sağlamakta
önemli bir rol üstlenir; bazı basit kuralların izlenmesi gerekir:
• AEEE'lere ev atıkları olarak davranılmamalıdır.
• AEEE'ler, belediye veya kayıtlı şirketler tarafından yönetilen ilgili
toplama noktalarına teslim edilmelidir. Pek çok ülkede, büyük
AEEE'ler için evden toplama hizmeti verilir.
• Yeni bir cihaz satın aldığınızda, eskisi satıcıya verilebilir ve satıcı
yeni teslim ettiği cihaz başına bir adet olmak üzere ücretsiz olarak
bu cihazı teslim alabilir, bunun için alınacak ekipmanın teslim
edilen ekipman ile aynı türden ve aynı fonksiyonlara sahip olması
gerekir.
Üretici bu broşürde bulunan basım veya kopyalama hatalarından
kaynaklanan herhangi bir eksiklikten sorumlu olmayacaktır.
Güvenlik veya işlevle ilgili özelliklere zarar vermeden tüketim
istekleri dahil olmak üzere ürünlerde gerektiğinde değişiklik
yapma hakkımız mahfuzdur.
30° Maxi
NOT:
Asla bıçak veya tornavida kullanmayın.
Ağzında jilet olan bir spatula, ocak yüzeyine 30°'lik bir
açıda tutulduğu sürece yüzeye zarar vermez.
Jiletli spatulayı asla çocukların erişebileceği bir yerde
bırakmayın.
Kesinlikle aşındırıcı ürünler veya ovma tozu kullanmayın.
• Metal yüzey: Metal yüzeyi temizlemek için sabunlu suyla
yıkayın, durulayın ve yumuşak bir bez ile kurulayın.
14 TR

ÜRETİCİ FİRMA:
CANDY HOOVER GROUP
Via Privata E. Fumagalli 20861 Brugherio (MB) - ITALY
Tel: 039.2086.1 • Fax: 039.2086.403
www.candy-group.com
İTHALATCI FİRMA:
CANDY HOOVER EUROASIA EV GEREÇLERİ SAN. VE TİC. A.Ş.
İçerenköy Mh. Hal Yolu Cd. Çayır Yolu Sk. No: 11
Sayar İş Merkezi Kat: 7 34752 Ataşehir / İSTANBUL/ TÜRKİYE
Tel: 0216 466 42 42 • Fax: 0216 466 15 45
www.hoover.com.tr • servis@hoover.com.tr
ANKASTRE OCAK
Ankastre ocak kullanma kılavuzunda gösterildiği şekilde kullanılması ve yetkili kıldığımız servis elemanları dışındaki şahıslar tarafından bakımı, onarımı
veya başka bir nedenle müdahale edilmemiş olması şartıyla bütün parçaları dahil olmak üzere tamamı malzeme, işçilik ve üretim hatalarına karşı
ürünün teslim tarihinden itibaren 3 ( ÜÇ ) YIL SÜRE İLE CANDY HOOVER EUROASIA A.Ş. TARAFINDAN GARANTİ EDİLMİŞTİR.
Malın bütün parçaları dahil olmak üzere tamamı garanti kapsamındadır.
Malın ayıplı olduğunun anlaşılması durumunda tüketici, 6502 sayılı Tüketicinin Korunması Hakkında Kanunun 11 inci maddesinde yer alan;
a) Satılanı geri vermeye hazır olduğunu bildirerek sözleşmeden dönme,
b) Satılanı alıkoyup ayıp oranında satış bedelinde indirim isteme,
c) Aşırı bir masraf gerektirmediği takdirde, bütün masrafları satıcıya ait olmak üzere satılanın ücretsiz onarılmasını istem,
ç) İmkan varsa, satılanın ayıpsız bir misli ile değiştirilmesini isteme, seçimlik haklarından birini kullanabilir.
Tüketicinin, Kanunun 11. maddesinde yer alan seçimlik haklarından ücretsiz onarım hakkını seçmesi durumunda satıcı; işçilik masrafı, değiştirilen
parça bedeli ya da başka herhangi bir ad altında hiçbir ücret talep etmeksizin malın onırımını yapmak veya yaptırmakla yükümlüdür. Tüketici ücretsiz
onarım hakkını üretici veya ithalatçıya karşı da kullanılabilir. Satıcı, üretici ve ithalatçı tüketicinin bu hakkını kullanmasından müteselsilen sorumludur.
Tüketicinin, ücretsiz onarım hakkını kullanması halinde malın;
• Garanti süresi içinde tekrar arızalanması,
• Tamiri için gereken azami sürenin aşılması,
• Tamirinin mümkün olmadığının, yetkili servis istasyonu, satıcı, üretici veya ithalatçı tarafından bir raporla belirlenmesi durumlarında;
tüketici malın bedel iadesini alıp, ayıp oranında beden indirimini veya imkan varsa malın ayıpsız misli ile değiştirilmesini satıcıdan talep edebilir. Satıcı,
tüketicinin talebini reddetmez. Bu talebin yerine getirilmemesi durumunda satıcı, üretici ve ithalatçı müteselsilen sorumludur.
Garanti uygulaması sırasında değiştirilen malın garanti süresi, satın alınan malın kalan garanti süresi ile sınırlıdır.
Malın tamir süresi 20 iş gününü geçemez. Bu süre, garanti süresi içerisinde mala ilişkin arızanın yetkili servis istasyonuna veya satıcıya bildirimi
tarihinde, garanti süresi dışında ise malın yetkili servis istasyonuna teslim tarihinden itibaren başlar. Malın arızasının 10 iş günü içerisinde
giderilememesi halinde, üretici veya ithalatçı; malın tüketicinin kullanımına tahsis etmek zorundadır. Malın garanti süresi içerisinde arızalanması
durumunda, tamirde geçen süre garanti süresine eklenir.
Malın kullanma kılavuzunda yer alan hususlara uykırı kullanılmasından kaynaklanın arızalar garanti kapsamı dışındadır.
Tüketici, garantiden doğan haklarının kullanılması ile ilgili olarak çıkabilecek uyuşmazlıklarda yerleşim yerinin bulunduğu veya tüketici işleminin
yapıldığı yerdeki Tüketici Hakem Heyetine veya Tüketici Mahkemesine başvurabilir.
Garanti belgesinin tekemmül ettirilerek tüketiciye verilmesi ve bu yükümlülüğün yerine getirildiğinin ispatı satıcıya aittir.
Satılan mala ilişkin olarak düzenlenen faturalar garanti belgesi yerine geçmez.
Satıcı tarafından bu Garanti Belgesinin verilmemesi durumunda, tüketici Gümrük ve Ticaret Bakanlığı Tüketicinin Korunması ve Piyasa Gözetimi Genel
Müdürlüğüne başvurabilir.
Bu bölümü, ürünü aldığınız Yetkili Satıcı imzalayacak ve kaşeleyecektir.
Bu garanti belgesi ile kesilen fatura garanti süresi boyunca garanti belgesi ile muhafaza edilmesi önerilir.
CANDY-HOOVER-EUROASIA EV GEREÇLERİ SAN VE TİC. A.Ş.
Yetkili servislerimizden hizmet talebiniz olduğunda veya ürünlerimizle ilgili genel öneri ve talepleriniz için aşağıdaki numaradan ulaşabilirsiniz.
Sabit telefonlardan veya cep telefonlarından alan kodu çevirmeden arayınız.
Ürününüzü kullanmadan önce montaj ve kullanma kılavuzunu mutlaka okuyunuz. Ürünün montaj ve kullanım kılavuzunda yer alan hususlara aykırı
kullanılması, kullanım hataları ve cihazın standart kullanım şartları / amaçları haricinde kullanılması halinde ürün garanti kapsamı dışında kalacaktır.
Ürünün standart ve sorunsuz çalışma koşullarının sağlanması için gerekli / zorunlu olan montaj ve kullanım kılavuzunda belirtilen teknik özelliklerinin (su
basıncı, voltaj değeri, gaz besleme basıncı, sigorta değeri, topraklama, yakıt cinsi, yakıt kalitesi vb.) uygun olmaması, sabit olmaması ve/veya değişken
olması halinde, cihazda meydana gelebilecek arızalar ve sorunlar garanti kapsamı dışında kalacaktır.
Candy Hoover Euroasia tarafından sağlanan garanti şartları aşağıdaki koşullarda geçersiz olacaktır.
• Ürüne, yetkili servis dışındaki kişiler tarafından müdahale edilmesi, elektrik-su kesintisi ve üründen kaynaklanmayan kaçaklar garanti kapsamı dışındadır.
• Kullanım hatalarından dolayı oluşan arıza ve hasarlar, elektrik-gaz -su tesisatı ve / veya tesisat ekipmanları nedeniyle meydana gelebilecek arızalar garanti
kapsamı dışındadır.
•Ürünün, müşteriye ulaştırılması sonrası yapılan taşıma işlemine bağlı arıza ve hasarlar, tüketici tarafından yapılan yanlış depolama ve ortam koşulları
nedeniyle cihazda meydana gelen hasarlar ve arızalar garanti kapsamı dışındadır.
• Hatalı elektrik tesisatı, ürünün üzerinde belirtilen voltajdan farklı voltajda kullanılması veya şebeke voltajındaki dalgalanmalar sonucu oluşan arıza ve
hasarlar, doğal afetler, üründen kaynaklanmayan harici/fiziki dış etkenler, mevsimsel hava şartları ve çevresel etkenler (deprem, yangın, sel, su basması,
şiddetli rüzgar, yıldırım düşmesi, kireç, nem, rutubet, toz, nakliye, taşıma, ürünün dona maruz kalması, susuz çalışma vb.) nedeniyle oluşan arızalar garanti
kapması dışında kalacaktır.
• Kullanım kılavuzunda belirtilen hususlara aykırı kullanılmasından kaynaklanan arızalar ve hasarlar.
Yukarıda belirtilen arızaların giderilmesi ücret karşılığı yapılır.
Ürünün kullanım ömrü 10 (on) yıldır. Bu ürünün tanımlandığı şekilde çalışabilmesi için gerekli yedek parçaları bulundurma süresidir.
Üretim yeri Türkiye 'dir.
TÜKETİCİ HİZMETLERİ
TÜKETİCİ HATTI: 444 03 98
GARANTİ BELGESİ
Model:...............................................
Bandrol ve Seri No:............................
Teslim Tarihi Yeri: ...............................
Fatura Tarihi No: ..............................................
Satıcı Firma Ünvanı: ........................................
Adres: .........................................................
...................................................................
Tel - Fax: .....................................................
Satıcı Firma (Kaşe ve İmza):........................
Genel Müdür:

GB
The manufacturer will not be responsible for any inaccuracy resulting from printing or transcript errors contained in this brochure. We reserve the right
to carry out modifications to products as required, including the interests of con sumption, without prejudice to the characteri stics relating to safety or
function.
03.2017 • REV:C • 42815055
TR
Üretici bu broşürde bulunan basım veya kopyalama hatalarından kaynaklanan herhangi bir yanlışlıktan sorumlu olmayacaktır
. Güvenlik veya işlevle
ilgili özelliklere zarar vermeden tüketim istekleri dahil olmak üzere ürünlere gerektiğinde değişiklik yapma hakkımız mahfuzdur.
/