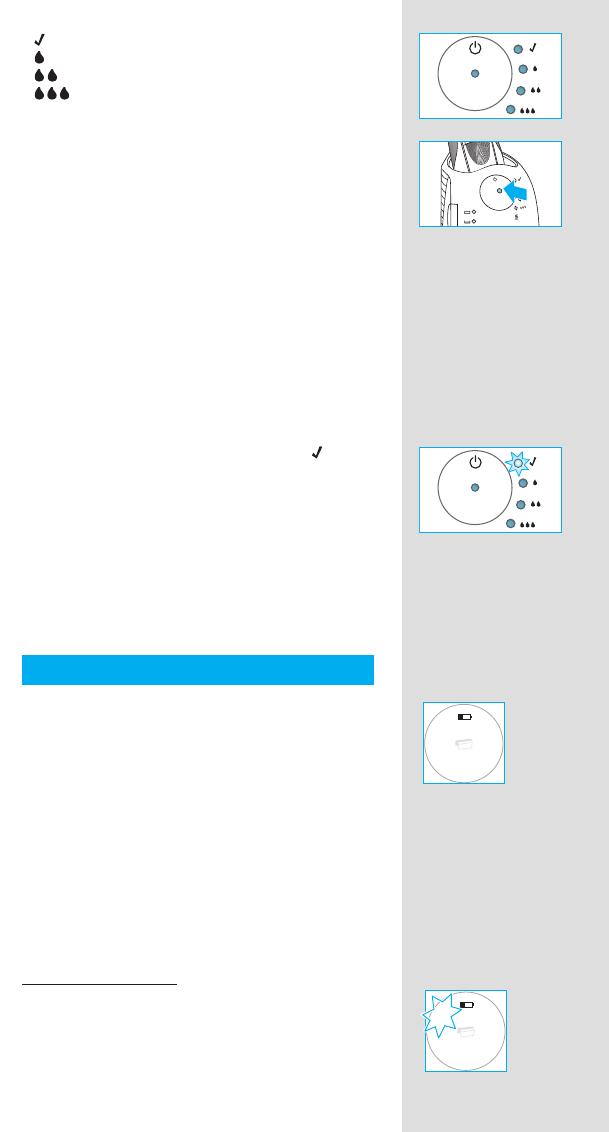
Braun 760cc-4 - 5693 User manual

Category
Men's shavers
Type
User manual

This manual is also suitable for

www.braun.com
Series 7
Type 5693
trimmer
trimmer
trimmer
Series 7 Series 7
Series 7
760cc-4
99500894_760cc_S1.indd 199500894_760cc_S1.indd 1 08.03.2010 11:44:09 Uhr08.03.2010 11:44:09 Uhr
Stapled booklet, 110x200 mm, 102 p (incl. 6 p cover), 2/2c = black + HKS43N
Braun Infolines
D
A
00 800 27 28 64 63
00 800 BRAUNINFOLINE
CH
08 44 - 88 40 10
GB
0800 783 70 10
IRL
1 800 509 448
F
0 810 309 780
B
0 800 14 592
E
901 11 61 84
P
808 20 00 33
I
(02) 6 67 86 23
NL
0 800-445 53 88
DK
70 15 00 13
N
22 63 00 93
S
020 - 21 33 21
FIN
020 377 877
TR
0 800 261 63 65
HK
852-25249377
(Audio Supplies Company Ltd.)
www.service.braun.com
Deutsch 4, 10
English 11, 17
Français 18, 25
Español 26, 33
Português 34, 41
Italiano 42, 49
Nederlands 50, 57
Dansk 58, 64
Norsk 65, 71
Svenska 72, 78
Suomi 79, 85
Türkçe 86
∂ÏÏËÓÈο 93, 101
Braun GmbH
Frankfurter Straße 145
61476 Kronberg/Germany
www.braun.com
99500894/III-10
D/GB/F/E/P/I/NL/DK/N/S/FIN/TR/GR
99500894_760cc_S2.indd 199500894_760cc_S2.indd 1 08.03.2010 11:45:48 Uhr08.03.2010 11:45:48 Uhr
trimmer
trimmer
trimmer
on
o
ff
on
off
trimmer
trimmer
trimmer
Series 7
Series 7
Series 7
3
4
6
5
1
2
9
8
10
11
12
15
14
17
18
19
7
20
16
13
t
r
imme
r
t
r
i
mme
r
t
r
i
m
m
e
r
Ser
i
e
s
7
Se
r
i
e
s
7
S
e
r
i
e
s 7
99500894_760cc_S3.indd 199500894_760cc_S3.indd 1 08.03.2010 11:46:20 Uhr08.03.2010 11:46:20 Uhr
11
Our products are designed to meet the highest
standards of quality, functionality and design.
We hope you enjoy your new Braun Shaver.
Warning
Your shaving system is provided with a special
cord set, which has an integrated Safety Extra
Low Voltage power supply. Do not exchange or
tamper with any part of it, otherwise there is risk
of an electric shock.
This appliance is not intended for use by children
or persons with reduced physical, sensory or
mental capabilities, unless they are supervised
by a person responsible for their safety. In
general, we recommend that you keep the
appliance out of reach of children. Children
should be supervised to ensure that they do not
play with the appliance.
To prevent the cleaning fl uid from leaking, ensure
that the Clean&Renew station is placed on a fl at
surface. When a cleaning cartridge is installed,
do not tip, move suddenly or transport the
station in any way as cleaning fl uid might spill
out of the cartridge. Do not place the station
inside a mirror cabinet, nor over a radiator, nor
place it on a polished or lacquered surface.
The cleaning cartridge contains a highly
ammable liquid so keep it away from sources of
ignition. Do not smoke near the station. Do not
expose to direct sunlight for long periods of time.
Do not refi ll the cartridge and use only original
Braun refi ll cartridges.
Description
Clean&Renew station
1 Cleaning uid display
2 Lift button for cartridge exchange
3 Station-to-shaver contacts
4 Start button
5 Cleaning program indicators
6 Station power socket
7 Cleaning cartridge
Shaver
8 Foil & Cutter cassette
9 Cassette «release» button
0 Shaver head «lock» switch
q Pop-out long hair trimmer
STOPSTOP
English
99500894_760cc_S4-102.indd 1199500894_760cc_S4-102.indd 11 08.03.2010 11:50:28 Uhr08.03.2010 11:50:28 Uhr
12
w On/off switch
e (–) setting button (sensitive)
r (+) setting button (intensive)
t Reset button
z Shaver display
u Shaver-to-station contacts
i Shaver power socket
o Travel case
p Special cord set
Before shaving
Prior to fi rst use you must connect the shaver to
an electrical outlet using the special cord set p
or alternatively proceed as below.
Installing the Clean&Renew station
Using the special cord set p, connect the
station power socket 6 to an electrical outlet.
Press the lift button 2 to open the housing.
Hold the cleaning cartridge 7 down on a fl at,
stable surface (e.g. table).
Carefully remove the lid from the cartridge.
Slide the cartridge into the base of the station
as far as it will go.
Slowly close the housing by pushing it down
until it locks.
The cleaning fl uid display 1 will show how much
uid is in the cartridge:
up to 30 cleaning cycles available
up to 7 cleaning cycles remaining
new cartridge required
Charging and cleaning the shaver
Insert the shaver head down into the cleaning
station. (The contacts u on the back of the
shaver will align with the contacts 3 in the
cleaning station).
If required, the Clean&Renew station will auto-
matically charge the shaver. The hygiene status
of the shaver will also be analyzed and one of
the following cleaning program indicators 5 will
light up:
new
f
a
s
t
c
l
e
a
n
f
a
s
t
c
l
e
a
n
2
1
new
f
a
s
t
c
l
e
a
n
f
a
s
t
c
l
e
a
n
2
1
trim
m
er
Series 7
trim
m
er
Series 7
99500894_760cc_S4-102.indd 1299500894_760cc_S4-102.indd 12 08.03.2010 11:50:29 Uhr08.03.2010 11:50:29 Uhr
13
« » shaver is clean
« » short economical cleaning required
« » normal level of cleaning required
« » high intensive cleaning required
If the station selects one of the required cleaning
programs, it will not start unless you press the
start button 4. For best shaving results, we
recommend cleaning after each shave.
Whilst cleaning is in progress, the respective
cleaning program indicator will blink. Each
cleaning program consists of several cycles,
where cleaning fl uid is fl ushed through the
shaver head and a heat drying process dries
the shaver. Depending on the program selected
the total cleaning time will range from 32 to 43
minutes.
The cleaning programs should not be inter-
rupted. Please note that whilst the shaver is
drying, the shaving head may be hot and wet.
When the program is fi nished, the blue «
»
indicator will light up. Your shaver is now clean
and ready for use.
Stand-by mode
10 minutes after completing the charging or
cleaning session, the Clean&Renew station
switches to the stand-by mode: The indicators
of the Clean&Renew station turn off.
Shaver display
The shaver display z shows the charge status
of the battery. During charging or when using the
shaver, the respective green charge status will
blink. When the battery is fully charged the green
charge status will light up continously, provided
the shaver is switched on or connected to an
electrical outlet.
Stand-by mode
(Shaver is switched off but connected to the
mains)
Some minutes after completing the charging, the
shaver switches to the stand-by-mode:
The display turns off.
Low charge indicator:
The red low charge indicator blinks to
indicate that the charge has dropped below
20%, provided the shaver is switched on.
The remaining battery capacity is suffi cient
for 2 to 3 shaves.
1
0
0
8
0
6
0
4
0
2
0
1
0
0
8
0
6
0
4
0
2
0
1
0
0
8
0
6
0
4
0
2
0
1
0
0
8
0
6
0
4
0
2
0
99500894_760cc_S4-102.indd 1399500894_760cc_S4-102.indd 13 08.03.2010 11:50:29 Uhr08.03.2010 11:50:29 Uhr
14
Charging information
A full charge provides up to 50 minutes
of cordless shaving time. This may vary
according to your beard growth.
The best environmental temperature for
charging is between 5 °C to 35 °C. Do not
expose the shaver to temperatures higher than
50 °C for extended periods of time.
Personalizing your shaver
With the (–)
e
and (+)
r
buttons you can choose
the best setting for shaving different areas of
your face and as per your specifi c needs.
The different settings are indicated by the pilot
light incorporated in the on/off switch w:
dark blue (powerful shave)
light blue (normal)
white (for a thorough comfortable shave in
sensitive areas of your face such as neck)
For a thorough and fast shave we recommend
the «+» setting.
When switching on next time, the last used
setting will be activated.
How to use
Press the on/off switch w to operate the shaver:
The pivoting shaver head and fl oating foils
automatically adjust to every contour of your
face.
To shave hard to reach areas (e.g. under the
nose) slide the shaver head «lock» switch 0 to
the back position to lock the pivoting head at
an angle.
• To trim sideburns, moustache or beard, slide
the pop-out long hair trimmer upwards.
Tips for the perfect shave
For best shaving results, Braun recommends you
follow 3 simple steps:
1. Always shave before washing your face.
2. At all times, hold the shaver at right angles
(90°) to your skin.
3. Stretch your skin and shave against the
direction of your beard growth.
+
normal
+
normal
t
r
lock
1
2
trimmer
lock
lock
lock
+
t
r
lock
1
2
trimmer
lock
lock
lock
+
releaserelease
99500894_760cc_S4-102.indd 1499500894_760cc_S4-102.indd 14 08.03.2010 11:50:30 Uhr08.03.2010 11:50:30 Uhr
15
Shaving with the cord
If the shaver has run out of power (discharged),
and you do not have the time to recharge it in the
Clean&Renew station, you may also shave with
the shaver connected to an electrical outlet via
the special cord set.
Cleaning
Automatic cleaning
After each shave, return the shaver to the
Clean&Renew station and proceed as described
above in the section «Before shaving».
All charging and cleaning needs are then
automatically taken care of. With daily use, a
cleaning cartridge should be suffi cient for about
30 cleaning cycles.
The hygienic cleaning cartridge contains alcohol,
which once opened will naturally evaporate
slowly into the surrounding air. Each cartridge,
if not used daily, should be replaced after
approximately 8 weeks.
The cleaning cartridge also contains lubricants,
which may leave residual marks on the outer foil
frame after cleaning. However, these marks can
be removed easily by wiping gently with a cloth
or soft tissue paper.
Manual cleaning
The shaver head is suitable for cleaning
under running tap water.
Warning: Detach the shaver from the
power supply before cleaning the shaver
head in water.
Rinsing the shaving head under running water
is an alternative way to keep the shaver clean,
especially when travelling:
Switch the shaver on (cordless) and rinse the
shaving head under hot running water.
You may use liquid soap without abrasive
substances. Rinse off all foam and let the
shaver run for a few more seconds.
Next, switch off the shaver, press the «release»
button 9 to remove the Foil & Cutter cassette
8 and let it dry.
If you regularly clean the shaver under
water, then once a week apply a drop of
light machine oil on top of the Foil & Cutter
cassette.
trimmertrimmer
oil
trim
mer
er
re
le
a
s
e
trimmer
re
le
a
s
e
re
le
a
s
e
click!
Series 7
Series 7
Series
Series
oil
trim
mer
er
re
le
a
s
e
trimmer
re
le
a
s
e
re
le
a
s
e
click!
Series 7
Series 7
Series
Series
99500894_760cc_S4-102.indd 1599500894_760cc_S4-102.indd 15 08.03.2010 11:50:30 Uhr08.03.2010 11:50:30 Uhr
16
Alternatively, you may clean the shaver using the
brush provided:
Switch off the shaver. Remove the Foil & Cutter
cassette 8 and tap it out on a fl at surface.
Using the brush, clean the inner area of the
pivoting head. However, do not clean the
cassette with the brush as this may damage it.
Cleaning the housing
From time to time clean the housing of the
shaver and the Clean&Renew station with a
damp cloth, especially inside the cleaning
chamber where the shaver rests.
Replacing the cleaning cartridge
After having pressed the lift button 2 to open the
housing, wait for a few seconds before removing
the used cartridge to avoid any dripping.
Before discarding the used cartridge, make sure
to close the openings using the lid of the new
cartridge, since the used cartridge will contain
contaminated cleaning solution.
Keeping your shaver in top shape
Replacing the Foil & Cutter cassette
/
reset
To maintain 100% shaving performance, re-
place the Foil & Cutter cassette 8, when the
replacement symbol lights up on the shaver
display z (after about 18 months) or when
cassette is worn.
The replacement symbol will remind you during
the next 7 shaves to replace the Foil & Cutter
cassette. Then the shaver will automatically reset
the display.
After you have replaced the Foil & Cutter
cassette, use a ball-pen to push the reset button
t for at least 3 seconds to reset the counter.
While doing so, the replacement light blinks and
goes off when the reset is complete. The manual
reset can be done at any time.
Accessories
Available at your dealer or Braun Service
Centres:
Foil & Cutter cassette 70S
Cleaning cartridge Clean&Renew CCR
re
le
a
s
e
re
le
a
s
e
re
le
a
s
e
Series 7
Series 7
re
le
a
s
e
re
le
a
s
e
re
le
a
s
e
Series 7
Series 7
new
old
new
old
1
0
0
8
0
6
0
4
0
2
0
1
0
0
8
0
6
0
4
0
2
0
m
er
re
le
a
s
e
70S
Series 7
m
er
re
le
a
s
e
70S
Series 7
70S70S
99500894_760cc_S4-102.indd 1699500894_760cc_S4-102.indd 16 08.03.2010 11:50:31 Uhr08.03.2010 11:50:31 Uhr
17
Environmental notice
This product contains rechargeable
batteries. In the interest of protecting the
environment, please do not dispose of the
product in household waste at the end of
its useful life. Disposal can take place at a
Braun Service Centre or at appropriate
collection points provided in your country.
The cleaning cartridge can be disposed with
regular household waste.
Subject to change without notice.
For electric specifi cations, see printing on the
special cord set.
Guarantee
We grant a 2 year guarantee on the product
commencing on the date of purchase. Within the
guarantee period we will eliminate any defects in
the appliance resulting from faults in materials or
workmanship, free of charge either by repairing
or replacing the complete appliance at our
discretion.
This guarantee extends to every country where
this appliance is supplied by Braun or its
appointed distributor.
This guarantee does not cover: damage due to
improper use, normal wear and tear (e.g. shaver
foil or cutter block) as well as defects that have
a negligible effect on the value or operation of
the appliance. The guarantee becomes void if
repairs are undertaken by unauthorised persons
and if original Braun parts are not used.
To obtain service within the guarantee period,
hand in or send the complete appliance with
your sales receipt to an authorised Braun
Customer Service Centre (address information
available online at www.service.braun.com).
For UK only:
This guarantee in no way affects your rights
under statutory law.
99500894_760cc_S4-102.indd 1799500894_760cc_S4-102.indd 17 08.03.2010 11:50:32 Uhr08.03.2010 11:50:32 Uhr
101
°È· Ó· ÂÈÙ‡¯ÂÙ ۤÚßȘ ̤۷ ÛÙËÓ ÂÚ›Ô‰Ô
Ù˘ ÂÁÁ‡ËÛ˘, ·Ú·‰ÒÛÙ ‹ ÛÙ›ÏÙ ÙËÓ
Û˘Û΢‹ Ì ÙËÓ ·fi‰ÂÈÍË ·ÁÔÚ¿˜ Û ¤Ó·
∂ÍÔ˘ÛÈÔ‰ÔÙË̤ÓÔ ∫·Ù¿ÛÙËÌ· ™¤ÚßȘ Ù˘
Braun: www.service.braun.com.
∫·Ï¤ÛÙ ÛÙÔ 01–9478700 ÁÈ· Ó·
ÏËÚÔõÔÚËı›Ù ÁÈ· ÙÔ ÏËÛȤÛÙÂÚÔ
∂ÍÔ˘ÛÈÔ‰ÔÙË̤ÓÔ ∫·Ù¿ÛÙËÌ· ™¤ÚßȘ Ù˘
Braun.
99500894_760cc_S4-102.indd 10199500894_760cc_S4-102.indd 101 08.03.2010 11:51:15 Uhr08.03.2010 11:51:15 Uhr
  • Page 1 1
  • Page 2 2
  • Page 3 3
  • Page 4 4
  • Page 5 5
  • Page 6 6
  • Page 7 7
  • Page 8 8
  • Page 9 9
  • Page 10 10
  • Page 11 11
  • Page 12 12
  • Page 13 13
  • Page 14 14
  • Page 15 15
  • Page 16 16
  • Page 17 17
  • Page 18 18
  • Page 19 19
  • Page 20 20
  • Page 21 21
  • Page 22 22
  • Page 23 23
  • Page 24 24
  • Page 25 25
  • Page 26 26
  • Page 27 27
  • Page 28 28
  • Page 29 29
  • Page 30 30
  • Page 31 31
  • Page 32 32
  • Page 33 33
  • Page 34 34
  • Page 35 35
  • Page 36 36
  • Page 37 37
  • Page 38 38
  • Page 39 39
  • Page 40 40
  • Page 41 41
  • Page 42 42
  • Page 43 43
  • Page 44 44
  • Page 45 45
  • Page 46 46
  • Page 47 47
  • Page 48 48
  • Page 49 49
  • Page 50 50
  • Page 51 51
  • Page 52 52
  • Page 53 53
  • Page 54 54
  • Page 55 55
  • Page 56 56
  • Page 57 57
  • Page 58 58
  • Page 59 59
  • Page 60 60
  • Page 61 61
  • Page 62 62
  • Page 63 63
  • Page 64 64
  • Page 65 65
  • Page 66 66
  • Page 67 67
  • Page 68 68
  • Page 69 69
  • Page 70 70
  • Page 71 71
  • Page 72 72
  • Page 73 73
  • Page 74 74
  • Page 75 75
  • Page 76 76
  • Page 77 77
  • Page 78 78
  • Page 79 79
  • Page 80 80
  • Page 81 81
  • Page 82 82
  • Page 83 83
  • Page 84 84
  • Page 85 85
  • Page 86 86
  • Page 87 87
  • Page 88 88
  • Page 89 89
  • Page 90 90
  • Page 91 91
  • Page 92 92
  • Page 93 93
  • Page 94 94
  • Page 95 95
  • Page 96 96
  • Page 97 97
  • Page 98 98
  • Page 99 99
  • Page 100 100
  • Page 101 101

Braun 760cc-4 - 5693 User manual

Category
Men's shavers
Type
User manual
This manual is also suitable for

Ask a question and I''ll find the answer in the document

Finding information in a document is now easier with AI