2726
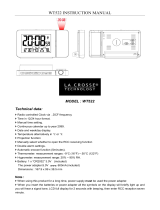
Radio-controlled projection alarm clock with thermometer
Radio-controlled projection alarm clock with thermometer
7. Manual settings
• Press and hold the ▲ or ▼ button in setting mode for fast mode.
• The device will automatically quit the setting mode if no button is pressed for 15 seconds.
7.1 Manual setting of the clock and calendar
• Press and hold the MODE / SET button for 3 seconds.
• RCC ON starts to flash.
• By default, the DCF reception is activated (RCC ON) and after successful reception of the DCF signal no
manual time setting is necessary.
• In the setting mode, press the ▲ or ▼ button if you want to deactivate the DCF reception (RCC OF).
• Press the MODE / SET button again and the setting sequence is shown as follows: Time zone (default:
00), hours, minutes, seconds, the language of the day-of-the-week (GER default), year, day/month
sequence (European version) or month/day sequence (American version), month and day. Adjust the set-
tings with the ▲ or ▼ button.
• If the DCF reception is activated (RCC ON), the manually set time will be overwritten by the DCF time
when the signal is received successfully.
7.1.1 Setting of the time zone
• The time zone correction is needed for countries where the DCF signal can be received but the time zone
is different from the DCF time (e.g. +1=one hour plus).
• There are 3 different reception states:
Symbol flashing – reception is active
Symbol solid – reception is very good
No symbol – reception is deactivated/turned off
Radio-controlled time reception
The time base for the radio-controlled time is a caesium atomic clock operated by the Physikalisch Technische
Bundesanstalt based in Braunschweig (Brunswick), Germany. It has a time deviation of less than one second
in one million years. The time is coded and transmitted from Mainflingen near Frankfurt via the frequency sig-
nal DCF-77 (77.5 kHz) and has a transmitting range of approximately 1,500 km. Your radio clock receives the
signal, converts it and always shows the exact time. The adjustment to Daylight Saving Time (summer/winter
time) is automatic. In Daylight Saving Time DST is shown on the display. The reception quality depends main-
ly on geographic location. Normally there should be no reception problems within a 1,500 km radius around
Frankfurt.
Therefore, please note the following steps:
• The recommended distance to any interfering sources like computer screens or TV sets is at least 1.5 -
2 meters.
• Within concrete walls (reinforced with steel) such as basements, the received signal is naturally weak-
ened. In extreme cases, please place the unit close to a window to improve reception.
• During night-time, the atmospheric interference is usually less severe and reception is possible in most
cases. A single daily reception is adequate to keep the accuracy deviation under 1 second.
TFA_No. 60.5016_Anleitung 18.04.2019 13:06 Uhr Seite 14