Maytag Gemini MGT8655X User manual

Category
Cookers
Type
User manual

This manual is also suitable for

GAS DOUBLE OVEN RANGE
Use & Care Guide
For questions about features, operation/performance, parts, accessories or service, call: 1-800-688-9900
In Canada, call: 1-800-807-6777
or visit our website at
www.maytag.com or www.maytag.ca
CUISINIÈRE À GAZ À DOUBLE FOUR
Guide d’utilisation et d’entretien
Au Canada, pour assistance, installation ou service, composez le : 1-800-807-6777
ou visitez notre site internet
www.maytag.ca
Table of Contents/Table des matieres.............................................................................2
W10291449A
2
TABLE OF CONTENTS
RANGE SAFETY .............................................................................3
The Anti-Tip Bracket ....................................................................4
COOKTOP USE ..............................................................................5
Cooktop Controls.........................................................................5
Sealed Surface Burners ...............................................................6
Griddle Accessory........................................................................6
Home Canning .............................................................................7
Cookware .....................................................................................7
ELECTRONIC OVEN CONTROLS.................................................8
Display..........................................................................................8
Cancel ..........................................................................................8
Oven Lights ..................................................................................8
Kitchen Timer ...............................................................................8
Settings ........................................................................................9
Oven Temperature Control ........................................................10
Control Lockout..........................................................................10
OVEN USE.....................................................................................11
Aluminum Foil.............................................................................11
Positioning Racks and Bakeware ..............................................11
Bakeware....................................................................................12
Meat Thermometer.....................................................................12
Oven Vents.................................................................................12
Baking.........................................................................................12
Broiling........................................................................................13
Convection Cooking - Lower Oven Only...................................14
Keep Warm™ Feature................................................................15
Automatic Shutoff/Sabbath Mode.............................................15
Favorite.......................................................................................16
Delay Start..................................................................................16
RANGE CARE ...............................................................................17
Self-Cleaning Cycle....................................................................17
General Cleaning........................................................................19
Oven Light ..................................................................................20
Oven Door ..................................................................................20
TROUBLESHOOTING ..................................................................21
ASSISTANCE OR SERVICE.........................................................22
In the U.S.A. ...............................................................................22
Accessories................................................................................22
In Canada ...................................................................................22
WARRANTY ..................................................................................23
TABLE DES MATIÈRES
SÉCURITÉ DE LA CUISINIÈRE ...................................................24
La bride antibasculement...........................................................25
UTILISATION DE LA TABLE DE CUISSON................................26
Commandes de la table de cuisson ..........................................26
Brûleurs de surface scellés ........................................................27
Plaque à frire accessoire............................................................27
Préparation de conserves à la maison.......................................28
Ustensiles de cuisson ................................................................28
COMMANDES ÉLECTRONIQUES DU FOUR ............................29
Affichage.....................................................................................29
Annulation...................................................................................29
Lampes du four ..........................................................................29
Minuterie de cuisine ...................................................................29
Réglages.....................................................................................30
Commande de la température du four ......................................32
Verrouillage des commandes.....................................................32
UTILISATION DU FOUR...............................................................32
Papier d’aluminium.....................................................................32
Positionnement des grilles et des ustensiles de
cuisson au four...........................................................................33
Ustensiles de cuisson au four....................................................34
Thermomètre à viande ...............................................................34
Évents du four ............................................................................34
Cuisson au four ..........................................................................34
Cuisson au gril............................................................................35
Cuisson par convection - four inférieur uniquement .................36
Caractéristique Keep Warm™ ...................................................37
Arrêt automatique/Mode Sabbat ...............................................38
Favori..........................................................................................39
Mise en marche différée.............................................................39
ENTRETIEN DE LA CUISINIÈRE.................................................40
Programme d'autonettoyage .....................................................40
Nettoyage général ......................................................................42
Lampe du four ............................................................................43
Porte du four...............................................................................43
DÉPANNAGE.................................................................................44
ASSISTANCE OU SERVICE.........................................................46
Au Canada..................................................................................46
Accessoires ................................................................................46
GARANTIE.....................................................................................47
3
RANGE SAFETY
You can be killed or seriously injured if you don't immediately
You
can be killed or seriously injured if you don't
follow
All safety messages will tell you what the potential hazard is, tell you how to reduce the chance of injury, and tell you what can
happen if the instructions are not followed.
Your safety and the safety of others are very important.
We have provided many important safety messages in this manual and on your appliance. Always read and obey all safety
messages.
This is the safety alert symbol.
This symbol alerts you to potential hazards that can kill or hurt you and others.
All safety messages will follow the safety alert symbol and either the word “DANGER” or “WARNING.”
These words mean:
follow instructions.
instructions.
DANGER
WARNING
WARNING: If the information in this manual is not followed exactly, a fire or explosion
may result causing property damage, personal injury or death.
Do not store or use gasoline or other flammable vapors and liquids in the vicinity of this
or any other appliance.
WHAT TO DO IF YOU SMELL GAS:
Do not try to light any appliance.
Do not touch any electrical switch.
Do not use any phone in your building.
Immediately call your gas supplier from a neighbor's phone. Follow the gas supplier's
instructions.
If you cannot reach your gas supplier, call the fire department.
Installation and service must be performed by a qualified installer, service agency or
the gas supplier.
WARNING: Gas leaks cannot always be detected by smell.
Gas suppliers recommend that you use a gas detector approved by UL or CSA.
For more information, contact your gas supplier.
If a gas leak is detected, follow the “What to do if you smell gas” instructions.
State of California Proposition 65 Warnings:
WARNING: This product contains a chemical known to the State of California to cause cancer.
WARNING: This product contains a chemical known to the State of California to cause birth defects or other reproductive harm.
4
The Anti-Tip Bracket
The range will not tip during normal use. However, the range can tip if you apply too much force or weight to the open door without the
anti-tip bracket fastened down properly.
Tip Over Hazard
A child or adult can tip the range and be killed.
Connect anti-tip bracket to rear range foot.
Reconnect the anti-tip bracket, if the range is moved.
See the installation instructions for details.
Failure to follow these instructions can result in death or serious burns to children and adults.
Anti-Tip
Bracket
Making sure the anti-tip bracket is installed:
Slide range forward.
Look for the anti-tip bracket securely attached to floor or wall.
Slide range back so rear range foot is under anti-tip bracket.
Range Foot
WARNING
SAVE THESE INSTRUCTIONS
IMPORTANT SAFETY INSTRUCTIONS
WARNING: To reduce the risk of fire, electrical shock, injury to
persons, or damage when using the range, follow basic
precautions, including the following:
WARNING:
TO REDUCE THE RISK OF TIPPING OF THE
RANGE, THE RANGE MUST BE SECURED BY PROPERLY
INSTALLED ANTI-TIP DEVICES. TO CHECK IF THE DEVICES
ARE INSTALLED PROPERLY, SLIDE RANGE FORWARD, LOOK
FOR ANTI-TIP BRACKET SECURELY ATTACHED TO FLOOR,
AND SLIDE RANGE BACK SO REAR RANGE FOOT IS UNDER
ANTI-TIP BRACKET.
WARNING:
NEVER use this appliance as a space heater to
heat or warm the room. Doing so may result in carbon monoxide
poisoning and overheating of the oven.
WARNING:
NEVER cover any slots, holes or passages in the
oven bottom or cover an entire rack with materials such as
aluminum foil. Doing so blocks air flow through the oven and may
cause carbon monoxide poisoning. Aluminum foil linings may also
trap heat, causing a fire hazard.
CAUTION:
Do not store items of interest to children in cabinets
above a range or on the backguard of a range – children climbing
on the range to reach items could be seriously injured.
Proper Installation – The range, when installed, must be electrically
grounded in accordance with local codes or, in the absence of
local codes, with the National Electrical Code, ANSI/NFPA 70. In
Canada, the range must be electrically grounded in accordance
with Canadian Electrical Code. Be sure the range is properly
installed and grounded by a qualified technician.
This range is equipped with a three-prong grounding
plug for your protection against shock hazard and
should be plugged directly into a properly grounded
receptacle. Do not cut or remove the grounding
prong from this plug.
Disconnect power before servicing.
Injuries may result from the misuse of appliance
doors or drawers such as stepping, leaning, or
sitting on the doors or drawers.
Maintenance – Keep range area clear and free from
combustible materials, gasoline, and other
flammable vapors and liquids.
Storage in or on the Range – Flammable materials
should not be stored in an oven or near surface
units.
Top burner flame size should be adjusted so it does
not extend beyond the edge of the cooking utensil.
For self-cleaning ranges –
Before Self-Cleaning the Oven – Remove broiler pan
and other utensils. Wipe off all excessive spillage
before initiating the cleaning cycle.
5
COOKTOP USE
Cooktop Controls
IMPORTANT: Your range is factory-set for use with Natural gas. If
you wish to use LP gas, an LP Gas Conversion Kit is included
with your new range. See the “Gas Conversions” section of the
Installation Instructions for details on making this conversion.
Electric igniters automatically light the surface burners when
control knobs are turned to LIGHT.
The large burners (16,000, 14,000 and 12,500 Btu/h [British
Thermal Units]) provide the highest heat setting, and are ideal for
cooking large quantities of food or liquid, using large pots and
pans. The small burners (9,200 and 5,000 Btu/h) allow more
accurate simmer control at the lowest setting, and are ideal for
cooking smaller quantities of food, using smaller pots and pans.
Before setting a control knob, place filled cookware on the grate.
Do not operate a burner while using empty cookware or without
any cookware on the grate.
NOTE: Visually check that the burner has lit. If the burner does
not ignite, listen for a clicking sound. If you do not hear the igniter
click, turn the burner off. Check for a tripped circuit breaker or
blown household fuse.
Check that the control knob is pressed completely down on the
valve shaft. If the spark igniter still does not operate, call a trained
repair specialist.
To Set:
1. Push in and turn knob counterclockwise to LIGHT.
All the surface burners will click. Only the burner with the
control knob turned to LIGHT will produce a flame.
2. Turn knob anywhere between HI and LO. Use the following
chart as a guide when setting heat levels.
A. Left front control knob
B. Left rear control knob
C. Center burner (on some models) D. Right rear control knob
E. Right front control knob
A
B
C
D
E
WARNING
Fire Hazard
Do not let the burner flame extend beyond the edge of
the pan.
Turn off all controls when not cooking.
Failure to follow these instructions can result in death
or fire.
SETTING RECOMMENDED USE
LIGHT Light the burner.
HI
Start food cooking.
Bring liquid to a boil.
MED (Medium)
Hold a rapid boil.
Quickly brown or sear food.
Fry or sauté foods.
Cook soups, sauces and gravies.
Stew or steam foods.
LO Keep food warm.
Simmer.
REMEMBER: When range is in use or (on some models)
during the Self-Cleaning cycle, the entire cooktop area may
become hot.
6
Sealed Surface Burners
IMPORTANT: Do not obstruct the flow of combustion and
ventilation air around the burner grate edges.
Burner cap: Always keep the burner cap in place when using a
surface burner. A clean burner cap will help avoid poor ignition
and uneven flames. Always clean the burner cap after a spillover
and routinely remove and clean the caps according to the
“General Cleaning” section.
Gas tube opening: Gas must flow freely throughout the gas tube
opening for the burner to light properly. Keep this area free of soil
and do not allow spills, food, cleaning agents or any other
material to enter the gas tube opening. Keep spillovers out of the
gas tube by always using a burner cap.
Burner ports: Check burner flames occasionally for proper size
and shape as shown above. A good flame is blue in color, not
yellow. Keep this area free of soil and do not allow spills, food,
cleaning agents or any other material to enter the burner ports.
To Clean:
IMPORTANT: Before cleaning, make sure all controls are off and
the oven and cooktop are cool. Do not use oven cleaners, bleach
or rust removers.
1. Remove the burner cap from the burner base and clean
according to “General Cleaning” section.
2. Clean the gas tube opening with a damp cloth.
3. Clean clogged burner ports with a straight pin as shown. Do
not enlarge or distort the port. Do not use a wooden
toothpick. If the burner needs to be adjusted, contact a
trained repair specialist.
4. Replace the burner cap, making sure the alignment pins are
properly aligned with the burner cap.
5. Turn on the burner. If the burner does not light, check cap
alignment. If the burner still does not light, do not service the
sealed burner yourself. Contact a trained repair specialist.
Griddle Accessory
(on some models)
1. Turn off the cooktop burners and allow the grates to cool.
2. Place griddle on center grate with the grease trap toward the
cooktop controls.
A. Burner cap
B. Burner base
C. Alignment pins
D. Igniter
E. Gas tube opening
A. 1-1¹⁄₂" (25-38 mm)
B. Burner ports
A
B
D
E
C
B
A
A. Incorrect
B. Correct
A. Cooktop controls
B. Grease trap
C. Center of grate
A
B
A
B
C
7
3. The locating tabs on the bottom side of the griddle at the
grease trap end should be placed over the grate fingers
closest to the controls.
4. The notch of the griddle should fit over the center support of
the grate.
NOTE: When properly installed, the bottom of the griddle will
rest securely just above the top surface of the grate.
IMPORTANT: Do not allow griddle to overhang controls.
To Use:
IMPORTANT: To avoid damaging the griddle, the griddle is to be
used on the center burner on Low to Medium heat only.
The griddle is intended for direct food cooking. To avoid
damaging the finish of the griddle, do not use pans or metal
utensils on the griddle.
To avoid damaging the nonstick finish, do not use nonstick
cooking sprays.
Home Canning
When canning for long periods, alternate the use of surface
burners between batches. This allows time for the most recently
used areas to cool.
Center the canner on the grate.
Do not place canner on 2 surface burners at the same time.
For more information, contact your local agricultural
department. Companies that manufacture home canning
products can also offer assistance.
Cookware
IMPORTANT: Do not leave empty cookware on a hot surface
cooking area, element or surface burner.
Ideal cookware should have a flat bottom, straight sides and a
well-fitting lid, and the material should be of medium-to-heavy
thickness.
Rough finishes may scratch the grates. Aluminum and copper
may be used as a core or base in cookware. However, when used
as a base they can leave permanent marks on the grates.
Cookware material is a factor in how quickly and evenly heat is
transferred, which affects cooking results. A nonstick finish has
the same characteristics as its base material. For example,
aluminum cookware with a nonstick finish will take on the
properties of aluminum.
Cookware with nonstick surfaces should not be used under the
broiler.
Use the following chart as a guide for cookware material
characteristics.
A. Grate fingers closest to controls
B. Center support of grate
C. Notch
D. Locating tabs
A
B
C
D
COOKWARE CHARACTERISTICS
Aluminum
Heats quickly and evenly.
Suitable for all types of cooking.
Medium or heavy thickness is best for
most cooking tasks.
Cast iron
Heats slowly and evenly.
Good for browning and frying.
Maintains heat for slow cooking.
Ceramic or
Ceramic glass
Follow manufacturer’s instructions.
Heats slowly, but unevenly.
Ideal results on low to medium heat
settings.
Copper
Heats very quickly and evenly.
Earthenware
Follow manufacturer’s instructions.
Use on low heat settings.
Porcelain
enamel-on-
steel or cast
iron
See stainless steel or cast iron.
Stainless steel
Heats quickly, but unevenly.
A core or base of aluminum or copper
on stainless steel provides even
heating.
8
ELECTRONIC OVEN CONTROLS
This manual covers different models. The range you have purchased may have some or all of the items listed. The locations and
appearances of the items shown here may not match those of your model.
Display
When power is first supplied to the range, or if a power failure has
occurred, “12:00” will appear on the display. See “Clock” in the
“Settings” section to set time of day.
When the oven is not in use, the display shows the time of day.
Cancel
The Cancel pads stop any function except the Clock, Timer and
Control Lock.
When the clock display is canceled, press CLOCK to briefly
display the time of day.
To Restore:
Press and hold UPPER CANCEL or LOWER CANCEL and
CLOCK for 3 seconds. The time of day will reappear in the
display.
Oven Lights
While the oven doors are closed, press OVEN LIGHT to turn the
lights on and off. The oven light will come on when the oven
door(s) is opened. The oven lights will not come on during the
Self-Clean cycle.
Kitchen Timer
The Kitchen Timer can be set in hours or minutes up to 9 hours
and 59 minutes, and counts down the set time. The Kitchen
Timer does not start or stop the oven.
To Set:
1. Press KITCHEN TIMER.
“Set TIMER” will scroll down the upper text display area, and
the clock will display “--:--” with the colon flashing.
2. Press the Temp/Time “+” or “-” pads until the desired time is
reached.
“Press TIMER” will scroll down the upper text display area.
3. Press KITCHEN TIMER. The colon stops flashing, and the
time begins counting down. “TIMER STARTED” will scroll
down the upper text display area.
The last minute of the timer countdown will be displayed in
seconds.
At the end of the set time, one long beep will sound, and
“TIMER End” will be displayed.
4. Press KITCHEN TIMER to clear the display.
NOTE: A reminder beep will sound until the Kitchen Timer is
canceled.
To Cancel:
Press KITCHEN TIMER.
A. Upper oven settings
B. Oven display
C. Cook time
D. Delay start
E. Favorite setting
F. Se lf cle an
G. Settings
H. Oven light
I. Clock
J. Kitchen timer on/off
K. Lower oven cancel
L. Upper oven cancel
M. Start
N. Temp/time “up” and “down” pads
O. Lower oven settings
A
B
CD E
F
G
H
I
J
K
LMN
O
9
Settings
Fahrenheit and Celsius
The temperature is factory preset to Fahrenheit, but can be
changed to Celsius.
1. Press SETTINGS once.
“TEMP UNIT” will appear in the upper text area while
“Fahrenheit Press (+) for Celsius” will scroll twice from right to
left in the lower text area.
2. Press the Temp/Time “+” pad to change the temperature unit
setting.
“CELSIUS. Press (+) for Fahrenheit” will scroll twice from right
to left in the lower text area.
3. “CELSIUS Selected” will scroll twice from right to left in the
lower text area. The temperature units have been changed.
Ton e s
Tones are audible signals, indicating the following:
Basic Functions
One tone
Valid pad press
End of Kitchen Timer (long tone)
Function has been entered
Two tones
Oven is preheated
Three tones
Invalid pad press
Four tones
End of cycle
Adjusting Sound On or Off
The oven sound is factory preset for On but can be changed to
Off.
1. Press SETTINGS twice until “SOUND” appears in the upper
text area and “ON. Press (+) for OFF” scrolls twice from right
to left in the lower text area.
2. Press the Temp/Time “+” pad to turn the sound Off. “OFF
Press (+) for ON” will scroll twice from right to left in the lower
text area.
3. “OFF Selected” will scroll twice from right to left in the lower
text area. The sound has now been turned off.
Adjusting Sound Volume
The oven sound is factory preset for High but can be changed to
Low.
1. Press SETTINGS three times until “SOUND VOLUME” will
appear in the upper text area and “HIGH Press (+) for LOW
scrolls twice from right to left in the lower text area.
2. Press the Temp/Time “+” pad to turn the sound Low. “LOW
Press (+) for High” will scroll twice from right to left in the
lower text area.
3. LOW Selected” will scroll twice from right to left in the lower
text area. The sound volume has now been changed.
Adjusting End Tone On or Off
The end tone is factory preset for On but can be changed to Off.
1. Press SETTINGS four times until “END TONE” appears in the
upper text area and “ON. Press (+) for OFF” scrolls twice from
right to left in the lower text area.
2. Press the Temp/Time “+” pad to turn the end tone Off. “OFF
Press (+) for ON” will scroll twice in the lower text area.
3. “OFF Selected” will scroll twice from right to left in the lower
text area. The end tone has now been turned off.
Adjusting Keypress Tone On or Off
The keypress tone is factory preset for On but can be changed to
Off.
1. Press SETTINGS five times until “KEYPRESS TONE” appears
in the upper text area and “ON. Press (+) for OFF” scrolls
twice from right to left in the lower text area.
2. Press the Temp/Time “+” pad to turn the keypress tone Off.
“OFF. Press (+) for ON” will scroll twice in the lower text area.
3. “OFF Selected” will scroll twice from right to left in the lower
text area. The keypress tone has now been turned off.
Adjusting Reminder Tone On or Off
The reminder tone is factory preset for On but can be changed to
Off.
1. Press SETTINGS six times until “REMINDER TONE” appears
in the upper text area and “ON. Press (+) for OFF” scrolls
twice from right to left in the lower text area.
2. Press the Temp/Time “+” pad to turn the reminder tone Off.
“OFF. Press (+) for ON” will scroll twice in the lower text area.
3. “OFF Selected” will scroll twice from right to left in the lower
text area. The reminder tone has now been turned off.
Clock
The clock can be set to display time in a 12-hour or 24-hour
format. The clock is factory preset at the factory for the 12-hour
format.
To Change the Clock to 24-Hour Format:
1. Press SETTINGS seven times until “12/24 HOUR” scrolls
from top to bottom in the upper text area and “12 HR
Press (+) for 24 Hr” appears in the lower text area.
2. Press the Temp/Time “+” pad once to select 24 hour and
again to select 12 hour.
3. Wait 30 seconds or press CANCEL to accept the setting.
To Set the Clock:
Before setting, make sure the oven and Kitchen Timer are off.
1. Press CLOCK. “Set Time” will appear in the upper text area.
2. Press the Temp/Time “+” or “-” pads until the desired time is
displayed.
3. “Press CLOCK” will appear in the upper text area and “or
Push START” will appear in the lower text area.
4. Press CLOCK or START. “Time Set” will appear in the upper
text area. Once it disappears, the time is set.
10
Sabbath Mode
Sabbath Mode is used to configure the oven system so that
certain features and modes are disabled or defeatured. By
enabling Sabbath Mode, the oven will conform to Star-K Jewish
Sabbath requirements.
The oven is factory preset with Sabbath Mode Off.
To Enable Sabbath mode (one time only):
1. Press SETTINGS eight times until “SABBATH” appears in the
upper text area.
2. Press the Temp/Time “+” pad to enable Sabbath Mode.
3. “ON Selected” will scroll twice in the text area. The oven is
now in Sabbath Mode.
12-Hour Auto Off
The oven control is set to automatically shut off the oven
12 hours after the oven turns on. This will not interfere with any
timed or delayed cook function.
To Cancel 12-Hour Auto Off:
1. Press SETTINGS nine times until “12 Hr AUTO_OFF” appears
in the upper text area and “ON. Press (+) for Off” scrolls twice
from right to left in the lower text area.
2. Press the Temp/Time “+” pad to turn off the 12-hour Auto Off
feature.
“OFF. Press (+) for ON” will scroll twice from right to left in the
lower text area.
3. “OFF Selected” will scroll twice from right to left in the lower
text area. The feature has been turned off.
Language
The Language is factory preset to English but can be changed to
French or Spanish.
To Change the Language to French:
1. Press SETTINGS 10 times until “LANGUAGE” appears in the
upper text area and “ENGLISH. Press (+) for French Press (-)
for Spanish” scrolls twice from right to left in the lower text
area.
2. Press the Temp/Time “+” pad to select French.
“FRENCH. Press (+) for English Press (-) for Spanish” will
scroll, in French, twice from right to left in the lower text area.
3. “FRENCH Selected” will scroll, in French, twice from right to
left in the lower text area.
4. The language displayed will now be French.
To Change the Language to Spanish:
1. Press SETTINGS 10 times until “LANGUAGE” appears in the
upper text area and “ENGLISH. Press (+) for French Press (-)
for Spanish” scrolls twice from right to left in the lower text
area.
2. Press the Temp/Time “-” pad to select Spanish.
“SPANISH. Press (+) for French Press (-) for English” will
scroll, in Spanish, twice from right to left in the lower text
area.
3. “SPANISH Selected” will scroll, in Spanish, twice from right to
left in the lower text area.
4. The language displayed will now be Spanish.
Oven Temperature Control
The oven provides accurate temperatures; however, it may cook
faster or slower than your previous oven, so the temperature
calibration can be adjusted. It can be changed in Fahrenheit or
Celsius.
Temperature adjustment applies to upper or lower ovens.
A minus sign means the oven will be cooler by the displayed
amount. The absence of a minus sign means the oven will be
warmer by the displayed amount. Use the following chart as a
guide.
To Adjust Oven Temperature Calibration:
1. Press SETTINGS 11 times until “TEMP CALIB” appears in the
upper text area and “UPPER CALIBRATE. Press (+) for Lower
calibrate or push START” scrolls twice from right to left in the
lower text area.
2. Press START to calibrate the upper oven. “UPPER Calibrate
selected” will scroll twice from right to left in the lower text
area. “UPPER calibrate” is shown in the upper text area and
“Press (+) or (-) to set offset” scrolls twice from right to left in
the lower text area.
OR
Press “+” to calibrate the lower oven. “LOWER Calibrate
selected” scrolls twice in the lower text area. “LOWER
Calibrate” is shown in the upper text area and “Press (+) or (-)
to set offset” scrolls twice in the lower text area.
3. Press the Temp/Time “+” pad to increase or decrease the
temperature in 5°F (3°C) increments. The adjustment can be
set between 30°F (17°C) and -30°F (-17°C).
4. Press START to set the adjustment and exit the Temperature
Calibration menu.
Control Lockout
The control can be locked out to avoid unintended use of the
oven.
The control cannot be locked if the oven is in use, or the oven
temperature is 400°F (205°C) or above.
The current time of day will remain in the display when the control
is locked.
To Lock Control:
1. Press and hold START for 3 seconds or until “CONTROL
LOCKED” appears in the display. “Control locked” scrolls
while the control is locking, then “LOCKED” is displayed.
“LOCKED” remains lit in the display.
To Unlock Control:
1. Press and hold START for 3 seconds. “Press and hold start”
will scroll in the display.
“Unlocking” will appear in the display while the control is
unlocking, then the time of day is displayed.
ADJUSTMENT °F
(ADJUSTMENT °C)
COOKS FOOD
10°F (6°C) ...a little more
20°F (12°C) ...moderately more
30°F (17°C) ...much more
-10°F (-6°C) ...a little less
-20°F (-12°C) ...moderately less
-30°F (-17°C) ...much less
11
OVEN USE
Odors and smoke are normal when the oven is used the first few
times, or when it is heavily soiled.
IMPORTANT: The health of some birds is extremely sensitive to
the fumes given off. Exposure to the fumes may result in death to
certain birds. Always move birds to another closed and well-
ventilated room.
Aluminum Foil
IMPORTANT: To avoid permanent damage to the oven bottom
finish, do not line the oven bottom with any type of foil, liner or
cookware.
For best cooking results, do not cover entire rack with foil
because air must be able to move freely.
To catch spills, place foil on rack below dish. Make sure foil is
at least ¹⁄₂" (1.3 cm) larger than the dish and that it is turned
up at the edges.
Positioning Racks and Bakeware
IMPORTANT: To avoid permanent damage to the porcelain
finish, do not place food or bakeware directly on the oven door or
bottom.
Racks
Position racks before turning on the oven.
Do not position racks with bakeware on them.
Make sure racks are level.
The upper oven is equipped with 1 flat rack.
The lower oven is equipped with 2 flat racks.
To Remove Oven Racks:
Flat Racks: Pull rack out to the stop position, raise the front edge,
and then lift out.
To Replace Oven Racks:
Flat Racks: Place rack on the rack support in the oven. Tilt the
front edge up slightly, and slide rack back until it clears the stop
position. Lower front and slide back into the oven.
Rack Positions - Upper Oven
Baking
Broiling
Rack Positions - Lower Oven
Traditional Cooking
Multiple Rack Cooking
2-rack: Use rack positions 2 and 4.
Baking Layer Cakes on 2 Racks
For best results when baking cakes on 2 racks, use racks 2 and 4
for baking. Place the cakes on the racks as shown.
FOOD RACK POSITION
Large dishes 1
Most foods 2
FOOD RACK POSITION
Broiling 1
FOOD RACK POSITION
Large roasts, turkeys, angel food, bundt
and tube cakes, quick breads, pies
1 or 2
Yeast breads, casseroles, meat and
poultry and 2-rack baking
2
Cookies, biscuits, muffins, cakes,
1- rack baking
2 or 3
2-rack baking 4 and 5, or 2 and 4,
or 2 and 5
1
2
5
4
3
2
1
12
Convection Cooking (on some models)
BAKEWARE
To cook food evenly, hot air must be able to circulate. Allow
2" (5.0 cm) of space around bakeware and oven walls. Use the
following chart as a guide.
Bakeware
The bakeware material affects cooking results. Follow
manufacturer’s recommendations and use the bakeware size
recommended in the recipe. Use the following chart as a guide.
Meat Thermometer
On models without a temperature probe, use a meat
thermometer to determine whether meat, poultry and fish, are
cooked to the desired degree of doneness. The internal
temperature, not appearance, should be used to determine
doneness. A meat thermometer is not supplied with this
appliance. Follow manufacturer's directions for using a meat
thermometer.
Oven Vents
The oven vents release hot air and moisture from the ovens, and
should not be blocked or covered. Blocking or covering the vents
will cause poor air circulation, affecting cooking and cleaning
results. Do not set plastics, paper or other items that could melt
or burn near the oven vents.
Baking
Before baking, position racks according to the “Positioning
Racks and Bakeware” section.
If only one oven is to be used, that oven will preheat more
quickly.
Allow at least ½" (1.3 cm) between the baking pan or
casserole and the top element in the upper oven. Loaf, angel
food or bundt pans are not recommended in the upper oven.
When preheating with a baking/pizza stone inside the upper
oven, do not set oven above 400°F (205°C). To use baking/
pizza stones at temperatures above 400°F (205°C) in the
upper oven, put stone in after the preheat beep.
To Bake:
1. Press the BAKE keypad for desired oven.
“BAKE” will scroll in the upper or lower text area (depending
on oven selection), and 350°F (175°C) will be displayed.
After 3 seconds, “Set temp or” will scroll in the selected oven
text area, followed by “Push START.”
2. Press the Temp/Time “+” or “-” pads until the desired
temperature is displayed.
NOTE: The temperature may be changed at any time by
pressing the Temp/Time “+” or “-” pads until the desired
temperature is displayed and then START. Changing the
temperature once food is placed in the oven could affect the
preheat cycle.
3. (Optional) If a Set Cooking Time is desired, press COOK
TIME. Press the Temp/Time “+” or “-” pads to adjust the cook
time by 5-minute increments until the desired time is
displayed.
“Push START” will scroll in the selected oven text area.
FUNCTION NUMBER OF
RACKS USED
RACK
POSITION(S)
Convection baking or
roasting
1 1, 2 or 3
Convection baking 2 2 and 4
NUMBER
OF PAN(S)
POSITION ON RACK
1 Center of rack.
2 Side by side or slightly staggered.
3 or 4 Opposite corners on each rack. Make sure that
no bakeware piece is directly over another.
BAKEWARE/
RESULTS
RECOMMENDATIONS
Light colored
aluminum
Light golden crusts
Even browning
Use temperature and time
recommended in recipe.
Dark aluminum and
other bakeware with
dark, dull and/or
nonstick finish
Brown, crisp
crusts
May need to reduce baking
temperatures slightly.
Use suggested baking time.
For pies, breads and casseroles,
use temperature recommended in
recipe.
Place rack in center of oven.
Insulated cookie
sheets or baking
pans
Little or no bottom
browning
Place in the bottom third of oven.
May need to increase baking time.
Stainless steel
Light, golden
crusts
Uneven browning
May need to increase baking time.
Stoneware/Baking
stone
Crisp crusts
Follow manufacturer’s instructions.
Ovenproof
glassware, ceramic
glass or ceramic
Brown, crisp
crusts
May need to reduce baking
temperatures slightly.
A. Oven vents
A
13
4. Press START to begin preheating oven.
“Baking” will appear in the selected oven text area.
After 3 seconds, “Rapid preheating for single rack baking”
will scroll in the selected oven text area until the set
temperature is reached.
5. When the preheat cycle is complete, “Preheat done insert
food for one rack baking only” will scroll twice in the selected
oven text area.
“Bake” will scroll in the selected oven text area until CANCEL
for the selected oven is pressed.
6. Place food in the oven.
7. Press UPPER or LOWER CANCEL when finished.
8. Remove food from the oven.
Broiling
Broiling uses direct radiant heat to cook food. The lower the
temperature, the slower the cooking. Thicker cuts and unevenly
shaped pieces of meat, fish and poultry may cook better at lower
broiling temperatures.
For best results, use a broiler pan and grid. They are
designed to drain juices and help avoid spatter and smoke.
If you would like to purchase a broiler pan, one may be
ordered. See “Assistance or Service” section to order. Ask for
Part Number 4396923.
For proper draining, do not cover the grid with foil. The
bottom of the pan may be lined with aluminum foil for easier
cleaning.
Trim excess fat to reduce spattering. Slit the remaining fat on
the edges to avoid curling.
Select HI/550°F (288°C) broil for most broiling. Select LO/
450°F (232°C) broil for low-temperature broiling of longer
cooking foods such as poultry to avoid overbrowning.
Pull out oven rack to stop position before turning or removing
food. Use tongs to turn food to avoid the loss of juices. Very
thin cuts of fish, poultry or meat may not need to be turned.
After broiling, remove the pan from the oven when removing
the food. Drippings will bake on the pan if left in the heated
oven, making cleaning more difficult.
Before broiling, position rack according to the Broiling Chart.
Position food on grid in the broiler pan, then place it in the center
of the oven rack. Close the door.
To Broil Using Hi/Low Temperature Settings:
1. Press BROIL.
“BROIL” will appear in the upper text area, and HI will be
displayed.
After 3 seconds, “Set temp or” will scroll in the upper text
area, followed by “Push START.”
2. Press the Temp/Time “+” or “-” pads to adjust the broil
temperature setting to HI or LO.
3. Press START.
“Broiling” will scroll in the upper text area and remains there
until the set temperature is reached.
Then “BROIL” will scroll in the upper text area until UPPER
CANCEL is pressed.
4. Place food in the oven.
5. Press UPPER CANCEL when finished.
6. Remove food from the oven.
BROILING CHART
Broil times are based on a 5-minute preheat. Times are guidelines only and may need to be adjusted for individual tastes. Turn meat
halfway through cooking time. Recommended rack positions are numbered from the bottom (1) to the top (5). For diagram, see the
“Positioning Racks and Bakeware” section.
*When broiling fish, spray broil pan with cooking oil. Do not turn fish filets.
FOOD RACK POSITION SETTING
UPPER OVEN COOK TIME
(minutes)
Steak
1" (2.5 cm) thick
medium 1 HI 12-16
Ground meat patties
4 oz (113 g), ³" (2.0 cm) thick
up to 12, well-done
up to 6, well done
1
1
HI
HI
15-20
12-16
Pork chops
1" (2.5 cm) thick,
well-done 1 HI 20-25
Chicken
bone-in, skin-on breast pieces
well-done 1 LO 30-40
Fish*
Filets, flaky
Steaks, 1" (2.5 cm) thick, flaky
1
1
LO
LO
6-7
10-14
14
Convection Cooking - Lower Oven Only
(on some models)
During convection cooking, the fan provides increased hot air
circulation continuously and more consistently throughout the
oven. The movement of heated air around the food helps to
speed up cooking by penetrating the cooler outer surfaces. Food
cooks more evenly, browning and crisping outer surfaces while
sealing moisture inside.
During the Convect function, the ring element (on some models)
operates along with the fan to heat the oven cavity. If the oven
door is opened during convection cooking or preheating, the
element(s) and fan will turn off immediately. Once the door is
closed, it will come back on.
It is important not to cover foods so that surface areas remain
exposed to the circulating air, allowing browning and crisping.
Keep heat loss to a minimum by only opening the oven door
when necessary.
Choose cookie sheets without sides and roasting pans with
lower sides to allow air to move freely around the food.
Test baked goods for doneness a few minutes before the
minimum cooking time with a method such as a toothpick.
Use a meat thermometer to determine the doneness of meats
and poultry. Check the temperature of pork and poultry in 2 or
3 different places, including the thickest part.
Before convection cooking, position the rack(s) according to
the “Positioning Racks and Bakeware” section.
When using more than one rack, position bakeware/
cookware on the racks to allow movement of the fan
circulated air around the food. See the “Positioning Racks
and Bakeware” section.
If the oven is full, extra cooking time may be needed.
For optimal cooking results, do not cover food.
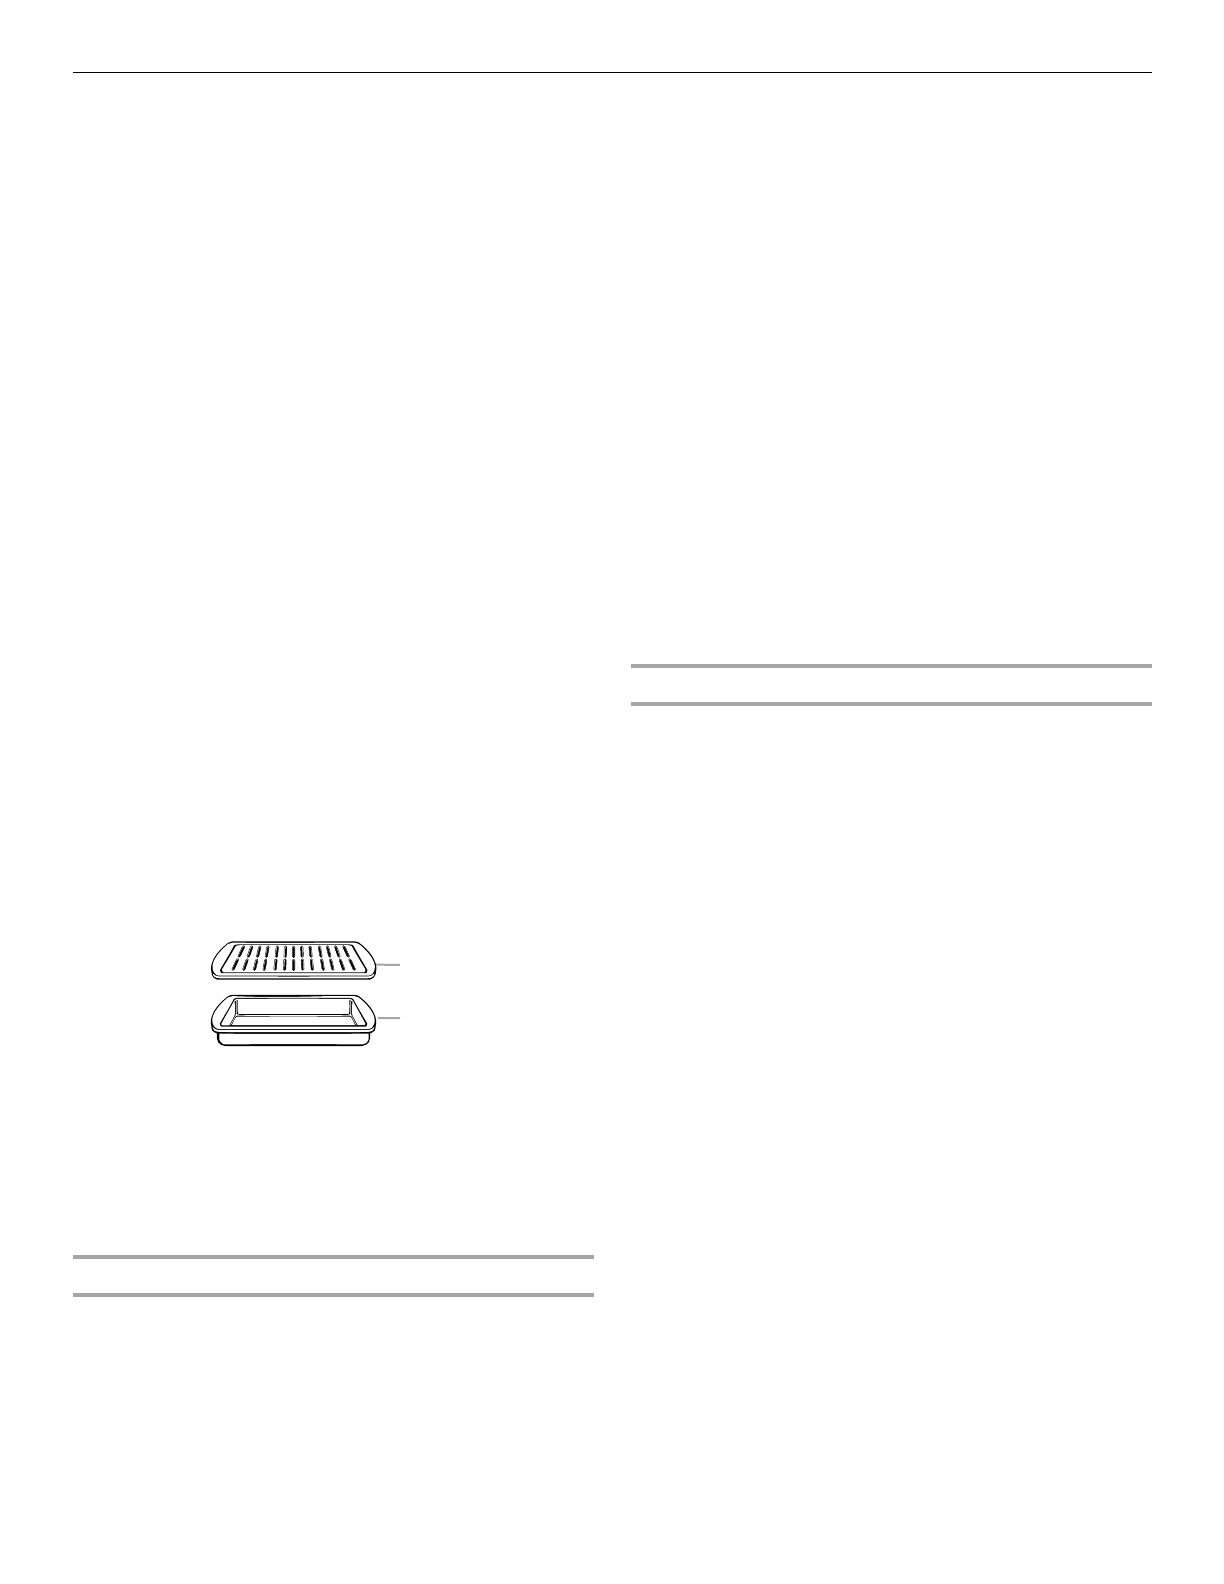
When roasting poultry and meat, use a broiler pan and grid. It
is not necessary to wait for the oven to preheat, unless
recommended in the recipe.
To order a broiler pan, see the “Assistance or Service”
section.
Preheating
During the CONVECT preheating cycle, the fan, ring element (on
some models) and bake burner heat the oven cavity. When
preheating is finished, the ring element (on some models) cycles
to maintain the oven temperature while the fan continues to
constantly circulate the heated air.
Convection Baking (on some models)
Use Convect for single or multiple rack baking. When convection
baking, reduce your recipe baking temperature by 25°F (15°C).
To Set Convect Bake:
1. Press CONVECT BAKE.
“CONVECT BAKE” will scroll in the lower text area, and 325°F
(163°C) will be displayed.
After 3 seconds, “Set temp or” will scroll in the lower oven
text area, followed by “Push START.”
2. Press the Temp/Time “+” or “-” pads until the desired
temperature is displayed.
3. Press START to begin preheating oven.
“CONVECT BAKE” will scroll in the lower oven text area and
“Rapid Preheating for single rack Press start to preheat for
multi-rack” will scroll in the lower oven text area until the set
temperature is reached.
4. “Insert food for one rack convect only” will scroll twice in the
lower text area once the one-rack preheat temperature is
reached.
5. “Insert food for multi rack baking only” will scroll twice in the
lower text area once the multi-rack preheat temperature is
reached.
6. When the preheat cycle is complete, “CONVECT BAKE” will
scroll in the lower oven text area until LOWER CANCEL is
pressed.
7. Place food in the oven.
To change the oven temperature during cooking, press the
Temp/Time “+” or “-” pads until the desired temperature is
displayed and then START.
8. Press LOWER CANCEL when finished.
9. Remove food from the oven.
Convection Roasting (on some models)
When convection roasting, enter your normal roasting
temperature. The roasting time should be set 15-30% less than
conventional cooking.
NOTE: It is not necessary to preheat the oven for convect roast.
1. Place food in oven.
2. Press CONVECT ROAST.
“CONVECT ROAST” will scroll in the lower text area, and
325°F (163°C) will be displayed.
“Set temp or” will scroll in the lower oven text area, followed
by “Push START.”
3. Press the Temp/Time “+” or “-” pads until the desired
temperature is displayed.
4. Press START.
“CONVECT ROAST” will scroll in the lower oven text area.
“Preheating” will scroll in the lower oven text area until the set
temperature is reached.
When the preheat cycle is complete, “CONVECT ROAST” will
scroll from bottom to top in the lower text area. The set
temperature will also be displayed.
To change the oven temperature during cooking, press the
Temp/Time “+” or “-” pads until the desired temperature is
displayed and then START.
“CONVECT ROAST” will scroll in the lower oven text area
until LOWER CANCEL is pressed.
5. Press LOWER CANCEL when finished.
6. Remove food from the oven.
A. Broiler grid
B. Broiler pan
A
B
15
Keep Warm™ Feature
IMPORTANT: Food must be at serving temperature before
placing it in the warmed oven. Food may be held up to 1 hour;
however, breads and casseroles may become too dry if left in the
oven during the Keep Warm™ function. For best results, cover
food.
The Keep Warm™ feature allows hot cooked foods to stay at
serving temperature.
To Use:
1. Press the KEEP WARM keypad for desired oven.
“KEEP WARM” will scroll in the upper or lower text area
(depending on oven selection), and 170°F (77°C) will be
displayed.
“Set temp or” will scroll in the selected oven text area,
followed by “Push START.
2. Press the Temp/Time “+” or “-” pads to adjust the
temperature by 5°F (3°C) increments until the desired
temperature is displayed.
The temperature can be set from 145°F (63°C) to
190°F (85°C).
NOTE: The temperature may be changed at any time by
pressing the Temp/Time “+” or “-” pads until the desired
temperature is displayed and then START.
3. Press START.
“Keep Warm” will appear in the selected oven text area, and
the set temperature will be displayed.
4. “KEEP WARM” and the temperature will be displayed while
the Keep Warm setting is active or CANCEL is pressed for the
selected oven.
5. Place food in the oven.
6. Press CANCEL for the selected oven when finished.
7. Remove food from the oven.
To Cancel Keep Warm™ Feature:
Press CANCEL for the oven that is in use. Remove food from
oven.
Automatic Shutoff/Sabbath Mode
The oven control is set to automatically shut off the oven
12 hours after the oven is turned on. This feature can be turned
off by using the Sabbath Mode.
12 Hour Shutoff Mode is disabled during an active Sabbath
mode.
All tones and chimes are disabled during an active Sabbath
mode.
All cooking and cleaning modes, except for Bake, are
disabled.
All keys are disabled during an active Sabbath mode except
for Cancel, Start, Kitchen Timer, and the Temp/Time “+” and
“-” keys.
Oven lights status will remain in the state they were in before
entering into the active Sabbath mode.
Once in the active Sabbath mode, the oven light will not
respond to the Oven Light key or the door being opened.
Timers are disabled during active Sabbath mode.
Cooktop burners can be enabled for use during Sabbath
Mode.
Cooktop lockout (if applicable) is disabled during the Sabbath
mode.
Energy saver is disabled during Sabbath mode.
To Enable Sabbath Mode (one time only):
1. Open the lower oven door.
2. Press LOWER CANCEL.
3. Press and hold the Temp/Time “+” pad for 5 seconds.
“Sabbath on” appears in the upper text display area, and
“Press START to enter” scrolls in the lower text display area.
4. Press START to confirm the selection.
“Sabbath Mode - on Holidays press (+) to change temp by
+25F and (-) to change temp by -25F and press Start” scrolls
in upper text display area.
Sabbath mode is now enabled but is not yet active.
5. Close the oven door.
A bake function for either, or both, ovens must be started
before Sabbath Mode can be activated. The bake function
may be set with Cook Time or Delay Start, if desired. See the
“Baking” or “Delay Start” sections for more information.
To Disable Sabbath Mode:
1. Open the lower oven door.
2. Press LOWER CANCEL.
3. Press and hold the Temp/Time “+” pad for 5 seconds or until
“Sabbath off” appears in the upper text display area.
4. Close the oven door.
WARNING
Food Poisoning Hazard
Do not let food sit in oven more than one hour before
or after cooking.
Doing so can result in food poisoning or sickness.
16
To Activate an Enabled Sabbath Mode:
Sabbath Mode can be activated at any time during an enabled
Sabbath Mode.
1. With a timed or untimed Bake function started (see the
“Bake” section for more information), press and hold
KITCHEN TIMER for 5 seconds. “Sabbath Bake” appears in
the upper text display area for 3 seconds.
For a Timed Bake function, the time will also be displayed.
After 3 seconds, the display will continuously scroll “Sabbath
Mode- on Holidays press (+) to change temp by +25F and (-)
to change temp by -25F and press Start.”
To Adjust Temperature (when Sabbath Mode is running in
only one oven):
1. Press the Temp/Time “+” or “-” pad. Each press of the pad
will increase or decrease temperature by 25°F (14°C). No
temperature will appear in the display.
2. Press and hold START longer than 1 second to set the
temperature change.
To Adjust Temperature (when Sabbath Mode is running in
both ovens):
1. Press BAKE for the desired oven.
2. Press the Temp/Time “+” or “-” pad. Each press of the pad
will increase or decrease temperature by 25°F (14°C). No
temperature will appear in the display.
3. Press and hold START longer than 1 second to set the
temperature change.
To Deactivate an Enabled Sabbath Mode:
1. Press and hold KITCHEN TIMER for 5 seconds to return to
regular baking or press CANCEL to turn off the oven(s).
If a Power Failure Occurs During Sabbath Mode
If a power failure occurs during Sabbath Mode, the upper text
display area will display “Sabbath.” Press UPPER or LOWER
CANCEL to exit Sabbath Mode and return to the Automatic
Shutoff Mode.
Favorite
The Favorite feature allows you to save the time and temperature
settings from any active cook function.
To Save a Cooking Function as a Favorite:
1. Press and hold FAVORITE until “PRESS + FOR UPPER
OVEN” appears in the upper text area, and “PRESS (-) FOR
LOWER OVEN” appears in the lower text area.
2. Press the Temp/Time “+” or “-” pad to select the oven in use.
The selected cooking function will be displayed in the
selected oven text display area for 3 seconds.
3. “SAVED” will scroll in the selected oven text display area for
3 seconds. If a cook time is programmed, it will be displayed.
4. The cooking function is now stored as a Favorite, and the
control resumes operation of the saved cooking function.
To Recall and Start a Favorite:
1. Press FAVORITE.
The name of the saved cook function will scroll into the
display text area of the oven that it was saved from for
3 seconds.
Then “Push START” will scroll in the display.
2. Press START.
The name of the saved cook function will scroll into the
display text area of the oven that it was saved from for
3 seconds followed, by the appropriate preheating message.
The temperature and time displays are active and indicate the
current oven temperature (if below 170°F, “Lo” is displayed)
and the countdown time elapsed.
The set temperature can be changed by pressing the Temp/
Time “+” or “-” pads, then START. Similarly, the Cook Time
can be changed by pressing COOK TIME then the Temp/Time
“+” or “-” pads to adjust to the desired time, then START.
Once the set temperature is reached, the temperature will
display, and the name of the saved cook function will scroll
into the display text area of the oven that it was saved from
until the Cook Time countdown has been completed.
3. Place food in the oven.
4. Press CANCEL for the oven that is being used when finished.
5. Remove food from the oven.
To Cancel a Favorite Cycle:
1. Press UPPER or LOWER CANCEL (depending on the oven
where the Favorite function is operating).
The stored Favorite cycle will not be affected.
2. Remove food from the oven.
Delay Start
Delay Start allows the oven(s) to cook for a set length of time. It
allows the oven(s) to be set to turn on at a certain time of day.
Delay Start should not be used for food such as breads and
cakes because they may not bake properly.
Delay Start is available with the Upper or Lower oven or with any
cooking or cleaning function. Before setting, a stop time must be
entered.
For more information on using Delay Clean, see “To Delay Clean”
in the “Range Care” section.
WARNING
Food Poisoning Hazard
Do not let food sit in oven more than one hour before
or after cooking.
Doing so can result in food poisoning or sickness.
WARNING
Food Poisoning Hazard
Do not let food sit in oven more than one hour before
or after cooking.
Doing so can result in food poisoning or sickness.
17
To Set a Delay Start:
1. Press Delay Start.
“PRESS (+) FOR UPPER OVEN” will scroll from top to bottom
in the upper text area, and “PRESS (-) FOR LOWER OVEN”
will scroll from bottom to top in the lower text area.
2. Press the Temp/Time “+” or “-” pads to select the desired
oven.
“--:--” will be displayed, and “Set start time. Push START” will
scroll from right to left in the selected oven text area for
2 minutes or until the Temp/Time “+” or “-” pads are pressed
again.
3. Press the Temp/Time “+” or “-” pads until the desired time is
reached.
“Select cooking/cleaning mode” will scroll in the selected
oven text area for 2 minutes or until a cooking cycle is
selected.
4. Press the desired cooking cycle key for upper or lower oven.
The name of the cooking function will scroll in the selected
oven text area, and a temperature value will be displayed.
After 3 seconds, “Set temp or” will scroll in the selected oven
text area.
5. Press the Temp/Time “+” or “-” pads until the desired
temperature is displayed.
“Push START” will scroll in the selected oven text area.
6. The cook time can be changed if desired by pressing the
Temp/Time “+” or “-” pads until the desired time is reached.
7. Press START.
The selected cooking cycle will begin once the cook time
countdown is complete, and the cycle name will scroll in the
upper text area.
8. Place food in the oven.
To change the oven temperature during cooking, press the
Temp/Time “+” or “-” pads until the desired temperature is
displayed and then START.
The cooking function name will remain in the selected oven
text area until the cook time countdown is complete. Once
the cook time countdown is complete, the oven in use will
turn off, then “Cooking Complete” will scroll in the selected
oven text area until UPPER or LOWER CANCEL is pressed or
the oven door is opened.
9. Press UPPER or LOWER CANCEL when finished.
10. Remove food from the oven.
RANGE CARE
Self-Cleaning Cycle
(on some models)
IMPORTANT: The health of some birds is extremely sensitive to
the fumes given off during the Self-Cleaning cycle. Exposure to
the fumes may result in death to certain birds. Always move birds
to another closed and well-ventilated room.
Self-clean the oven before it becomes heavily soiled. Heavy soil
results in longer cleaning and more smoke.
Keep the kitchen well-ventilated during the Self-Cleaning cycle to
help get rid of heat, odors, and smoke.
Do not block the oven vent(s) during the Self-Cleaning cycle. Air
must be able to move freely. Depending on your model, see
“Oven Vent” or “Oven Vents” section.
Do not clean, rub, damage or move the oven door gasket. The
door gasket is essential for a good seal.
Prepare Oven:
Remove the broiler pan, grid, cookware and bakeware and,
on some models, the temperature probe from the oven.
Remove oven racks to keep them shiny and easy to slide.
See “General Cleaning” section for more information.
Remove any foil from the oven because it may burn or melt,
damaging the oven.
Hand clean inside door edge and the 1½" (3.8 cm) area
around the inside oven cavity frame, being certain not to
move or bend the gasket. This area does not get hot enough
during self-cleaning to remove soil. Do not let water, cleaner,
etc., enter slots on door frame. Use a damp cloth to clean this
area.
Wipe out any loose soil to reduce smoke and avoid damage.
At high temperatures, foods react with porcelain. Staining,
etching, pitting or faint white spots can result. This will not
affect cooking performance.
Prepare Cooktop:
Remove plastic items from the cooktop because they may
melt.
NOTE: The cooktop burners will not function during the self-
clean cycle.
IMPORTANT:
Oven temperature must be below 400°F (205°C) to program a
clean cycle.
Only 1 oven can be cleaned at a time.
Both oven doors lock when either oven is being cleaned.
WARNING
Burn Hazard
Do not touch the oven during the Self-Cleaning cycle.
Keep children away from oven during
Self-Cleaning cycle.
Failure to follow these instructions can result in burns.
18
How the Cycle Works
IMPORTANT: The heating and cooling of porcelain on steel in the
oven may result in discoloring, loss of gloss, hairline cracks and
popping sounds.
The Self-Cleaning cycle uses very high temperatures, burning soil
to a powdery ash.
The oven is preset for a 3 hour clean cycle; however, the time can
be changed. Suggested clean times are 2 hours for light soil and
between 3 hours and 4 hours for average to heavy soil.
Once the oven has completely cooled, remove ash with a damp
cloth. To avoid breaking the glass, do not apply a cool damp
cloth to the inner door glass before it has completely cooled.
The oven light will not work during the Self-Cleaning cycle.
When “LOCK” shows in the display, the door cannot be opened.
To avoid damage to the door, do not force the door open when
“LOCK” is displayed.
If an oven door is left open, “Door Open? Clean Canceled” will
appear in the display and a signal will beep. Close the oven door
and press SELF CLEAN.
To Self-Clean:
1. Close the oven door.
2. Press SELF CLEAN.
“PRESS (+) FOR UPPER OVEN” will appear in the upper oven
text area and “PRESS (-) FOR LOWER OVEN” will appear in
the lower oven text area
3. Press the Temp/Time “+” or “-” pads to select the desired
oven.
“REMOVE RACKS” will scroll in the selected oven text area
followed by “SELECT OPTION.” In the other text area,
“PRESS + or - KEY” will scroll from left to right.
4. Choose the Standard Clean setting by pressing the Temp/
Time “+” or “-” pads until “STANDARD CLEAN” and “PUSH
START” scroll in the displays.
5. Press START.
“Set clean time” will scroll in the displays.
6. Press the Temp/Time “+” or “-” pads to adjust the clean time.
7. Press START.
“UNLOCK IN XXX” will scroll in the upper or lower text area
(depending on oven selection). “LOCKING” will scroll until the
door is locked.
After the door is lock, “CLEAN UPPER” or “CLEAN LOWER
will scroll in the selected oven text area until the clean cycle is
finished.
When the self-clean cycle ends:
“CLN COMPLETE will scroll in the selected oven text area.
“OVEN COOLING” will scroll in the display until the oven
temperature falls below 500°F (260°C).
“UNLOCKING” will be displayed until the oven door unlocks and
the lock icon turns off.
To Delay Start Self-Clean:
1. Press Delay Start.
“PRESS (+) FOR UPPER OVEN” will appear in the upper text
area, and “PRESS (-) FOR LOWER OVEN” will appear in the
lower text area.
2. Press the Temp/Time “+” or “-” pads to select the desired
oven.
“--:--” will be displayed, and “Set starting time. Push START”
will scroll from right to left in the selected oven text area for
2 minutes or until the Temp/Time “+” or “-” pads are pressed
again.
3. Press the Temp/Time “+” or “-” pads until the desired time is
reached.
“Select cooking/cleaning mode” will scroll in the selected
oven text area for 2 minutes or until a cleaning cycle is
selected.
4. Press SELF CLEAN.
“REMOVE RACKS” will scroll in the selected oven text area
for 5 seconds, followed by “SELECT OPTION.” In the other
text area, “PRESS + or - KEY” will scroll from left to right.
5. Press the Temp/Time “+” or “-” pads until “Standard Clean” is
displayed.
“Push START” will scroll in the selected oven text area.
6. Press the Temp/Time “+” or “-” pads to select the desired
cleaning level. The desired clean level and “PUSH START”
will scroll in the displays.
7. Press START.
The cleaning cycle will begin, and the name will scroll in the
upper text area.
“UNLOCK IN XXX” will scroll in the upper or lower text area
(depending on oven selection). After 5 seconds, “LOCKING”
will scroll until the door is locked.
After the door is lock, “CLEAN UPPER” or “CLEAN LOWER
will scroll in the displays until the clean cycle is finished.
When the self-clean cycle ends:
“CLN COMPLETE will scroll in the selected oven text area. After
5 seconds, “OVEN COOLING” will scroll in the display until the
oven temperature falls below 500°F (260°C).
“UNLOCKING” will be displayed until the oven door unlocks and
the lock icon turns off.
19
General Cleaning
IMPORTANT: Before cleaning, make sure all controls are off and
the oven and cooktop are cool. Always follow label instructions
on cleaning products.
Soap, water and a soft cloth or sponge are suggested first unless
otherwise noted.
EXTERIOR PORCELAIN ENAMEL SURFACES
Food spills containing acids, such as vinegar and tomato, should
be cleaned as soon as the entire range is cool. These spills may
affect the finish.
Cleaning Method:
Glass cleaner, mild liquid cleaner or nonabrasive scrubbing
pad: Gently clean around the model and serial number plate
because scrubbing may remove numbers.
All-Purpose Appliance Cleaner Part Number 31682 (not
included):
See “Assistance or Service” section to order.
STAINLESS STEEL (on some models)
To avoid damage to stainless steel surfaces, do not use soap-
filled scouring pads, abrasive cleaners, Cooktop Cleaner, steel-
wool pads, gritty washcloths or abrasive paper towels.
Cleaning Method:
Rub in direction of grain to avoid damaging.
Stainless Steel Cleaner and Polish Part Number 31462 (not
included): See “Assistance or Service” section to order.
Liquid detergent or all-purpose cleaner: Rinse with clean
water and dry with soft, lint-free cloth.
PORCELAIN-COATED GRATES AND CAPS
Food spills containing acids, such as vinegar and tomato, should
be cleaned as soon as the cooktop, grates and caps are cool.
These spills may affect the finish.
To avoid chipping, do not bang grates and caps against each
other or hard surfaces such as cast iron cookware.
Do not reassemble caps on burners while they are wet.
Cleaning Method:
Nonabrasive plastic scrubbing pad and mildly abrasive
cleanser:
Clean as soon as cooktop, grates and caps are cool.
Dishwasher (grates only, not caps):
Use the most aggressive cycle. Cooked-on soils should be
soaked or scrubbed before going into a dishwasher.
Gas Grate and Drip Pan Cleaner Part Number 31617:
See “Assistance or Service” section to order.
GRIDDLE
Before using the griddle for the first time and after each use,
wash thoroughly with mild dishwashing detergent and warm
water.
To avoid damaging the nonstick finish, it is not recommended
to wash the griddle in the dishwasher.
To avoid damage, do not use abrasive cleaning products or
scouring pads.
COOKTOP CONTROLS
To avoid damage to the cooktop controls, do not use steel wool,
abrasive cleansers or oven cleaner.
To avoid damage, do not soak knobs.
When removing or replacing knobs, make sure knobs are in the
Off position.
Do not remove seals under knobs, if present.
Cleaning Method:
Warm, soapy water:
Pull knobs straight away from control panel to remove.
CONTROL PANEL
To avoid damage to the control panel, do not use abrasive
cleaners, steel-wool pads, gritty washcloths or abrasive paper
towels.
To avoid turning the controls on while cleaning, you may activate
the Control Lock feature (on some models). See “Oven Door and
Control Lockout” section.
Cleaning Method:
Glass cleaner and soft cloth or sponge: Apply glass cleaner
to soft cloth or sponge, not directly on panel.
All-Purpose Appliance Cleaner Part Number 31682 (not
included):
See “Assistance or Service” section to order.
OVEN DOOR EXTERIOR
Cleaning Method:
Glass cleaner and paper towels or nonabrasive plastic
scrubbing pad: Apply glass cleaner to soft cloth or sponge,
not directly on panel.
All-Purpose Appliance Cleaner Part Number 31682 (not
included):
See “Assistance or Service” section to order.
OVEN CAVITY
Do not use oven cleaners.
Food spills should be cleaned when oven cools. At high
temperatures, foods react with porcelain and staining, etching,
pitting or faint white spots can result.
Cleaning Method:
Self-Cleaning cycle: See “Self-Cleaning Cycle” first.
OVEN RACKS
Cleaning Method:
Self-Cleaning cycle: See “Self-Cleaning Cycle” first. Remove
racks, or they will discolor and become harder to slide. If this
happens, a light coating of vegetable oil applied to the rack
guides will help them slide.
Steel-wool pad
20
Oven Light
The ovens light is a standard 40-watt appliance bulb.
Before replacing, make sure the oven and cooktop are cool and
the control knobs are off.
To Replace:
1. Unplug range or disconnect power.
2. Turn the glass bulb cover in the back of the oven
counterclockwise to remove.
3. Turn bulb counterclockwise to remove from socket.
4. Replace bulb, then bulb cover by turning clockwise.
5. Plug in range or reconnect power.
Oven Door
IMPORTANT:
To avoid oven door glass breakage:
Do not close the oven door if the racks are not fully inserted
into the oven cavity or when bakeware extends past the front
edge of an oven rack.
Do not set objects on the glass surface of the oven door.
Do not hit glass surfaces with bakeware or other objects.
Do not wipe down glass surfaces until the oven has
completely cooled.
For normal range use, it is not suggested to remove the oven
door. However, if removal is necessary, make sure the oven is off
and cool. Then, follow these instructions. The oven door is heavy.
To Remove:
1. Open oven door all the way.
2. Pull forward and down on the hinge latch on each side.
3. Close the oven door as far as it will shut.
4. Lift the oven door while holding both sides.
Continue to push the oven door closed and pull it away from
the oven door frame.
To Replace:
1. Insert both hanger arms into the door.
2. Open the oven door.
You should hear a “click” as the door is set into place.
3. Move the hinge levers back to the locked position. Check
that the door is free to open and close. If it is not, repeat the
removal and installation procedures.
  • Page 1 1
  • Page 2 2
  • Page 3 3
  • Page 4 4
  • Page 5 5
  • Page 6 6
  • Page 7 7
  • Page 8 8
  • Page 9 9
  • Page 10 10
  • Page 11 11
  • Page 12 12
  • Page 13 13
  • Page 14 14
  • Page 15 15
  • Page 16 16
  • Page 17 17
  • Page 18 18
  • Page 19 19
  • Page 20 20
  • Page 21 21
  • Page 22 22
  • Page 23 23
  • Page 24 24
  • Page 25 25
  • Page 26 26
  • Page 27 27
  • Page 28 28
  • Page 29 29
  • Page 30 30
  • Page 31 31
  • Page 32 32
  • Page 33 33
  • Page 34 34
  • Page 35 35
  • Page 36 36
  • Page 37 37
  • Page 38 38
  • Page 39 39
  • Page 40 40
  • Page 41 41
  • Page 42 42
  • Page 43 43
  • Page 44 44
  • Page 45 45
  • Page 46 46
  • Page 47 47
  • Page 48 48

Maytag Gemini MGT8655X User manual

Category
Cookers
Type
User manual
This manual is also suitable for

Ask a question and I''ll find the answer in the document

Finding information in a document is now easier with AI

in other languages