48
TRACTOR
Siempre observe las reglas de seguridad cuando
dé man te ni mien to.
OPERACIÓN DEL FRENO
Si el tractor necesita más de cinco (5) pies para
detenerse a la máxima velocidad al cambio más
alto en una superficie nivelada, de hormigón o
pavimentada, hay que hacerle el servicio al freno.
Ver “PARA VERIFICAR SI FUNCIONA BIEN EL
FRENO” en el capítulo de Servicio y ajustes de
este manual.
LLANTAS
• Mantenga todos los neumáticos con la presión
de aire adecuada (Ver la PSI que se indica en
estos).
• Mantenga las llantas sin gasolina, aceite o
substancias químicas para control de insectos
que pueden dañar la goma.
• Evite los tocones, las piedras, las grietas pro-
fundas, los objetos afilados y otros peligros que
pueden dañar a las llantas.
AVISO: Para arreglar las llantas perforadas
y péra prevenir que tenga llantas pinchadas a
causa de pequeñas fugas, puede comprar el
sello para llantas de su comerciante de partes de
repuesto más cercano. Elsello previene que las
llantas se sequen y también la corrosión.
SISTEMA PRESENCIA OPERADOR Y SISTE-
MA FUNCIONAMIENTO ATRÁS (ROS)
Asegurarse de que el sistema de presencia del
operador y el sistema funcionamiento atrás fun-
cionen bien. Si tu tractor no función como descrito,
reparar el problema inmediatamente.
• El motor no arrancará si el pedal de embra-
gue/freno está completamente presionado y
el mando del embrague del accesorio está
desconectado.
VÉRIFIÉZ SISTEMA PRESENCIA OPERADOR
• Cuando el motor está en marcha, cualquier
tentativa del operador de abandonar el asiento
sin haber puesto el freno de estacionamiento
primero, apagará el motor.
• Cuando el motor está en marcha y el embra-
gue del accesorio está conectado, cualquier
tentativa del operador de abandonar el asiento,
apagará el motor.
• El embrague del accesorio no tendría que funcio-
nar nunca si el operador no está en su asiento.
VÉRIFIÉZ SISTEMA FUNCIONAMIENTO ATRÁS (ROS)
• Cuando el motor está en marcha con el inte-
rruptor de llave en posición de motor “ON” y el
embrague del accesorio conectado, cualquier
tentativa del operador de viajar marcha atrás,
apagará el motor.
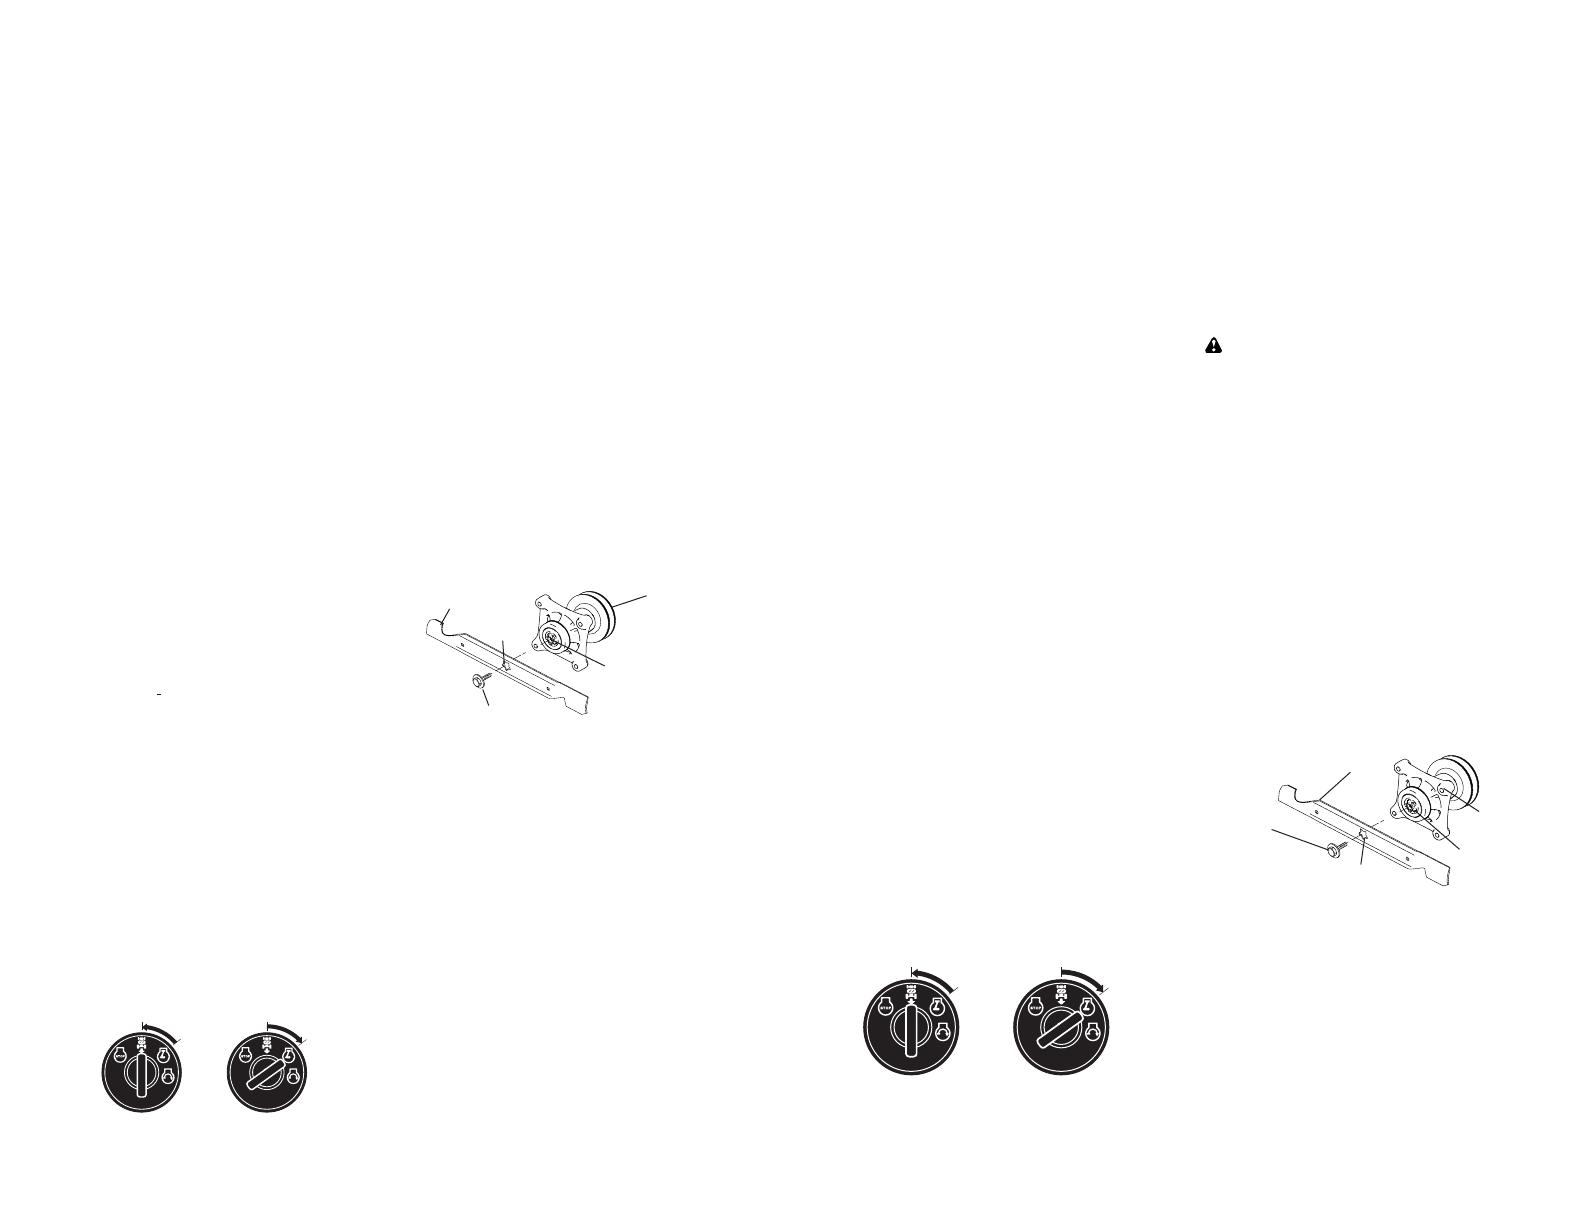
Conjunto del
Mandril
Cuchilla
Perno de la Cuchilla
Estrella
Agujero
Central
REMOCIÓN DE LA CUCHILLA
1. Levante la segadora a su posición más alta
para permitir el acceso a las cuchillas.
AVISO: Proteja sus manos con guantes y/o
envuelva la cuchilla con una tela gruesa.
2. Remueva el perno de la cuchilla dandole
vueltas en el sentido inverso al de las agujas
del reloj.
3. Instale la nueva cuchilla con el estampado
“THIS SIDE UP” en la direccion de la sega-
dora y del conjunto del mandril.
IMPORTANTE: Para asegurar la instalacion ap-
ropiada, posicione el agujero central de la cuchilla
con la estrella del conjunto del mandril.
4. Instale y apriete el perno de la cuchilla firme-
mente (Par 45-55 pies/libras).
IMPORTANTE: El perno especial de la cuchilla
es termotratado.
• Cuando el motor está en marcha con el inte-
rruptor de llave del sistema de funcionamiento
atrás (ROS) en la posición “ON” y el embrague
del accesorio conectado, cualquier tentativa del
operador de viajar marcha atrás, NO apagará
el motor.
CUIDADO DE LA CUCHILLA
Para obtener resultados óptimos, las cuchillas
de la cortadora deben estar afiladas. Reemplace
las cuchillas que estén gastadas, dobladas o
dañadas.
BATERÍA
Su tractor cuenta con un sistema de carga de la
batería que es suficiente para el uso normal. Sin
embargo, si se carga la batería periódicamente,
con un cargador de automóviles, se prolongará
su duración.
• Mantenga la batería y los terminales limpios.
• Mantenga los pernos de la batería apretados.
• Mantenga los agu je ros de ventilación peque-
ños abiertos.
• Vuelva a cargar de 6-10 amperes por 1 hora.
AVISO: La bateria del equipo original de su
trac tor no becesita servicio. No intente abrir o
remover las tapas o cubiertas. No esnecesario
añadir o verificar el nivel del electrólito.
PARA LIMPIAR LA BATERÍA Y LOS TERMINALES
La corrosión y la mugre de la batería y de los
terminales pueden producir “escapes” de potencia
en la batería.
1. Remueva la protección de los terminales.
2. Desconecte el cable de la batería NEGRO
primero y luego el cable de la batería ROJO
y remueva la batería del tractor.
0
2
8
2
8
Posición
ROS “ON”
Motor en
posición “ON”
17
Blade
Blade Bolt
(Special)
Center Hole
Star
Mandrel
Assembly
BLADE REMOVAL
1. Raise mower to highest position to allow
access to blades.
NOTE: Protect your hands with gloves and/
or wrap blade with heavy cloth.
2. Remove blade bolt by turning coun ter-
clock wise.
3. Install new blade with stamped "GRASS
SIDE" facing the ground.
IMPORTANT: To ensure proper as sem bly,
center hole in blade must align with star on
mandrel assembly.
4. Install and tighten blade bolt securely
(45-55 Ft. Lbs. torque/62-75 Nm.).
IMPORTANT: Special blade bolt is heat
treated.
TRACTOR
Always observe safety rules when per form ing
any main te nance.
BRAKE OPERATION
If tractor requires more than five (5) feet to
stop at highest speed in high est gear on a
level, dry concrete or paved surface, then
brake must be serviced. (See “TO CHECK
BRAKE” in the Ser vice and Ad just ments
section of this manual).
TIRES
• Maintain proper air pressure in all tires
(See PSI on tires).
• Keep tires free of gasoline, oil, or insect
control chemi cals which can harm rubber.
• Avoid stumps, stones, deep ruts, sharp
objects and other hazards that may cause
tire damage.
NOTE: To seal tire punctures and pre vent
flat tires due to slow leaks, tire sealant may
be purchased from your local parts dealer.
Tire sealant also pre vents tire dry rot and
corrosion.
OPERATOR PRESENCE SYS TEM AND
REVERSE OPERATION SYSTEM (ROS)
Be sure operator presence and reverse
operation sys tems are work ing properly. If
your tractor does not function as described,
repair the problem immediately.
• The engine should not start unless the
brake pedal is fully de pressed, and the
attachment clutch con trol is in the dis en-
gaged position.
CHECK OPERATOR PRESENCE SYSTEM
• When the engine is running, any attempt
by the op er a tor to leave the seat without
first setting the parking brake should shut
off the engine.
• When the engine is running and the at-
tach ment clutch is engaged, any attempt
by the operator to leave the seat should
shut off the engine.
• The attachment clutch should never oper-
ate unless the operator is in the seat.
CHECK REVERSE OPERATION (ROS)
SYSTEM
• When the engine is running with the ignition
switch in the engine "ON" position and the
at tach ment clutch engaged, any attempt
by the operator to drive in reverse should
shut off the engine.
• When the engine is running with the ignition
switch in the ROS "ON" position and the
at tach ment clutch engaged, any attempt
by the operator to drive in reverse should
NOT shut off the engine.
BLADE CARE
For best results mower blades must be sharp.
Re place worn, bent or damaged blades.
CAUTION: Use only a replacement blade
approved by the manufacturer of your tractor.
Using a blade not approved by the manu-
facturer of your tractor is hazardous, could
damage your tractor and void your warranty.
0
2
8
2
8
ROS "ON" Position Engine "ON" Position
(Normal Operating)
BATTERY
Your tractor has a battery charging sys tem
which is suf fi cient for normal use. How ev er,
periodic charging of the bat tery with an au-
tomotive charger will ex tend its life.
• Keep battery and terminals clean.
• Keep battery bolts tight.
• Keep small vent holes open.
• Recharge at 6-10 amperes for 1 hour.
NOTE: The original equipment battery on
your tractor is maintenance free. Do not
attempt to open or remove caps or covers.
Adding or checking level of elec tro lyte is
not necessary.


