Electrolux SANTOW9882041RE User manual
- Category
- Drink coolers
- Type
- User manual

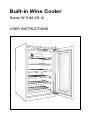
Built-in Wine Cooler
Santo W 9 88 20-4i
USER INSTRUCTIONS

Contents
Safety Instructions / Standards 3
Disposal of packaging and old appliances 4
Installation / Installation site 5
Your cooler needs air 6
Installation 6
Electrical connection 7
Product description 8
Interior fittings 8
User panel 8
Commissioning – setting temperature, switching off 8
Adjusting storage racks 9
Adjusting the temperature zone divider 10
Changing the light fitting 10
Proper loading 11
Ideal drinking temperatures 11
Defrosting 11
Cleaning 11
Energy-saving tips 12
What to do if ….Troubleshooting 12
Guarantee 14
Operating noises 14
2

Dear Customer
Please read these instructions carefully before starting to use your wine cooler. They
contain important information about the safe operation, installation and maintenance
of your appliance.
Please keep them for reference and pass them on to any subsequent user.
Safety Instructions
This refrigerator conforms to recognised technical regulations and to the EC guide-
line /EEC (low voltage guideline). It has been checked for compliance with electrical
safety regulations in accordance with EMC guideline 89/336/EEC and EN
55014.1993.
. Electrical safety (shock-hazard protection) must be effected as part of the instal-
lation procedure.
. Mains voltage 230V/50Hz.
. This appliance should be used for domestic purposes only in accordance with the
user instructions.
. If you have received a faulty appliance, contact your supplier immediately.
. Repairs and modifications must only be carried out by a qualified service engineer.
. Disconnect from the mains when cleaning; pull out the plug or deactivate the fuse.
Never pull the plug out of the socket by the cable or with wet hands. Always take
hold of the plug itself and pull it straight out of the socket.
. This appliance is CFC- and FC-free and contains small quantities of Isobutane
(R600a), an environmentally friendly coolant.
. You must ensure that the cooling circuit is undamaged when handling this appli-
ance. However, if it becomes damaged, avoid proximity to open fires and heat
sources of all kinds. The room in which the appliance is located should be venti-
lated for a few minutes.
. Never use an appliance with a damaged circuit.
. Ensure that the ventilation openings to and from a built-in appliance are never
blocked or covered. No liability will be accepted for any damage incurred owing
to misuse of the appliance or as a result of repairs carried out by unqualified
personnel. In this case neither the guarantee nor any other liability claims will
apply.
. In the interests of safety, faulty connection cables for this appliance must be repla-
ced by the manufacturer, his customer service department or similarly qualified
personnel.
. Warning: Do not operate any electrical appliances inside the cooler.
3

Disposal
Information about the appliance packaging
Dispose of your appliance packaging properly. None of the packaging materials
used are harmful to the environment and they may be re-used.
About the materials: the plastics may also be recycled and are identified as follows:
>PE< for polyethylene e.g. in the outer casing and internal pockets.
>PS< for polystyrene foam, e.g. in padding. Essentially CFC-free.
The cardboard used is made from recycled paper and should also be put out for old
paper collection.
Disposal of old appliances
Refrigeration equipment must be properly disposed of in a way which protects the
environment. This applies to your old appliance and to your new unit once it has
reached the end of its service life.
Warning: Please ensure that old, worn appliances are rendered unusable before
disposal by removing the plug, cutting the network cable, and removing or de-
stroying any snap fastenings or bolts. You will thus prevent children from locking
themselves in the appliance during play (risk of suffocation) or endangering their lives
in any other way.
Disposal instructions:
. The appliance must not be disposed of in the dustbin or with normal household
rubbish.
. The coolant circuit, particularly the heat exchanger at the back of the appliance,
must not be damaged.
. The symbol on the product or its packaging indicates that this product is not
to be handled as normal household waste but is to be taken to a recycling collec-
tion point for electrical and electronic goods. By correctly disposing of this pro-
duct you are contributing to the protection of the environment and to the health of
your fellow human beings. Improper disposal endangers health and the environ-
ment. Further information about the recycling of this product may be obtained
from your town hall, refuse collection department or the store where you purcha-
sed the product.
4

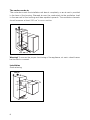
Installation
Installation site
The appliance should be positioned in a well-ventilated, dry room. The ambient tem-
perature will influence energy consumption and the proper functioning of the unit.
For this reason, the appliance
. Should not stand in direct sunlight;
. Should not stand near a radiator, a stove or any other heat source;
. Should be located only where the ambient temperature is compatible
with the climatic classification of the appliance.
You will find the climatic classification on the nameplate inside the appliance on the
top right-hand side.
The following table specifies the ambient temperature range for each climatic clas-
sification:
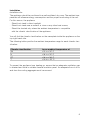
Climatic classification for an ambient temperature of
SN +10 to +32° C
N +16 to +32° C
ST +18 to +38° C
T +18 to +43° C
To prevent the appliance from heating up, ensure that an adequate ventilation gap
is retained and install a suitable thermal insulation panel. An adequate flow of air to
and from the cooling aggregate must be ensured.
5

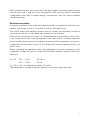
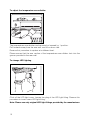
The cooler needs air
The cooler door seals the installation unit almost completely, so an air vent is provided
in the base of the housing. Warmed air must be conducted via the ventilation shaft
to the rear wall of the housing and then expelled upwards. The ventilation channels
should measure at least 200 cm
2
in cross-section.
Warning! To ensure the proper functioning of the appliance, air vents should never
be blocked or covered.
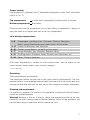
Installation
Scale drawing
6
min. 200 cm
2
min. 200 cm
2
50
200 cm
2
200 cm
2
874–880
560 min.
550 min.
547
566
873
50

After installing the unit, and particularly if the door hinge is reversed, please ensure
that the door seal is tight all round. An imperfect door seal can lead to increased
condensation and thus to higher energy consumption (see the section headed
“Troubleshooting”).
Electrical connection
A properly installed socket outlet with earthing contact is required for electrical con-
nection, positioned so that it is possible to pull out the mains plug.
The socket outlet with earthing contact used to connect the appliance should be
positioned on the left or right-hand side adjacent to the housing.
Electrical fuse protection of at least 10/16 amperes must be provided. If the socke
is no longer accessible once the appliance has been built-in, suitable measures
must be taken during electrical installation to ensure that the appliance can be dis-
connected from the mains (fuse, LP [line protection] contact opening width of at
least 3 mm).
Before operating the appliance, check the nameplate to ensure compliance of the
connection voltage and type of current with the mains network values at the instal-
lation site.
e.g. AC 220 … 240 V 50 Hz or
220 … 240V~ 50 Hz
(i.e. 220 to 240 volt alternating current, 50 Hertz)
The nameplate is located inside the appliance on the top right-hand side.
7

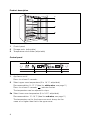
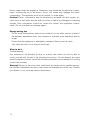
Product description
1 Control panel
2 Storage racks (adjustable)
3 Temperature zone divider (adjustable)
Control panel
1 Appliance on/off
Press for at least 3 seconds.
2 Select upper zone temperature (5 to 18° C, adjustable)
Recommendation: 5–12° C (ideal for white wine, see page 11)
Press for at least 3 seconds indicator flashes
The temperature can be adjusted in steps.
2a Select lower zone temperature (5 to 18°C, adjustable)
Recommendation: 12–18° C (ideal for red wine, see page 11)
The temperature set for the lower zone must always be the
same as or higher than that in the upper zone.
8
32 2a
1 4
2
3
2
1

3 Supercool
Press for 3 seconds the yellow pilot light illuminates.
The appliance cools the upper zone for 24 hours at +5° C
and then automatically at the set temperature.
4 Interior light switched on permanently:
Press for 3 seconds ON
Interior light on only while the door is open:
Press for 3 seconds OFF
If the door is kept open for longer than 5 minutes, an acoustic door alarm will
sound. This can be switched off by briefly pressing any button.
To adjust storage racks
The height of the storage racks is adjustable.
Pull the shelf forwards, lift on the door side and remove.
Reverse this procedure to replace the shelf at a different level.
9

To adjust the temperature zone divider
The temperature zone divider can be raised or lowered by 1 position.
Pull forwards away from the rear wall, and lift on door side.
Reverse this procedure to replace at a different level.
Please ensure that the rear section of the temperature zone divider slots into the
groove provided in the rear wall.
To change LED lighting
Click off the LED light cover. Loosen the plug of the LED light fitting. Reverse this
procedure to insert a new LED light fitting.
Note: Please use only original LED light fittings provided by the manufacturer.
10

Proper loading
The appliance is separated into 2 adjustable temperature zones (both adjustable
from 5 to 18° C):
Top compartment white wine, champagne, sparkling wine, rosé wine.
Bottom compartment red wine
Please ensure that the temperature set for the bottom compartment is always at
least the same as or higher than that in the top compartment.
Ideal drinking temperatures*
6–8° Champagne, sparkling wines, Chasselas, Riesling, Sauvignon
Blanc, young Chardonnays and sweet wines, all rosé wines
8–10° Mature Chardonnays and Sauternes
13 –15° Gamay, young Merlots, young Pinot Noir wines
15 –17° Young Bordeaux, light Cabernet, Barbera, Merlot
16 –18° Big Burgundies, Bordeaux, Italian, Spanish and Californians, etc.
17– 18° Barolo, Reciotto Amarone
(The lower temperature is suitable for more simple wines, and the higher for the
more complex, better quality wines of each category).
* Source: Mövenpick
Defrosting
The cooler defrosts automatically.
The evaporator behind the rear wall of the cooler defrosts automatically. The con-
densate collects in the drainage channel behind the rear wall of the cooler, and flows
through the drainage hole into the drip tray by the compressor where it evaporates.
Cleaning and maintenance
For reasons of hygiene, the interior of the appliance, including all internal fitments,
should be cleaned regularly.
Warning! Because of the risk of electric shock, the appliance should not be con-
nected to the mains during cleaning. Before cleaning, switch off the appliance, pull
out the mains plug or deactivate and/or remove the fuse.
11

Never steam-clean the appliance. Dampness may penetrate the electrical compo-
nents, creating the risk of an electric shock. Hot steam may damage the plastic
components. The appliance must be dry before it is used again.
Caution! Plastic components may be attacked by essential oils and organic sol-
vents such as fruit juices and the acids in butter, as well as by detergents containing
vinegar. Such substances should not come into contact with appliance compo-
nents. Do not use abrasive cleaning agents.
Energy-saving tips
. Do not install the appliance near stoves, radiators, or any other sources of heat. If
the ambient temperature rises, the compressor operates more frequently and for
longer.
. Ensure that the appliance is adequately ventilated. Never cover air vents.
. Only open the door for as long as necessary.
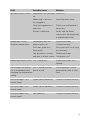
What to do if…
Troubleshooting
Any malfunction will probably be due to a minor fault which you will be able to
rectify yourself with the aid of the following instructions. Do not attempt any more
extensive repairs yourself, should the following information prove unhelpful in solving
a particular problem.
Warning! Repairs to the wine cooler should only be carried out by qualified person-
nel. Repairs undertaken incorrectly may cause considerable risk to the user. Contact
your dealer or our customer service department.
12

Appliance doesn’t work.
Inadequate cooling
chamber temperature.
Interior light doesn’t work.
The compressor doesn’t
cut in immediately after
changing the temperature
setting.
Error message F1 on
control panel.
Error message F2 on
control panel.
Error message F3 on
control panel.
Appliance is not switched
on.
Mains plug is loose or
not plugged in.
Fuse has triggered or is
defective.
Socket is defective.
Temperature has not
been properly set.
Door was open for a
long period.
The appliance is positio-
ned next to a heat source.
LED is defective.
This is normal and not
due to a fault.
Upper sensor defective.
Lower sensor defective.
Fan defective.
Switch on.
Insert the mains plug.
Check fuse and replace if
necessary.
Faults with the mains
supply must be repaired by
a qualified electrician.
Please see under
“Commissioning”.
Only open door for as long
as necessary.
Please see under
“Installation site”.
Please see under “LED
lighting”.
The compressor cuts in
automatically after a short
time.
Contact customer service.
Contact customer service.
Contact customer service.
Fault Possible cause Solution
13

Guarantee
The guarantee runs from the date on which the appliance is delivered to the end
user. Under the terms of the guarantee, the customer service department will rectify
any faults which may occur despite proper use during the guarantee period and
which may be attributable to faulty materials or manufacture.
Excluded from the guarantee are:
. Defects arising from improper use or failing to observe the
operating instructions.
. Claims for damages which exceed the terms of our guarantee.
. Appliances which have been repaired by a third party.
Operating Noises
Noises which are entirely normal
The chill cabinet is cooled by a compressor (refrigeration aggregate). The compressor
pumps coolant through the cooling system, producing operating noises. Even when
the compressor cuts out, noises caused by changes in temperature and pressure
are unavoidable.
This cooler is fitted with a quiet compressor and a low-noise cooling circuit
designed in line with the latest technical developments. However, a certain
level of noise, dependent on the size of the cooler, is inevitable. Operating noise will
be most audible immediately after the compressor cuts in. It becomes quieter as the
operating period continues.
Noises which are not normal
Unusual noise is normally the result of improper installation. The cooler must be
installed or built-in so that it is level and stable. Under no circumstances must tubing
come into contact with a wall, other furniture or with another tubing.
Where coolers are installed in open-plan kitchens or in partition walls, the
level of operating noise will be heard more acutely. However, this is due to
the surrounding architecture and not to a fault with the cooler.
14

Description Cause Comment
Droning Cooling aggregate Normal operating noise of the cooling
aggregate. The level is dependent on
the size of cooler.
Humming Fan Normal operating noise of the fan.
Gurgling Cooling circuit Normal operating noise as coolant
Babbling flows through the circuit.
Murmuring
Hissing Cooling circuit Normal operating noise as coolant is
injected into the condenser.
Cracking Cooler housing Normal as materials expand and
contract due to temperature variations
(e.g. plastics, isolation).
15

168 058
-
 1
1
-
 2
2
-
 3
3
-
 4
4
-
 5
5
-
 6
6
-
 7
7
-
 8
8
-
 9
9
-
 10
10
-
 11
11
-
 12
12
-
 13
13
-
 14
14
-
 15
15
-
 16
16


Electrolux SANTOW9882041RE User manual
- Category
- Drink coolers
- Type
- User manual
Ask a question and I''ll find the answer in the document
Finding information in a document is now easier with AI
Related papers
-
Electrolux EK170011LI User manual
-
-
Aeg-Electrolux SANTOW98820-4ILIUK User manual
-
-
-
-
-
-
-
Other documents
-
Essick Air EC 302 User manual
-
V-ZUG Winecooler SL Owner's manual
-
-
-
AEG SWS98820G0 User manual
-
Baumatic BW18BL - 34001984 User manual
-
Cosmo COS-24BIWCS User manual
-
Cuisinart CWC-1200 User manual
-
Summit VC28S User manual
-
Hoover HWCB 45 UKBM User manual