Aeg-Electrolux F77000M0P User manual

Category
Dishwashers
Type
User manual

This manual is also suitable for

The Aeg-Electrolux F77000M0P dishwasher is a high-performance appliance designed to make dishwashing easier and more efficient. With its innovative features, it offers a range of benefits that can enhance your kitchen experience. Here are some key capabilities of the Aeg-Electrolux F77000M0P dishwasher:

  • Efficient Cleaning: Equipped with multiple spray arms and a powerful water circulation system, the dishwasher ensures thorough cleaning of your dishes, removing stubborn dirt and food residue.

  • Flexible Loading Options: The adjustable baskets and cutlery tray allow you to customize the interior space to accommodate different types and sizes of dishes, maximizing loading flexibility.

FAVORIT 77000
EN
DISHWASHER USER MANUAL
FOR PERFECT RESULTS
Thank you for choosing this AEG product. We have created it to give you
impeccable performance for many years, with innovative technologies that help
make life simpler – features you might not find on ordinary appliances. Please
spend a few minutes reading to get the very best from it.
ACCESSORIES AND CONSUMABLES
In the AEG webshop, you’ll find everything you need to keep all your AEG
appliances looking spotless and working perfectly. Along with a wide range of
accessories designed and built to the high quality standards you would expect,
from specialist cookware to cutlery baskets, from bottle holders to delicate
laundry bags…
Visit the webshop at:
www.aeg.com/shop
2
CONTENTS
4 Safety information
6 Product description
7 Control panel
9 Use of the appliance
10 Setting the water softener
11 Use of dishwasher salt
12 Use of detergent and rinse aid
13 Multitab function
14 Loading cutlery and dishes
15 Washing programs
16 Setting and starting a washing
program
18 Care and cleaning
19 What to do if…
22 Technical data
23 Installation
24 Water connection
26 Electrical connection
26 Environment concerns
28 Warranty
The following symbols are used in this user
manual:
Important information concerning your
personal safety and information on how to
avoid damaging the appliance.
General information and tips
Environmental information
Subject to change without notice
Contents
3
SAFETY INFORMATION
For your safety and correct operation of the appliance, read this manual carefully before
installation and use. Always keep these instructions with the appliance even if you move or
sell it. Users must fully know the operation and safety features of the appliance.
Correct use
Only use the appliance to clean household utensils that are suitable for dishwashers.
Do not put solvents in the appliance. Risk of explosion.
Put knives and all items with sharp points in the cutlery basket with their points down. If
not, put them in a horizontal position in the upper basket.
Use only products specified for dishwashers (e.g. detergent, salt, rinse aid).
If you open the door while the appliance is in operation, hot steam can escape. Risk of
skin burns.
Do not remove dishes from the appliance before the end of the washing program.
When the washing program is completed, disconnect the mains plug from the mains
socket and close the water tap.
Only an authorised service engineer can repair this appliance. Use only original spare
parts.
Do not do repairs yourself to prevent injury and damage to the appliance. Always con-
tact the Customer Care Centre.
General safety
This appliance is intended to be used in household and similar applications such as:
Staff kitchen areas in shops, offices and other working environments
Farm houses
By clients in hotels, motels and other residential type environments
Bed and breakfast type environments.
Some dishwasher detergents are strongly alkaline. They can be extremely dangerous if
swallowed. Avoid contact with skin and eyes. Keep the children away from the appliance
when the door is open. Check that the detergent dispenser is empty after completion of
the washing program.
Obey the safety instructions from the manufacturer of the dishwasher detergent to pre-
vent burns to eyes, mouth and throat.
Only put detergent in the dispenser before you start a washing program.
Do not drink the water from the appliance. Detergent residue can stay in your appliance.
Always close the door when you do not use the appliance to prevent injury and not to
stumble over the open door.
Do not sit or stand on the open door.
4 Safety information
Child safety
This appliance is not intended for use by young children or infirm persons unless they
have been adequately supervised by a responsible person to ensure that they can use the
appliance safely.
Children should be supervised to ensure that they do not play with the appliance.
Keep all the packaging away from children. There is a risk of suffocation.
Keep all detergents in a safe area. Do not let children touch the detergents.
Keep children and pets away from the appliance when the door is open.
Installation
Make sure that the appliance is not damaged because of transport. Do not connect a
damaged appliance. If necessary, contact the supplier.
Remove all packaging before first use.
A qualified and competent person must do the electrical installation.
A qualified and competent person must do the plumbing installation.
Do not change the specifications or modify this product. Risk of injury and damage to
the appliance.
Do not use the appliance:
If the mains cable or the water hoses are damaged.
If the control panel, worktop or plinth area are damaged so that you can get access to
the inner side of the appliance.
Contact your local Customer Care Centre.
Do not drill into the sides of the appliance otherwise damage to hydraulic and electrical
components may occur.
WARNING!
Follow carefully the instructions for electrical and water connections.
Safety information
5
PRODUCT DESCRIPTION
2
3
4
5
6
7
1
8
9
10
11
1 Upper basket
2 Air vent and water hardness dial
3 Salt container
4 Detergent dispenser
5 Rinse aid dispenser
6 Rating plate
7 Filters
8 Lower spray arm
9 Upper spray arm
10 Top spray arm
11 Worktop
6 Product description
CONTROL PANEL
1
3
4
5
6
7
8
9
2
A
BC
1 On/off button
2 Program guide
3 Program button
4 Program indicators
5 Display
6 Delay button
7 Start button
8 Indicators
9 Option button
Indicators
Multitab
It comes on when you activate the multitab function. Refer to 'Multitab func-
tion'.
Extra-Hygiene
It comes on when you activate the Extra-Hygiene function.
Wash
It comes on when the washing phase operates.
Rinse
It comes on when the rinsing phase operates.
Dry
It comes on when the drying phase operates.
End
It comes on when the washing program is completed.
Control panel 7
Indicators
Rinse aid
It comes on when it is necessary to fill the rinse aid dispenser. Refer to 'Use of
rinse aid'.
1)
The rinse aid indicator does not come on while a washing program operates even
If the rinse aid dispenser is empty
Salt
It comes on when it is necessary to fill the salt container.
1)
After you fill the container, the salt indicator can stay on for some hours. This
does not have an unwanted effect on the operation of the appliance.
Delay
It comes on when you activate the delay start.
Door
It comes on when the door of the appliance is open or not correctly closed.
1) When the salt container and/or the rinse aid dispenser are empty, the related indicators do not come on while a
washing program operates.
On/off button
Press this button to switch on or off the appliance.
After 10 minutes from the end of the washing program, the Auto Off function automatical-
ly switches off the appliance. This helps to decrease energy consumption.
Program button
To set a washing program, press this button repeatedly until the indicator of the washing
program comes on. Refer to 'Washing programs' chart.
The display
The display shows:
The electronic adjustment of the level of the water softener
The activation and deactivation of the rinse aid dispenser (only with the multitab func-
tion on)
The time of the washing program
The remaining time to the end of the washing program
The end of a washing program (the display shows a zero)
The time of the delay start
The alarm codes
Delay button
Press this button to delay the start of the washing program from 1 to 24 hours. Refer to
'Setting and starting a washing program'.
Start button
Press this button to:
Start the washing program.
Start the countdown of the delay start.
8 Control panel
Option button
Press this button, once or more times, to set the required functions.
When a function is activated, the related indicator comes on.
Option button Multitab function Extra-Hygiene function
Press once ACTIVATED DEACTIVATED
Press twice DEACTIVATED ACTIVATED
Press three times ACTIVATED ACTIVATED
Press four times DEACTIVATED DEACTIVATED
Functions
Multitab
Activate the multitab function when you use the combi detergent tablets ('3 in 1', '4 in 1', '5
in 1'), . Refer to 'Multitab function'.
Extra-Hygiene
This function provides more hygienically clean dishes and glasses. During the last rinse, the
temperature increases to 70 °C and is kept above 65 °C minimum for 10 to 14 minutes
The function can be activated with all washing programs but has effect only on some pro-
grams. To see where the Extra-Hygiene function has effect, refer to the 'Washing programs'
chart.
Setting mode
The appliance must be in setting mode for these operations:
To set and start a washing program.
To set and start a delay start.
To adjust electronically the level of the water softener.
To activate or deactivate the rinse aid dispenser (only with the multitab function on).
Switch on the appliance. The appliance is in setting mode when:
All the program indicators come on.
The display shows two horizontal status bars.
Switch on the appliance. The appliance is not in setting mode when:
Only one program indicator comes on.
The display shows the time of a washing program or a delay start.
To go back to the setting mode, it is necessary to cancel the program or the delay
start . Refer to 'Setting and starting a washing program'.
USE OF THE APPLIANCE
Refer to the specific instructions for each step of the procedure.
1. Check if the water softener level is correct for the water hardness in your area. If neces-
sary set the water softener.
2. Fill the salt container with dishwasher salt.
Use of the appliance
9
3. Fill the rinse aid dispenser with rinse aid.
4. Load cutlery and dishes into the appliance.
5. Set the correct washing program for the type of load and soil.
6. Fill the detergent dispenser with the correct quantity of detergent.
7. Start the washing program.
If you use the combi detergent tablets ('3 in 1', '4 in 1', '5 in 1'), set the multitab function.
Refer to 'Multitab function'.
SETTING THE WATER SOFTENER
The water softener removes minerals and salts from the water supply. Minerals and salts
can have bad effect on the operation of the appliance.
Water hardness is measured in equivalent scales:
mg/I (millimol per litre)
ppm (parts per million),
mmol/l (millimol per litre - international unit for the hardness of water).
Adjust the water softener in to the water hardness in your area. If necessary, contact your
local water authority.
Water hardness Water hardness setting
mg/l ppm mmol/l manually electronically
910 - 1250 910 - 1250 9.1 - 12.5 2 10
760 - 909 760 - 909 7.6 - 9.0 2 9
650 - 759 650 - 759 6.5 - 7.5 2 8
510 - 649 510 - 649 5.1 - 6.4 2 7
400 - 509 400 - 509 4.0 - 5.0 2 6
330 - 399 330 - 399 3.3 - 3.9 2 5
260 - 329 260 - 329 2.6 - 3.2 1 4
190 - 259 190 - 259 1.9 - 2.5 1 3
70 - 189 70 - 189 0.7 - 1.8 1 2
< 70 < 70 < 0.7 1
1
1)
1) No use of salt required.
You must set the water softener manually and electronically.
Manual adjustment
The appliance is set at the factory at position 2.
1. Remove the lower basket.
10 Setting the water softener
2. Turn the water hardness dial to position 1
or 2 (refer to the chart).
3. Put back the lower basket.
Electronic adjustment
The appliance is factory set at level 5.
1. Switch on the appliance. Make sure that the appliance is in setting mode.
2. Press and hold button Delay and button Start at the same time until the indicators of
programs AUTO, PRO and SILENT flash.
3. Release button Delay and button Start .
4. Press button Program.
The indicators of programs PRO and SILENT go off.
The indicator of program AUTO continues to flash.
The display shows the setting of the water softener (example:
= level 5).
5. Press button Program once to increase the water softener level by one step. Continue
to press the button until the required water softener level is achieved.
6. Switch off the appliance to confirm.
USE OF DISHWASHER SALT
CAUTION!
Only use dishwasher salt. Types of salt that are not suitable for dishwashers cause damage
to the water softener.
CAUTION!
Grains of salt and salty water on the bottom of the appliance can cause corrosion. Fill the
appliance with salt before you start a washing program.
Filling the salt container
1. Turn the cap counterclockwise to open the salt container.
2. Fill the salt container with 1 litre of water (only the first operation).
Use of dishwasher salt 11
3. Use the funnel to fill the salt container
with salt.
4. Remove the salt around the opening of
the salt container.
5. Turn the cap clockwise to close the salt
container.
It is normal that water overflows from the
salt container when you fill it with salt.
USE OF DETERGENT AND RINSE AID
20
30
M
A
X
1
2
3
4
+
-
1
2
3
4
5
6
7
Use of detergent
CAUTION!
Only use detergents (powder, liquid or tablet) that are suitable for dishwashers.
Follow the recommendations on the detergent packaging for the use and storage of the
detergent.
To help the environment, do not use more than the correct quantity of detergent.
Filling with detergent
1.
Press the release button
2
to open the lid
7
of the detergent dispenser.
2.
Put the detergent in the dispenser
1
.
3. If the washing program has a prewash phase, put a small quantity of detergent on the
inner part of the appliance door.
4.
If you use the detergent tablets, put the tablet in the detergent dispenser
1
.
5. Close the detergent dispenser. Press the lid until it locks into position.
12 Use of detergent and rinse aid
Different brands of detergent dissolve in different times. Some detergent tablets do not
have the best cleaning results during short washing programs. Use long washing programs
when you use detergent tablets to fully remove the detergent.
Use of rinse aid
CAUTION!
Only use rinse aid specified for dishwashers.
Do not fill the rinse aid dispenser with other products (e.g. dishwasher cleaning agent, liq-
uid detergent). This can cause damage to the appliance.
Rinse aid makes it possible to dry the dishes without streaks and stains.
Rinse aid is automatically added during the last rinsing phase.
Follow these steps to fill the rinse aid dispenser:
Filling with rinse aid
1.
Press the release button
6
to open the lid
5
of the rinse aid dispenser.
2.
Fill the rinse aid dispenser
3
with rinse aid. The mark 'max' shows the maximum level.
3. Remove the spilled rinse aid with an absorbent cloth to prevent too much foam during
the washing program.
4. Close the rinse aid dispenser. Press the lid until it locks into position.
Adjusting the rinse aid dosage
Factory set: position 3.
You can set the rinse aid dosage between position 1 (lowest dosage) and position 4 (highest
dosage).
Turn the rinse aid selector
4
to increase or reduce the dosage.
Wash hands to remove any residue of rinse aid from skin.
MULTITAB FUNCTION
The multitab function is for combi detergent tablets.
These tablets contain agents as detergent, rinse aid and dishwasher salt. Some types of tab-
lets can contain other agents.
Be sure that these tablets are suitable for the water hardness in your area (refer to the in-
structions on the packaging of the products).
The multitab function deactivates the flow of rinse aid and salt.
The multitab function deactivates the indicators of salt and rinse aid.
The program duration can increase if you use the multitab function.
Activate or deactivate the multitab function before the start of a washing program. You
cannot activate or deactivate the function while a washing program operates.
Before the start of a washing program, always make sure that the multitab function is ac-
tive.
Multitab function
13
To activate the multitab function
1. Press the Option button, until the multitab indicator comes on. The function is activa-
ted.
To deactivate the multitab function and use separately detergent, salt and rinse aid
1. Press the Option button, until the multitab indicator goes off. The function is deactiva-
ted.
2. Fill the salt container and the rinse aid dispenser.
3. Adjust the water hardness to the highest level.
4. Start a washing program without dishes.
5. When the washing program is completed, adjust the water softener to the water hard-
ness in your area.
6. Adjust the rinse aid dosage.
LOADING CUTLERY AND DISHES
Refer to the leaflet 'Examples of ProClean loads'.
Helpful hints and tips
CAUTION!
Only use the appliance for household utensils that are suitable for dishwashers.
Do not use the appliance to clean objects that can absorb water (sponges, household cloths,
etc.).
Before you load cutlery and dishes:
Remove all remains of food and debris.
Soften burnt remains of food.
While you load cutlery and dishes:
Load hollow items (e.g. cups, glasses and pans) with the opening down.
Make sure that water does not collect in the container or in a deep base.
Make sure that cutlery and dishes do not lie inside one another.
Make sure that cutlery and dishes do not cover other cutlery and dishes.
Make sure that glasses do not touch other glasses.
Put small objects in the cutlery basket.
Plastic items and pans with non-stick coatings can retain water droplets. Plastic items do
not dry as well as porcelain and steel items.
Put light items in the upper basket. Make sure that the items do not move.
CAUTION!
Make sure that the spray arms can move freely before you start a washing program.
14 Loading cutlery and dishes
WARNING!
Always close the door after you load or unload the appliance. An open door can be danger-
ous.
WASHING PROGRAMS
Program Type of soil Type of load Program description Function
1)
All Crockery, cut-
lery, pots and
pans
Prewash
Wash 45 °C or 70 °C
Rinses
Dry
Extra-Hygiene
Heavy soil Crockery, cut-
lery, pots and
pans
Prewash
Wash 70 °C
Rinses
Dry
2)
Normal soil Crockery and
cutlery
Prewash
Wash 50 °C
Rinses
Dry
3)
Fresh soil Crockery and
cutlery
Wash 60 °C
Rinse
Extra-Hygiene
4)
Normal soil Crockery and
cutlery
Prewash
Wash 50 °C
Rinses
Dry
Extra-Hygiene
Light soil Crockery and
cutlery
Wash 55 °C
Rinses
Extra-Hygiene
Use this program to quickly rinse the dishes. This pre-
vents the remaining food to bond on the dishes and bad
odours to come out from the appliance.
Do not use detergent with this program.
1) The appliance senses the type of soil and the quantity of items in the baskets. It automatically adjusts the
temperature and quantity of the water, the energy consumption and the program time.
2) This is the most silent washing program. The pump works at a very low speed to decrease the level of noise.
Because of the low speed, the program time is long.
3) With this program you can wash a load with fresh soil. It gives good washing results in a short time.
4) This is the standard program for test institutes. With this program you have the most efficient use of water and
energy consumption for crockery and cutlery with normal soil. Refer to the supplied leaflet for test information.
Consumption values
Program
1)
Energy (kWh) Water (litre)
0.9 - 1.7 8 - 15
1.5 - 1.6 13 - 14
1.1 - 1.2 9 - 11
0.9 9
Washing programs 15
Program
1)
Energy (kWh) Water (litre)
0.67 - 0.81 9.6 - 11.6
1.0 - 1.2 10 - 11
0.05 4
1) The display shows the program time.
The water pressure and temperature, the variations of the mains supply and the quantity of
dishes can change the consumption values.
SETTING AND STARTING A WASHING PROGRAM
Starting the washing program without delay start
1. Close the appliance door.
2. Switch on the appliance. Make sure that the appliance is in setting mode.
3. Set the washing program and if required, the available functions. (Always set the Extra-
Hygiene function after the setting of the washing program).
The related program indicator comes on.
The time of the program flashes in the display
The phase indicators of the program come on.
4. Press the Start button. The washing program starts.
Only the indicator of the phase in operation stays on. The other phase indicators go
off.
Starting the washing program with delay start
1. Close the appliance door.
2. Switch on the appliance. Make sure that the appliance is in setting mode.
3. Set the washing program and if required, the available functions. (Always set the Extra-
Hygiene function after the setting of the washing program).
4. Press the Delay button repeatedly until the display shows the time of the delay start.
The time of the delay start flashes in the display.
The delay indicator is on.
5. Press the Start button, the countdown starts.
The time of the delay start is no longer flashing in the display.
The phase indicators of the set washing program go off.
When the countdown is completed, the washing program starts automatically.
The opening of the appliance door interrupts the countdown. When you close the door, the
countdown continues from the point of interruption.
16 Setting and starting a washing program
Cancelling the delay start
The countdown has not yet started
1. Press the Delay button repeatedly until the display shows the time of the washing pro-
gram.
The phase indicators of the program come on.
2. Press the Start button, the washing program starts.
The countdown is operating
Press the Delay button repeatedly until the display shows the time of the washing pro-
gram. The washing program starts.
WARNING!
Only interrupt or cancel a washing program if necessary.
Attention! Open the door carefully. Hot steam and water can escape.
Interrupting a washing program
Open the appliance door. The washing program stops.
Close the appliance door. The washing program continues from the point of interruption.
Cancelling the washing program
If the washing program has not started, you can change the selection.
To change the selection while the washing program operates, it is necessary to cancel the
program.
Press and hold the Delay button and the Start button at the same time until:
All the program indicators come on.
The display shows two horizontal status bars.
Make sure that there is detergent in the detergent dispenser before you start a new wash-
ing program.
End of the washing program
When the washing program is completed, the display shows a zero and the end indicator is
on
1. Switch off the appliance.
2. Open the appliance door.
For better drying results, keep the appliance door ajar for some minutes.
Removing the load
Let the dishes cool down before you remove them from the appliance. Hot dishes are
easily damaged.
First remove items from the lower basket, then from the upper basket.
There can be water on the sides and door of the appliance. Stainless steel becomes cool
more quickly than the dishes.
Setting and starting a washing program
17
CARE AND CLEANING
To remove and clean the filters
WARNING!
Switch the appliance off before you carry out any cleaning operation.
Dirty filters decrease the washing results. Although the maintenance is very low with these
filters, we recommend that you regularly check the filters and clean them if necessary.
1. To remove filter (A), turn it counterclock-
wise and remove it out from filter (B).
2. Filter (A) has 2 parts. To disassemble the
filter, pull them apart.
3. Thoroughly clean the parts under running
water.
4. Put the 2 parts of the filter (A) together
and push. Make sure that they assemble
correctly in each other.
5. Remove filter (B).
6. Thoroughly clean filter (B) under running
water.
7. Put filter (B) to its initial position. Make
sure that it assembles correctly under the
two guides (C).
8. Put filter (A) into position in filter (B) and
turn it clockwise until it locks.
A
B
C
18 Care and cleaning
Cleaning the spray arms
Do not remove the spray arms.
If the holes in the spray arms become clogged, remove remaining parts of soil with a thin
pointed object.
External cleaning
Clean the external surfaces of the appliance and control panel with a damp soft cloth. Only
use neutral detergents. Do not use abrasive products, scouring pads or solvents (e.g. ace-
tone).
Internal cleaning
We recommend, every 3 months to run a washing program for heavily soiled dishes. Use
detergent, but do not put dishes in the appliance.
When the appliance is not to be used for a long period
1. Disconnect the mains plug from the mains socket.
2. Close the water tap.
3. Leave the door open to prevent unpleasant smells.
4. Keep the inner side of the appliance clean.
Frost precautions
CAUTION!
Do not install the appliance where the temperature is below 0 °C. The manufacturer is not
responsible for damage caused by frost.
Moving the appliance
1. Disconnect the mains plug from the mains socket.
2. Close the water tap.
3. Remove the appliance and the hoses.
4. Do not tilt the appliance during transport.
WHAT TO DO IF…
The appliance does not start or stops during operation.
If there is a fault, first try to find a solution to the problem yourself. Refer to following
charts. If you cannot find a solution to the problem, contact your dealer or the Customer
Care Centre.
With some malfunctions, the display shows an alarm code:
- The appliance does not fill with water
- The appliance does not drain the water
- The anti-flood device operates.
WARNING!
Switch the appliance off before you do the suggested corrective actions.
What to do if…
19
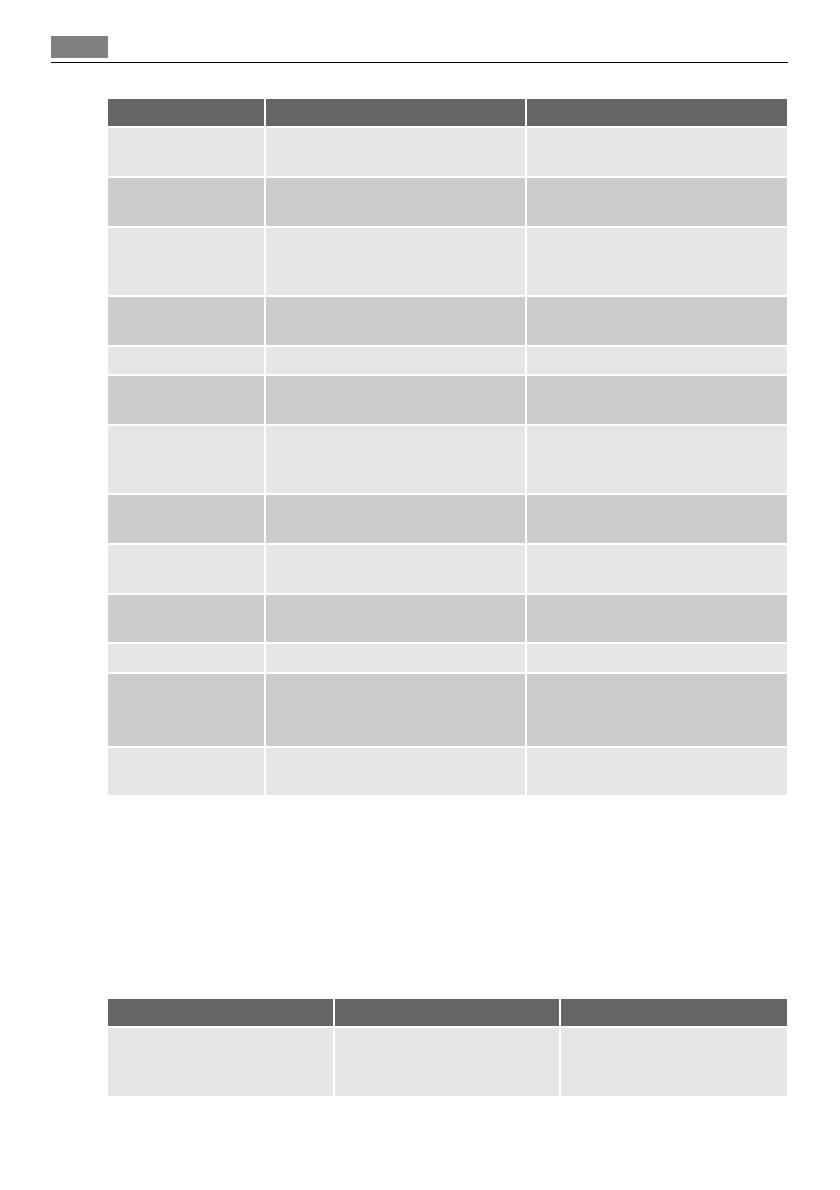
Malfunction Possible cause Possible solution
The appliance does
not fill with water
The water tap is closed. Open the water tap.
The filter in the water inlet hose is
blocked.
Clean the filter.
The installation of the water inlet
hose is not correct. The hose is bent
or squashed.
Make sure that the installation is
correct.
The water tap is blocked or restricted
with limescale.
Clean the water tap.
The water pressure is too low. Contact your local water authority.
The appliance does
not drain the water
There is a blockage in the sink spi-
got.
Clean the sink spigot.
The installation of the water drain
hose is not correct. The hose is bent
or squashed.
Make sure that the installation is
correct.
The anti-flood device
operates
Close the water tap and contact
your Customer Care Centre.
The program does
not start
The appliance door is not closed. The
door indicator is on.
Close the door.
The Start button or touchpad has
not been pressed.
Press the Start button or touchpad.
Mains plug is not connected. Plug-in the appliance to the mains.
The delay start is set. Cancel the delay start.
Wait until the countdown of the
delay start is completed.
The fuse has blown out in the
household fuse box
Replace the fuse.
After the check, switch on the appliance. The program continues from the point of inter-
ruption. If the malfunction occurs again, contact your Customer Care Centre.
If the display shows an alarm code, not described in the chart, contact your Customer Care
Centre.
When you contact the Customer Care Centre you will need to give some details of the ap-
pliance that can be found on the rating plate (e.g. model number, serial number, product
number). We recommend that you record these details.
The washing results and drying results are not satisfactory
Problem Possible cause Possible solution
The dishes are not clean. The selected washing program
was not suitable for the type of
load and soil.
Make sure that the washing
program is suitable for the type
of load and soil.
20 What to do if…
  • Page 1 1
  • Page 2 2
  • Page 3 3
  • Page 4 4
  • Page 5 5
  • Page 6 6
  • Page 7 7
  • Page 8 8
  • Page 9 9
  • Page 10 10
  • Page 11 11
  • Page 12 12
  • Page 13 13
  • Page 14 14
  • Page 15 15
  • Page 16 16
  • Page 17 17
  • Page 18 18
  • Page 19 19
  • Page 20 20
  • Page 21 21
  • Page 22 22
  • Page 23 23
  • Page 24 24
  • Page 25 25
  • Page 26 26
  • Page 27 27
  • Page 28 28
  • Page 29 29
  • Page 30 30
  • Page 31 31
  • Page 32 32

Aeg-Electrolux F77000M0P User manual

Category
Dishwashers
Type
User manual
This manual is also suitable for

The Aeg-Electrolux F77000M0P dishwasher is a high-performance appliance designed to make dishwashing easier and more efficient. With its innovative features, it offers a range of benefits that can enhance your kitchen experience. Here are some key capabilities of the Aeg-Electrolux F77000M0P dishwasher:

  • Efficient Cleaning: Equipped with multiple spray arms and a powerful water circulation system, the dishwasher ensures thorough cleaning of your dishes, removing stubborn dirt and food residue.

  • Flexible Loading Options: The adjustable baskets and cutlery tray allow you to customize the interior space to accommodate different types and sizes of dishes, maximizing loading flexibility.

Ask a question and I''ll find the answer in the document

Finding information in a document is now easier with AI