
Use and care
GUIDE
THERMADOR.COM
Freedom
®
Induction Cooktop
CIT30XWBB


Table of
CONTENTS
Table of Contents
Use and care manual
9 Safety Definitions .................................................. 4
IMPORTANT SAFETY INSTRUCTIONS ........................ 5
Fire Safety ....................................................................... 5
Cooking Safety ................................................................ 5
Burn Prevention .............................................................. 6
Child Safety ..................................................................... 6
Cleaning Safety ............................................................... 6
Cookware Safety ............................................................. 7
Proper Installation and Maintenance .............................. 7
Electromagnetic interference ......................................... 7
Cooling fan ...................................................................... 8
Proposition 65Warning .................................................. 8
Causes of damage ...................................................... 9
Overview ......................................................................... 9
Protecting the Environment ....................................... 9
Energy-saving Advice ...................................................... 9
Cooking with Induction ............................................ 10
Advantages of Induction Cooking ................................ 10
Cookware ...................................................................... 10
Familiarizing yourself with your appliance ................ 11
Cooking surface ............................................................ 11
The control panel .......................................................... 11
Overview of the Menus ................................................. 12
Cooking Position Display .............................................. 13
Residual Heat Indicator ................................................. 13
Operating the Appliance .......................................... 14
First-time use ................................................................ 14
Switching the cooktop on and off ................................ 14
Setting a cooking position ............................................ 14
Chef's recommendations .............................................. 15
Timer functions ............................................................. 17
PowerBoost
®
Function .................................................. 19
PanBoost™ Function .................................................... 19
Keep Warm ................................................................... 20
Transfer function ........................................................... 20
Wireless Cooking Sensor .............................................. 20
Cooking Sensor Mode .................................................. 23
MyZone™ ..................................................................... 28
TeppanyakiPro™ Mode ................................................ 29
Panel Lock ..................................................................... 30
Pause function ............................................................... 30
Automatic Shutoff ......................................................... 30
Basic Settings ................................................................ 30
Home Connect ......................................................... 32
Connection to your home network ............................... 32
Home Connect Settings ................................................ 34
Software Update ........................................................... 36
Information on Data Protection .................................... 36
Wi-Fi
®
Module .............................................................. 36
Cooktop - Hood Sync .............................................. 37
Setting up a connection ................................................ 37
Disconnecting from the network .................................. 38
Controlling the hood via the cooktop .......................... 38
Hood control settings ................................................... 39
Cleaning and Maintenance ...................................... 39
Daily Cleaning ............................................................... 39
Cleaning guidelines ....................................................... 39
Cleaning chart ............................................................... 40
Maintenance .................................................................. 40
Frequently-asked questions and answers (FAQ) ...... 41
Troubleshooting ....................................................... 43
Warnings and fault messages ....................................... 43
Tips ................................................................................ 44
Demo mode .................................................................. 45
How to Obtain Warranty Service .................................. 45
STATEMENT OF LIMITED PRODUCT WARRANTY ... 45
What this Warranty Covers & Who it Applies to .......... 45
How Long the Warranty Lasts ....................................... 45
Repair/Replace as Your Exclusive Remedy ................... 46
Out of Warranty Product ............................................... 46
Warranty Exclusions ...................................................... 46
THERMADOR® Support .......................................... 47
Service ........................................................................... 47
Parts and Accessories ................................................... 47

4
.
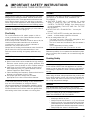
9 Safety Definitions
Safety Defi nitions
9 WARNING
This indicates that death or serious injuries may
occur as a result of non-observance of this warning.
9 CAUTION
This indicates that minor or moderate injuries may
occur as a result of non-observance of this warning.
NOTICE: This indicates that damage to the appliance or
property may occur as a result of non-compliance with
this advisory.
Note: This alerts you to important information and/or
tips.

5
9 IMPORTANT SAFETY INSTRUCTIONS
READ AND SAVE THESE INSTRUCTIONS
IMPORTANT SAFET Y I NS T RUCT I ONS RE AD AND SAVE THESE INSTRUCTIONS
WARNING
When properly cared for, your new appliance has been
designed to be safe and reliable. Read all instructions
carefully before use. These precautions will reduce the
risk of burns, electric shock, fire, and injury to persons.
When using kitchen appliances, basic safety precautions
must be followed, including those in the following pages.
Examine the appliance after unpacking it. In the event of
transport damage, do not plug it in.
Fire Safety
Do not allow aluminum foil, plastic, paper or cloth to
come in contact with a hot surface element, burner or
grate. Do not allow pans to boil dry.
If the cooktop is near a window, forced air vent or fan, be
certain that flammable materials such as window
coverings do not blow over or near the burners or
elements. They could catch on fire.
Always have a working smoke detector near the kitchen.
Never leave the cooktop unattended when in use.
Boilovers cause smoking and greasy spillovers may
ignite.
WARNING
TO REDUCE THE RISK OF A GREASE FIRE:
a.
Never leave surface units unattended at high settings.
Boilovers cause smoking and greasy spillovers that
may ignite. Heat oils slowly on low or medium settings.
b.
Always turn hood ON when cooking at high heat or
when flambéing food (i.e. Crepes Suzette, Cherries
Jubilee, Peppercorn Beef Flambé).
c.
Clean ventilating fans frequently. Grease should not be
allowed to accumulate on fan or filter.
d.
Use proper pan size. Always use cookware
appropriate for the size of the surface element.
In the event that personal clothing or hair catches fire,
drop and roll immediately to extinguish flames.
Have an appropriate fire extinguisher available, nearby,
highly visible and easily accessible near the appliance.
Smother flames from food fires other than grease fires
with baking soda. Never use water on cooking fires.
WARNING
TO REDUCE THE RISK OF INJURY TO PERSONS IN
THE EVENT OF A GREASE FIRE, OBSERVE THE
FOLLOWING:
a.
SMOTHER FLAMES with a close-fitting lid, cookie
sheet, or metal tray, then turn off the burner. BE
CAREFUL TO PREVENT BURNS. If the flames do not
go out immediately, EVACUATE AND CALL THE FIRE
DEPARTMENT.
b.
NEVER PICK UP A FLAMING PAN – You may be
burned.
c.
DO NOT USE WATER, including wet dishcloths or
towels – a violent steam explosion will result.
d.
Use an extinguisher ONLY if:
- You know you have a Class ABC extinguisher, and
you already know how to operate it.
- The fire is small and contained in the area where it
started.
- The fire department is being called.
- You can fight the fire with your back to an exit.
Whenever possible, do not operate the ventilation system
during a cooktop fire. However, do not reach through fire
to turn it off.
Cooking Safety
WARNING
Use this appliance only for its intended use as described
in this manual. NEVER use this appliance as a space
heater to heat or warm the room. Doing so may result in
overheating the appliance. Never use the appliance for
storage.
When using the timer, always supervise the cooktop and
do not allow anything to boil over or burn. Boilovers can
cause smoke and some foods and oils may catch fire if
left on high temperature settings.
CAUTION
If the temperature sensing system is not working
properly, boilovers may result causing burns and injury.
WHEN COOKING WITH THE COOKING SENSOR
FUNCTION OBSERVE THE FOLLOWING:
▯ Always put the lid on pots
▯ Always fill pots with at least 1¼" (3cm) of liquid
▯ Always use pots of the appropriate size and type
(enamelware pots, stainless steel and aluminum
pots equipped with wireless temperature sensor)
▯ Always keep the sensor’s window clean

9 IMPORTANT SAFETY INSTRUCTIONS
READ AND SAVE THESE INSTRUCTIONS
6
When using the Cooking Sensor mode, make sure that
the selected cooking zone matches the one on which
you have placed the cookware with the cooking sensor.
WARNING
RISK OF INJURY
The wireless cooking sensor is powered by a battery,
which may become damaged if it is exposed to high
temperatures. Remove the sensor from the cookware
and store it away from any heat sources.
WARNING
RISK OF INJURY
The cooking sensor can be very hot when removing it
from the cookware. Use potholders or a dish towel to
remove it.
Never use the appliance if liquids or foods have spilled
around the control panel. Always turn off the cooktop
and dry the control panel.
Injury and damage to the appliance may occur if control
elements are not used properly.
If the cooktop turns off automatically and can no longer
be operated, it may turn itself on unintentionally at a later
point. Switch off the circuit breaker in the fuse box.
Contact Customer Support for service.
Burn Prevention
DO NOT TOUCH SURFACE UNITS OR AREAS NEAR
UNITS - Surface units may be hot even though they are
dark in color. Areas near surface units may become hot
enough to cause burns. During and after use, do not
touch, or let clothing, potholders, or other flammable
materials contact surface units or areas near units until
they have had sufficient time to cool. Among these areas
are the cooktop and areas facing the cooktop.
Do not heat or warm unopened food containers. Build-up
of pressure may cause the container to burst and cause
injury.
Always use dry potholders. Moist or damp potholders on
hot surfaces may result in burns from steam. Do not let
potholder touch hot heating elements. Do not use a towel
or other bulky cloth.
Always turn hood ON when cooking at high heat or when
flambéing food (i.e. Crêpes Suzette, Cherries Jubilee,
Peppercorn Beef Flambé).
Use high heat settings on the cooktop only when
necessary. To avoid bubbling and splattering, heat oil
slowly, on no more than a low-medium setting. Hot oil is
capable of causing extreme burns and injury.
Never move a pan of hot oil, especially a deep fat fryer.
Wait until it is cool.
Secure all loose garments, etc., before beginning. Tie
long hair so that it does not hang loose, and do not wear
loose-fitting clothing or hanging garments, such as ties,
scarves, jewelry, or dangling sleeves.
WARNING
RISK OF BURNS
Metallic objects become hot very quickly on the cooktop.
Never set down metallic objects such as knives, forks,
spoons and lids on the cooktop.
WARNING
RISK OF BURNS
The pan detection shut-off feature may not turn off the
cooking zone due to spilled food or objects placed on
the cooktop.
If the display does not work when a cooking area is
heating up, disconnect the circuit breaker or fuse in the
electrical panel. Contact an authorized servicer.
Child Safety
When children become old enough to use the appliance,
it is the responsibility of the parents or legal guardians to
ensure that they are instructed in safe practices by
qualified persons.
Do not allow anyone to climb, stand, lean, sit, or hang on
any part of an appliance, especially a door, warming
drawer, or storage drawer. This can damage the
appliance, and the unit may tip over, potentially causing
severe injury.
Do not allow children to use this appliance unless closely
supervised by an adult. Children and pets should not be
left alone or unattended in the area where the appliance
is in use. They should never be allowed to play in its
vicinity, whether or not the appliance is in use.
CAUTION
Items of interest to children should not be stored in an
appliance, in cabinets above an appliance or on the
backsplash. Children climbing on an appliance to reach
items could be seriously injured.
Cleaning Safety
Do not clean the appliance while it is still hot. Some
cleaners produce noxious fumes when applied to a hot
surface. Wet clothes and sponges can cause burns from
steam.
Do not use steam cleaners to clean the appliance.

7
9 IMPORTANT SAFETY INSTRUCTIONS
READ AND SAVE THESE INSTRUCTIONS
Cookware Safety
Hold the handle of the pan when stirring or turning food.
This helps prevent spills and movement of the pan.
Use Proper Pan Size.
The use of undersized cookware will expose a portion of
the heating element or burner to direct contact and may
result in ignition of clothing. Select cookware having flat
bottoms large enough to cover the surface heating unit.
This appliance is equipped with one or more surface
units of different sizes. Proper relationship of cookware to
heating element or burner will also improve efficiency.
Cookware not approved for use with ceramic cooktops
may break with sudden temperature changes. Use only
pans that are appropriate for ceramic induction
cooktops.
Always position handles of utensils inward so they do not
extend over adjacent work areas, burners, or the edge of
the cooktop. This reduces the risk of fires, spills and
burns.
WARNING
RISK OF INJURY
When cooking with a double-boiler, the cooktop and
cooking vessel may crack due to overheating. The
cooking vessel in the double-boiler must not come in
direct contact with the bottom of the pot filled with water.
Use only heat-resistant cookware.
WARNING
DANGER OF INJURY
Cookware may jump upward due to fluid trapped
between the cookware bottom and cooking zone. Always
keep cooking zone and cookware bottom dry.
Proper Installation and Maintenance
Have the installer show you the location of the circuit
breaker or fuse. Mark it for easy reference.
This appliance must be properly installed and grounded
by a qualified technician. Connect only to properly
grounded outlet. Refer to Installation Instructions for
details.
This appliance is intended for use up to a maximum
height of 13,100 feet (4,000 meters) above sea level.
This appliance is intended for normal family household
use only. It is not approved for outdoor use. See the
Statement of Limited Product Warranty. If you have any
questions, contact the manufacturer.
Do not store or use corrosive chemicals, vapors,
flammables or nonfood products on or near this
appliance. It is specifically designed for use when
heating or cooking food. The use of corrosive chemicals
in heating or cleaning will damage the appliance and
could result in injury.
Do not operate this appliance if it is not working properly,
or if it has been damaged. Contact an authorized
servicer.
Do not cook on a broken cooktop. Cleaning solutions
and spillovers may create a risk of electric shock.
Do not repair or replace any part of the appliance unless
specifically recommended in this manual. Refer all
servicing to a factory authorized service center.
To avoid electrical shock hazard, before servicing the
appliance, switch power off at the service panel and lock
the panel to prevent the power from being switched on
accidentally.
Electromagnetic interference
WARNING
This induction cooktop generates and uses ISM
frequency energy that heats cookware by using an
electromagnetic field. It has been tested and complies
with Part 18of the FCC Rules for ISM equipment. This
induction cooktop meets the FCC requirements to
minimize interference with other devices in residential
installation. Induction cooktops may cause interference
with television or radio reception. If interference occurs,
the user should try to correct the interference by:
▯ Relocating the receiving antenna of the radio or
television.
▯ Increasing the distance between the cooktop and the
receiver.
▯ Connecting the receiver into an outlet different than the
cooktop.
It is the user’s responsibility to correct any interference.
CAUTION
Persons with a pacemaker or similar medical device
should exercise caution when standing near an induction
cooktop while it is in use. Consult your doctor or the
manufacturer of the pacemaker or similar medical device
for additional information about its effects with
electromagnetic fields from an induction cooktop.
WARNING
HAZARD DUE TO MAGNETISM
The wireless temperature sensor is magnetic. The
magnetic elements can damage electronic implants such
as pacemakers or insulin pumps. People with electronic
implants should therefore not put the temperature sensor
in the pockets of their clothes and should maintain a
minimum distance of 4" (10 cm) with respect to their
pacemaker or similar medical device.

9 IMPORTANT SAFETY INSTRUCTIONS
READ AND SAVE THESE INSTRUCTIONS
8
Cooling fan
The cooktop is equipped with a cooling fan on its
underside. Should the cooktop lie above a drawer, there
must be no objects or paper in it. They may be sucked in
and compromise the cooling of the appliance or damage
the fan.
There must be a minimum distance of ¾" (20mm)
between the content of the drawer and the fan input.
Proposition 65Warning:
This product may contain a chemical known to the State
of California, which can cause cancer or reproductive
harm. Therefore, the packaging of your product may
bear the following label as required by California:
&DQFHUDQG5HSURGXFWLYH+DUPZZZ3:DUQLQJVFDJRY
67$7(2)&$/,)251,$352326,7,21:$51,1*
:$51,1*

9
Causes of damage
Causes of damage
NOTICE:
▯ Rough pot and pan bases scratch the cooktop.
▯ Never leave cookware cooking empty. This can cause
damage.
▯ Do not place hot pots or pans on the control panel, the
displays or the cooktop surround. This can cause
damage.
▯ Damage can occur if hard or pointed objects fall on
the cooktop.
▯ Aluminum foil and plastic containers can melt and
stick on hot burners. The use of oven protective foil on
the cooktop is not recommended.
Overview
You will find the most frequently caused damage in the
following table.
Protecting the Environment
Energy-saving Advice
▯ Place a lid on cookware. Cooking with an uncovered
pan will result in a considerable increase in energy
use. Use a glass lid to provide visibility and avoid
having to lift the lid.
▯ Use cookware equipped with a solid, flat bottom.
Curved pan bases increase energy consumption.
▯ The diameter of the pan base must match the size of
the element. Note: The manufacturer normally
indicates the pan's upper diameter. This is normally
greater than the diameter of the pan's base.
▯ Choose cookware of a size suited to the amount of
food you are going to cook. A large pan that is only
half full will use a lot of energy.
▯ Use a small amount of water when cooking. This
saves energy, and vegetables retain a larger
percentage of their vitamins and minerals.
▯ Select the lowest power level to maintain cooking. If
the power level is too high, energy is wasted.
Damage Cause Remedy
Stains Boiled-over food. Remove boiled-over food immediately with a glass
scraper.
Unsuitable cleaning agent. Only use cleaning agents that are suitable for this type of
cooktop.
Scratches Salt, sugar and sand. Do not use the cooktop as a work surface or storage
space.
Cookware with rough bases scratch the
cooktop.
Check the cookware.
Discoloration Unsuitable cleaning agent. Only use cleaning agents that are suitable for this type of
cooktop.
Pan abrasion. Lift pots and pans when moving them.
Blisters Sugar, food with a high sugar content. Remove boiled-over food immediately with a glass
scraper.

10
Cooking with Induction
Advantages of Induction Cooking
Induction cooking is fundamentally different from
traditional cooking methods, as heat builds up directly in
the cookware. This offers numerous advantages:
▯ Saves time when boiling and frying.
▯ Saves energy.
▯ Easier to care for and clean. Spilled food does not
burn on as quickly.
▯ Heat control and safety – the cooktop increases or
decreases the amount of heat supplied as soon as the
user changes the setting. If the cookware is removed,
the induction burner immediately interrupts the heat
supply without it having been switched off.
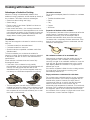
Cookware
Only use ferromagnetic cookware for induction cooking,
such as:
▯ Cookware made from enameled steel
▯ Cookware made from cast iron
▯ Special induction-compatible cookware made from
stainless steel.
To find out whether your cookware is suitable for
induction cooking, check whether a magnet is attracted
to the base of the item or refer to the manufacturer's
specifications.
Some induction cookware does not have a fully
ferromagnetic base:
▯ If the base of the cookware is only partially
ferromagnetic, only the area that is ferromagnetic will
heat up. This may mean that heat will not be
distributed evenly. The non-ferromagnetic area may
not heat up to a sufficient temperature for cooking.
▯ The ferromagnetic area will also be reduced if the
material from which the base of the cookware is made
contains aluminum, for example. This may mean that
the cookware will not become sufficiently hot or even
that it will not be detected.
Unsuitable cookware
Do not ever use adapter plates for induction or cookware
made of:
▯ Traditional stainless steel
▯ Glass
▯ Clay
▯ Copper
▯ Aluminum
Properties of the base of the cookware
The properties of the base of the cookware can affect the
cooking result. Cookware made of materials that
distribute heat evenly, such as saucepans with a
stainless steel sandwich base, save time and energy.
Cookware with a completely flat base works best. If the
base of the cookware is uneven or embossed, this will
reduce the heat supplied.
No cookware/cookware of an unsuitable size
Always place cookware inside the usable area of the
cooking surface. If the cookware is not positioned
correctly, is made of an unsuitable material or is not the
right size, the : symbol appears next to the cooking
zone display. Move the cookware or try again with a
different pot or pan.
If the active cookware is lifted from the cooking surface
for longer than 30 seconds, the cooking zone
automatically switches off.
Empty cookware or cookware with a thin base
Do not heat empty cookware and do not use cookware
that has a thin base. The cooktop is equipped with an
internal safety system. However, an empty item of
cookware can heat up so quickly that the automatic
switch-off function has no time to react and an
excessively high temperature is reached. This could melt
the base of the cookware and damage the glass plate. If
this happens, switch off the cooktop and do not touch
the cookware. If the cooktop no longer works once it has
cooled down, contact Customer Support.

11
Pot detection
The cooktop uses the ferromagnetic diameter and
material of the base of the cookware to automatically
detect the position, size and shape of the cookware
being used. Cookware with a base measuring 3½" to
13½" (90to 340mm) in diameter is suitable for use.
Note: The cooking zone displays may show a size and
shape that is different from the cookware actually being
used. This is normal and does not affect the functioning
of the hob. For more information, see the section entitled
~ "Frequently-asked questions and answers (FAQ)".
Familiarizing yourself with your appliance
Familiarizing yourself with your appliance
This section explains how to use the cooking surface, the
control panel and the various functions of the appliance.
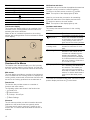
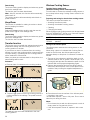
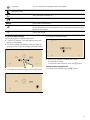
Cooking surface
The entire cooking surface of the cooktop supplies
induction heating. You can place cookware anywhere
inside the usable area of the cooking surface. The
position, size and shape of the cookware will be detected
automatically.
Note: Up to five items of cookware can be heated at the
same time on the cooking surface.
The control panel
The control panel has touch buttons and a touchscreen
display.
Buttons
The buttons are touch-sensitive. To select a function,
touch the relevant symbol. The available functions will
appear on the display.
Notes
▯ Always keep the control panel clean and dry. Moisture
can prevent it from working properly.
▯ Never place hot cookware on the touchscreen display.
There is a risk that the electronics will overheat.
FP
FP
FP
LQ
LQ
LQ
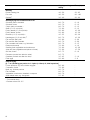
Cooktop
1 Usable cooking surface
2 Control panel
21O2)) 7,0(56
Touch buttons
ON l OFF Main switch
TIMERS Timer menu
.
Kitchen Timer
œ
Stopwatch Timer
1
Panel Lock
a
Pause function
A
Cooktop - Hood Sync
"
Basic settings
ü#
Detected cooking position
1.0-
9.0
Power levels
k
PowerBoost
®
function
l
PanBoost™ function
$
21O2))
7,0(56

12
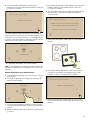
Touchscreen display
The touchscreen display gives you an overview of the
cookware on the cooking surface and the buttons for
activating the various functions.
When an item of cookware is placed on the cooking
surface, the cooking position for this cookware is shown
on the display.
Overview of the Menus
The intuitive menu structure helps you to find your way
around the control panel of your cooktop. You can find
out more about the most important menus in this section.
Main screen
The main display provides an overview of the indicators
for the cookware on the cooking surface. It displays the
cooking mode, power levels, and the timer functions that
are set for the cooking positions that are switched on.
Function bar
The function bar provides access to a number of
functions and other menus.
The following options are shown in the function bar:
▯ 1 Panel Lock
▯ a Pause function
▯ A Cooktop - Hood Sync
▯ " Basic Settings
Info menu
The info menu provides you with information about the
appliance or the functions that are currently active.
To access the info menu, touch the ! symbol on the
function bar. The sensor will show when the function is
available.
Notifications and alerts
Notifications let you know that the appliance's status has
changed or that you need to confirm something.
To return to the main screen, touch the
8 symbol.
Note: The top line of the display lights up blue.
Alerts let you know that you need to do something.
Follow the instructions in the display and touch the
8 symbol to return to the main screen.
Note: The top line of the display lights up red.
Cookware mode menu
The cooktop has various functions for the cooking
positions.
To access the cookware mode menu, touch the cooking
position display and then the ¢ touch button.
«
Keep Warm function
+
Cook timer
¢
Cookware mode
MyZone™
~
Standard cooking mode
n
Cooking Sensor mode
o
TeppanyakiPro™
Touch buttons
$
««
Cookware mode Function
MyZone™
This enables a particular power
level to be controlled according
to the position of the cookware,
i.e. by moving it from front to
back across the cooking surface.
~ Standard
cooking mode
This enables a power level to be
chosen for each item of cook-
ware.
n Cooking Sensor
You can use the cooking sensor
attached to the outside of the
cookware to maintain the tem-
perature automatically. These
cooking functions are designed
for foods that need to be cooked
with a lot of water or fried with a
lot of oil/fat in a pot.
o TeppanyakiPro™
This enables the Teppanyaki-
Pro™ surface to be divided into
two sections. This means you
can cook food on one section
and keep food warm on the other
section, or use the entire area to
cook food at the same power
level.

13
Cooking Position Display
When you place cookware on the cooking surface, the
indicator for the relevant cooking position will light up on
the touchscreen display.
Residual Heat Indicator
The cooktop has several residual heat indicators ÷ to
warn you that one or more cooking positions is/are still
hot. One, two or all three bars of the indicator
÷ will light
up depending on how strong the residual heat is. Do not
touch the cooking surface while the indicators are still lit
or immediately after they have switched off.
When you switch off the cooktop the residual heat
indicators will remain lit for as long as the cooking
surface is still hot.
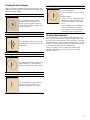
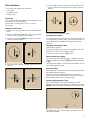
Detected cooking position
The cookware on the cooking
surface has been detected. The
cooking position display lights up.
Touch the # symbol to select the
cooking position.
Selected cooking position
The indicated cooking position has
been selected. You can now set the
power level.
Cooking position switched on
The indicated cooking position has
been switched on. The selected
power level lights up in the display.
There is no cookware on the cooking position
The cookware has been removed
from the cooking position. The
selected power level is dimmed.
K
PLQ
K
PLQ
Other displays and symbols
The settings for the cooking position
cannot be configured.
Touch the display for more informa-
tion.
Possible causes:
▯ Up to 5items of cookware evenly
distributed over the cooking sur-
face can be heated at the same
time.
▯ The cookware is not suitable for
use on an induction cooktop.
▯ The appliance has exceeded its
maximum power consumption.

14
Operating the Appliance
This chapter explains how to set a cooking position. The
table shows heat settings and cooking times for various
meals.
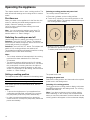
First-time use
When you switch on the appliance for the first time, the
menu for selecting the initial settings appears on the
display. Select the settings you require.
Once you have confirmed these settings, the main
screen will appear.
Note: You can change the settings at any time. For
information on how to select these settings, see the
section entitled ~ "Basic Settings".
Switching the cooktop on and off
Use the main switch to switch the cooktop on and off.
Switch on: Touch the ON l OFF button. The indicator
above the main switch will light up. After a short time, the
cooktop will be ready for operation.
Switch off: Touch the ON l OFF button. The indicator will
switch off. All cooking positions are switched off.
The residual heat indicator will remain lit until the cooking
positions have cooled down sufficiently.
Notes
▯ The cooktop switches off automatically if the cooking
positions have been switched off for more than
30 seconds.
▯ The selected settings will be stored for 10 minutes
after the cooktop has been switched off. If you switch
the cooktop back on during this time, the option to
confirm the previous settings appears on the main
screen. For information on this setting, see the section
entitled ~ "Basic Settings"
Setting a cooking position
The required power level is selected in the settings area.
Each power level has an intermediate level, which is
marked with.5.
Notes
▯ To protect the fragile parts of your appliance from
overheating and electrical overloading, the cooktop
may temporarily reduce the power automatically.
▯ In order to prevent the appliance from producing
excess noise, the cooktop may temporarily reduce the
power automatically.
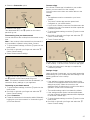
Selecting a cooking position and power level
The cooktop must be switched on.
1.
Place the cookware on the cooking surface.
2.
Touch the # symbol for the cooking position on the
touchscreen display. The settings area will light up on
the cooking position display.
3.
Within the next 4seconds, scroll up with your finger
and select the power level you require.
To select power level 9.0, tap 9.0directly.
The power level is set.
Changing the power level
Select the cooking position and then select the required
power level in the settings area.
Switching off a cooking position
Touch and hold the cooking position display until power
level ó.ó is displayed in the settings area. The cooking
position will switch off.
Note: If you place cookware on the cooking surface
before switching on the cooktop, this will be detected
when you touch the main switch, and the indicator for the
cooking position will appear on the touchscreen display.
Power level 1.0 = lowest setting
Power level 9.0 = highest setting
K
PLQ

15
Chef's recommendations
Recommendations
▯ Stir occasionally when heating up purees, creamy
soups and thick sauces.
▯ For preheating, select heat setting 8or 9.
▯ When cooking with the lid on, turn the heat setting
down as soon as steam starts to escape from between
the lid and the cookware.
▯ After cooking, keep the lid on the cookware until you
serve the food.
▯ To cook with the pressure cooker, follow the
manufacturer's instructions.
▯ Do not cook food for too long, otherwise nutrients will
be lost. The kitchen timer can be used to set the
optimum cooking time.
▯ For healthier cooking results, oils and fats should not
be heated to their smoke point.
▯ To brown food, fry small portions one after the other.
▯ Cookware may reach high temperatures while the food
is cooking. We recommend that you use pot holders.
▯ You can find recommendations for energy-efficient
cooking in the section entitled ~ "Cooking with
Induction"
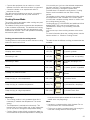
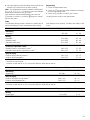
Cooking table
The table shows which heat setting is suitable for each
type of food. The cooking time may vary depending on
the type, weight, thickness and quality of the food.
Ongoing cooking
setting
Time (min)
Melting
Chocolate, couverture 1.0- 1.5 -
Butter, honey, gelatin 1.0- 2.0 -
Heating or keeping warm
Stew, e.g. lentil stew 1.5- 2.0 -
Milk
1
1.5- 2.5 -
Heating sausages in water
1
3.0- 4.0 -
Defrosting and heating
Spinach, frozen 3.0- 4.0 15- 25
Goulash, frozen 3.0- 4.0 35- 55
Poaching, simmering
Potato dumplings
1
4.5- 5.5 20- 30
Fish
1
4.0- 5.0 10- 15
White sauces, e.g. Béchamel sauce 1.0- 2.0 3- 6
Whisked sauces, e.g. Béarnaise sauce, Hollandaise sauce 3.0- 4.0 8- 12
Boiling, steaming, braising
Rice (with double the volume of water) 2.5- 3.5 15- 30
Rice pudding
3
2.0- 3.0 30- 40
Unpeeled boiled potatoes 4.5- 5.5 25- 35
Boiled potatoes 4.5- 5.5 15- 30
Pasta
1
6.0- 7.0 6- 10
Stew 3.5- 4.5 120- 180
Soups 3.5- 4.5 15- 60
Vegetables 2.5- 3.5 10- 20
Vegetables, frozen 3.5- 4.5 7- 20
Stew in a pressure cooker 4.5- 5.5 -
1
Without lid
2
Turn several times
3
Preheat at level 8.0- 8.5

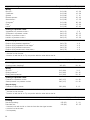
16
Braising
Rolled roasting joint 4.0- 5.0 50- 65
Pot roast 4.0- 5.0 60- 100
Goulash
3
3.0- 4.0 50- 60
Braising/frying with a small amount of oil
1
Schnitzel, plain or breaded 6.0- 7.0 6- 10
Schnitzel, frozen 6.0- 7.0 6- 12
Chops, plain or breaded
2
6.0- 7.0 6- 12
Steak (1¼" (3cm) thick) 7.0- 8.0 6- 12
Poultry breast (¾" (2 cm) thick)
2
5.0- 6.0 10- 20
Poultry breast, frozen
2
5.0- 6.0 10- 30
Rissoles (1¼" (3cm) thick)
2
4.5- 5.5 20- 30
Hamburgers (¾" (2 cm) thick)
2
6.0- 7.0 10- 20
Fish and fish fillet, plain 5.0- 6.0 8- 20
Fish and fish fillet, breaded 6.0- 7.0 8- 20
Fish, breaded and frozen, e.g. fish sticks 6.0- 7.0 8- 15
Prawns and scampi 7.0- 8.0 4- 10
Sautéing fresh vegetables and mushrooms 7.0- 8.0 10- 20
Asian stir fries (vegetables and pieces of meat) 7.0- 8.0 15- 50
Stir fries, frozen 6.5- 7.5 6- 10
Pancakes (cooked one after the other) 6.5- 7.5 -
Omelette (cooked one after the other) 3.5- 4.5 3- 10
Fried eggs 5.0- 6.0 3- 6
Deep fat frying
1
[5- 7oz (150-200 g) per portion in 2- 4pints (1-2 liters) oil, fried in portions]
Frozen products, e.g. fries, chicken nuggets 8.0- 9.0 -
Croquettes, frozen 7.0- 8.0 -
Meat, e.g. chicken portions 6.0- 7.0 -
Fish, breaded 6.0- 7.0 -
Vegetables, mushrooms, breaded, or tempura 6.0- 7.0 -
Small baked items, e.g. doughnuts 5.5- 6.5 -
Ongoing cooking
setting
Time (min)
1
Without lid
2
Turn several times
3
Preheat at level 8.0- 8.5

17
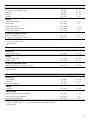
Timer functions
Timer functions
The cooktop has three timer functions:
▯ Cook timer
▯ Stopwatch timer
▯ Kitchen timer
Cook Timer
The cooking position will switch off automatically once
the time that is set has elapsed.
You can set a cooking time of up to 12hours
59 minutes.
Setting the Cook Timer
1.
Select the cooking position and the required power
level.
2.
Touch the selected power level. The + symbol will
light up in the cooking position display.
3.
Touch the + symbol. 00|00 ‹ will light up on the
cooking position display.
4.
Then select the required cooking time in hours and
minutes.
5.
Touch the < symbol to confirm the selected time. The
time you have set will appear in the cooking position
display.
The cooking time begins to elapse.
Cooking Sensor mode
If a cooking time has been set for a cooking position and
Cooking Sensor mode is active, the time will not start to
count down until the selected temperature has been
reached.
Changing or deleting the time
Select the + symbol.
Change the time that is currently set and then touch the
< symbol to confirm your chosen setting.
To delete the time, touch the 9 symbol.
When the time has elapsed
The cooking position will switch off. A signal will sound.
The set cooking time will be óó.óó and the power level
at ó.ó.
Touch the time display. The indicators will switch off and
the audible signal will stop.
Stopwatch Timer
The Stopwatch Timer timer function displays the time that
has elapsed since activation.
This functions runs independently from the cooking
positions and from other settings. This function does not
automatically switch off a cooking position.
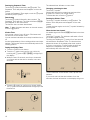
Activating the Stopwatch Timer
Touch the TIMERS touch button and select the œ
symbol. Then touch the < symbol to confirm your choice.
óó.óó and the œ symbol will light up in the function bar.
The Stopwatch Timer has now been activated. The time
will begin to elapse.
¤
$
D

18
Pausing the Stopwatch Timer
Touch the œ symbol followed by the a symbol. The
Stopwatch Timer will pause and reappear on the main
screen.
To start the Stopwatch Timer again, touch the
œ symbol
followed by the < symbol.
Deactivating
Touch the
œ symbol followed by the Ù symbol. The
Stopwatch Timer will stop. The time will reset to óó.óó
and reappear on the main screen.
The function has now been deactivated.
Note: To clear the menu and return to the main screen,
touch the 9 symbol.
Kitchen Timer
You can set a time of up to 9hours, 59minutes and
59 seconds on the Kitchen Timer.
You can activate it whether the cooktop is switched on or
off.
It works independently of the cooking positions and other
settings. This function does not automatically switch off a
cooking position.
Setting the Kitchen Timer
1.
Touch the TIMERS touch button.
2.
Touch the . symbol and confirm your choice by
touching the 8 symbol. óóEóó.óóÕ will light up in
the display.
3.
Within the next 10seconds, scroll up or down with
your finger and set the time in minutes, hours and
seconds.
4.
Touch the < symbol to confirm your chosen setting.
The . symbol and the selected time will light up in the
function bar.
The selected time will start to count down.
Changing or deleting the time
Touch the
. symbol.
Change the time that is currently set and touch the
< symbol to confirm your chosen setting.
To delete the time, touch the
= symbol.
Pausing the Kitchen Timer
Touch the . symbol followed by the a symbol. The
Kitchen Timer will pause and reappear on the main
screen.
To start the timer again, touch the
. symbol followed by
the
< symbol.
When the time has elapsed
An audible signal will sound. óó.óó will flash in the timer
display.
Touch the . symbol. The indicators will switch off and
the audible signal will stop.
Touching and holding the . symbol for a few seconds
will activate the Stopwatch Timer. The time that has
elapsed is shown on the display after the @ symbol.
If you do not touch the . symbol after the time has
elapsed, the Stopwatch Timer will be activated
automatically after a few seconds.
To set a new time on the Kitchen Timer, tap the time
indicator.
If you touch and hold the time indicator for a few
seconds, the time information on the display will go out.
$
D
$
D

19
PowerBoost
®
Function
The PowerBoost
®
function enables you to heat up large
quantities of water more quickly than with power level
9.0.
This function is available if the k symbol is displayed in
the settings area for the cookware.
The PowerBoost
®
function is only available for one
saucepan on each side of the cooking surface.
If the PowerBoost
®
function is activated and you choose
a second cooking position on the same side of the
cooking surface, the PowerBoost
®
function will be
deactivated. The cooking position is automatically set to
power level 9.0.
If the PowerBoost
®
function in the center of the cooking
surface is active, settings can be implemented for other
items of cookware on the left- and right-hand side of the
cooktop.
Activating
Select the cooking position and scroll up with your finger
until the k symbol appears.
The function has now been activated.
Deactivating
Touch the cooking position display and select any power
level in the settings area.
The function has now been deactivated.
Note: Under certain circumstances, the function will
switch off automatically to protect the electronic
components inside the cooktop.
The cooking position will automatically switch back to
power level 9.0.
PanBoost™ Function
The PanBoost™ function can be used to heat pans more
quickly than with power level 9.0.
After deactivating the function, select the appropriate
power level for your food.
This function is available if the l symbol is displayed in
the settings area for the cookware.
The PanBoost™ function is only available for one item of
cookware per cooking surface.
If the PanBoost™ function is activated and the settings
for a different cooking position on the same side of the
cooking surface are selected, the PanBoost™ function
will be deactivated and power level 9.0set automatically.
If the PanBoost™ function for frying pans in the center of
the cooking surface is active, settings can be
implemented for other items of cookware on the left- and
right-hand side of the cooktop.
Recommendations for use
▯ Always use cookware that has not been preheated.
▯ Use cookware with a fully flat base. Do not use
cookware with a thin base.
▯ Never leave empty cookware, oil, butter or lard
unattended when it is being heated.
▯ Do not place a lid on the cookware.
▯ For information on the type, size and positioning of the
cookware, see the section entitled ~ "Basic Settings"
Activating
Touch the cooking position display and select the
l symbol in the settings area.
The function has now been activated.
NN
D $
N
D $
D $
OO
O
D $

20
Deactivating
Touch the cooking position display and select any power
level in the settings area.
The function has now been deactivated.
Note: After 30 seconds, this function will automatically
switch itself off.
The cooking position will automatically switch back to
power level 9.0.
Keep Warm
This function is suitable for melting chocolate or butter
and for keeping food warm.
Activating
Select the relevant cooking position and then set the
power level to
ò.î « in the settings area.
Deactivating
Touch the cooking position display and select any power
level in the settings area.
The function has now been deactivated.
Transfer function
This function lets you transfer the selected power level or
temperature setting and the cooking time from one
cooking position to another.
If you remove an item of cookware from the cooking
surface or move it, the cooking position it was previously
on stops heating. The settings for the cooking position
will be retained for 30 seconds.
When you place the cookware back in this position, the
same settings will be used.
Activation
1.
Place an item of cookware on the cooking surface.
The ˆ symbol will appear on the new cooking position.
2.
Touch the ˆ symbol on the new cooking position to
confirm transfer of the settings. The power level will
light up.
The settings have now been transferred to the new
cooking position.
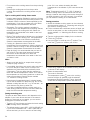
Wireless Cooking Sensor
Cooking Sensor mode ready
(Wireless Cooking Sensor sold separately)
You will need to connect the wireless cooking sensor to
the cooktop before using Cooking Sensor mode for the
first time.
Preparing and caring for the wireless cooking sensor
This section provides information on:
▯ Attaching the silicone patch
▯ Attaching the wireless cooking sensor
▯ Cleaning
▯ Changing the battery
Silicone patches and cooking sensors can be purchased
from the THERMADOR
®
eShop or by Customer Support.
Order the relevant reference number:
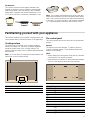
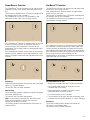
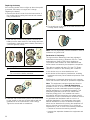
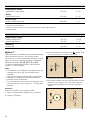
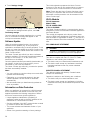
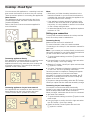
Gluing on the silicone patch
The silicone patch secures the cooking sensor to the
cookware.
When using a piece of cookware with Cooking Sensor
mode for the first time, the silicone patch must be
attached directly to this piece of cookware. Proceed as
follows:
1.
The part of the cookware to which the patch is to be
adhered must be free of grease. Clean the pan, dry it
thoroughly and wipe the area where the patch is to be
adhered with an all purpose degreasing agent.
2.
Remove the protective film from the silicone patch.
Adhere the silicone patch in the correct place on the
outside of the pot using the supplied template as a
guide.
3.
Press down all over the surface of the silicone patch,
including in the center.
The adhesive requires 1 hour to fully cure. Do not use or
clean the pot during this time.
Notes
▯ Do not leave the pot with the silicone patch to soak in
soapy water for long periods of time.
▯ If the silicone patch comes off, replace it with a new
one.
21O2)) 7,0(56
D
$
21O2)) 7,0(56
21O2)) 7,0(56
D
$
00577921 Set of 5silicone patches
TCOOK-
SENSW
Cooking sensor and set of 5silicone
patches
Page is loading ...
Page is loading ...
Page is loading ...
Page is loading ...
Page is loading ...
Page is loading ...
Page is loading ...
Page is loading ...
Page is loading ...
Page is loading ...
Page is loading ...
Page is loading ...
Page is loading ...
Page is loading ...
Page is loading ...
Page is loading ...
Page is loading ...
Page is loading ...
Page is loading ...
Page is loading ...
Page is loading ...
Page is loading ...
Page is loading ...
Page is loading ...
Page is loading ...
Page is loading ...
Page is loading ...
Page is loading ...
Page is loading ...
Page is loading ...
Page is loading ...
Page is loading ...
-
 1
1
-
 2
2
-
 3
3
-
 4
4
-
 5
5
-
 6
6
-
 7
7
-
 8
8
-
 9
9
-
 10
10
-
 11
11
-
 12
12
-
 13
13
-
 14
14
-
 15
15
-
 16
16
-
 17
17
-
 18
18
-
 19
19
-
 20
20
-
 21
21
-
 22
22
-
 23
23
-
 24
24
-
 25
25
-
 26
26
-
 27
27
-
 28
28
-
 29
29
-
 30
30
-
 31
31
-
 32
32
-
 33
33
-
 34
34
-
 35
35
-
 36
36
-
 37
37
-
 38
38
-
 39
39
-
 40
40
-
 41
41
-
 42
42
-
 43
43
-
 44
44
-
 45
45
-
 46
46
-
 47
47
-
 48
48
-
 49
49
-
 50
50
-
 51
51
-
 52
52


Ask a question and I''ll find the answer in the document
Finding information in a document is now easier with AI
Related papers
-
Thermador CIT304YM Owner's manual
-
Thermador CIT304TB Owner's manual
-
Thermador CIT365TB Owner's manual
-
Thermador CIT304TM User manual
-
-
Thermador CIT367YGS User guide
-
Thermador CIT367TMS User manual
-
Thermador PRD486WIGU User guide
-
-
Thermador HMCB30WS User guide
Other documents
-
Bosch NEM5066UC/01 Owner's manual
-
Bosch NIT5660UC User manual
-
Gaggenau CX 492 611 ***NEW*** Use & Care
-
Bosch NEM5466UC Owner's manual
-
-
-
-
Bosch NIT5469UC User manual
-
-
Gaggenau VI 422 613 Use & Care