Page is loading ...

TECHNICAL & SERVICE MANUAL
CZ-RD515U
WIRED REMOTE CONTROLLER
REFERENCE NO. SM700883
Model No.
CZ-RD515U
Product Code No.
1 852 361 14

• Before doing repair work, please read the " SAFETY PRECAUTIONS" carefully and fully understand them.
• The precautionary items here are divided into " Warning" and " Caution" items.
Items in particular which may cause death or serious injury to the service personnel if the work is not performed correctly,
are included in the " Warning" table.
However, even precautionary items identified as " Caution" also have the potential for serious consequences
if not performed correctly.
Important safety precautions are described for all items in both categories. Be sure to carefully follow all of them.
• Symbol Indication
: This symbol indicates items to which we need to pay attention.
In this triangle, a definite precautionary item is described.
: This symbol indicates the item to be prohibited.
In or close to this circle, a prohibited item is described.
: This symbol indicates the items requiring special attention or instruction.
In or close to this circle, a prohibited item is described.
• After doing repair work, perform a test run to confirm that there are no abnormalities.
At the same time, explain the precautions in use to the user.
SAFETY PRECAUTIONS
Warning
Before performing an overhaul, disconnect the power plug or power cable from the unit.
Performing the work with the power supplied to the unit, may cause an electric shock.
When repair work or circuit inspection that requires power supply for the air conditioner, is to be performed,
do not touch the charging section.
Doing so may cause an electric shock.
For the step-up capacitor attached to the electric section, perform the repair work after sufficiently discharging it.
Insufficient capacitor discharge may cause an electric shock.
Do not perform repair work on the electric sections with wet hands.
Doing so may cause an electric shock.
Do not start or stop the air conditioner by means of connecting or disconnecting the power plug.
Doing so may cause an electric shock or fire.
When conducting repair work only use components included in the parts list for the corresponding unit and perform
the work with the appropriate tools.
Incorrect or poor repair work may cause an electric shock or fire.
Never modify the unit.
Doing so may cause an electric shock or fire.
Perform all electric work according to local applicable regulations related to electrical equipment or interior wiring
regulation and make sure to use the exclusive circuit.
Insufficient capacity to the electric circuit or defective arrangement results may cause an electric shock or fire.
Make sure to replace any power cable or lead wire showing any signs of scratch or deterioration.
Failure to do so may cause an electric shock, overheating or fire.
Make sure that there is no dust on or slack in the power plug and insert fully into the socket.
Dust or incomplete connections may cause an electric shock or fire.
Do not damage or process the power cord, as it may cause an electric shock or fire.
For the wiring between the indoor unit and outdoor unit, securely fix the specified cable onto the terminal plate.
Poorly fixed wiring may cause a heat or fire.
After connecting the wiring between the indoor unit and outdoor unit, attach the terminal cover securely.
Incomplete attachment of the terminal cover may cause overheating or fire.
Prohibit
Prohibit
Prohibit
Prohibit
Prohibit
2

Warning
If refrigerant gas blows off during the work, do not touch the refrigerant gas as it may cause frostbite.
If refrigerant gas leaks during the work, ventilate the room.
If refrigerant gas catches fire, harmful gas may be generated.
Do not mix any gas other than the specified refrigerant gas in the refrigerating cycle.
If air or other contaminants mix with the gas, pressure will become extremely high in the refrigerating cycle,
which may cause a unit breakdown."
When the welded section of the compressor intake or discharge pipe is to be disconnected, perform it in
a well-ventilated place after sufficiently recovering the refrigerant gas.
Any residue gas may jet out refrigerant or refrigerating machine oil, which may cause an injury.
When the work is to be performed in a high place (About 2 meters or more), make sure to wear a safety helmet,
gloves and safety belt. Insufficient safety gear may cause a serious injury in case of a fall.
When the unit is to be relocated, confirm that the new installation location has sufficient strength for the weight of the unit.
Insufficient strength of the installation location and incomplete installation work may cause an injury due to
the unit falling.
When the remote controller batteries are replaced, dispose of the old batteries out of the reach of children.
If a child swallows a battery, make sure that the child gets immediate medical attention.
Caution
Do not wash the air conditioner with water, as this may cause an electric shock or fire.
For the repair work in places with high humidity or moisture, make sure to ground the unit.
Failure to do so may cause an electric shock.
Confirm that the component attachment position, wiring condition, soldering condition and connector connection
are normal.
If not, it may cause overheating or fire.
Confirm that the temperature around the compressor is not too high, and then perform the repair work.
Failure to do so may cause a burn.
Perform welding work in a place with good ventilation.
If the work is performed in a poorly ventilated area, it might cause a lack of oxygen.
If the installation plate or attachment frame has deteriorated due to corrosion, etc., replace it.
Failure to do so may cause an injury due to the unit falling.
When the cleaning is to be performed, make sure to turn off the power and pull out the plug.
Touching the fan that is rotating at high speed may result in an injury.
When the indoor unit is to be removed, do not place it on an incline.
Doing so may cause wet furniture because water left inside may trickle down.
Do not hold the sharp end of the unit or the aluminum fins, as it may cause an injury to your hand or finger.
After repairs, make sure to measure the insulation resistance and confirm that the value is 1 Mohm or more.
Any insulation error may cause an electric shock.
After repairs, make sure to check the drainage of the indoor unit.
Inappropriate drainage may cause wet furniture and floors due to water leakage.
Prohibit
Prohibit
Prohibit
Prohibit
Prohibit
3

Table of Contents
SAFETY PRECAUTIONS
TABLE OF CONTENTS
1. SPECIFICATIONS
2. APPLICABLE INDOOR UNITS
3. FUNCTIONS
4. SELF-DIAGNOSTICS
4-1. Self-Diagnostics Procedure
4-2. Self-Diagnostics Table (Ceiling Cassette Type)
4-3. Self-Diagnostics Table (Wall Mounted Type 1)
4-4. Self-Diagnostics Table (Wall Mounted Type 2)
APPENDIX A Operating Instructions
APPENDIX B INSTALLATION INSTRUCTIONS
(CZ-RD515U)
APPENDIX C INSTALLATION INSTRUCTIONS
(Installing the Connection Kit for Wall Mounted Type 1)
APPENDIX D INSTALLATION INSTRUCTIONS
(Installing the Connection Kit for Wall Mounted Type 2)
2
4
5
6
6
7
7
8
9
10
A-1
A-2
A-3
A-4
...............................................................................................................
......................................................................................................................
.........................................................................................................................
.....................................................................................................
.................................................................................................................................
...................................................................................................................
...................................................................................................
.....................................................................
......................................................................
......................................................................
..........................................................................................
...........................................................................
...........................................................................
...........................................................................
Page
4

1. SPECIFICATIONS
70.0 16.5
120.0
Item
Signal Transmission Method Dedicated Remote Controller Cable
DC5V supplied from Indoor Unit
Liquid Crystal
Set Temperature Indication (68 °F to 86 °F)
Six Directions Indication
AM and PM 12-Hour Indication (Minute Indication Unit: 1 minute)
Displayed when indoor unit sensor is in use
AUTO, HEAT, DRY and FAN Operation
Push Switch
2
2
Detection using the Sensor in the Remote Controller or
Indoor Unit Temperature Sensor
(The detection result is transmitted to the indoor unit every 5 minutes)
Power Source
Display Panel Type
Functions
Operation Section
Room Temperature Detection
Temperature
Airflow Direction
Time
Temperature Sensor
Display Items
Description
1. When the indoor unit is modified from one for wireless remote controller to that for
wired remote controller, some of the functions becomes unavailable.
Therefore, before such modification, make sure to receive an approval of the client.
Also, the self-diagnostics procedure is changed.
• Unavailable Functions : Refer to "3. FUNCTIONS".
• Self-Diagnostics Procedure : Refer to "4. SELF-DIAGNOSTICS".
2. The mode change or SINGLE/MULTI change-over operation is performed using the slide switch
located inside the rear of the remote controller.
Refer to "APPENDIX B : INSTALLATION INSTRUCTIONS" for details.
NOTE
NOTE
NOTE
5

2. APPLICABLE INDOOR UNITS
3. FUNCTIONS
When the unit is modified from one for wireless remote controller to that for wired remote controller,
the following functions become unavailable.
(1) Ceiling Cassette Type
• Remote Controller
• High Power Operation
(2) Wall Mounted Type
• Remote Controller
• High Power Operation
• Quiet Operation
Model No. CS-KE12NB41, CS-KE18NB4UW, CS-KS12NB41, CS-KS18NB4UW
Model No. CS-KE30NKU, CS-KE36NKU, CS-KS30NKU, CS-KS36NKU
Model No.
CS-KE18NKU, CS-KE24NKU
CS-KS18NKU, CS-KS24NKU
CS-MKE7NKU, CS-MKE9NKU, CS-MKE12NKU, CS-MKE18NKU, CS-MKE24NKU
CS-MKS7NKU, CS-MKS9NKU, CS-MKS12NKU, CS-MKS18NKU, CS-MKS24NKU
(1) Ceiling cassette type
(2) Wall mounted type 1
NOTE
The connection kit "CZ-RC515U" is required for the installation.
(3) Wall mounted type 2
NOTE
The connection kit "CZ-RC515UA" is required for the installation.
6

4. SELF-DIAGNOSTICS
PROCEDURE
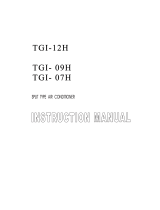
After turning on power to the air conditioner, use the remote
controller and follow the steps below to execute
self-diagnostics.
Step 1: Press and hold the remote controller NIGHT SET
BACK (NSB) button and 1 HR TIMER button. Then,
press and hold the ACL (reset) button with a pointed
object such as the tip of a pen. After 5 seconds,
release ACL button first, then release NIGHT SET
BACK (NSB) and 1 HR TIMER buttons, "oP-1" (test
run) appears, blinking in the remote controller clock
display area.
Step 2: Next, press the 1 HR TIMER button once to change
the display from "oP-1" to "oP-3" (self-diagnostics).
(The display continues to blink.)
Step 3: Finally press the ON/OFF button to engage
self-diagnostics mode.
• The self-diagnostics function utilizes the 3 indicator lamps
on the main unit, in combinations of ON lamps, blinking
lamps, and OFF lamps, to report the existence of sensor
trouble or a protective operation. (The lamps blink or
remain ON for 5 seconds, then turn OFF for 2 seconds.)
Self-diagnostics is completed when the buzzer sounds 3
short beeps.
• A maximum of 3 self-diagnostics reports are displayed, for
5 seconds each, beginning with the most recent report.
Following this display the lamps turn OFF. In order to view
the self-diagnostics results again, press the ON/OFF button
again.
• The 3 lamps remain OFF if no trouble has occurred.
<IMPORTANT> After self-diagnostics is completed, be sure
to press the ACL (reset) button to return to
normal mode. The air conditioner will not
operate if this is not done.
ON/OFF
operation button
1 HR.TIMER
button
NIGHT SETBACK
button
ACL (Reset)
button
< Clock display >
Test run mode
Self-diagnostics mode
4-1. Self-Diagnostics Procedure
7

4-2. Self-Diagnostics Table (Ceiling Cassette Type)
Since the indications cover various units, the corresponding parts listed below may not be present in some models.
(1) DRAIN PUMP FAILURE (2) FS FAILURE (3) CHOKED DRAIN HOSE
8512-5261-99100-1
REMOTE CONTROL receiver
OPERATION lamp
TIMER lamp
OPERATION button
HIGH POWER lamp
INDOOR UNIT
TIMER
LAMP
BLINKING (3 SEC. INTERVAL)
FLOAT SWICTH (FS) IS ACTIVED.
....
OFF
CODE DIAGNOSIS CONTENTS POSSIBLE MALFUNCTION
ROOM TEMP. SENSOR TROUBLE
I/D HEAT EXCHANGER TEMP.
SENSOR TROUBLE
COMPRESSOR TEMP. SENSOR
TROUBLE
O/D HEAT EXCHANGER TEMP.
SENSOR TROUBLE
O/D AIR TEMP. SENSOR TROUBLE
I/D-O/D COMMUNICATION
TROUBLE
(SERIAL COMMUNICATION
TROUBLE)
O/D UNIT EXTERNAL ROM
TROUBLE
CURRENT PEAK CUT
HIC CIRCUIT TROUBLE
POWER TR CIRCUIT TROUBLE
PAM CIRCUIT TROUBLE
ACTIVE CIRCUIT TROUBLE
O/D SYSTEM COMM FAILURE,
OLR OPERATION, O/D POWER
OPEN PHASE, O/D FREEZING
COMPRESSOR
DISCHARGE TEMP.
OVERHEATING PREVENTION
I/D FAN OPERATION TROUBLE
GAS-LOSS PREVENTION
DC COMPRESSOR DRIVE
CIRCUIT TROUBLE
O/D DC FAN OPERATION TROUBLE
FREEZING-PREVENTION OPERATION
4-WAY VALVE SWITCHING
TROUBLE
ZERO-CROSS TROUBLE
O/D CURRENT SENSOR ERROR
....
BLINKING
....
ON
OPERATION
TIMER
HIGH
POWER
(1) OPEN OR SHORT CIRCUIT IN SENSOR
(2) POOR CONTACT AT CONNECTOR OR OPEN
CIRCUIT AT TERMINAL PRESS-FIT LOCATION.
(3) I/D PCB FAILURE (I/D = INDOOR)
(1) OPEN OR SHORT CIRCUIT IN SENSOR
(2) POOR CONTACT AT CONNECTOR OR OPEN
CIRCUIT AT TERMINAL PRESS-FIT LOCATION
(3) O/D PCB FAILURE (O/D = OUTDOOR)
O/D PCB FAILURE
(1) MIS-WIRING (2) AC POWER FAILURE (3) BLOWN FUSE
(4) POWER RELAY FAILURE (5) I/D OR O/D PCB FAILURE
(6) O/D FAN MOTOR FAILURE (7) REACTOR FAILURE
(8) HIGH-PRESSURE SW FAILURE (9) OLR FAILURE (10) MAGNETIC COIL FAILURE
(1) HIC OR POWER TR FAILURE (2) O/D FAN NOT OPERATING
(3) INSTANTANEOUS POWER STOPPAGE (4) SERVICE VALVE NOT OPENED
(5) O/D FAN BLOCKED (6) CONTINUOUS OVERLOAD OPERATION
(7) COMPRESSOR FAILURE (8) O/D PCB FAILURE
(1) EXTERNAL ROM DATA FAILURE (2) O/D PCB FAILURE
(1) INSTANTANEOUS POWER STOPPAGE (2) HIC OR POWER TR FAILURE
(3) O/D PCB FAILURE
(1) O/D PCB FAILURE
(2) O/D POWER VOLTAGE TROUBLE
(1) ELECTRIC EXPANSION VALVE FAILURE (2) CHOKED CAPILLARY TUBE
(3) INSUFFICIENT GAS (4) CONTINUOUS OVERLOAD OPERATION
(5) O/D FAN NOT OPERATING (6) O/D PCB FAILURE
(1) FAN MOTOR FAILURE (2) CONNECTOR CONTACT FAILURE
(3) I/D PCB FAILURE
(1) 4-WAY VALVE FAILURE (HEAT PUMP MODEL ONLY)
(2) O/D PCB FAILURE
(1) SERVICE VALVE NOT OPENED (2) INSUFFICIENT GAS
(1) OPEN PHASE (2) O/D PCB FAILURE
(1) FAN MOTOR FAILURE (2) CONNECTOR CONTACT FAILURE
(3) O/D PCB FAILURE
(1) MIS-WIRING (2) BLOWN FUSE
(3) POWER RELAY FAILURE (4) O/D PCB FAILURE
(5) COMPRESSOR FAILURE
(1) I/D FAN SYSTEM TROUBLE (2) INSUFFICIENT GAS
(3) OPERATION AT LOW TEMPERATURE
S01
S02
S04
S05
S06
S07
E01
E02
E03
E04
E05
E06
E07
E08
E09
E10
E11
E12
E13
INDICATION ON INDOOR UNIT
8

4-3. Self-Diagnostics Table (Wall Mounted Type 1)
REMOTE CONTROL receiver
(1) OPERATION lamp
(2) TIMER lamp
(3) QUIET lamp
OPERATION button
INDOOR UNIT
Since the indications cover various units, the corresponding parts listed below may not be present in some models.
INDICATION ON INDOOR UNIT
....
OFF
CODE DIAGNOSIS CONTENTS POSSIBLE MALFUNCTION
ROOM TEMP. SENSOR TROUBLE
I/D HEAT EXCHANGER
TEMP. SENSOR TROUBLE
HUMIDITY SENSOR TROUBLE
COMPRESSOR TEMP. SENSOR
TROUBLE
O/D HEAT EXCHANGER
TEMP. SENSOR TROUBLE
O/D AIR TEMP. SENSOR TROUBLE
I/D-O/D COMMUNICATION TROUBLE
(SERIAL COMMUNICATION TROUBLE)
O/D UNIT EXTERNAL ROM TROUBLE
CURRENT PEAK CUT
HIC CIRCUIT TROUBLE
POWER TR CIRCUIT TROUBLE
PAM CIRCUIT TROUBLE
ACTIVE CIRCUIT TROUBLE
O/D SYSTEM COMM FAILURE,
OLR OPERATION, O/D POWER
OPEN PHASE, O/D FREEZING
COMPRESSOR DISCHARGE TEMP.
OVERHEATING PREVENTION
I/D FAN OPERATION TROUBLE
GAS-LOSS PREVENTION
DC COMPRESSOR DRIVE
CIRCUIT TROUBLE
O/D DC FAN OPERATION TROUBLE
FREEZING-PREVENTION OPERATION
4-WAY VALVE SWITCHING TROUBLE
ZERO-CROSS TROUBLE
O/D CURRENT SENSOR ERROR
....
BLINKING
....
ON
QUIET TIMER
OPERATION
(3) (2) (1)
(1) OPEN OR SHORT CIRCUIT IN SENSOR
(2) POOR CONTACT AT CONNECTOR OR OPEN CIRCUIT AT
TERMINAL PRESS-FIT LOCATION (FOR HUMIDITY SENSOR,
THIS REPRESENTS SHORT-CIRCUIT DETECTION ONLY.)
(3) I/D PCB FAILURE (I/D = INDOOR)
(1) OPEN OR SHORT CIRCUIT IN SENSOR
(2) POOR CONTACT AT CONNECTOR OR OPEN CIRCUIT AT
TERMINAL PRESS-FIT LOCATION
(3) O/D PCB FAILURE (O/D = OUTDOOR)
O/D PCB FAILURE
(1) MIS-WIRING (2) AC POWER FAILURE (3) BLOWN FUSE
(4) POWER RELAY FAILURE (5) I/D OR O/D PCB FAILURE
(6) O/D FAN MOTOR FAILURE (7) REACTOR FAILURE
(8) HIGH-PRESSURE SW FAILURE (9) OLR FAILURE (10) MAGNETIC COIL FAILURE
(1) HIC OR POWER TR FAILURE (2) O/D FAN NOT OPERATING
(3) INSTANTANEOUS POWER STOPPAGE (4) SERVICE VALVE NOT OPENED.
(5) O/D FAN BLOCKED (6) CONTINUOUS OVERLOAD OPERATION
(7) COMPRESSOR FAILURE (8) O/D PCB FAILURE
(1) EXTERNAL ROM DATA FAILURE (2) O/D PCB FAILURE
(1) INSTANTANEOUS POWER STOPPAGE (2) HIC OR POWER TR FAILURE
(3) O/D PCB FAILURE
(1) O/D PCB FAILURE
(2) O/D POWER VOLTAGE TROUBLE
(1) ELECTRIC EXPANSION VALVE FAILURE (2) CHOKED CAPILLARY TUBE
(3) INSUFFICIENT GAS (4) CONTINUOUS OVERLOAD OPERATION
(5) O/D FAN NOT OPERATING (6) O/D PCB FAILURE
(1) FAN MOTOR FAILURE (2) CONNECTOR CONTACT FAILURE
(3) I/D PCB FAILURE
(1) 4-WAY VALVE FAILURE (HEAT PUMP MODEL ONLY)
(2) O/D PCB FAILURE
(1) SERVICE VALVE NOT OPENED (2) INSUFFICIENT GAS
(1) OPEN PHASE (2) O/D PCB FAILURE
(1) FAN MOTOR FAILURE (2) CONNECTOR CONTACT FAILURE
(3) O/D PCB FAILURE
(1) MIS-WIRING (2) BLOWN FUSE (3) POWER RELAY FAILURE
(4) O/D PCB FAILURE (5) COMPRESSOR FAILURE
(1) I/D FAN SYSTEM FAILURE (2) INSUFFICIENT GAS
(3) OPERATION AT LOW TEMPERATURE
8FA2-5251-11100-2
S01
S02
S03
S04
S05
S06
S07
E01
E02
E03
E04
E05
E06
E07
E08
E09
E10
E11
E12
E13
9

4-4. Self-Diagnostics Table (Wall Mounted Type 2)
(1) OPERATION lamp
(2) TIMER lamp
(3)
OPERATION TIMER
ON/OFF
INDOOR UNIT
Since the indications cover various units, the corresponding parts listed below may not be present in some models.
INDICATION ON INDOOR UNIT
....
OFF
DIAGNOSIS CONTENTS POSSIBLE MALFUNCTION
ROOM TEMP. SENSOR TROUBLE
I/D HEAT EXCHANGER
TEMP. SENSOR TROUBLE
HUMIDITY SENSOR TROUBLE
COMPRESSOR TEMP. SENSOR
TROUBLE
O/D HEAT EXCHANGER
TEMP. SENSOR TROUBLE
O/D AIR TEMP. SENSOR TROUBLE
I/D-O/D COMMUNICATION TROUBLE
(SERIAL COMMUNICATION TROUBLE)
O/D UNIT EXTERNAL ROM TROUBLE
CURRENT PEAK CUT
HIC CIRCUIT TROUBLE
POWER TR CIRCUIT TROUBLE
PAM CIRCUIT TROUBLE
ACTIVE CIRCUIT TROUBLE
O/D SYSTEM COMM FAILURE,
OLR OPERATION, O/D POWER
OPEN PHASE, O/D FREEZING
COMPRESSOR DISCHARGE TEMP.
OVERHEATING PREVENTION
I/D FAN OPERATION TROUBLE
GAS-LOSS PREVENTION
DC COMPRESSOR DRIVE
CIRCUIT TROUBLE
O/D DC FAN OPERATION TROUBLE
FREEZING-PREVENTION OPERATION
4-WAY VALVE SWITCHING TROUBLE
ZERO-CROSS TROUBLE
O/D CURRENT SENSOR ERROR
....
BLINKING
....
ON
TIMER
OPERATION
(3)
...
(2)
..
(1)
.
(1) OPEN OR SHORT CIRCUIT IN SENSOR
(2) POOR CONTACT AT CONNECTOR OR OPEN CIRCUIT AT
TERMINAL PRESS-FIT LOCATION (FOR HUMIDITY SENSOR,
THIS REPRESENTS SHORT-CIRCUIT DETECTION ONLY.)
(3) I/D PCB FAILURE (I/D = INDOOR)
(1) OPEN OR SHORT CIRCUIT IN SENSOR
(2) POOR CONTACT AT CONNECTOR OR OPEN CIRCUIT AT
TERMINAL PRESS-FIT LOCATION
(3) O/D PCB FAILURE (O/D = OUTDOOR)
O/D PCB FAILURE
(1) MIS-WIRING (2) AC POWER FAILURE (3) BLOWN FUSE
(4) POWER RELAY FAILURE (5) I/D OR O/D PCB FAILURE
(6) O/D FAN MOTOR FAILURE (7) REACTOR FAILURE
(8) HIGH-PRESSURE SW FAILURE (9) OLR FAILURE (10) MAGNETIC COIL FAILURE
(1) HIC OR POWER TR FAILURE (2) O/D FAN NOT OPERATING
(3) INSTANTANEOUS POWER STOPPAGE (4) SERVICE VALVE NOT OPENED.
(5) O/D FAN BLOCKED (6) CONTINUOUS OVERLOAD OPERATION
(7) COMPRESSOR FAILURE (8) O/D PCB FAILURE
(1) EXTERNAL ROM DATA FAILURE (2) O/D PCB FAILURE
(1) INSTANTANEOUS POWER STOPPAGE (2) HIC OR POWER TR FAILURE
(3) O/D PCB FAILURE
(1) O/D PCB FAILURE
(2) O/D POWER VOLTAGE TROUBLE
(1) ELECTRIC EXPANSION VALVE FAILURE (2) CHOKED CAPILLARY TUBE
(3) INSUFFICIENT GAS (4) CONTINUOUS OVERLOAD OPERATION
(5) O/D FAN NOT OPERATING (6) O/D PCB FAILURE
(1) FAN MOTOR FAILURE (2) CONNECTOR CONTACT FAILURE
(3) I/D PCB FAILURE
(1) 4-WAY VALVE FAILURE (HEAT PUMP MODEL ONLY)
(2) O/D PCB FAILURE
(1) SERVICE VALVE NOT OPENED (2) INSUFFICIENT GAS
(1) OPEN PHASE (2) O/D PCB FAILURE
(1) FAN MOTOR FAILURE (2) CONNECTOR CONTACT FAILURE
(3) O/D PCB FAILURE
(1) MIS-WIRING (2) BLOWN FUSE (3) POWER RELAY FAILURE
(4) O/D PCB FAILURE (5) COMPRESSOR FAILURE
(1) I/D FAN SYSTEM TROUBLE (2) INSUFFICIENT GAS
(3) OPERATION AT LOW TEMPERATURE
8FA2-5251-12500-1
S01F10
F02
F13
F04/F12
F09/F12-F18
F08/F21-F24
F27
E05
P26
F31
P16
P07
P03
P01
P19
P15
P29
P22
E07/P04/P05
P20/P27
P11
S02
S03
S04
S05
S06
S07
E01
E02
E03
E04
E05
E06
E07
E08
E09
E10
E11
E12
E13
ERROE
CODE
ALARM
CODE
10


Operating Instructions
CZ-RD515U
(852-6-4181-230-00-1)
APPENDIX A
A-1

Wired Remote Controller
Model No.
CZ-RD515U
Operating Instructions
Panasonic Corporation
1006 Kadoma, Kadoma City, Osaka, Japan
85264181230001 CV6233187877
This wired remote controller is designed for
both the “COOL/DRY/HEAT Model” and
“COOL/DRY Model” indoor unit.
Once the wired remote controller is
connected, the wireless remote controller
cannot be used.
Before operating the unit, read these operating instructions thoroughly and keep them for future reference.

2
FEATURES
• Microprocessor Controlled Operation
The interior compartment of the remote controller contains several
features to facilitate automatic operation, easy logically displayed
for easy use.
• 24-Hour ON or OFF Timer
This timer can be set to automatically turn the unit on or off at any
time within a 24 hour period.
• 1-Hour OFF Timer
This timer can be set to automatically turn off the unit at any time
after one hour.
• Night Setback
This function saves energy by controlling operation to provide a
quieter operating sound than normal.
• Automatic and 3-step Fan Speed
Auto/High/Medium/Low
• Air Sweep Control
This function moves a flap up and down in the air outlet, directing
air in a sweeping motion around the room and providing comfort in
every corner.
• Automatic Restart Function for Power Failure
Even when power failure occurs, preset programmed operation
can be reactivated once power resumes.
• Automatic Switching between Cooling and Heating
This unit automatically switches between cooling operation and
heating operation according to the difference between the room
temperature and the temperature setting.
(This function is available only for “Single use” of COOL/DRY/
HEAT Model.)
• Hot Start Heating System
Right from the start, the air is warm and comfortable. This system
prevents any cold blasts at the beginning while the heat pump is
warming up, or even defrosting.
(This function is available only for COOL/DRY/HEAT Model.)
• Since the wired remote controller is designed to be commonly used for various air conditioners, some of the functions of the wireless
remote controller supplied with the indoor unit cannot be used.
• “Single use” means that only one indoor unit is connected with one outdoor unit in a one-unit-to-one-unit configuration.
• “Multiple use” (i.e. Flexi-Multi system) means that two or more indoor units are connected with one outdoor unit in a multiple-unit-to-one-unit
configuration.
CONTENTS
Page
FEATURES ......................................................................................................................................... 2
PRODUCT INFORMATION ................................................................................................................ 2
SAFETY PRECAUTIONS ................................................................................................................... 2
INSTALLATION LOCATION ................................................................................................................ 3
ELECTRICAL REQUIREMENTS........................................................................................................ 3
SAFETY INSTRUCTIONS .................................................................................................................. 3
REMOTE CONTROLLER ................................................................................................................... 4
OPERATION WITH THE REMOTE CONTROLLER........................................................................... 7
1. Automatic Operation (only for COOL/DRY/HEAT Model) .................................................... 7
2. Manual Operation ................................................................................................................ 7
3. Adjusting the Fan Speed .....................................................................................................8
4. Fan Only .............................................................................................................................. 8
5. Night Setback Mode ............................................................................................................ 8
SPECIAL REMARKS.......................................................................................................................... 8
SETTING THE TIMER........................................................................................................................ 9
USING THE 1-HOUR OFF TIMER ................................................................................................... 10
ADJUSTING THE AIRFLOW DIRECTION ....................................................................................... 10
PRODUCT INFORMATION
If you have problems or questions concerning your wired
remote controller, you will need the following information.
Model No. __________________________________
Date of purchase _____________________________
Dealer’s address _____________________________
Phone number _______________________________
SAFETY PRECAUTIONS
The following symbols used in this manual, alert you
to potentially dangerous conditions to users, service
personnel or the appliance:
NOTE
This symbol refers to a hazard or unsafe
practice which can result in severe
personal injury or death.
This symbol refers to a hazard or unsafe
practice which can result in personal
injury or product or property damage.
CAUTION

3
INSTALLATION LOCATION
We recommend that this wired remote controller be
installed properly by qualified installation technicians
in accordance with the Installation Instructions
provided with the unit.
Avoid:
To protect the air conditioner from heavy corrosion, avoid installing
the outdoor unit where salty sea water can splash directly onto it or
in sulphurous air near a spa.
ELECTRICAL REQUIREMENTS
1. All wiring must conform to the local electrical codes.
Consult your dealer or a qualified electrician for details.
2. Each unit must be properly grounded with a ground (or
earth) wire or through the supply wiring.
3. Wiring must be done by a qualified electrician.
Pull off the power plug from a receptacle, or switch off the breaker, or
switch off the power disconnecting mean to isolate the air conditioner
from the main power supply when not in use for a long time.
SAFETY INSTRUCTIONS
• Read this Instruction Manual carefully before using
this air conditioner. If you still have any difficulties
or problems, consult your dealer for help.
• This air conditioner is designed to give you
comfortable room conditions. Use this only for its
intended purpose as described in this Instruction
Manual.
• Do not install this wired remote
controller where there are fumes or
flammable gases, or in an extremely
humid space such as a greenhouse.
• Do not install the wired remote
controller where excessively high
heat-generating objects are placed.
• Confirm to authorized dealer or specialist on usage of
specified refrigerant type.
Using of refrigerant other than the specified type may cause
product damage, burst and injury etc.
• Never touch the unit with wet hands.
• Never use or store gasoline or other flammable vapor or
liquid near the air conditioner — it is very dangerous.
• Do not use this appliance in a potentially explosive
atmosphere.
• This air conditioner has no ventilator for intaking fresh air
from outdoors. You must open doors or windows frequently
when you use gas or oil heating appliances in the same
room, which consume a lot of oxygen from the air.
Otherwise there is a risk of suffocation in an extreme case.
• Do not swallow the battery.
• After removing the battery from remote controller, keep it
away from the reach of children. The battery can cause
death by suffocation if swallowed.
NOTE
• To prevent possible hazards from insulation failure,
the unit must be grounded.
• Do not clean inside the indoor and outdoor units by users.
Engage authorized dealer or specialist for cleaning.
• In case of malfunction of this appliance, do not repair by
yourself. Contact to the sales dealer or service dealer for a
repair.
• Refrigerant gas leakage may cause fire.
• For safety, be sure to turn the air conditioner off and
also to disconnect the power before cleaning.
• Pull off the power plug from a receptacle, or switch off the
breaker, or switch off the power disconnecting mean to
isolate the air conditioner from the main power supply in
case of emergency.
• Do not turn the air conditioner on and off from the power
mains switch. Use the ON/OFF operation button.
• Do not stick anything into the air outlet of the outdoor unit.
This is dangerous because the fan is rotating at high
speed.
• Do not touch the air inlet or the sharp aluminum fins
of the outdoor unit. You may get injured.
• Keep the fire alarm and the air outlet at least 1.5m away from
the unit.
• Do not let children play with the air conditioner.
• Do not cool or heat the room too much if babies or invalids
are present.
• Do not sit or step on the unit. You may fall down
accidentally.
• Do not stick any object into the FAN CASE.
You may be injured and the unit may be damaged.
• This device complies with part 15 of the FCC Rules.
Operation is subject to the following two conditions:
(1) This device may not cause harmful interference, and (2) this
device must accept any interference received, including
interference that may cause undesired operation.
• This equipment has been tested and found to comply with
the limits for a Class B digital device, pursuant to part 15 of
the FCC Rules.
These limits are designed to provide reasonable protection
against harmful interference in a residential installation. This
equipment generates, uses and can radiate radio frequency
energy and, if not installed and used in accordance with the
instructions, may cause harmful interference to radio
communications. However, there is no guarantee that
interference will not occur in a particular installation. If this
equipment does cause harmful interference to radio or television
reception, which can be determined by turning the equipment off
and on, the user is encouraged to try to correct the interference
by one or more of the following measures:
• Reorient or relocate the receiving antenna.
• Increase the separation between the equipment and receiver.
• Connect the equipment into an outlet on a circuit different from
that to which the receiver is connected.
• Consult the dealer or an experienced radio/TV technician for
help.
• FCC Caution: To assure continued compliance, follow the
attached installation instructions. Any changes or modifications
not expressly approved by the party responsible for compliance
could void the user's authority to operate this equipment.
CAUTION
NOTICE

4
REMOTE CONTROLLER
Display
Information on the operating conditions is displayed while the remote
controller is switched on. If the unit is turned off, only the mode that was set
previously is still displayed.
FAN SPEED selector button
: The air conditioner automatically decides the fan speeds.
: High fan speed
: Medium fan speed
: Low fan speed
FLAP button
Press this button either to select the setting of the airflow direction to one of
the six possible positions manually or to select the sweep function which
moves the flap up and down automatically.
: The airflow direction can be set manually. (six positions)
: The flap moves up and down automatically.
When you press the FLAP button, the air flow direction will be changed one by
one as follows.
NOTE
SWEEP
Temperature setting buttons (TEMP.)
Press the button to increase the set temperature.
Press the button to reduce the set temperature.
The temperature setting changes by 2 °F each time one of the TEMP. buttons
is pressed.
NIGHT SETBACK button
For details, see “5. Night Setback Mode”. When you press this button in the
HEAT, DRY or COOL mode, the mark appears in the display, and the
remote controller will automatically adjust the set temperature to save energy.
Timer and Present Time setting buttons
First, press the SET button to select the mode (ON, OFF and Present Time
settings) you want.
Each time you press the ‘‘HH’’ button, the hours advance by one.
(PM0, PM1.....PM11, AM0, AM1.....AM11)
Each time you press the ‘‘MM’’ button, the minutes advance by one when
setting Present Time and by ten when setting ON and OFF Time.
SET button
For details, see “SETTING THE TIMER”.
Press this button to select the mode you want to program.
ACL button (ALL CLEAR)
When you press the ACL button while the
operation button is ON, all settings are cleared.
Press the ACL button if the air conditioner is not
operating correctly.
The descriptions on the AUTO ( ) or HEAT ( ) operation mode are only for the “COOL/DRY/HEAT Model,” and not for the
“COOL/DRY Model.”
NOTE

5
Sensor
A temperature sensor inside the remote controller senses the room temperature.
ON/OFF operation button
This button is for turning the air conditioner on and off.
1 HR. TIMER button (1-HOUR OFF TIMER)
: When you press this button, regardless of whether the unit is operating or stopping, the unit operates for
one hour and then shuts down.
MODE selector button
Use this button to select AUTO, HEAT, DRY, COOL or FAN mode.
(AUTO) : When this setting is selected, the air conditioner calculates the difference between the
thermostat setting and the room temperature and automatically switches to the ‘‘COOL’’ or
‘‘HEAT’’ mode as appropriate. (This function is available only for “Single use” of COOL/DRY/
HEAT Model.)
(HEAT) : The air conditioner makes the room warmer.
(DRY) : The air conditioner reduces the humidity in the room.
(COOL) : The air conditioner makes the room cooler.
(FAN) : The air conditioner works only as a circulation fan except for “Multiple use” of COOL/DRY/
HEAT Model.
The indoor fan runs continuously when the system is in normal operation. It does not turn off when the desired room temperature is
reached. If Night Set Back mode is selected, the fan will turn off intermittently during cooling operation in order to control air flow.
NOTE
SENSOR button
When you press this button (use a small-tipped object such as a ballpoint pen), the mark will disappear at the
display. And the room temperature is detected by the sensor which is built into the remote controller and the air
conditioner is controlled accordingly.
If the remote controller is located near a heat source, such as a space heater or in direct sunlight, press the
SENSOR button to switch to the sensor on the indoor unit.
NOTE
TIMER SELECT button
No display : The timer does not operate.
: The air conditioner starts at the set time.
: The air conditioner stops at the set time.
: The air conditioner stops and starts, or starts and stops, at the set times every day.

6
REMOTE CONTROLLER (DISPLAY)
(1) Operation mode
AUTO .....................................
(only for COOL/DRY/HEAT
Model)
HEAT......................................
(only for COOL/DRY/HEAT
Model)
MILD DRY ..............................
COOL .....................................
FAN ........................................
(2) Fan speed
Automatic operation ...............
HIGH .....................................
MEDIUM.................................
LOW .......................................
(3) Temperature setting
60 – 86 °F ..............................
When set to 80 °F
temperature indication ...........
(4) Timer
24-hour clock with ON/OFF
program Timer .......................
ON Timer. ..............................
OFF Timer. ............................
1-hour OFF Timer. .................
(5) NIGHT SETBACK..................
(6) Flap angle indication..............
Sweep indication....................
Displayed when indoor unit sensor
is in use
Displayed when operating NIGHT
SETBACK mode
Displayed when setting
temperature
Displayed when temperature is
shown
Displayed when setting timer
Symbols

7
OPERATION WITH THE REMOTE CONTROLLER
1. Automatic Operation
(only for COOL/DRY/HEAT Model)
• Single use
This unit automatically switches between cooling operation and
heating operation according to the difference between the room
temperature and the temperature setting.
• Multiple use
The air conditioner calculates the difference between the
thermostat setting and room temperature, and automatically
determines the mode to operate under cooling or heating. Then,
the air conditioner continuously operates under the mode selected
at initial operation.
2. Manual Operation
Check that the circuit breaker on the power panel is
turned on.
Once mode is selected and the unit is preset by
following the steps below, you can have the air
conditioner automatically bring the room to the desired
temperature simply by pressing the ON/OFF operation
button.
STEP 1 Press the MODE selector button to .
STEP 2 Press the ON/OFF operation button.
To stop the air conditioner, press the ON/OFF operation
button again.
To change the temperature setting; press the
temperature setting buttons and change the setting to
the desired temperature.
STEP 2
STEP 1
NOTE
NOTE
Check that the circuit breaker on the power panel is
turned on.
If the automatic operation settings of the unit do not
meet your needs, press the setting buttons as
described below and change the settings as desired.
STEP 1 Press the MODE selector button
and select the desired mode.
For heating operation
For dehumidifying operation
For cooling operation
For fan only operation
(No Fan mode in “Multiple use” of
COOL/DRY/HEAT Model)
o
o
o
o
STEP 2 To start the air conditioner, press the ON/
OFF operation button.
STEP 3 Press the TEMP. setting buttons to change
the temperature setting to the desired
temperature.
Adjustable temperature range:
86 °F max.
60 °F min.
STEP 4 Set the FAN SPEED selector button to the
setting you want.
STEP 5 Press the FLAP button and set the airflow
direction as desired.
(Refer to “ADJUSTING THE AIRFLOW
DIRECTION” on page 10.)
To stop the air conditioner, press the ON/OFF
operation button again.
• Choose the best position in the room for the remote
controller, which also acts as the sensor for room
comfort and transmits the operating instructions.
Once you’ve found this best position, always keep the
remote controller there.
• This appliance has a built-in 5-minute time delay
circuit to ensure reliable operation. When the
operation button is pressed, the compressor will start
running within three minutes. In the event of power
failure, the unit will stop.
• The display on the remote controller shows the setting
temperature and not the room temperature.
• When multiple indoor units are used and units in other
rooms are already operating, they will be operating
with the same mode as the operating indoor units.
(only for “Multiple use” of COOL/DRY/HEAT Model)
STEP 2
STEP 3
STEP 1
STEP 4
STEP 5
NOTE
NOTE

8
3. Adjusting the Fan Speed
A. Automatic fan speed
Simply set the FAN SPEED selector button to the
position.
This automatically sets the best fan speed for the room
temperature.
B. Manual fan speed
If you want to adjust fan speed manually during operation,
just set the FAN SPEED selector button as desired. [ ,
, or ]
4. Fan Only
5. Night Setback Mode
Night Setback Mode is used for saving energy.
Press the NIGHT SETBACK button while unit is operating.
The mark appears in the display.
To release the night setback function, press the NIGHT SETBACK
button again.
A. In Cooling and DRY Mode: ( and )
B. In Heating Mode: ( )
(only for COOL/DRY/HEAT Model)
SPECIAL REMARKS
In the event of power failure, the unit will stop. When the power is
resumed within 8 hours, the unit will restart automatically in
approximately five minutes, or 15 minutes in “Multiple use” of COOL/
DRY/HEAT Model on AUTO mode by the remote controller.
The remote controller sends the setting condition to the air
conditioner regularly at five minute intervals.
If the display malfunctions, press the ACL button.
This resets the remote controller back to the initial settings.
Make the settings again.
If you want to circulate air without any temperature
control, follow these steps:
STEP 1 Press the MODE selector button to switch to
the fan mode .
STEP 2 Press the ON/OFF operation button.
STEP 3 Press the FAN SPEED selector button to
select the fan speed of your choice ( ,
or ).
There is no FAN only function in “Multiple use” of
COOL/DRY/HEAT Model.
STEP 2
STEP 1
STEP 3
NOTE
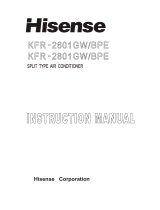
When the night setback mode is selected, the air conditioner
automatically raises the temperature setting 2 °F when 30 minutes
have passed after the selection was made, and then another 2 °F
after another 30 minutes have passed, regardless of the indoor
temperature when night setback was selected. This enables you
to save energy without sacrificing comfort. This function is
convenient when gentle cooling is needed.
Setting
temperature
Press the NIGHT
SETBACK button
30 min.
30 min.
Time
2°F
2°F
When the night setback mode is selected, the air conditioner
automatically lowers the temperature setting 4 °F when 30
minutes have passed after the selection was made, and then
another 4 °F after another 30 minutes have passed, regardless of
the indoor temperature when night setback was selected. This
enables you to save energy without sacrificing comfort. This
function is convenient when gentle heating is needed.
Setting
temperature
Press the NIGHT
SETBACK button
30 min.
30 min.
Time
4°F
4°F
Power failure during operation
Remote Controller
Remote Controller Display
/