
User's Guide
Digital 1.8 GHz
DIGITAL CORDED/CORDLESS
PHONE SET
Model ME6091 Series

emocleW
1
Congratulations on your purchase of a Motorola product!
Your Motorola
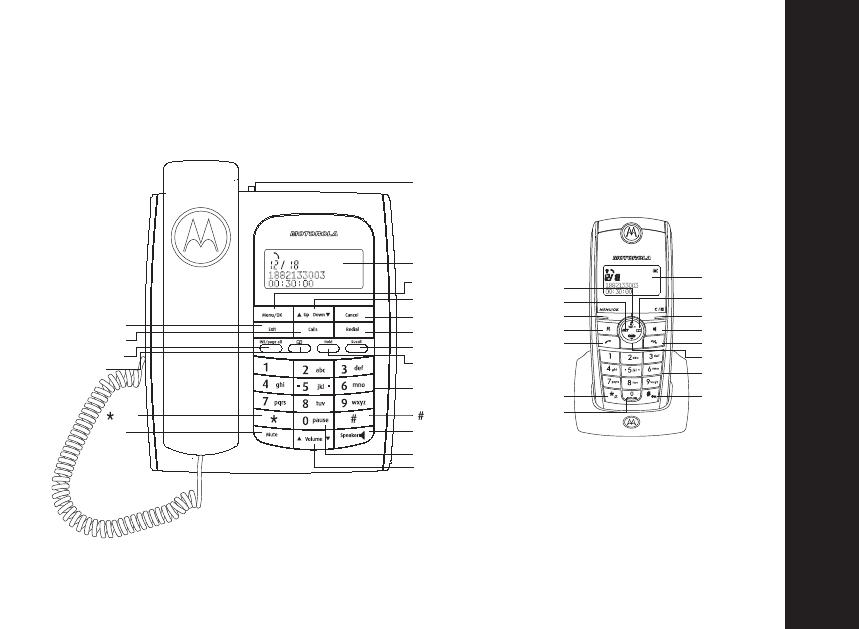
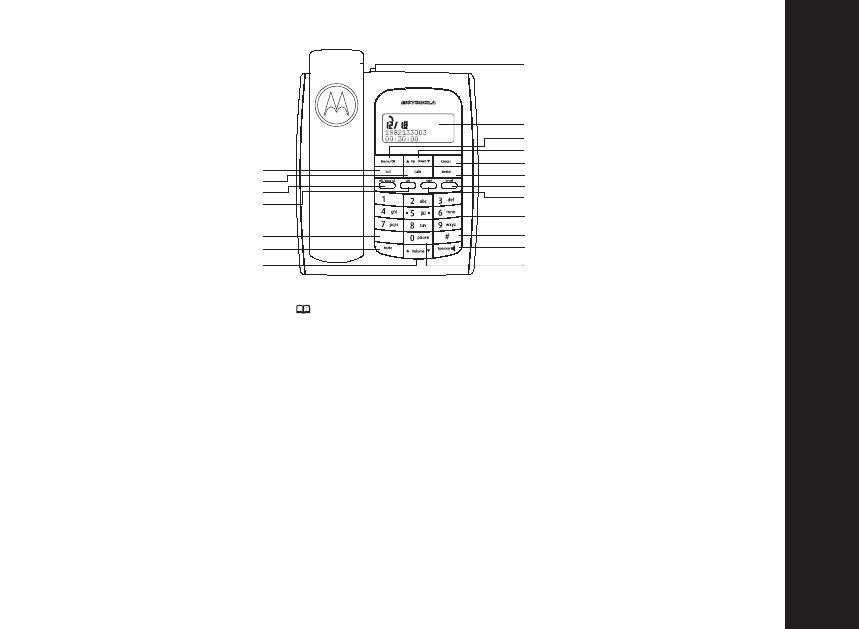
Telephone at a glance:
Display
Menu/OK
Up/Down
Cancel
Redial
Recall
Hold
Spea
ker
Keypad 0-9
Pause
Exit
Calls
INT/page all
PB
Mute
Volume Up/Down
Ringer Switch
Display
C/Mute
Spea
ker
External Call
PB
DOWN/Calls
Keypad 0-9
# Key/Keylock
Menu/OK
Flash (Recall)
End Call
INT
UP/
Redial
* Key
Pause
Key
Key

emocleW
2
For product-related questions, please refer to the Warranty section.
Please retain your original dated sales receipt for your records. For warranty service
of your Motorola Product, you will need to provide a copy of your dated sales receipt
to condfilm warranty status.
Complies with the essential protective requirements and objectives of the EC's R&TTE
Directive 1999/5/EC; EC Low Voltage Directive 72/23/EEC; EC EMC Directive 89/336/EEC
Copyright © 2007 Motorola, Inc.
All rights reserved. No part of this publication may be reproduced in any form or by
any means or used to make any derivative work (such as translation, transformation
or adaptation) without written permission from Motorola, Inc.
Motorola reserves the right to revise this publication and to make changes in content
from time to time without obligation on the part of Motorola to provide notification
of such revision or change. Motorola provides this guide without warranty of any kind,
either implied or expressed, including but not limited to, the implied warranties of
merchantability and fitness for a particular purpose. Motorola may make improvements
or changes in the product(s) described in this manual at any time.
MOTOROLA, the Stylized M Logo, and PhoneWrap are registered in the U.S. Patent
and Trademark Office. All other product or service names are the property of their
respective owners.

Contents
3
Contents
Welcome. . . . . . . . . . . . . . . . . . . . . . . . . . . . . . . . . . . . . 1
Contents . . . . . . . . . . . . . . . . . . . . . . . . . . . . . . . . . 3 - 4
Important Safety Instructions . . . . . . . . . . . . . . . . . . . 5
Installation Guidelines . . . . . . . . . . . . . . . . . . . . . . 6
Technical Amendments . . . . . . . . . . . . . . . . . . . . . 7
Installation . . . . . . . . . . . . . . . . . . . . . . . . . . . . . . . . . . 8
Package Contents: . . . . . . . . . . . . . . . . . . . . . . . . . . 8
Setting up the Handset Base and Charger Unit . 8
Connecting the Handset Base Station . . . . . . . . . 9
Connecting the Cordless Handset Charger . . . . . 9
Preparing the Handset . . . . . . . . . . . . . . . . . . . . . . . . 10
Inserting and Charging the Batteries . . . . . . . . . 10
Low Battery Warning . . . . . . . . . . . . . . . . . . . . . . 11
Product Features . . . . . . . . . . . . . . . . . . . . . . . . . . . . . 12
Control Buttons for the Handset Base . . . . . . . . . 13
Control Buttons for the Cordless Handset. . . . . . 14
Display Icons . . . . . . . . . . . . . . . . . . . . . . . . . . . . . . . 15
Using the Telephone Base . . . . . . . . . . . . . . . . . . . . . 16
Making External Calls . . . . . . . . . . . . . . . . . . . . . . 16
Preparatory dialling . . . . . . . . . . . . . . . . . . . . . . . 16
Direct dialling . . . . . . . . . . . . . . . . . . . . . . . . . . . . 16
Speakerphone dialling . . . . . . . . . . . . . . . . . . . . . 16
Receiving Calls . . . . . . . . . . . . . . . . . . . . . . . . . . . 17
Hold . . . . . . . . . . . . . . . . . . . . . . . . . . . . . . . . . . . . 17
Changing the Handset Volume . . . . . . . . . . . . . . . 17
Using the Cordless Handset . . . . . . . . . . . . . . . . . . . 18
Making External Calls . . . . . . . . . . . . . . . . . . . . . . 18
Preparatory dialling . . . . . . . . . . . . . . . . . . . . . . . . . . . 18
Direct dialling . . . . . . . . . . . . . . . . . . . . . . . . . . . . . 18
Speakerphone dialling . . . . . . . . . . . . . . . . . . . . . 18
Receiving Calls. . . . . . . . . . . . . . . . . . . . . . . . . . . . 19
Changing the Handset Volume . . . . . . . . . . . . . . 19
Making an Internal Call with the Handset Base or
Cordless Handset . . . . . . . . . . . . . . . . . . . . . . . . . . . . 20
Receiving an Internal Call . . . . . . . . . . . . . . . . . . . 20
Transferring a Call to another handset . . . . . . . . 20
3-Way Conference . . . . . . . . . . . . . . . . . . . . . . . . . 21
Paging Handsets . . . . . . . . . . . . . . . . . . . . . . . . . . 21
Muting the Microphone, Handset Base . . . . . . . 22
Muting the Microphone, Cordless Handset . . . . 22
Key Lock on the Cordless Handset . . . . . . . . . . . . . 22
Cordless Handset Range . . . . . . . . . . . . . . . . . . . 23
Redial on the Handset Base . . . . . . . . . . . . . . . . 23
Redial on the Cordless Handset . . . . . . . . . . . . . . 24
Using the Phonebook on the Handset Base or
Cordless Handset . . . . . . . . . . . . . . . . . . . . . . . . . . . . 25
Store a Phonebook entry . . . . . . . . . . . . . . . . . . . 25
Entering a Dialling Pause (P). . . . . . . . . . . . . . . . . 25
View a Phonebook entry . . . . . . . . . . . . . . . . . . . . 26
Edit a Phonebook entry . . . . . . . . . . . . . . . . . . . . . 26
Delete a Phonebook entry . . . . . . . . . . . . . . . . . . 26

stnetnoC
4
Contents
Using the Call Log on the Handset Base or
Cordless Handset .
. . . . . . . . . . . . . . . . . . . . . . . . . . 27
Caller Display/Caller Display with Call Waiting . 27
View an entry in the Call Log .
. . . . . . . . . . . . . . 27
Dial from the Call Log .
. . . . . . . . . . . . . . . . . . . . . 27
Save a Call Log entry to Phone Book .
. . . . . . . . 28
Delete an entry in the Call log .
. . . . . . . . . . . . . . 28
Delete all entries from in the Call log .
. . . . . . . . 28
Using the Menu on the Handset Base . . . . . . . . . . . 29
Changing the Display Language .
. . . . . . . . . . . . 29
Changing the Display Contrast .
. . . . . . . . . . . . . 29
Key Tones On/Off .
. . . . . . . . . . . . . . . . . . . . . . . . . 29
Changing the Dial Mode .
. . . . . . . . . . . . . . . . . . . 30
Changing the Flash (Recall) Time .
. . . . . . . . . . . 30
Set the Date and Time .
. . . . . . . . . . . . . . . . . . . . . 30
Message Waiting .
. . . . . . . . . . . . . . . . . . . . . . . . . 31
Reset to Default .
. . . . . . . . . . . . . . . . . . . . . . . . . . 31
Using the Menu on the Cordless Handset .
. . . . . . . 32
Changing the Ring Melody .
. . . . . . . . . . . . . . . . 32
Changing the Ring Volume .
. . . . . . . . . . . . . . . . 32
Changing the Handset Tones .
. . . . . . . . . . . . . . . 32
Turn Auto Talk On/Off .
. . . . . . . . . . . . . . . . . . . . . . 33
Changing the Cordless Handset Name .
. . . . . . . 33
Changing the Cordless Display Language.
. . . . . 34
Changing the Cordless Contrast.
. . . . . . . . . . . . . 34
Reset the Cordless to Default .
. . . . . . . . . . . . . . . 35
Changing the Handset Base PIN.
. . . . . . . . . . . . . 35
Changing the Handset Base Dial Mode from the
Cordless Handset.
. . . . . . . . . . . . . . . . . . . . . . . . . 35
Changing the Handset Base Flash (Recall) Time . 36
Message Waiting .
. . . . . . . . . . . . . . . . . . . . . . . . . 36
Reset Handset Base from the Cordless Handset . 37
Setting the Cordless Handset Date and Time . . . 37
Registration .
. . . . . . . . . . . . . . . . . . . . . . . . . . . . . 38
To Register an additional Handset .
. . . . . . . . . . 38
To De-register a Cordless Handset .
. . . . . . . . . . . 38
Warranty .
. . . . . . . . . . . . . . . . . . . . . . . . . . . . . . . . 39- 44

snoitcurtsnI ytefaS tnatropmI
5
Important Safety Instructions
Follow these safety precautions when using your cordless phone to reduce the risk of
fire, electric shock and injury to pers
ons or property:
Re
duce risk of fire and shock by:
1. Ke
ep all slits and openings of the phone unblocked. Do not set the phone on a hot surface or
over a radiator. Ensure that proper ventilation is provided at the installation site.
2. D
o not use while wet or while standing in water.
3. D
o not use this product near water (for example, near a bath tub,
kitchen sink, or swimming pool).
4. D
o not allow anything to rest on the power cord. Place the power cord so that
it will not be walked on.
5. Never insert
objects of any kind into the product slits as that may result in fire or shock.
6. U
nplug this product from the wall outlet before cleaning. Do not use liquid cleaners or aerosol
cleaners. Use a damp cloth for cleaning.
7. D
o not disassemble this product. If service or repair work is required, contact the Warranty
Se
rvice phone number found in the back of this user’s guide.
8. D
o not overload wall outlets and extension cords.
9. Avo
id using during an electrical storm. Use a surge protector to protect the equipment.
10. D
o not use this cordless phone to report a gas leak, especially if you are in the
vicinity of the gas line.

snoitcurtsnI ytefaS tnatropmI
6
Unplug this cordless phone immediately from an outlet if:
• The power cord or plug is damaged or frayed.
• Liquid has been spilled into the product.
• The product has been exposed to rain or water. Do not retrieve the handset or base until after
you have unplugged the power and phone from the wall. Then retrieve the unit by
unplugged cords.
• The product has been dropped or the cabinet has been damaged.
• The product exhibits a distinct change in performance.
Installation Guidelines
1. Read and understand all instructions and save them for future reference.
2. Follow all warnings and instructions marked on the product.
3. Do not install this product near a bath tub, sink or shower.
4. Operate this phone using only the power source that is indicated on the marking label. If
you are unsure of the power supply to your home, consult with your dealer or local power
company.
5. Do not place this product on an unstable cart, stand or table. This product may fall, causing
serious damage to the product.
6. Adjust only those controls that are covered by the operating instructions. Improper
adjustment of other controls may result in damage and will often require extensive work to
restore the product to normal operation.
7. Clean this product with a soft, damp cloth. Do not use chemicals or cleaning
agents to clean this phone.

snoitcurtsnI ytefaS tnatropmI
7
8. Use only the power supply that came with this unit. Using other power supplied
may damage the unit.
9. Because cordless phones operate on electricity, you should have
at least one phone in your
home that isn’t cordless, in case the power in your home goes out.
10. To avoid interference to nearby appliances, do not place the base of the cordless phone on or
near a TV, microwave oven, or VCR.
11. It is impossible to make emergency calls when the keypad lock is enabled.
Technical Amendments
These Operating Instructions are issued for information purposes.
Their content is not subject of a contract.
All indicated data are merely nominal values. The described equipment and options
may differ depending on requirements which are specific to each country.
This device is dedicated to be used in th
e analog public switched telecomunication network (PSTN).

noitallatsnI
8
Package Contents
Single Pack Twin Pack Triple Pack Quad Pack
Handset Base Station 1 1 1 1
Cordless Handset 1 2 3 4
Mains Adaptor 2 3 4 5
Telephone Line Cord 1 1 1 1
Rechargeable Batteries 2 4 6 8
(type AAA rechargeable)
Charger Unit 1 2 3 4
User Guide 1 1 1 1
Please check the contents of the package carefully. If something is missing or has become
damaged in transit, you should NOT use the handset base station or cordless handset and charger.
In such a case you should return the product to the dealer with your sales receipt or contact the
Motorola distributor directly. (For details, please refer to the Warranty section.)
Note: Retain the packaging of your appliance to prevent it from being damaged should
you ever
need to return it.
Setting up the Handset Base Station and Cordless Charger Unit
Place the handset base station and cordless charger unit in easily accessible locations near to
mains power sockets. Make sure that the locations are stable and flat and that the surfaces are
non-slip. Make sure that all cables can be routed so as to prevent people tripping over them.
Furthermore, avoid placing the handset base station and cordless charger unit too close to other
electronic appliances such as microwaves, PCs or HiFis, for example.
Do not ex
pose the handset base station and cordless charger unit to direct sunlight or
allow th
em to become wet. They should not be set up in rooms which are subject to
condensation or corrosive steam or a high concentration of dust (e.g. cellars,
garages or conservatories). The room temperature must be between 0°c and 35°c.

noitallatsnI
9
Connecting the Handset Base Station
1. esnI rt the telephone line plug into the
corresponding socket back of the handset base
station.
2. Connect the small mains power plug into the
corresponding socket on the back of the handset
base station.
3. Connect the mains power adaptor to the mains
wall socket and switch the power on.
4. tcennoC the telephone line cord to the telephone socket.
The handset base station is now ready for use.
Connecting the Cordless Handset Charger
1. Connect the mains power adaptor to the mains
wall socket and switch the power on.
The handset base station and cordless
charger do not have power switches.
Only use the mains adaptors supplied
with your phone.
Plug the adaptor to the saket-outlet
which near the equipment and shall
be easily accessible.

noitallatsnI
10
Preparing the Handset
Inserting and Charging the Batteries
On the bottom of the handset, press in the release catch in
between the two charging connectors and push the battery
hatch up to remove. Insert the 2 x AAA (600mAh/1.2v) Ni-MH
rechargable batteries provided, taking care to note the ‘+’ and ‘-‘
markings and position the batteries the correct way around.
Locate the top of the battery cover first and press down towards the release catch until it clicks into
place. Place the handset onto the base station to charge the batteries for a minimum of 16 hours
before first use. You will hear a confirmation beep, the battery charging indicator will start to scroll
and ‘Charging’’ will initially appear on the display to confirm that the handset is charging.
When the handset is fully charged, the full battery icon will be displayed until the handset is
taken off of the base station.
Note: Before first use the batteries should be allowed to charge for a minimum of 16 hours,
without interruption. If possible, only take the handset out of the base station when charging is
complete. This will help to guarantee optimum operation.
Please do not put the cordless
handset onto
the charger without
first inserting
the batteries.
The
handset will not func
tion and
may become
damaged
.
Please do not use alkaline or
non-rechargeable
ba
tteries. It
may cause permanent damage
to the product and void the warranty.
CAUTION
RISK OF EXPLOSION IF BATTERY IS REPLACED BY AN INCORRECT TYPE. DISPOSE OF USED BATTERIES
ACCORDING TO THE INSTRUCTIONS.
Use only SANIK; type no, SN-AAA60HJ or GP, GP60AAAHC or LEXEL, LH060-3AH45 rechargeable batteries.

Installation
11
LOW BATTERY WARNING
When the battery is low and needs to be recharged, you will hear a warning tone during standby
and when the handset is in use .
Technical data
Receiver impedance : 150 ohm
Microphone impedance : 2.2K ohm
Receiver output power : 20mW
Microphone sensitivity : -42dBV/pa

serutaeF
12
Product Features
Congratulations on your purchase of this high quality, handset base station and cordless
telephone set. This product offers the following features:
Handset Base Station
• Digital sound quality (DECT)
• Large mono display with backlight
• 50 Name and number phone book
• Handsfree
• Caller ID* and Caller ID with Call Waiting
• Incoming 30 name/number call log
• Multi-language menu.
• 8 level LCD contrast, user changeable
• 10 Last number redial
• Microphone mute
• GAP compatible
• Conference call+ (1 external/2 internal)
• Call forwarding/transfer+
• Message waiting alert
• Separate base and handset ringers
• 4 Level earpiece volume
• Real time clock display
• Call timer
• Key input tone on/off
• Handset paging from base station
• Recall/Pause/Hold
• Tone and pulse dialling
DECT Cordless Handset
• iw yalpsid onom egraL th backlight
• koob enohp rebmun dna emaN 05
• Handsfree
• iw DI rellaC dna *DI rellaC th Call Waiting
• Incoming 30 name/number call log
• Multi-language menu.
• 8 Ringtone melodies
• Ringer on/off
• 5 level LCD contrast
• 5 level ring volume
• Real time clock display
• Handset naming
• Automatic call answering
• Key input tone on/off
• Battery status inc low battery warning
• Tone and pulse dialling
• Up to 100 hours standby
• Up to 10 hours continuous talk time
• Out of range warning
• Recall/Pause/Hold
• Line in use indication
* Subscription may be required. Please contact your network provider.
DECT: Digitally Enhanced Cordless Telephone - Standard for Cordless telephones
GAP : Generic Access Profile – Standard for the interoperation of handsets and base stations from other manufacturers
10 Last number redial
•
+ More than one handset required
snottuB lortnoC
13
Control Buttons
- Handset Base
1. Display
2. Menu/OK
Press from idle to view the Menu
Press to select and confirm display items
3. Up/Down
Press Menu to move up/down the options
4. Cancel
Lo
ng press in Menu (in call) to go to call display
Short press in Menu to go back one level
Short press whilst editing to backspace
Long press whilst editing to delete all
characters/digits
5. Exit
Press in Menu to exit to idle mode
6. Calls
Press from idle to view the Calls log
7. Redial
Press from idle to view the Redial log
8. INT/page all
Press in call to make an internal handset call
Pr
ess and hold from idle to page all handsets
9.
Pr
ess from idle or during a call to enter the
Phonebook
10. hold
Press in call to put a call on hold/retrieve a call
from hold
11. Recall
Used with some Network Services
12. Mute
Use in call to Mute/Unmute the microphone
Press and hold at idle for Registration mode
13. Volume Up/Down
Use in call to increase/decrease the volume
14. Speaker
Press to answer an incoming call in handsfree
mode
Press in a list to dial a number in handsfree
mode
Press in a call to switch between handsfree and
handset mode
15. Keypad 0-9
Alphanumeric entry
16. * Key
Press in a call (pulse mode) to switch to tone
17. pause
Press and hold to enter a dialling pause
18. # Key
Inserts a # into the dialling string
19. Ringer Switch
Hi - Loud incoming ring volume
Lo - Low incoming ring volume
Off - Silent mode, the handset will NOT ring
for External ring.
1
2
3
4
7
5
6
11
10
8
9
12
13
14
15
18
17
16
19
*

snottuB lortnoC
snottuB lortnoC
14
1. Display
2. Menu/OK
Press from idle to view the Menu
Press to select and confirm display items
3.
Short press in Menu to go back one level
Long press in Menu (in call) to return to call
display
Short press whilst editing to backspace
Long press whilst editing to delete all
characters/digits
Press in call to Mute/Unmute the microphone
4. Recall
Used with some Network Services
5. INT
Press to make an internal handset call
6.
/Redial
Press from idle to view the Redial log
Scroll up in a menu or list
Increase the volume in call
7.
Pr
ess from idle or during a call to access
Phonebook
8.
Press to answer an incoming call in handsfree
mode
Press in a list to dial a number in handsfree
mode
Press in a call to switch between handsfree and
handset mode
9.
/Calls
Press from idle to view the Call log
Scroll down in a menu or list
Decrease the volume in call
10.
End Call
Use in call to end/hang up the call
Use in pre-dialling to return to the idle display
11.
External Call
Press to answer an incoming call in handset
mode
Press in a list to dial a number in handset
mode
Press and dial a number to make a call in
handset mode
12. Keypad 0-9
Alphanumeric entry
13. * Key
Press in a call (pulse mode) to switch to tone
Press and hold at idle to turn the ringer on/off
14. pause
Press and hold to enter a dialling pause
15.
Inserts a # into the dialling string
Press and hold to turn keylock on/off
Control Buttons
- Cordless Handset
1
2
3
4
8
10
11
7
5
6
9
12
13
15
14
#/Keypad lock Key

Display Icons
Handset Base Station Cordless Handset
Line is in use Line is in use
Speaker phone (Handsfree) in use Speaker phone (Handsfree) in use
Microphone Muted Microphone Muted
Battery charge level
Missed Calls
Ringer Off
Repeat call within the Calls Log
Keylock is on
Internal call
Internal call
Antenna - disappears when the
handset is out of range of the base
Display Backlight
The backlight on your handset comes on when you receive an incoming call and after any key is
pressed and will stay on for 10 seconds after the last button press.
15
snocI yalpsiD
Message Waiting

emocleW
16
Making External Calls
Using the Telephone Base Station
There are three ways that you can make an external call:
Preparatory dialling
1. Enter the number you would like to call using the keypad
2. Lift the handset or press ‘Speaker’
3. The number will be dialled and after a short delay the call timer will start counting
4. Replace the handset or press ‘Speaker’ to end the call
5. The timer will stop counting and will remain on the display for 2 seconds
Direct dialling
1. Lift the handset or press ‘Speaker’ and enter the number using the keypad
2. After a short delay the timer will be displayed and start counting
3. Replace the handset or press ‘Speaker’ to end the call
4. The timer will stop counting and will remain on the display for 2 seconds
Speakerphone dialling
In Speaker mode, all communication is via the handset speakerphone and microphone and
you can talk to your caller without having to hold the handset, leaving your ‘hands free’
You can initiate a call in speaker mode or switch to speaker during a call
1. Enter the number you would like to call using the keypad
2. Press the Speaker key, you will hear the speaker switch on and the digits being dialled
3. After a short delay the timer will be displayed and start counting
4. Press the Speaker key to end the call
5. The timer will stop counting and will remain on the display for 2 seconds.
Note: To switch to Speaker during a call, just press the Speaker key at any time
enohpeleT eht gnisU
16

Receiving Calls
1. When you receive an incoming call, just pick up the handset or press the Speaker key to
answer the call
Note: If you have Caller ID service, the caller’s name (if stored in the Phone Book) will be
displayed.
Hold Feature
When you make or receive an external call you can put the call on hold. Music will play whilst
the call is on hold to remind you that you have an external call in progress.
To use the Hold feature
1. Press the ‘Hold’ key whilst an external call is in progress
To retrieve a call from Hold
1. Press the ‘Hold’ key. The music will stop and you will be reconnected to your caller.
Changing the Handset Volume
You can adjust the handset volume during a call (external or internal). There are 4 different
volume levels
During a call:
1. Press the Volume or key to adjust the handset volume.
enohpeleT eht gnisU
1717

Making External Calls
Using the Cordless Handset
When you first insert the batteries there will be enough charge for the Handset to automatically
power on. Also, when the handset is put into the base station it will automatically begin to
charge. Before first use, allow the batteries to charge uninterrupted for 16 hours.
There are three ways that you can make an external call:
Preparatory dialling
1. Enter the number you would like to call using the keypad
2. Press the External call key
3. The number will be dialled and after a short delay the call timer will start counting
4. Press the key to end the call
5. The timer will stop counting and will remain on the display for 2 seconds
Direct dialling
1. Press the External call key and enter the number using the keypad
2. After a short delay the timer will be displayed and start counting
3. Press the key to end the call
4. The timer will stop counting and will remain on the display for 2 seconds
Speakerphone dialling
In Speaker mode, all communication is via the handset speakerphone and microphone and
you can talk to your caller without having to hold the handset, leaving your ‘hands free’
You can initiate a call in speaker mode or switch to speaker during a call
1. Enter the number you would like to call using the keypad
2. Press the Speaker key , you will hear the speaker switch on and the digits being dialled
3. After a short delay the timer will be displayed and start counting
4. Press the Speaker key to end the call
enohpeleT eht gnisU
18
Page is loading ...
Page is loading ...
Page is loading ...
Page is loading ...
Page is loading ...
Page is loading ...
Page is loading ...
Page is loading ...
Page is loading ...
Page is loading ...
Page is loading ...
Page is loading ...
Page is loading ...
Page is loading ...
Page is loading ...
Page is loading ...
Page is loading ...
Page is loading ...
Page is loading ...
Page is loading ...
Page is loading ...
Page is loading ...
Page is loading ...
Page is loading ...
Page is loading ...
Page is loading ...
Page is loading ...
/