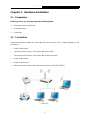
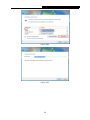
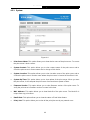
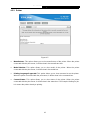
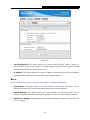
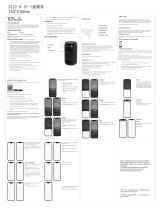
TP-LINK TL-PS110P is a Single Parallel Port Fast Ethernet Print Server that allows you to connect your printer to a network and share it with multiple users. It supports various printing protocols, including LPR, IPP, and SMB, and is compatible with Windows, Mac, and Linux operating systems. With its high-speed Ethernet port, the TL-PS110P ensures fast and reliable data transfer, making it ideal for small offices or home networks.
TP-LINK TL-PS110P is a Single Parallel Port Fast Ethernet Print Server that allows you to connect your printer to a network and share it with multiple users. It supports various printing protocols, including LPR, IPP, and SMB, and is compatible with Windows, Mac, and Linux operating systems. With its high-speed Ethernet port, the TL-PS110P ensures fast and reliable data transfer, making it ideal for small offices or home networks.


-
 1
1
-
 2
2
-
 3
3
-
 4
4
-
 5
5
-
 6
6
-
 7
7
-
 8
8
-
 9
9
-
 10
10
-
 11
11
-
 12
12
-
 13
13
-
 14
14
-
 15
15
-
 16
16
-
 17
17
-
 18
18
-
 19
19
-
 20
20
-
 21
21
-
 22
22
-
 23
23
-
 24
24
-
 25
25
-
 26
26
-
 27
27
-
 28
28
-
 29
29
-
 30
30
-
 31
31
-
 32
32
-
 33
33
-
 34
34
-
 35
35
-
 36
36
-
 37
37
-
 38
38
-
 39
39
-
 40
40
-
 41
41
-
 42
42
-
 43
43
-
 44
44
-
 45
45
-
 46
46
-
 47
47
-
 48
48
-
 49
49
-
 50
50
-
 51
51
-
 52
52
-
 53
53
-
 54
54
-
 55
55
-
 56
56
-
 57
57
-
 58
58
-
 59
59
-
 60
60


TP-LINK TL-PS110P is a Single Parallel Port Fast Ethernet Print Server that allows you to connect your printer to a network and share it with multiple users. It supports various printing protocols, including LPR, IPP, and SMB, and is compatible with Windows, Mac, and Linux operating systems. With its high-speed Ethernet port, the TL-PS110P ensures fast and reliable data transfer, making it ideal for small offices or home networks.
Ask a question and I''ll find the answer in the document
Finding information in a document is now easier with AI
Related papers
-
TP-LINK TL-PS110P.G User manual
-
-
TP-LINK Single USB2.0 Port Fast Ethernet Print Server User manual
-
-
-
-
TP-LINK TL-PS110U User manual
-
-
TP-Link Technologies TL-WPS510U User manual
-
Other documents
-
Digicom 8E4262 User manual
-
 TCP Smart WiFi Heater Fan Operating instructions
-
Zonet ZPS3611 - QUICK Quick Installation Manual
-
Zonet ZPS1002 User manual
-
C2G 27477 Owner's manual
-
 Eusso UGL2454-S10 Owner's manual
-
Repotec RP-WUP211 Owner's manual
-
Epson PS-1216U User manual
-
Edimax Past Ethernet Combo Print Server PS-1216U User manual
-
StarTech.com PM1115P2 Owner's manual

