Harbor Freight Tools 3/8 in. - 2 in. Ratcheting Pipe Threader Set Owner's manual
- Category
- Straight grinders
- Type
- Owner's manual


Page 2 For technical questions, please call 1-888-866-5797. Items 62353 62354
Table of Contents
Safety ......................................................... 3
Specifications ............................................. 8
Setup .......................................................... 8
Operation .................................................... 9
Maintenance .............................................. 12
Parts List and Diagram .............................. 14
Warranty .................................................... 16
WARNING SYMBOLS AND DEFINITIONS
This is the safety alert symbol. It is used to alert you to potential
personal injury hazards. Obey all safety messages that
follow this symbol to avoid possible injury or death.
Indicates a hazardous situation which, if not avoided,
will result in death or serious injury.
Indicates a hazardous situation which, if not avoided,
could result in death or serious injury.
Indicates a hazardous situation which, if not avoided,
could result in minor or moderate injury.
Addresses practices not related to personal injury.
Specifications
Item 62353 62354
Die Sizes
3/8" (18 TPI), 1/2" (14 TPI), 3/4" (14 TPI),
1" (11.5 TPI), 1-1/4" (11.5 TPI),
1-1/2" (11.5 TPI), 2" (11.5 TPI)
1/2" (14 TPI), 3/4" (14 TPI), 1" (11.5 TPI)
Kit Includes
Ratchet Head with Coupler, 3 Handles,
7 Dies, and Blowmold Case
Ratchet Head with Coupler, 2 Handles,
3 Dies, and Blowmold Case

Page 3For technical questions, please call 1-888-866-5797.Items 62353 62354
IMPORTANT SAFETY INFORMATION
1. Wear ANSI-approved safety goggles and
heavy-duty work gloves during use.
2. Keep work area clean and well lit.
3. Keep bystanders out of the area during use.
4. Do not use when tired or when under the
influence of alcohol, drugs or medication.
5. This product is not a toy. Do not allow
children to play with or near this item.
6. Use as intended only. Do not use handle
extension to increase force.
7. Inspect before every use; do not use
if parts are loose or damaged.
8. Maintain product labels and nameplates.
These carry important safety information.
If unreadable or missing, contact
Harbor Freight Tools for a replacement.
9. Keep pipe lubricated with cutting oil (not included).
10. Secure pipe to be threaded in clamp before use.
11. Read manual before set up and/or use.
12. Store idle equipment. When not in use, tools must
be stored in a dry location to inhibit rust. Always
lock up tools and keep out of reach of children.
13. Use the right tool for the job. Do not attempt
to force a small tool or attachment to do the
work of a larger industrial tool. Do not use a tool
for a purpose for which it was not intended.
14. Dress properly. Do not wear loose clothing or
jewelry as they can be caught in moving parts.
Protective, electrically nonconductive clothes and
nonskid footwear are recommended when working.
Wear restrictive hair covering to contain long hair.
15. Maintain tools with care. Keep tools sharp
and clean for better and safer performance.
Follow instructions for lubricating and changing
accessories. Inspect tool cords periodically and,
if damaged, have them repaired by an authorized
technician. The handles must be kept clean,
dry, and free from oil and grease at all times.
16. Replacement parts and accessories. When
servicing, use only identical replacement parts. Use
of any other parts will void the warranty. Only use
accessories intended for use with this tool. Approved
accessories are available from Harbor Freight Tools.
17. Fully engage the direction switch in the
“in” or “out” position before use.
18. WARNING: Some dust created by power sanding,
sawing, grinding, drilling, and other construction
activities, contains chemicals known [to the State
of California] to cause cancer, birth defects or
other reproductive harm. Some examples of
these chemicals are:
• Lead from lead-based paints
• Crystalline silica from bricks and cement or
other masonry products
• Arsenic and chromium from
chemically treated lumber
Your risk from these exposures varies, depending on
how often you do this type of work. To reduce your
exposure to these chemicals: work in a well ventilated
area, and work with approved safety equipment, such
as those dust masks that are specially designed to
filter out microscopic particles.
(California Health & Safety Code § 25249.5, et seq.)
19. The warnings, precautions, and instructions
discussed in this instruction manual cannot cover all
possible conditions and situations that may occur.
It must be understood by the operator that
common sense and caution are factors
which cannot be built into this product,
but must be supplied by the operator.

Page 4 For technical questions, please call 1-888-866-5797. Items 62353 62354
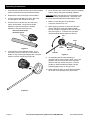
Operating Instructions
1. Assemble the Handle Rod parts and insert threaded
portion of Handle Tube into the Ratchet Holder.
2. Determine the size of the pipe to be threaded.
3. Pick the appropriate Die to be used. Die sizes
are stamped on the outside of each Die.
4. Place the rear of the Die over the end of the
pipe to be threaded. Verify that the inside
diameter of the Die matches the outside
diameter of the pipe (see Figure A).
These measurements
should be equal.
Figure A
5. Insert the Die into the Ratchet Holder. It is a
force fitting, and once the Die is in the Ratchet
Holder, it may require light tapping with a wooden
mallet to remove the Die (see Figure B).
Figure B
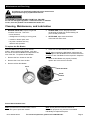
6. Fill an Oil Can with Thread Cutting Oil (not included).
Keep it nearby during the threading operation.
CAUTION: Make sure the pipe end and threads of the
Die are sufficiently oiled at all times. Otherwise, Die
life will be shortened and the threads will be rough.
7. Make sure that the pipe to be threaded
is properly secured in a vise.
8. While applying pressure to the end of the pipe,
use the Handle to rotate the Ratchet Holder
around the pipe to engage the Die with the pipe
end (see Figure C). Continue this operation
until the desired thread length is achieved.
Pipe
Die
Ratchet
Holder
Handle
Knob
Figure C
9. To disengage the Die after threading is
complete, pull out the reversing Knob, turn it 180
degrees until the arrow points in the opposite
direction and drop it back into place. Use the
Handle to rotate the Ratchet Holder until the
Die disengages fully from the pipe end.
10. When sliding the pipe out of the Ratchet Holder,
be careful not to damage newly cut threads.

Page 5For technical questions, please call 1-888-866-5797.Items 62353 62354
Maintenance and Servicing
Procedures not specifically explained in this manual must
be performed only by a qualified technician.
TO PREVENT SERIOUS INJURY FROM TOOL FAILURE:
Do not use damaged equipment. If abnormal noise or vibration
occurs, have the problem corrected before further use.
Cleaning, Maintenance, and Lubrication
1. BEFORE EACH USE, inspect the general
condition of the tool. Check for:
• loose hardware,
• misalignment or binding of moving parts,
• cracked or broken parts, and
• any other condition that may
affect its safe operation.
2. DURING USE, ensure that pipe end and
die threads are oiled with Thread Cutting Oil
(not included) at all times.
3. AFTER USE, wipe external surfaces
of the tool with clean cloth.
To replace the Die Blades
Worn Die Blades can result in poor thread
quality. When replacing Die Blades, verify that
the size of the new Die Blades corresponds to the
size of the Die. To replace the Die Blades:
1. Remove the four Screws on the Die.
2. Remove the Cover from the Die.
3. Remove all four Die Blades.
4. Insert four new Die Blades into the Die.
NOTE: When inserting the Die Blades, make sure the
cutting edges of the Die Blades face inward and that the
number on each Die Blade is at the top and in sequence.
5. Once the Die Blades are properly inserted,
replace the Cover and four Screws.
Cover
Die
Die Blade
Blade
Number
Record Serial Number Here:
Note: If product has no serial number, record
month and year of purchase instead.
Note: Some parts are listed and shown for
illustration purposes only, and are not available
individually as replacement parts.

Page 6 For technical questions, please call 1-888-866-5797. Items 62353 62354
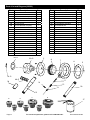
Parts List and Diagram (62353)
Part Description Qty
1A 3/8" Die Screw 4
2A 3/8" Die Cover 1
3A 3/8" Die Ratchet Coupling 1
4A 3/8" Die Blade Set 4
1B 1/2" Die Screw 4
2B 1/2" Die Cover 1
3B 1/2" Die Ratchet Coupling 1
4B 1/2" Die Blade Set 4
1C 3/4" Die Screw 4
2C 3/4" Die Cover 1
3C 3/4" Die Ratchet Coupling 1
4C 3/4" Die Die Blade Set 4
1D 1" Die Screw 4
2D 1" Die Cover 1
3D 1" Die Ratchet Coupling 1
4D 1" Die Blade Set 4
1E 1-1/4" Die Screw 4
2E 1-1/4" Die Cover 1
3E 1-1/4" Die Ratchet Coupling 1
4E 1-1/4" Die Blade Set 4
1F 1-1/2" Die Screw 4
Part Description Qty
2F 1-1/2" Die Cover 1
3F 1-1/2" Die Ratchet Coupling 1
4F 1-1/2" Die Blade Set 4
1G 2" Die Screw 4
2G 2" Die Cover 1
3G 2" Die Ratchet Coupling 1
4G 2" Die Blade Set 4
5 Plate 1
6 Ratchet 1
7 Ratchet Holder 1
8 Plate 1
9 Screw 6
10 Handle Tube 2
11 Pawl 1
12 Spring 1
13 Knob 1
14 Pin 1
15 Handle 1
16 Handle Connector 2
17 Oil Can 1
1
2
3
4
3A- G
4A- G
5
10
7
1A- G
2A- G
9
6
12
11
13
14
16
8
15
17
A B C
D E
GF

Page 7For technical questions, please call 1-888-866-5797.Items 62353 62354
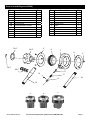
Parts List and Diagram (62354)
Part Description Qty
1A 1/2" Die Screw 4
2A 1/2" Die Cover 1
3A 1/2" Die Ratchet Coupling 1
4A 1/2" Die Blade Set 4
1B 3/4" Die Screw 4
2B 3/4" Die Cover 1
3B 3/4" Die Ratchet Coupling 1
4B 3/4" Die Blade Set 4
1C 1" Die Screw 4
2C 1" Die Cover 1
3C 1" Die Ratchet Coupling 1
4C 1" Die Blade Set 4
Part Description Qty
5 Plate 1
6 Ratchet 1
7 Ratchet Holder 1
8 Plate 1
9 Screw 6
10 Handle Tube 2
11 Pawl 1
12 Spring 1
13 Knob 1
14 Pin 1
15 Handle 1
1
2
3
4
3A- C
4A- C
5
10
7
1A- C
2A- C
9
6
12
11
13
14
8
15
A
B
C

3491 Mission Oaks Blvd. • PO Box 6009 • Camarillo, CA 93011 • 1-888-866-5797
PLEASE READ THE FOLLOWING CAREFULLY
THE MANUFACTURER AND/OR DISTRIBUTOR HAS PROVIDED THE PARTS LIST AND ASSEMBLY DIAGRAM
IN THIS DOCUMENT AS A REFERENCE TOOL ONLY. NEITHER THE MANUFACTURER OR DISTRIBUTOR
MAKES ANY REPRESENTATION OR WARRANTY OF ANY KIND TO THE BUYER THAT HE OR SHE IS
QUALIFIED TO MAKE ANY REPAIRS TO THE PRODUCT, OR THAT HE OR SHE IS QUALIFIED TO REPLACE
ANY PARTS OF THE PRODUCT. IN FACT, THE MANUFACTURER AND/OR DISTRIBUTOR EXPRESSLY
STATES THAT ALL REPAIRS AND PARTS REPLACEMENTS SHOULD BE UNDERTAKEN BY CERTIFIED AND
LICENSED TECHNICIANS, AND NOT BY THE BUYER. THE BUYER ASSUMES ALL RISK AND LIABILITY
ARISING OUT OF HIS OR HER REPAIRS TO THE ORIGINAL PRODUCT OR REPLACEMENT PARTS
THERETO, OR ARISING OUT OF HIS OR HER INSTALLATION OF REPLACEMENT PARTS THERETO.
Limited 90 Day Warranty
Harbor Freight Tools Co. makes every effort to assure that its products meet high quality and durability standards,
and warrants to the original purchaser that this product is free from defects in materials and workmanship for the
period of 90 days from the date of purchase. This warranty does not apply to damage due directly or indirectly,
to misuse, abuse, negligence or accidents, repairs or alterations outside our facilities, criminal activity, improper
installation, normal wear and tear, or to lack of maintenance. We shall in no event be liable for death, injuries
to persons or property, or for incidental, contingent, special or consequential damages arising from the use of
our product. Some states do not allow the exclusion or limitation of incidental or consequential damages, so the
above limitation of exclusion may not apply to you. THIS WARRANTY IS EXPRESSLY IN LIEU OF ALL OTHER
WARRANTIES, EXPRESS OR IMPLIED, INCLUDING THE WARRANTIES OF MERCHANTABILITY AND FITNESS.
To take advantage of this warranty, the product or part must be returned to us with transportation charges
prepaid. Proof of purchase date and an explanation of the complaint must accompany the merchandise.
If our inspection verifies the defect, we will either repair or replace the product at our election or we may
elect to refund the purchase price if we cannot readily and quickly provide you with a replacement. We will
return repaired products at our expense, but if we determine there is no defect, or that the defect resulted
from causes not within the scope of our warranty, then you must bear the cost of returning the product.
This warranty gives you specific legal rights and you may also have other rights which vary from state to state.
-
 1
1
-
 2
2
-
 3
3
-
 4
4
-
 5
5
-
 6
6
-
 7
7
-
 8
8


Harbor Freight Tools 3/8 in. - 2 in. Ratcheting Pipe Threader Set Owner's manual
- Category
- Straight grinders
- Type
- Owner's manual
Ask a question and I''ll find the answer in the document
Finding information in a document is now easier with AI
Related papers
-
Harbor Freight Tools Over_the_Wheel Tie Down Bonnet User manual
-
-
-
Central Machinery Welder 94101 User manual
-
-
-
-
-
Drill Master 18 Volt Cordless Jig Saw User manual
-
Other documents
-
TPI U18TE-HD Owner's manual
-
-
 Pittsburgh Item 61411-UPC 193175321022 Owner's manual
-
 Pittsburgh Item 61411-UPC 193175321022 Owner's manual
-
Pittsburgh 62831 Owner's manual
-
 Pittsburgh 61410 Owner's manual
-
 Pittsburgh 61410 Owner's manual
-
 HAUL MASTER 30131 1200 lb. Cable Winch Puller Owner's manual
-
Central Machinery Item 62203 Owner's manual
-
 Pittsburgh Item 62831 Owner's manual


