
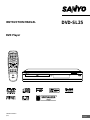
INSTRUCTION MANUAL
DVD Player
1AD6P1P1806-A
(CA)
DVD-SL25
®
TM
TM
q
n a
ef
z/ON
REMOTE CONTROLLER RB-SL25
z /ON
NEXTPREV
FWD SLOWREV SLOW
PAUSE/STEP
PLAY
REV FWD
CLEAR
SEARCH
MODE
123C
456
789
0
4
b
5
a
ENT
SETUP MENU
AUDIO RETURN
PICTURE
MODE
ANGLE
REPLAY
ZOOM ANGLE
LAST MEMO
SURROUND
ON SCREEN
OPEN/CLOSE
REPEAT A-B REPEAT
SUBTITLE
CHANGE
SUBTITLE
ON/OFF
TOP MENU
PROGRAM
/RANDOM
English

-E1-
REMOTE CONTROLLER RB-SL25
z /ON
NEXTPREV
FWD SLOWREV SLOW
PAUSE/STEP
PLAY
REV FWD
CLEAR
SEARCH
MODE
123C
456
789
0
4
b
5
a
ENT
SETUP MENU
AUDIO RETURN
PICTURE
MODE
ANGLE
REPLAY
ZOOM ANGLE
LAST MEMO
SURROUND
ON SCREEN
OPEN/CLOSE
REPEAT A-B REPEAT
SUBTITLE
CHANGE
SUBTITLE
ON/OFF
TOP MENU
PROGRAM
/RANDOM
CONTENTS
Accessories ......................................................................... E1
Controls ............................................................................... E3
Remote Control ................................................................... E4
Before Connection .............................................................. E5
Choosing a Connection ................................................... E5
Basic Connections.............................................................. E6
Connecting to a Conventional TV (Example 1) ............... E6
Connecting to a TV with Progressive-scan Capability
(Example 2) ..................................................................... E8
Additional Connection Examples ...................................... E9
Connecting to an Audio System and TV (Example 3) ..... E9
Connecting to an Amplifier with Dolby Digital Decoder,
DTS Decoder, or MPEG2 Decoder (Example 4) ........... E10
Connecting to a Digital Amplifier (Example 5) ............... E10
Connecting to an Amplifier with Dolby Pro Logic Decoder
(Example 6) ....................................................................E11
Power Supply .................................................................E11
For Safe and Efficient Operation ......................................E11
Playable Discs ................................................................... E12
Basic Operation................................................................. E13
Preparations .................................................................. E13
Basic Playback .............................................................. E13
Stopping Playback......................................................... E14
Continuing Playback from Where You Stopped Watching
(LAST MEMO PLAY), for DVD only............................... E14
Selecting a DVD Menu .................................................. E15
Selecting a Top Menu [DVD] ......................................... E15
Chapter (Track) Skip ..................................................... E15
Title Search [DVD]......................................................... E16
Chapter Search [DVD]................................................... E16
Time Search [DVD]........................................................ E16
Time Search [CD] .......................................................... E16
Track Search [CD] ......................................................... E16
Fast Playback................................................................ E17
Slow Motion Playback [DVD]......................................... E17
Still Picture (Pause)....................................................... E17
Frame by Frame Advance Playback [DVD]................... E17
Picture Zoom (Pin Point Zoom) [DVD] .......................... E18
Viewing from a Desired Camera Angle
(Multi-Angle) [DVD] ...................................................... E18
Angle Replay ................................................................. E18
Repeat Playback ........................................................... E19
Designated Range Repeat Playback (A-B Repeat) ...... E19
Random Playback [CD] ................................................. E20
Programmed Playback [CD].......................................... E20
Selecting Subtitle Language [DVD] ............................... E21
Selecting Audio Soundtrack Language
(Multi-Language) [DVD]................................................. E21
Selecting On-Screen Information .................................. E22
Selecting Picture Mode ................................................. E22
Selecting Spatializer N-2-2
TM
Virtual Surround Sound Mode
[DVD] [CD]..................................................................... E22
MP3/WMA CD Operation................................................... E23
Before Starting .............................................................. E23
MP3/WMA CD Playback................................................ E23
Stopping Playback......................................................... E24
Pause ............................................................................ E24
File Skip......................................................................... E24
Repeat Playback ........................................................... E24
Picture Disc Operation ..................................................... E25
KODAK Picture CD Playback........................................ E25
JPEG CD Playback ....................................................... E26
Picture Zoom ................................................................. E26
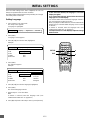
Initial Settings.................................................................... E27
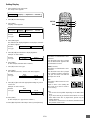
Setting Language .......................................................... E27
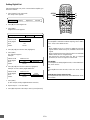
Setting Display .............................................................. E28
Setting Digital Out ......................................................... E29
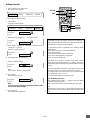
Setting Parental............................................................. E30
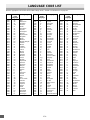
Language Code List.......................................................... E31
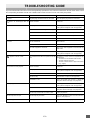
Troubleshooting Guide..................................................... E32
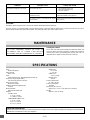
Maintenance ...................................................................... E33
Specifications.................................................................... E33
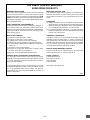
Warranty............................................................................. E34
ACCESSORIES
RB-SL25 wireless remote control Audio/Video cable

-E2-
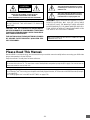
This symbol indicates that dangerous voltage
constituting a risk of electric shock is present
within this unit.
This symbol indicates that there are impor-
tant operating and maintenance instructions
in the literature accompanying this unit.
WARNING: TO PREVENT FIRE OR SHOCK HAZARD,
DO NOT EXPOSE THIS APPLIANCE TO RAIN OR
MOISTURE.
CAUTION: TO PREVENT THE RISK OF ELECTRIC
SHOCK, DO NOT REMOVE COVER (OR BACK).
NO USER-SERVICEABLE PARTS INSIDE.
REFER SERVICING TO QUALIFIED SERVICE PERSONNEL.
WARNING: UNAUTHORIZED RECORDING OF COPY-
RIGHTED MATERIAL MAY VIOLATE APPLICABLE
COPYRIGHT LAWS. THE MANUFACTURER ASSUMES
NO RESPONSIBILITY FOR UNAUTHORIZED DUPLICA-
TION, USE OR OTHER ACTS WHICH INFRINGE UPON
THE RIGHTS OF COPYRIGHT OWNERS.
CAUTION
RISK OF ELECTRIC SHOCK
DO NOT OPEN
IMPORTANT INFORMATION:
To connect this unit to a TV, TV must have a set of Audio/Video composite input jacks (RCA-type). You cannot use an
antenna terminal to connect this unit.
Please Read This Manual.
Because DVD is a new technology, we recommend that you read this manual carefully before connecting your DVD video
player and operating it for the first time.
Keep the manual in a safe place for future reference.
To enjoy Dolby Digital sound
For connection, see “Connecting to an Amplifier with Dolby Digital Decoder, DTS Decoder or MPEG2 Decoder (Example
4)” on page E10.
See “Setting Digital Out” in the INITIAL SETTINGS on page E29.
CAUTION - USE OF CONTROLS OR ADJUSTMENTS
OR PERFORMANCE OF PROCEDURES OTHER THAN
THOSE SPECIFIED HEREIN MAY RESULT IN HAZARD-
OUS RADIATION EXPOSURE.
THIS UNIT SHOULD NOT BE ADJUSTED OR REPAIRED
BY ANYONE EXCEPT PROPERLY QUALIFIED SER-
VICE PERSONNEL.
THIS CLASS B DIGITAL APPARATUS COMPLIES WITH
CANADIAN ICES-003.

-E3-
q
n a
ef
z/ON
1
2
3 4 5
6
78
Y
RL
PB PR
AUDIO OUT
VIDEO OUT
COMPONENT VIDEO OUT
OPT.
DIGITAL
OUT
VIDEO OUT
SELECT
S
COMPONENT
S-VIDEO OUT
1 2 34
65
A–BREP
1
LM
3
DALL
PGM
RND
MP
3
WMA
DVD CD
10 81112 9
1 2 54 6 73
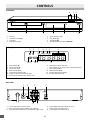
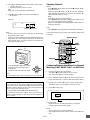
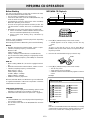
Front Panel
CONTROLS
1. Disc tray
2. Open/Close button (q)
3. FL display
4. Remote sensor (IR)
5. Power button (z/ON)
6. Play button (a)
7. Stop button (n)
8. Skip/Next/Previous buttons (f, e)
Rear Panel
FL Display
8. Message or number indicators
(Title, chapter, track, playing time or other information)
9. MP3 indicator (MP3)
10. WMA indicator (WMA)
11. Random play indicator (RND)
12. Program indicator (PGM)
1. Play indicator (a)
2. Pause indicator (k)
3. CD indicator (CD)
4. DVD indicator (DVD)
5. Last memory indicator (LM)
6. Virtual Surround Sound indicator (3D)
7. Repeat mode indicators (ALL, REP 1, A-B)
1. S-Video output jack (S-VIDEO OUT)
2. Video output select switch (VIDEO OUT SELECT)
3. Component video output jacks (COMPONENT VIDEO OUT)
4. Optical digital output jack (DIGITAL OUT)
5. Video output jack (VIDEO OUT)
6. Audio output jacks (AUDIO OUT)

-E4-
z /ON
NEXTPREV
FWD SLOWREV SLOW
PAUSE/STEP
PLAY
REV FWD
CLEAR
SEARCH
MODE
123C
456
789
0
4
b
5
a
ENT
SETUP MENU
AUDIO TOP MENU RETURN
PICTURE
MODE
ANGLE
REPLAY
ZOOM ANGLE
LAST MEMO
SURROUND
ON SCREEN
PROGRAM
/RANDOM
OPEN/CLOSE
REPEAT A-B REPEAT
SUBTITLE
CHANGE
SUBTITLE
ON/OFF
17
13
15
4
5
6
7
9
11
18
19
8
12
10
1 2 3
16
14
21
24
23
20
26
25
27
29
28
31
30
33
32
22
q
n a
ef
z/ON
z /ON
NEXTPREV
FWD SLOWREV SLOW
PAUSE/STEP
PLAY
REV FWD
CLEAR
SEARCH
MODE
123C
456
789
0
4
b
5
a
ENT
SETUP MENU
AUDIO RETURN
PICTURE
MODE
ANGLE
REPLAY
ZOOM ANGLE
LAST MEMO
SURROUND
ON SCREEN
OPEN/CLOSE
REPEAT A-B REPEAT
SUBTITLE
CHANGE
SUBTITLE
ON/OFF
TOP MENU
PROGRAM
/RANDOM
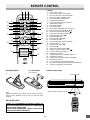
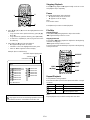
Controls
1. Power button (z/ON)
2. Last memory button (LAST MEMO)
3. Picture mode button (PICTURE MODE)
4. Open/Close button (OPEN/CLOSE)
5. A-B repeat button (A-B REPEAT)
6. Repeat button (REPEAT)
7. Angle replay button (ANGLE REPLAY)
8. Angle button (ANGLE)
9. Menu button (MENU)
10. Enter button (ENT)
11. Return button (RETURN) (See page E24.)
12. Directional arrow buttons (4, a, 5, b)
13. Forward slow button (FWD SLOW )
14. Pause/Step button (k PAUSE/STEP)
15. Skip/Next button (NEXT e)
16. Play button (a PLAY)
17. Forward button (FWD c)
18. Clear button (CLEAR)
19. Search mode button (SEARCH MODE)
20. Number buttons (1 – 9, 0)
21. Reverse button (REV d)
22. Stop button (n)
23. Skip/Previous button (PREV f)
24. Reverse slow button (REV SLOW )
25. Top menu button (TOP MENU)
26. Audio button (AUDIO)
27. Subtitle On/Off button (SUBTITLE ON/OFF)
28. Setup button (SETUP)
29. Subtitle change button (SUBTITLE CHANGE)
30. Zoom button (ZOOM)
31. On screen display button (ON SCREEN)
32. Program/Random play button (PROGRAM/RANDOM)
33. Surround sound button (SURROUND)
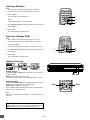
REMOTE CONTROL
Inserting batteries
12
Note:
Remove the batteries if the remote control is not to be used for a
month or more. Batteries left in the unit may leak and cause
damage.
IMPORTANT NOTE:
SPENT OR DISCHARGED BATTERIES MUST BE
RECYCLED OR DISPOSED OF PROPERLY IN COMPLIANCE
WITH ALL APPLICABLE LAWS.
FOR DETAILED INFORMATION, CONTACT YOUR LOCAL
COUNTY SOLID WASTE AUTHORITY.
Remote sensor
Within approx. 23 feet (7 meters)
Two “AA” batteries
(not supplied)
Remote control range
30° 30°

-E5-
BEFORE CONNECTION
IMPORTANT INFORMATION:
• To connect this unit to a TV, TV must have a set of Audio/Video composite input jacks (RCA-type).
You cannot use an antenna terminal to connect this unit.
• If your TV has only an antenna terminal, please purchase the TV with Audio/Video input jacks or the RF modulator.
• Do not connect the unit to a VCR directly. The playback picture will be distorted because DVD video discs are copy-
protected.
• Please refer to the instruction manuals for the components that you are connecting (TV, AV amplifier, etc.).
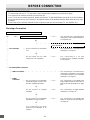
Choosing a Connection
Does your TV have “Audio/Video input jacks”?
Please purchase the TV with Audio/Video input jacks or
the RF Modulator.
TV Connection Do you connect it to a Conventional
TV?
No
Do you connect it to a TV with
Progressive-scan Capability?
Do you connect it to an Amplifier
with Dolby Digital Decoder, DTS
Decoder or MPEG2 Decoder?
No
Do you connect it to a Digital
Amplifier?
No
Do you connect it to an Amplifier
with Dolby Pro Logic Decoder?
No
See “Connecting to an Audio
System and TV (Example 3)” on
page E9.
See “Connecting to a Conventional TV
(Example 1)” on page E6.
See “Connecting to a TV with
Progressive-scan Capability (Example
2)” on page E8.
See “Connecting to a Conventional TV
(Example 1)” on page E6 or “Connecting
to a TV with Progressive-scan Capability
(Example 2)” on page E8.
See “Connecting to an Amplifier with
Dolby Digital Decoder, DTS Decoder or
MPEG2 Decoder (Example 4)” on page
E10.
See “Connecting to a Digital Amplifier
(Example 5)” on page E10.
See “Connecting to an Amplifier with
Dolby Pro Logic Decoder (Example 6)”
on page E11.
x
x
xx
x
Yes
xx
x
xx
xx
x
x
x
xx
Do you use an RF Modulator (not supplied)?No
x
x
No
x
x Yes x See “Connecting to a Conventional TV
(Example 1)” and “Using RF Modulator”
on pages E6 & E7.
xxxx
x
xx
x
x Yes x
x Yes x
x Yes x
x Yes x
x
x
x Yes x
xx
x
AUDIO
Connection
VIDEO Connection
TV and Amplifier Connection
x
x
xx
x
xxxxxxxxxx

-E6-
R-AUDIO-L VIDEO
AUDIO
VIDEO
INPUT
1
Y
RL
P
B
P
R
AUDIO OUT
VIDEO OUT
COMPONENT VIDEO OUT
OPT.
DIGITAL
OUT
VIDEO OUT
SELECT
S
COMPONENT
S-VIDEO OUT
Y
RL
PB PR
AUDIO OUT
VIDEO OUT
COMPONENT VIDEO OUT
VIDEO OUT
SELECT
S
COMPONENT
S-VIDEO OUT
COMPONENT VIDEO INPUT
YP
B
P
R
S-VIDEO IN 1
Y
R
VIDEO OUT
SELECT
S
COMPONENT
S-VIDEO OUT
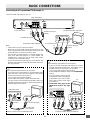
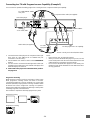
BASIC CONNECTIONS
Connecting to a Conventional TV (Example 1)
Connect the DVD video player to your TV.
Notes:
• Please refer to your TV instruction manual.
• When you connect the DVD video player to your TV, be sure
to turn off the power and disconnect both units from the wall
outlet until all the connections have been made.
• If your TV has one audio input jack, connect the AUDIO OUT
jacks of the DVD video player to a Y-cable adapter (not
supplied), then connect it to the TV Audio input. Please
consult your local audio/video dealer.
• Do not connect the DVD video player to a VCR directly. The
playback picture will be distorted because DVD video discs
are copy protected.
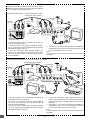
Using the S-VIDEO jack
Note:
Please follow the steps before turn on the power.
1. If your TV has the S-video input jack, connect the DVD video
player with the S-video cable (not supplied). (The VIDEO
OUT jack connection is not necessary.)
You can enjoy clearer picture playback.
2. Set the VIDEO OUT SELECT switch to the S position.
3. You also need to connect the left and right audio cables (not
supplied) to the AUDIO OUT jacks of DVD video player and
the Audio input jacks of the TV.
Using the COMPONENT VIDEO OUT jacks
Note:
Please follow the steps before turn on the power.
1. If your TV has the component video input jacks, connect
the DVD video player to these jacks. (The VIDEO OUT or
S-VIDEO OUT jack connection is not necessary.)
You can enjoy high quality picture playback.
2. Set the VIDEO OUT SELECT switch to the COMPONENT
position.
3. You also need to connect the left
and right audio cables (not supplied)
to the AUDIO OUT jacks of DVD
video player and the Audio input
jacks of the TV.
4. Set the DVD video player to the
INTERLACE position. See page
E13.
*Please consult your local audio/video dealer.
(White) L
TV with Audio/Video input jacks
To video input jack
(Yellow)
To VIDEO OUT jack
(Yellow)
To AUDIO OUT jacks
DVD video player
To AC 120V, 60Hz
Audio/Video cable (supplied)
(Red) R
To audio input jacks
(White) L
(Red) R
*Component video cable (not supplied)
Green
Red
Blue
Green
Red
Blue
TV
To S-video input jack
*S-video cable
(not supplied)
To S-VIDEO
OUT jack
TV
DVD video player

-E7-
34
CHANNEL
TO TV ANT. IN
R-AUDIO-LVIDEO
A/V INPUT JACKS
VHF/UHF
ANTENNA
IN
Y
RL
P
B
P
R
AUDIO OUT
VIDEO OUT
COMPONENT VIDEO OUT
VIDEO OUT
SELECT
S
COMPONENT
S-VIDEO OUT
1
2
3
4
34
CHANNEL
TO TV ANT. IN
R-AUDIO-LVIDEO
A/V INPUT JACKS
VHF/UHF
ANTENNA
IN
34
CHANNEL
VHF/UHF
FROM ANT.
IN
OUT
TO TV
Y
RL
P
B
P
R
AUDIO OUT
VIDEO OUT
COMPONENT VIDEO OUT
SUBWOOFER
OUT
VIDEO OUT
SELECT
S
COMPONENT
S-VIDEO OUT
3
4
1
2
5
5
Using RF Modulator
If your TV does not have a Video input jack and has an antenna
terminal only, please purchase the *RF Modulator (not supplied).
(*Please consult your audio/video dealer.)
Example: DVD video player, TV and RF Modulator connections
1. Connect the antenna cable (not supplied) to the ANT. IN
terminal of the RF Modulator.
2. Connect the 75-ohm coaxial cable (not supplied) between
the TO TV terminal of the RF Modulator and the VHF/UHF
ANTENNA IN terminal of the TV.
3. Connect the Audio/Video cable (supplied) between the
AUDIO OUT and VIDEO OUT jacks of the DVD video
player and the AUDIO INPUT and VIDEO INPUT jacks of
the RF Modulator.
Example: DVD video player, VCR, TV and RF Modulator connections
1. Connect the antenna cable (not supplied) to the VHF/UHF
FROM ANT IN terminal of the VCR.
2. Connect the 75-ohm coaxial cable (not supplied) between
the TO TV OUT terminal of the VCR and the ANT. IN
terminal of the RF Modulator.
3. Connect the 75-ohm coaxial cable (not supplied) between
the TO TV terminal of the RF Modulator and the VHF/UHF
ANTENNA IN terminal of the TV.
4. Connect the Audio/Video cable (supplied) between the
AUDIO OUT and VIDEO OUT jacks of the DVD video player
and the AUDIO INPUT and VIDEO INPUT jacks of the RF
Modulator.
5. Turn on the TV, and set the channel number (CHANNEL3 or
CHANNEL4) on all TV, VCR and RF Modulator, whichever
is not used for regular broadcasts in your area.
Note:
For more details, please refer to the instruction manual of the RF
Modulator.
4. Turn on the TV, and set the channel number (CHANNEL3 or
CHANNEL4) on both TV and RF Modulator, whichever is not
used for regular broadcasts in your area.
Note:
For more details, please refer to the instruction manual of the RF
Modulator.
TV
(White) L
To AUDIO
OUT jacks
(Red) R
TV
VCR
RF Modulator
Audio/Video cable (supplied)
(White) L
(Red) R
To audio input
jacks
(White) L
(Red) R
Audio/Video cable (supplied)
To audio input
jacks
(White) L
(Red) R
RF Modulator
To AC 120V,
60Hz
DVD video player
To AC 120V,
60Hz
DVD video player
To VIDEO OUT jack
(Yellow)
To VIDEO OUT jack
(Yellow)
To AUDIO
OUT jacks
To video input
jack
(Yellow)
To video input
jack
(Yellow)

-E8-
Y
RL
PB PR
AUDIO OUT
VIDEO OUT
COMPONENT VIDEO OUT
OPT.
DIGITAL
OUT
VIDEO OUT
SELECT
S
COMPONENT
S-VIDEO OUT
COMPONENT VIDEO INPUTAUDIO INPUT
YP
B
RL P
R
+
1. Connect the DVD video player to the component video input
jacks of the TV. (The VIDEO OUT or S-VIDEO OUT jack
connection is not necessary.)
2. Set the VIDEO OUT SELECT switch to the COMPONENT
position.
3. You also need to connect the left and right audio cables (not
supplied) to the AUDIO OUT jacks of DVD video player and
the Audio input jacks of the TV.
4. Set the DVD video player to the PROGRESSIVE position.
See page E13.
*Please consult your local audio/video dealer.
(White) L
To AUDIO OUT jacks
DVD video player
*Audio cable (not supplied)
(Red) R
To audio
input jacks
(White) L
(Red) R
*Component video cable (not supplied)
Green
Red
Blue
Green
Red
Blue
Progressive Scanning
While interlaced scanning produces one frame of video in two
fields, progressive scanning creates one frame in one field.
Conventional interlaced scanning constitutes one second with
30 frames (60 fields), but progressive scanning constitutes it with
60 frames from scratch. Progressive scanning can reproduce
sharper picture with high resolution for still image or other picture
containing long texts or horizontal lines.
This model has compliance with 525p (progressive) system.
TV with progressive-scan capability
Connecting to a TV with Progressive-scan Capability (Example 2)
Notes:
• Please refer to your TV instruction manual.
• When you connect the DVD video player to your TV, be sure
to turn off the power and disconnect both units from the wall
outlet until all the connections have been made.
• Do not connect the DVD video player to a VCR directly. The
playback picture will be distorted because DVD video discs
are copy protected.
To AC 120V, 60Hz
Your TV must be capable of handling progressive scanning and have component video input capability.
Interlaced scanning
Progressive scanning
To COMPONENT VIDEO
OUT jacks
To COMPONENT VIDEO
INPUT jacks

-E9-
AUDIO
INPUT
R
L
R-AUDIO-L VIDEO
AUDIO
VIDEO
INPUT
1
Y
RL
P
B
P
R
AUDIO OUT
VIDEO OUT
COMPONENT VIDEO OUT
OPT.
DIGITAL
OUT
VIDEO OUT
SELECT
S
COMPONENT
S-VIDEO OUT
S-VIDEO IN 1
Y
R
VIDEO OUT
SELECT
S
COMPONENT
S-VIDEO OUT
Y
RL
PB PR
AUDIO OUT
VIDEO OUT
COMPONENT VIDEO OUT
VIDEO OUT
SELECT
S
COMPONENT
S-VIDEO OUT
COMPONENT VIDEO INPUT
YP
B
P
R
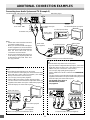
ADDITIONAL CONNECTION EXAMPLES
Connecting to an Audio System and TV (Example 3)
Connect the DVD video player to an Audio System and a TV.
Notes:
• Please refer to the instruction manual of
your Audio System and TV.
• When you connect the DVD video player
to other equipment, be sure to turn off the
power and disconnect all of the equipment
from the wall outlet until all the
connections have been made.
• Do not connect the DVD video player to a
VCR directly. The playback picture will
be distorted because DVD video discs
are copy protected.
Using the S-VIDEO jack
Note:
Please follow the steps before turn on the power.
1. If your TV has the S-video input jack, connect the DVD video
player with the S-video cable (not supplied). (The VIDEO
OUT jack connection is not necessary.)
You can enjoy clearer picture playback.
2. Set the VIDEO OUT SELECT switch to the S position.
3. You also need to connect the left and right audio cables (not
supplied) to the AUDIO OUT jacks of DVD video player and
the Audio input jacks of the Audio System.
Using the COMPONENT VIDEO OUT jacks
Note:
Please follow the steps before turn on the power.
1. If your TV has the component video input jacks, connect the
DVD video player to these jacks. (The VIDEO OUT or S-
VIDEO OUT jack connection is not necessary.)
You can enjoy high quality picture playback.
2. Set the VIDEO OUT SELECT switch to the COMPONENT
position.
3. You also need to connect the left and right audio cables (not
supplied) to the AUDIO OUT jacks of DVD video player and
the Audio input jacks of the Audio System.
4. Set the DVD video player to
the INTERLACE position.
See page E13.
*Please consult your local audio/video dealer.
DVD video player
*Please consult your local audio/video dealer.
To S-video input jack
*S-video cable
(not supplied)
To S-VIDEO
OUT jack
TV
DVD video player
Audio System
*Video cable
(not supplied)
*Audio cable
(not supplied)
(Red) R
To video input (Yellow)
(White) L
(White) L
TV with Audio/Video input jacks
To VIDEO OUT jack
(Yellow)
To AUDIO OUT jacks
To AC 120V, 60Hz
(Red) R
*Component video cable (not supplied)
Green
Red
Blue
Green
Red
Blue
TV
To audio input jacks

-E10-
Y
RL
P
B
P
R
AUDIO OUT
VIDEO OUT
COMPONENT VIDEO OUT
OPT.
DIGITAL
OUT
VIDEO OUT
SELECT
S
COMPONENT
S-VIDEO OUT
Y
RL
P
B
P
R
AUDIO OUT
VIDEO OUT
COMPONENT VIDEO OUT
OPT.
DIGITAL
OUT
VIDEO OUT
SELECT
S
COMPONENT
S-VIDEO OUT
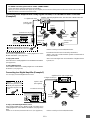
Notes:
• For VIDEO connection, please refer to “BASIC CONNECTIONS”.
• Please refer to the instruction manual of your amplifier.
• When you connect the DVD video player to your amplifier, be sure to turn off the power and disconnect both units from the wall
outlet until all the connections have been made.
Before connecting, remove the
protective cap from the jack. Replace
the cover when the jack is not in use.
Connecting to an Amplifier with Dolby Digital Decoder, DTS Decoder or MPEG2 Decoder
(Example 4)
Manufactured under license from Dolby Laboratories.
“Dolby”, “Pro Logic” and the double-D symbol are trademarks of
Dolby Laboratories.
“DTS” and “DTS Digital Out” are trademarks of Digital Theater
Systems, Inc.
To DIGITAL OUT jack
*Optical cable
(not supplied)
To digital audio input
Amplifier with Dolby Digital Decoder, DTS Decoder or MPEG2 Decoder
*Please consult your local audio/video dealer.
Front right
speaker
Center
speaker
Subwoofer
Front left
speaker
Surround left
speaker
Surround right
speaker
To enjoy Dolby Digital sound
Select “Dolby Digital BitStream” in “Setting Digital Out” on the
INITIAL SETTINGS. (See page E29.)
To enjoy DTS sound
Select “DTS On” in “Setting Digital Out” on the INITIAL SETTINGS.
(See page E29.)
To enjoy MPEG2 sound
Select “MPEG BitStream” in “Setting Digital Out” on the INITIAL
SETTINGS. (See page E29.)
Before connecting,
remove the protective cap
from the jack. Replace the
cover when the jack is not
in use.
Connecting to a Digital Amplifier (Example 5)
*Please consult your local audio/video dealer.
*Optical cable
(not supplied)
To DIGITAL OUT jack
To digital audio input
Amplifier with an optical digital input
Front right
speaker
Front left
speaker
To enjoy 2 Channel Digital Stereo sound
Select “Dolby Digital LPCM”, “MPEG LPCM”, and “DTS Off” in
“Setting Digital Out” on the INITIAL SETTINGS. (See page E29.)
Note:
If “DTS On” is selected, loud noise will occur. (See page E29.)
You can enjoy 2 Channel Digital Stereo Sound.

-E11-
Y
RL
P
B
P
R
AUDIO OUT
VIDEO OUT
COMPONENT VIDEO OUT
OPT.
DIGITAL
OUT
VIDEO OUT
SELECT
S
COMPONENT
S-VIDEO OUT
Power Supply
Connect the power cord to a 120VAC 60Hz outlet. This unit is
equipped with a polarized plug. If you have difficulty inserting the
plug, turn it over and reinsert it. If the unit will not be used for a
long time, disconnect the AC plug from the AC outlet.
Notes:
• Before plugging the power cord into an AC outlet, make sure
that all the connections have been made.
• The unit is not disconnected from the AC power unless the
power cord is unplugged from the AC outlet.
• Do not damage the power cord.
• When not in use, disconnect the power cord from the outlet.
Grasp the plug, not the cord, when disconnecting the unit.
• If water should enter the unit, electrical shock or a malfunction
may result. Use in an area where there is low humidity and
little dust.
• Do not disassemble or alter the unit in any way.
• Do not use the unit in areas where extremes in temperature
occur (below 40°F (5°C) or exceeding 95°F (35°C)), or where
it may be exposed to direct sunlight.
• Because of the DVD video player extremely low noise and
wide dynamic range, there is a tendency to set the volume on
the amplifier higher than necessary. Doing so may produce
an excessively high output from the amplifier which can
cause damage to your speakers. Please be careful in this
regard.
• Sudden changes in the surrounding temperature can cause
dew to form on the optical pickup lens inside the unit. Under
this condition the unit may be unable to operate properly. If
this should occur, remove the disc and allow the unit to adjust
to the surrounding temperature.
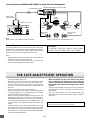
FOR SAFE AND EFFICIENT OPERATION
• When carrying the unit, be sure to remove a disc which
may be inside and turn the power off. Then unplug the
power cord from the AC outlet after 10 seconds. Carrying
the unit with a disc inside may damage the disc and/or
the unit.
• The unit is automatically set to the Screen Saver mode after
approximately 15 minutes have elapsed under the stop or
pause mode.
• The unit is automatically set to the standby mode after
approximately 30 minutes have elapsed under the complete
stop mode.
Amplifier with Dolby Pro Logic Decoder
Front right
speaker
Center
speaker
Subwoofer
Surround left
speaker
Front left
speaker
*Please consult your local audio/video dealer.
Surround right
speaker
*Audio cable
(not supplied)
To AUDIO OUT jacks
To AUDIO INPUT jacks
Connecting to an Amplifier with Dolby Pro Logic Decoder (Example 6)
Note:
Please refer to your amplifier instruction manual.
Press [q] (or [OPEN/CLOSE] on the remote control) when
closing the disc tray. Do not push the disc tray.
CAUTION:
TO PREVENT ELECTRIC SHOCK, MATCH WIDE
BLADE OF PLUG TO WIDE SLOT, FULLY INSERT.

-E12-
TM
1
ALL
1
3
2
3
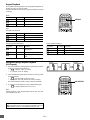
LB16:9
PLAYABLE DISCS
Disc type and logo mark
DVD-Video
The following types of discs can be played on this unit.
Audio CD
CAUTION:
• Only the above types of discs can be played on this unit.
DVD-ROM, CD-ROM, SVCD, CVD, VCD, etc. cannot be
played.
• This unit can play back the DVD-R that has recorded movie
data as well. However, some DVD-Rs cannot be played back
depending on the recording conditions.
• The DVD-R that has no movie data cannot be played back.
• This unit is to be used exclusively with the NTSC color
system. PAL and SECAM system discs cannot be used with
this unit.
• For MP3/WMA CD, please see page E23.
• For Picture/JPEG CD, please see pages E25 and E26.
Region Number
Region number (Regional restriction code) is built-in to the unit
and DVD video discs.
Region number “1” or “ALL” of DVD video discs can be used on
this unit.
DVD Video Disc
DVD video discs are divided into titles, and the titles are sub-
divided into chapters.
Title 1
Chapter 1 Chapter 2
Title 2
Chapter 1 Chapter 2 Chapter 3
There are the marks on some DVD video disc package.
Examples:
Multiple languages
Multi-language subtitles
Multi-angle
Multi-aspect
Region Number
Closed caption
This product incorporates copyright protection technology that
is protected by method claims of certain U.S. patents and other
intellectual property rights owned by Macrovision Corporation
and other rights owners. Use of this copyright protection
technology must be authorized by Macrovision Corporation,
and is intended for home and other limited viewing uses only
unless otherwise authorized by Macrovision Corporation.
Reverse engineering or disassembly is prohibited.
Handling, Storing and Cleaning Discs
• Fingerprints and dust should be carefully wiped from the
signal surface of the disc (glossy side) with a soft cloth.
Wipe in a straight motion from the center to the outside of
the disc.
• Never use chemicals such as record cleaning sprays,
antistatic sprays or fluids, benzene or thinner to clean the
discs. These chemicals will permanently damage the plastic
surface of the disc.
• To remove a disc from its storage case, press down on the
center of the case and lift the disc out, holding it carefully by
the edges.
• Discs should be returned to their cases after use to protect
them from dust and scratches.
• To prevent warping the disc, do not expose it to direct
sunlight, high humidity or high temperatures for extended
periods of time.
• Do not apply paper or write anything on either side of the
disc. Sharp writing instruments, or the inks used in some
felt-tip pens, may damage the surfaces of the disc.
Audio CD Disc
Audio CD discs are divided into tracks.
Track 1 Track 2 Track 3 Track 4 Track 5

-E13-
q
n a
ef
z/ON
51
2, 4
3
z /ON
NEXTPREV
FWD SLOWREV SLOW
PAUSE/STEP
PLAY
REV FWD
CLEAR
123C
4
b
5
a
ENT
SETUP MENU
AUDIO RETURN
PICTURE
MODE
ANGLE
REPLAY
ZOOM ANGLE
LAST MEMO
SURROUND
ON SCREEN
OPEN/CLOSE
REPEAT A-B REPEAT
SUBTITLE
CHANGE
SUBTITLE
ON/OFF
1 2, 4
5
TOP MENU
PROGRAM
/RANDOM
VIDEO
4:3 LB
(Letterbox):
4:3 PS
(Panscan):
16:9 :
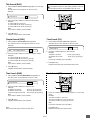
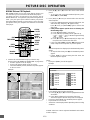
BASIC OPERATION
Preparations
• Turn on the power (TV, Audio System, AV amplifier, etc.).
• Select the video input source from your television.
(Please refer to your TV instruction manual.)
Important Note:
• This instruction manual explains the basic instruction of this
unit using the remote control.
• Some DVD video discs have different functions that may
not be explained in this instruction manual. You may need
extra instructions. In this case, please follow the instructions
displayed on the TV screen or jacket or case of the disc.
•“ ” may appear on the TV screen during operation. This
icon means that the function is not available on the disc
now.
• For improvement, FL displays and on-screen displays
subject to change without notice.
• Select the playback picture size according to the aspect ratio
of the TV. (For more details, see “Setting Display” on page
E28.)
TV
• Select the audio input source (Audio System, AV amplifier,
etc.).
• When the DVD video player is connected to the
COMPONENT VIDEO OUT jacks of the TV (see pages E6,
E8, and E9), you must select the INTERLACE or
PROGRESSIVE position.
Note: Initial setting is “INTERLACE”.
1. Turn on the power (TV and DVD video player).
2. In “No Disc” mode, press and hold down [ a ] on the DVD
video player until “
” (INTERLACE) or “ ”
(PROGRESSIVE) appears on the TV screen.
Conventional TV: Select “
”.
TV with Progressive-scan Capability: Select “
”.
Note:
In “
” mode, the closed caption may not appear on
the TV screen.
Basic Playback
Notes:
• Do not touch the disc tray while it is moving.
• Never place anything except a disc on the disc tray. Foreign
objects can damage the unit.
• Do not apply excessive force to the disc tray.
• Discs must be placed on the disc tray one at a time.
When operation buttons are pressed, that operation is displayed
on the TV screen. The display turns off after several seconds.
1. Press [z/ON].
•“SANYO” logo appears on the TV screen.
•“------” blinks, and then “NO dISC” appears on the FL
display.
2. Press [q] (or [OPEN/CLOSE] on the remote control).
•“OPEN” appears on the FL display and the disc tray
opens.
Note:
To open or close the disc tray, be sure to press [q] (or
[OPEN/CLOSE] on the remote control). Do not press the disc
tray with your hand.
3. Place the disc with the label facing up on the disc tray.
or
For 5-inch (12cm) disc For 3-inch (8cm) disc

-E14-
z /ON
NEXTPREV
FWD SLOWREV SLOW
PAUSE/STEP
PLAY
REV FWD
CLEAR
4
b
5
a
ENT
SETUP MENU
AUDIO RETURN
PICTURE
MODE
ANGLE
REPLAY
ZOOM ANGLE
LAST MEMO
SURROUND
ON SCREEN
OPEN/CLOSE
REPEAT A-B REPEAT
SUBTITLE
CHANGE
SUBTITLE
ON/OFF
TOP MENU
PROGRAM
/RANDOM
z/ON
LAST
MEMO
n (Stop)
4
ENT
5
PLAY
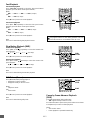
OPEN/CLOSE
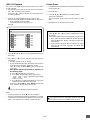
DVD
MENU
Play Movie
Languages & Audio Set-Up
Subtitles
Theatrical Trailers
Scene Selections
4
b
5
a
ENT
Last Memo Play?
Yes
No
Clear
4. Press [q] (or [OPEN/CLOSE] on the remote control) again.
• The disc tray closes.
•“Reading” appears on the TV screen.
Note:
Some discs may start playback automatically.
5. Press [a PLAY] (or [a] on the unit) to start playback.
•“a” appears.
Example:
Notes:
• In some discs, even if 4:3 PS is selected, the black bands
may remain on the screen.
• If the disc is loaded with the label side downward (and it is a
single sided disc), or if a badly scratched disc is loaded, “No
Play” appears on the TV screen. If this occurs, load the disc
correctly or replace the disc.
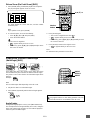
Stopping Playback
[DVD]
• Press [n] once during playback. “Resume n” appears briefly
on the TV screen.
When you press [a PLAY] (or [a] on the unit), playback
starts automatically from the point where you stopped. “a”
appears briefly on the TV screen.
Note:
Some discs may not resume playback.
• Press [n] twice during playback. “n” appears briefly on the
TV screen and playback stops completely.
When you press [a PLAY] (or [a]), playback starts from the
beginning of the disc.
[CD]
• Press [n] once during playback. The unit stops completely.
To turn off the power, press [z/ON]. “OFF” appears briefly on the
FL display.
Continuing Playback from Where You Stopped
Watching (LAST MEMO PLAY), for DVD only
1. Press [LAST MEMO] to stop playback.
“Last Memo n” appears briefly on the TV screen.
“LM” and “StOP” appear on the FL display.
2. Press [OPEN/CLOSE] (or [q] on the unit) to open the disc
tray to change the disc, or press [z/ON] to turn off the power.
3. Load the disc (or press [a PLAY]), or press [z/ON] again.
“Last Memo Play?” screen appears on the TV screen.
4. Press [4] to select “Yes”.
If a DVD disc menu screen appears on the TV screen...
Elapsed playing time
TV
1. Press [o], [a], [p] or [b] (or the number
buttons) to select the desired menu.
2. Press [ENT].
Playback of the selected menu starts.
Note:
For more details, please refer to the jacket or case of the disc.
To lock the disc tray
You can lock the disc tray to prevent misuse of young children.
While the disc tray is opened, press [q] on the unit until “LOC”
appears on the FL display (or “Disc Tray Locked” appears on
the TV screen). (The disc tray closes.)
• The OPEN/CLOSE (or [q]) button will not function.
To release this mode, press [q] on the unit until “U
n-LOC”
appears on the FL display (or “Disc Tray Unlocked” appears on
the TV screen).
5. Press [ENT].
Playback resumes from the point where you stopped.
If desired, press [LAST MEMO] again.
Notes:
• Point on up to 3 discs can be memorized.
• The Last Memo Play mode may not work correctly with some
discs.
(The memory is released.)

-E15-
z /ON
FWD SLOWREV SLOW
PAUSE/STEP
4
b
5
a
ENT
SETUP MENU
AUDIO RETURN
PICTURE
MODE
ANGLE
REPLAY
ZOOM ANGLE
LAST MEMO
SURROUND
ON SCREEN
OPEN/CLOSE
REPEAT A-B REPEAT
SUBTITLE
CHANGE
SUBTITLE
ON/OFF
TOP MENU
PROGRAM
/RANDOM
2
3
1
z /ON
FWD SLOWREV SLOW
PAUSE/STEP
4
b
5
a
ENT
SETUP MENU
AUDIO RETURN
PICTURE
MODE
ANGLE
REPLAY
ZOOM ANGLE
LAST MEMO
SURROUND
ON SCREEN
OPEN/CLOSE
REPEAT A-B REPEAT
SUBTITLE
CHANGE
SUBTITLE
ON/OFF
TOP MENU
PROGRAM
/RANDOM
2
3
1
q
n a
ef
z/ON
ef
NEXTPREV
FWD SLOWREV SLOW
PAUSE/STEP
PLAY
REV FWD
CLEAR
123C
5
AUDIO RETURN
TOP MENU
PREV NEXT
Important Note:
“ ” may appear on the TV screen during operation. This icon
means that the function is not available on the disc now.
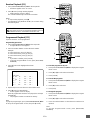
Selecting a DVD Menu
Notes:
• The operation may differ depending on the disc used.
• Selecting a menu may not be possible on some discs.
1. Press [MENU].
The main menu screen will appear.
Note:
Press [MENU] again to resume playback.
2. Press [4], [5], [b] or [a] (or the number buttons) to select the
desired menu.
3. Press [ENT]
The selected menu playback starts.
Selecting a Top Menu [DVD]
Notes:
• The operation may differ depending on the disc used.
• Selecting a top menu may not be possible on some discs.
1. Press [TOP MENU].
The top menu will appear (if the disc contains a top menu).
2. Press [4], [5], [b] or [a] (or the number buttons) to select the
desired menu.
3. Press [ENT].
The selected menu playback starts.
Chapter (Track) Skip
Skipping forward
Press [NEXT e] (or e) during playback to skip to the next
chapter (or track).
“e” appears briefly on the TV screen.
A chapter (or track) is skipped each time the button is pressed.
Skipping backward
Press [PREV f] (or f) during playback to skip back to the
beginning of the chapter (or track) currently play.
“f” appears briefly on the TV screen.
Press the button again immediately to skip back to the beginning
of the previous chapter (or track).
Note:
You can skip only through the chapters, not over the title on the
DVD disc.

-E16-
NEXTPREV
FWD SLOWREV SLOW
PAUSE/STEP
PLAY
REV FWD
CLEAR
SEARCH
MODE
123C
456
789
0
1
CLEAR
2
3
NEXTPREV
FWD SLOWREV SLOW
PAUSE/STEP
PLAY
REV FWD
CLEAR
SEARCH
MODE
123C
456
789
0
1
2
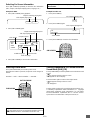
Title Search
-- /28
Title 01 Chapter Search -- /35
Time Search
--:--:--
Time Search
--:--:--
Important Note:
“ ” may appear on the TV screen during operation. This icon
means that the function is not available on the disc now.
Title Search [DVD]
1. Press [SEARCH MODE] once during playback or in the stop
mode.
The title search screen appears on the TV screen.
Example:
Time Search [CD]
1. Press [SEARCH MODE] once during playback.
The time search screen appears on the TV screen.
2. Press the number button(s) to enter the title number.
Example:
To select Title No.3, press [3].
To select Title No.10, press [1], then [0].
To select Title No.24, press [2], then [4].
Note:
If you make a mistake, press [CLEAR].
3. Press [a PLAY].
Playback starts from the selected title.
Chapter Search [DVD]
1. Press [SEARCH MODE] twice during playback.
The chapter search screen appears on the TV screen.
Example:
2. Press the number button(s) to enter the chapter number.
Example:
To select Chapter No.3, press [3].
To select Chapter No.10, press [1], then [0].
To select Chapter No.24, press [2], then [4].
Note:
If you make a mistake, press [CLEAR].
3. Press [a PLAY].
Playback starts from the selected chapter .
Time Search [DVD]
1. Press [SEARCH MODE] three times during playback.
The time search screen appears on the TV screen.
2. Press the number button(s) to enter the time.
Example:
20 minutes 5 seconds Press [2], [0], [0] and [5].
42 minutes 39 seconds Press [4], [2], [3] and [9].
1 hour 4 minutes 35 seconds Press [1], [0], [4], [3] and [5].
Note:
If you make a mistake, press [CLEAR].
3. Press [a PLAY].
Playback starts from the searched time.
Note:
The Search mode may not work on some discs.
2. Press the number button(s) to enter the time.
Example:
2 minutes 5 seconds Press [2], [0] and [5].
42 minutes 39 seconds Press [4], [2], [3] and [9].
Note:
If you make a mistake, press [CLEAR].
3. Press [a PLAY].
Playback starts from the searched time in the track.
Track Search [CD]
1. Press the number buttons during playback or in the stop
mode.
Example:
To select Track No. 3, press [3].
To select Track No. 10, press [1], then [0].
To select Track No. 24, press [2], then [4].
Note:
If you make a mistake, press [CLEAR].
2. Press [a PLAY].
Playback starts from the selected track.

-E17-
NEXTPREV
FWD SLOWREV SLOW
PAUSE/STEP
PLAY
REV FWD
CLEAR
SEARCH
MODE
123C
456
789
0
4
b
5
a
ENT
SETUP MENU
AUDIO RETURN
CHANGE
SUBTITLE
ON/OFF
TOP MENU
REV
PLAY
FWD
NEXTPREV
FWD SLOWREV SLOW
PAUSE/STEP
PLAY
REV FWD
CLEAR
123C
5
PLAY
PAUSE
/STEP
NEXTPREV
FWD SLOWREV SLOW
PAUSE/STEP
PLAY
REV FWD
CLEAR
SEARCH
MODE
123C
456
789
0
4
b
5
a
ENT
SETUP MENU
AUDIO RETURN
CHANGE
SUBTITLE
ON/OFF
TOP MENU
REV
SLOW
PLAY
FWD
SLOW
Fast Playback
Fast forward playback
Press [FWD c] repeatedly to select the fast speed forward
playback (up to 200 times normal speed in DVD).
[DVD]
c 1 v c 2 v c 3 v c 4 (4 steps)
[CD]
c 1 v c 2 (2 steps)
Press [a PLAY] to return to normal playback.
Fast reverse playback
Press [REV d] repeatedly to select the fast speed reverse
playback (up to 200 times normal speed in DVD).
[DVD]
d 1 v d 2 v d 3 v d 4 (4 steps)
[CD]
d 1 v d 2 (2 steps)
Press [a PLAY] to return to normal playback.
Note:
The sound is muted during fast playback in DVD.
Slow Motion Playback [DVD]
Forward slow playback
Press [FWD SLOW ] repeatedly to select the forward slow
speed playback.
1 v 2 v 3 v 4 (4 steps)
Press [a PLAY] to return to normal playback.
Reverse slow playback
Press [REV SLOW ] repeatedly to select the reverse slow
speed playback.
1 v 2 v 3 v 4 (4 steps)
Press [a PLAY] to return to normal playback.
Note:
The sound is muted during slow motion playback.
Still Picture (Pause)
Press [k PAUSE/STEP] during playback.
•“k” appears on the FL display.
•“k” appears briefly on the TV screen.
[DVD]
Still picture mode
[CD]
Pause mode
Press [a PLAY] to return to normal playback.
Note:
The sound is muted during still picture.
Frame by Frame Advance Playback
[DVD]
Press [k PAUSE/STEP] during still picture.
•“k a” appears briefly on the TV screen.
Each time the button is pressed, the picture advances one frame.
Press [a PLAY] to return to normal playback.
Notes:
• The sound is muted.
• Frame playback is operated forward only.
Important Note:
“ ” may appear on the TV screen during operation. This icon
means that the function is not available on the disc now.

-E18-
NEXTPREV
FWD SLOWREV SLOW
PAUSE/STEP
PLAY
REV FWD
CLEAR
SEARCH
MODE
123C
456
789
0
4
b
5
a
ENT
SETUP MENU
AUDIO RETURN
ANGLE
REPLAY
ZOOM ANGLE
SURROUND
ON SCREEN
REPEAT A-B REPEAT
SUBTITLE
CHANGE
SUBTITLE
ON/OFF
TOP MENU
PROGRAM
/RANDOM
4, a, 5, b
ZOOM
Number
button
ENT
z /ON
FWD SLOWREV SLOW
4
b
5
a
ENT
SETUP MENU
AUDIO RETURN
PICTURE
MODE
ANGLE
REPLAY
ZOOM ANGLE
LAST MEMO
SURROUND
ON SCREEN
OPEN/CLOSE
REPEAT A-B REPEAT
SUBTITLE
CHANGE
SUBTITLE
ON/OFF
TOP MENU
PROGRAM
/RANDOM
ANGLE
ANGLE
REPLAY
123
456
789
3
Viewing from a Desired Camera Angle
(Multi-Angle) [DVD]
Picture Zoom (Pin Point Zoom) [DVD]
1. Press [ZOOM] during normal/slow playback or still picture.
The pin point guide appears on the TV screen.
The guide divides the screen into nine, and the number
shows the point.
Note:
If you quit the screen, press [ZOOM].
2. To select the point, do one of the following:
• Press [o], [a], [p] or [b], and press [ENT].
• Press the number button.
• The screen is magnified.
•“
1” appears briefly on the TV screen.
• If necessary, press [o], [a], [p] or [b] repeatedly to move
the screen as desired.
3/5
Some DVD video discs may contain scenes which have been
shot simultaneously from a number of different camera angles.
The jacket or case of discs that are recorded with angles will be
marked.
Example:
Note:
The recorded angles differ depending on the disc used.
1. Play the disc that is recorded with angles.
2. Press [ANGLE] repeatedly until the desired angle appears.
Example:
Angle Replay
During Multi-angle playback screen, press [ANGLE REPLAY].
The unit skips back to last approximately 10 seconds, changes it
to the next camera angle and plays it, and continues playback.
If desired, press the button again.
3. Press [ZOOM] again.
• The screen is magnified more than “
1”.
•“
2” appears briefly on the TV screen.
• If necessary, press [o], [a], [p] or [b] repeatedly to move
the screen as desired.
4. Press [ZOOM] to return to the original screen.
•“
Off” appears briefly on the TV screen.
Note:
Pin Point Zoom may not work on some discs.
Important Note:
“ ” may appear on the TV screen during operation. This icon
means that the function is not available on the disc now.

-E19-
z /ON
FWD SLOWREV SLOW
PAUSE/STEP
4
b
5
a
ENT
SETUP MENU
AUDIO RETURN
PICTURE
MODE
ANGLE
REPLAY
ZOOM ANGLE
LAST MEMO
SURROUND
ON SCREEN
OPEN/CLOSE
REPEAT A-B REPEAT
SUBTITLE
CHANGE
SUBTITLE
ON/OFF
TOP MENU
PROGRAM
/RANDOM
A-B REPEAT
z /ON
FWD SLOWREV SLOW
PAUSE/STEP
4
b
5
a
ENT
SETUP MENU
AUDIO RETURN
PICTURE
MODE
ANGLE
REPLAY
ZOOM ANGLE
LAST MEMO
SURROUND
ON SCREEN
OPEN/CLOSE
REPEAT A-B REPEAT
SUBTITLE
CHANGE
SUBTITLE
ON/OFF
TOP MENU
PROGRAM
/RANDOM
REPEAT
Repeat Playback
Press [REPEAT] during playback (or programmed playback) of
the title (or track) you want to repeat.
Each time the button is pressed, the repeat mode will be changed
as follows.
[DVD]
TV screen FL display Operation
Chapter REP 1 Repeat of chapter being played
Title ALL REP Repeat of title being played
Off Normal playback mode
[CD]
During Normal Playback
TV screen FL display Operation
1 REP 1 Repeat of track being played
All ALL REP Repeat all tracks
Off Normal playback mode
During Programmed Playback
TV screen FL display Operation
Program 1 REP 1 Repeat the programmed track
being played
Program All ALL REP Repeat all programmed tracks
Off Original programmed playback
mode
Important Note:
“ ” may appear on the TV screen during operation. This icon
means that the function is not available on the disc now.
Point A Point B
During Random Playback
TV screen FL display Operation
1 REP 1 Repeat of track being played
All ALL REP Repeat all tracks at random
Off Original random playback mode
Designated Range Repeat Playback
(A-B Repeat)
1. Press [A-B REPEAT] during playback at the beginning of the
section you want to repeat (Point A).
•“ A-” appears on the TV screen.
•“A-” appears on the FL display.
2. Press [A-B REPEAT] again at the end of the section you want
to repeat (Point B).
•“ B” appears briefly on the TV screen.
•“B” appears, and “A-B” remains lit on the FL display.
The section between points A and B is played repeatedly.
3. To return to normal playback, press [A-B REPEAT] again.
•“ Off” appears briefly on the TV screen.
Note:
Repeat playback or A-B repeat playback mode may not work
correctly with some discs.
Page is loading ...
Page is loading ...
Page is loading ...
Page is loading ...
Page is loading ...
Page is loading ...
Page is loading ...
Page is loading ...
Page is loading ...
Page is loading ...
Page is loading ...
Page is loading ...
Page is loading ...
Page is loading ...
Page is loading ...
Page is loading ...
-
 1
1
-
 2
2
-
 3
3
-
 4
4
-
 5
5
-
 6
6
-
 7
7
-
 8
8
-
 9
9
-
 10
10
-
 11
11
-
 12
12
-
 13
13
-
 14
14
-
 15
15
-
 16
16
-
 17
17
-
 18
18
-
 19
19
-
 20
20
-
 21
21
-
 22
22
-
 23
23
-
 24
24
-
 25
25
-
 26
26
-
 27
27
-
 28
28
-
 29
29
-
 30
30
-
 31
31
-
 32
32
-
 33
33
-
 34
34
-
 35
35
-
 36
36


Ask a question and I''ll find the answer in the document
Finding information in a document is now easier with AI
Related papers
Other documents
-
Hitachi DV-P745U User manual
-
Palsonic DVD2021 Owner's manual
-
-
RCA rc6001p User manual
-
Sylvania DVL515SL Owner's manual
-
Mitsubishi DD6050 User manual
-
-
-
Curtis Dvd8007b User manual
-
Toshiba SD-V296KU User guide