Page is loading ...

:: 1
E2
Owner's Manual :: 2-12
GB
Mode d'emploi :: 13-23
F
Manual del usario :: 24-34
E
Gebruikers gids :: 35-45
NL
583 1028A
© TUNTURI 2001

2 :: :: 3
WELCOME TO THE WORLD OF
TUNTURI EXERCISING!
Your choice shows that you really want to invest in your well-being and
condition; it also shows you really value high quality and style. In Tunturi
Fitness Equipment, you’ve chosen a high-quality, safe and motivational
training partner. Whatever your training goal, we are certain this is the
equipment to get you there.
ASSEMBLY ::
Start by unpacking the equipment and check that you have the following
parts:
1. Frame
2. Rear support
3. Plastic covers for front support (2)
4. Handlebar / interface
5. Ear sensor
6. Assembly hardware kit (contents are marked with an * in the spare
part list)
In case of problems contact your Tunturi dealer.
The packaging includes a silicate bag for absorbing moisture during
storage and transportation. Please dispose of the bag once you have
unpacked the equipment.
The directions left, right, front and back are defi ned as seen from the
exercising position. The fi gures referred to in the text are in the back
fold.
Assemble your fi tness equipment as follows:
IMPORTANT SAFETY INSTRUCTIONS
This manual is an essential part of your equipment: read it
through carefully before assembling, using or servicing your
equipment. Please keep the manual somewhere safe; it will
provide you now and in the future with the information you
need to use and maintain your equipment. Always follow these
instructions with care.
:: Before you start any training, consult a physician to check your
state of health.
:: If you experience nausea, dizziness or other abnormal symptoms
while exercising, stop your workout at once and consult a
physician.
:: The device is not to be used outdoors. E2 tolerates an
environment measuring + 10º C to + 35ºC. Air humidity must
never exceed 90 %.
:: Place the equipment on a fi rm, level and protected surface.
:: The device can only be used at home.
:: Make sure the equipment is unplugged before carrying out any
assembly or maintenance procedures.
:: Before you start using the equipment, make sure it functions
correctly in every way. Do not use faulty equipment.
:: Do not attempt any servicing or adjustments other than those
described in this manual. All other servicing else must be left to
someone familiar with the maintenance of electro-mechanical
devices and authorised under the laws of the country in question
to carry out maintenance and repair work. Always follow these
maintenance instructions.
:: The electromagnetic brake forms a magnetic fi eld that may
damage the mechanism of a watch, or the magnetic identifi cation
strip on a credit or cash card, should they come into immediate
contact with the magnetic fi eld.
:: Press the keys with the tip of the fi nger; your nails may damage
the key membrane.
:: The device must not be used by persons weighing over 135 kg.

4 :: :: 5
ADJUSTMENTS ::
CORRECT EXERCISING POSITION
The seat height should be set so that the heal of the foot reaches the pedal
with the leg straight and the pedal at its lowest point. To raise or lower
the seat: First turn the locking knob one turn counter-clockwise, then
pull the locking knob outwards, so that the seat tube can be moved
freely up and down. Once the height is right, let go of the knob and
the seat locks into
place. Turn the locking knob clockwise to tighten. NOTE! Always make
sure that the locking knob is properly fastened before starting to exercise!
The scale on the seat tube helps you remember the seat height that suits
you best. The seat can be inclined forward or backward by turning the
green adjustment ring below the saddle. The seat inclines forward when
the ring is turned clockwise, and back when the ring is turned counter-
clockwise. Do not try to adjust seat inclination when you’re sitting on the
seat - the ring won’t turn.
HANDLEBAR SET-UP
Loosen the grey knob in front of the handlebar and adjust the handlebar
position until your training position feels comfortable. Tighten the grey
knob carefully.
PEDALS
Select strap tightness, set the appropriate strap hole on the retainer from
below and pull forcibly upward. Especially when the equipment is new,
the strap fastening may seem relatively tight.
PEDALLING RESISTANCE
To increase or decrease resistance, turn the adjustment knob at the top of
the handlebar support tube clockwise (+ direction) to increase resistance
and counterclockwise (- direction) to decrease resistance. The scale above
the knob (0-8) helps you fi nd and reset a suitable resistance.
SUPPORTS (FIGURES 1 AND 2)
:: Place the rear support under the frame and fasten it with two hex
screws and washers.
:: Tilt the cycle back so that it rests on the rear support and seat.
Push the plastic covers into place at the ends of the front support.
Turn the cycle back to upright position.
HANDLEBAR (FIGURES 3 AND 4)
:: Expose the wire coming from the frame tube by unwrapping the
tape that covers it, and then connect it to the counterpart in the
handlebar support tube. Ensure that the joint is securely locked by
gently pulling the wire.
:: Thread the wire carefully inside the frame tube and push the
handlebar support tube into place inside the frame tube, so that
the fastening screws are on the front of the tube.
:: NOTE! Use the enclosed Allen key to tighten both fastening
screws through the holes in the tube. Tighten the fastening screws
by turning them counter-clockwise.
:: Pull out the tape protecting batteries from the side of the meter.
The meter becomes activated.
:: Remove the protecting fi lm from the display.

6 :: :: 7
PULSE MEASUREMENT ::
1. Push the ear sensor connector into the interface connector.
2. Attach the ear sensor to your earlobe.
3. Attach the sensor wire to your shirt with the clip provided. This
prevents the sensor and wire from moving, which may interfere
with measuring.
If there are problems in pulse measurement:
:: The display shows - - instead of the heart rate.
:: Check how the sensor works while not pedalling.
:: Try measuring on the inside surface of the ear or on the tip of your
fi nger.
:: Rub the earlobe with your fi ngers to quicken circulation.
:: If pulse values rise above 150 beats/min., earlobe measurement
may be affected by the faster circulation.
:: Sometimes a strong light source in the immediate vicinity of the
user may cause disturbances. Turn the ear sensor the other way
around on your earlobe.
Keep the ear sensor clean. Clean the ear sensor after use with a damp
cloth and dry carefully.
You can buy a heart-rate belt for telemetric measurement from your
Tunturi dealer as an accessory. Due to its reliability we recommend the
heart-rate belt.
EXERCISING WITH TUNTURI ::
No matter what your goal, you’ll get the best results by training at the
right level of effort, and the best measure is your own heart-rate. First
fi nd your maximum heart-rate, i.e. where the rate doesn’t increase with
added effort. If you don’t know your maximum heart rate, please use the
following formula as a guide:
Women: 226 - age Men: 220 - age
These are average values and the maximum varies from person to person.
The maximum heart rate diminishes on average by one point per year.
If you belong to a risk group, ask a doctor to measure your maximum
heart rate for you.
We have defi ned three different heart-rate zones to help you with targeted
training.
Beginner: 50-60 % of maximum heart rate
Also suitable for weight-watchers, convalescents and those who haven’t
exercised for a long time. Three sessions a week of at least a half-hour
each is recommended.
Trainer: 60-70 % of maximum heart rate
Perfect for improving and maintaining fi tness. You should train for a
minimum of 30 minutes at least three times a week. To improve your
condition still further, increase either frequency or effort, but not both
at the same time!
Active trainer: 70-80 % of maximum heart rate
Exercise at this level suits only the fi ttest and presupposes a long history
of exercising.

8 :: :: 9
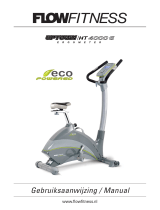
MAIN DISPLAY ::
When you turn the user interface on, the display shows the following
exercise parameters:
1. Effi ciency (W)
:: Figure indicates exercise effi ciency in Watts, which depends on
pedalling speed and resistance adjustment.
2. Energy consumption (kcal/kJ)
:: Displays cumulative energy consumption (0-999); default setting
is kcal.
3. Speed (rpm / km/h / mph)
:: Default setting is rpm (pedal revolutions / minute).
4. Pulse
:: Heart rate transmitter belt or an ear sensor is required.
:: If the user interface does not receive a heart-rate signal, - - is
displayed instead of the heart rate.
NOTE! Always disconnect the ear sensor from the user interface if using
a heart rate transmitter belt; the ear sensor will interfere with the heart
rate transmitter.
5. Time
:: Displays the exercise time elapsed between 0:00 - 59:59 minutes
and between 1:00 - 10:00 hours in 1 minute increments.
:: Time display stops if speed falls to zero.
6. Distance (km / miles)
:: Default display setting is km.
:: Displays the distance travelled during the workout in km (or
miles) to two decimal points up to 9.99 km (or miles) and with
one decimal point up to 99.9.
METER ::
RESET
Pressing Reset always resets the value on the display.
SET
Press Set key for 2 seconds to set units of measurement.
:: Default units are rpm, km and kcal.
:: To change the units press the - or + key until the desired units are
displayed.
:: To measure speed you can set either revolutions per minute,
(rpm), kilometres per hour (km/h) or miles per hour (mph).
Energy consumption measurement can be set for kilocalories
(kcal) or kilojoules (kJ).
:: In addition to rpm you can also select either kilometres (km) or
miles as distance measures. If km/h is selected as the unit to
measure speed, km will automatically be the unit for distance. The
same applies to the units mph and miles.
:: The user interface automatically returns to the main display 5
seconds after the Set key was last pressed.
:: Press the Reset key to exit the setting function without saving the
adjustment. This resets the readings on the main display.

10 :: :: 11
If the display malfunctions proceed as follows:
Loosen the 6 fastening screws in the top of the meter. Carefully lift the
top and turn it so that the wire joint is exposed. Detach the joint by
pressing the lever towards the wire and pull the wire connector out. Be
careful not to let the wire drop inside the tube. If the bottom of the
meter is damaged, remove it by unscrewing the 2 fastening screws at the
bottom. Defective parts should be sent to your Tunturi dealer. Ensure
that the meter wire is securely locked in place when replacing the top of
the interface by gently pulling on the joint.
NOTE! Despite continuous quality control, defects and malfunctions
caused by individual components may occur in the equipment. In most
cases it is unnecessary to take the whole device in for repair, as it is
usually suffi cient to replace the defective part. If the equipment does not
function properly during use, contact your Tunturi dealer immediately.
Always give the model and serial number of your equipment. The
location of the serial number sticker is shown on the inside cover. Please
also state the nature of the problem, conditions of use and purchase date.
If you require spare parts for your equipment, please contact your dealer
with the model, equipment serial no. and spare part number of the
required part. There is a spare part list at the back of this manual. Use
only components and parts mentioned in the spare part list.
TECHNICAL DATA ::
Length 96 cm Height 124 cm
Width 69 cm Weight 35 kg
All Tunturi models and user interfaces meet the requirements of the
EU EMC Directives on electromagnetic compatibility (89/336/EEC)
and electrical equipment designed for use within certain voltage limits
(73/23/EEC). This product therefore carries the CE label.
All Tunturi ergometers meet CEN precision and safety standards (Class
A, EN-957, parts 1 and 5).
TRANSPORT AND STORAGE ::
Follow these instructions when carrying and moving the cycle about,
because lifting it incorrectly may strain your back or risk other accidents:
Stand behind the device. Grip the seat with one hand and the handlebar
with the other, and set your foot on the rear support. Tilt the device so
that it rests on its transport wheels. Wheel the device to move it on these
transport wheels. Lower the device while holding on to the handlebar and
remain behind the device all the time.
If the device is not used for a period of time, the transmission belt may
become temporarily distorted. This can lead to slightly uneven pedalling.
However, after a few minutes of use the effect disappears as the belt
returns to its original form.
To prevent the cycle malfunctioning, store in a dry place with as little
temperature variation as possible and protected from dust.
MAINTENANCE ::
The equipment requires very little maintenance. Check, however, from
time-to-time that all screws and nuts are tight.
:: After exercising, clean the equipment with a soft, absorbent cloth.
Sweat may cause corrosion: we recommend therefore that you
protect all metal surfaces outside the plastic covers with tefl on or
car wax. Do not use solvents. The magnetic brake is
based on magnetic resistance; resistance level is measured
electronically and shown as a watt-reading on the display.
:: Due to the measurement system, your Tunturi ergometer need not
be recalibrated when assembled, serviced and used according to
this owner’s manual.
If the meter display shows text “LO BAT”, change the batteries. Loosen
the 6 fastening screws in the top of the meter. Carefully lift the top, cut
the ribbon over the batteries and remove the old batteries. Place the new
batteries (3 x 1.5 V AA) in the holder and replace the top of the meter.

12 :: :: 13
:: Avant de commencer un entraînement, quel qu’il soit, consultez
votre médecin.
:: En cas de nausées, vertiges ou autres symptômes anormaux,
interrompez la séance immédiatement et consultez un médecin.
:: L’appareil ne doit pas être utilisé à l’extérieur. L’appareil supporte
des températures de + 10º C à + 35ºC. L’hygrométrie ne doit
jamais excéder 90 %.
:: Installez l’appareil sur une surface plane et ferme, et sur un tapis
protecteur.
:: L’appareil peut être utilisé seulement à la maison.
:: N’utilisez jamais un appareil défectueux ou incomplet.
:: N’essayez pas d’effectuer d’autres mesures d’entretien ou réglage
que celles décrites dans ce mode d’emploi. Toutes les autres
opérations doivent être laissées aux soins des personnes
compétentes dans l’entretien des dispositifs électromagnétiques et
autorisées, au regard des lois du pays concerné (ou équivalent), à
accomplir des travaux de maintenance et réparations. Les
instructions d’entretien de ce mode d’emploi doivent être
scrupuleusement suivies.
:: Le champ magnétique généré par les aimants de l’arc de frein peut
endommager par ex. les montres ou les cartes bancaires, si elles
entrent en contact direct avec le champ en question.
:: Appuyez sur les touches avec l’intérieur des bouts de vos doigts ;
les ongles peuvent endommager le fi lm les protégeant.
:: L’appareil ne doit pas être utilisé par des personnes dont le poids
excède 135 kg.
CONSEILS ET AVERTISSEMENTS
Ce manuel est une pièce essentielle de votre appareil : lisez
attentivement ce mode d’emploi avant d’assembler, d’utiliser ou
d’effectuer l’entretien de votre appareil. Veuillez conserver ce guide,
il contient les renseignements dont vous aurez besoin, maintenant
et plus tard, pour bien utiliser et entretenir votre appareil. Suivez
toujours les instructions très rigoureusement.
TIPS ::
ABOUT YOUR HEALTH
:: To avoid muscular pain and strain, begin and end each workout
by stretching.
ABOUT THE EXERCISE ENVIRONMENT
:: Make sure the exercise environment has adequate ventilation. To
avoid catching cold, do not exercise in a draughty place.
ABOUT USING THE EQUIPMENT
:: If children are allowed to use the fi tness equipment, they should
be supervised and taught to use it properly, keeping in mind the
child’s physical and mental development and their personality.
:: Only one person may use the cycle at a time.
:: Protect the user interface from excess sunlight. Do not let the
interface come into contact with water.
:: Hold the handlebar for support when getting on or off the cycle.
:: Wear appropriate clothing and shoes while exercising.
:: Keep hands clear of any moving parts.
NOTE! The instructions must be followed carefully in the assembly,
use and maintenance of your equipment. The warranty does not cover
damage due to negligence of the assembly, adjustment and maintenance
instructions described herein. Changes or modifi cations not expressly
approved by Tunturi Oy Ltd will void the user’s authority to operate
the equipment!
Due to our continuous policy of product development, Tunturi reserves
the right to change specifi cations without notice.
We wish you many enjoyable workouts with your new Tunturi
training partner!
/