Page is loading ...

1
Z-Wave® Enabled
Thermostat
User Manual
For Model WDTC-20
Manage and automate your home’s
climate to maximize energy
conservation and comfort
Thank you for purchasing the Z-Wave® Enabled Thermostat. It was designed to give you many years
of reliable service and easy to use climate control when operated manually or by remote control in a
Z-Wave® network. Z-Wave® products by Wayne-Dalton allow you to manage and control your home by
remote control for convenience, comfort, safety and energy conservation. Your Z-Wave® Thermostat
is a great addition to your Z-Wave® network and can maximize energy conservation and comfort while
minimizing the effort required to maintain the appropriate temperature in your home whether you are
at home or away. In addition to thermostats, indoor and outdoor lighting, security systems, garage door
openers and window shades are just a few of the items you can easily control with additional Z-Wave®
certified products.
Your new Z-Wave
® Enabled Thermostat is compatible with the complete range of Wayne-Dalton
Z-Wave® certified controllers. Your Z-Wave® Enabled Thermostat will also work with Z-Wave® certified
controllers from other manufacturers and brands. Please consult the user manual and your controller
supplier for more details.
Home Control Basics
Z-Wave® certified products will allow you to easily control multiple devices in a home with the push of a
button in what is known as a “scene”. Turning on your home’s interior lights and activating the set-back
on your thermostat from your in-vehicle remote as you come home is an example of a scene. Dimming
the lights and automatically closing your curtains to watch TV with a single push of a button is another
example of a scene.
Visit www.wayne-dalton.com/access for more ideas on how to create, set-up and use scenes for safety,
security, comfort and convenience.
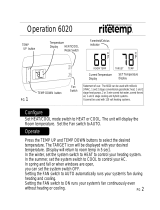
IMPORTANT NOTICE!
Read the enclosed instructions carefully before installing your new Z-Wave® Enabled Thermostat. Pay
close attention to all warnings and notes and carefully follow the installation steps in the order they are
presented to save time and minimize the risk of damaging the thermostat or the system it controls.
This manual should be retained for future reference.
AUTO
ON
FAN
HEAT
COOL
SAVE
ENERGY
NORMAL
RESET
COOL

2
Table of Contents
Table of Contents
Introduction .................................................................................... 1
Table of Contents ............................................................................2
Glossary .........................................................................................3
Z-Wave
® Enabled Thermostat Basics ..............................................4
Package Contents/Tools Required ...................................................5
Locating Thermostat ....................................................................... 6
Removing Existing Thermostat ........................................................7
Mounting Thermostat ......................................................................8
Wiring Information ..........................................................................9
Terminal Designation Reference Guide ..........................................10
Jumper Reference Guide .............................................................11
Wiring Diagrams and Jumper Configurations .......................... 12-17
Control Unit Installation .................................................................18
Installation Verification ..................................................................19
Degrees C and F ..........................................................................20
Temperature Offset ....................................................................... 20
General Operating Information ...................................................... 21
Manual Operation .........................................................................22
Programming Target Temperatures ......................................... 23-25
Z-Wave® Programming ........................................................... 26-27
Programming Example (WDUSB-10R with ThinkEssentials®) ... 28-29
Programming Example (Wireless Gateway, WDHA-12R)........... 30-31
Programming Example (Handy Remote, HA-09WD) ................. 32-33
Customer Support/Compliance .....................................................34
Table of Contents

3
Basics
Bind – Activates Z-Wave® module. Can be used to include Thermostat into a network, include
into a Scene or delete thermostat from Scene or network. Similar to program button found on
other products.
Calibration - Accuracy of thermostat (set at factory only, see Temperature Offset.)
Copy – See Replicate.
Delete – Erase transmitter or scene information from Controller. Also known as Exclude.
Device – Any item that is connected to a module (for example, lamps).
Exclude – Remove a module, transmitter or scene from the controller.
HVAC – Heating, Ventilation, and Air Conditioning system
Include – Add a module to the controller. Also known as Inclusion.
LCD – Liquid Crystal Display. The informational display on the thermostat.
Module – Any HomeSettings or Z-Wave® product that is controlled with a HomeSettings or
Z-Wave® remote controller. A module can be part of more than one scene.
Network – A collection of Z-Wave® modules controlled by primary and secondary controllers
operating on the same system. A network has its own unique identification code so that no one
else can control the system.
Node – Single Z-Wave® endpoint (controller or module) on a network .
Primary Controller – The first controller used to set up your modules and network.
NOTE: Only the Primary Controller can be used to include or delete modules from a network. It is
recommended that you mark the primary controller for each network for ease in modifying your
network.
Replicate – Copy from one controller to another.
Scene – A scene is a series of Z-Wave® modules programmed to turn to a specific level (on, off
or dim, normal mode, save mode, etc...) with the push of a button on a controller.
Schedule - A timer based event in the software that will activate a scene or turn on/off a zone at
a specified time of day, or at sunrise or sunset.
Secondary Controller – A controller containing network information about other modules within
the network, and is created FROM the primary controller. Secondary controllers cannot include or
delete modules to the network.
Set-back temperature – Energy saving target temperature setting associated to SAVE ENERGY
mode.
Target Temperature - Temperature to be maintained by thermostat.
Temperature Offset - Forced adjustment of thermostat read out to display a temperature either
higher or lower than the actual temperature.
GLOSSARY

4
Basics
The Wayne-Dalton Z-Wave® Enabled Thermostat is compatible with most standard 24 Volt heating and cooling
systems including:
• 1 and 2 stage heat pump systems
• 1 or 2 stage normal heating systems
• 1 stage cooling systems
The Wayne-Dalton Z-Wave
® Enabled Thermostat also features:
• Support for all Z-Wave
® controllers
• “Home” and “Away” programs via Z-Wave® or manual operation
• “Heat” and “Cool” modes via Z-Wave® or manual operation
• Temperature setting up or down via Z-Wave® or manual operation
• Easy Energy Savings buttons and Mode Switch
• Low Battery indicator
The Z-Wave
® Enabled Thermostat is a new arrival into the Wayne-Dalton Z-Wave® product line and contains
many new features that were not conceived when some Z-Wave® controllers were initially developed. The
Wayne-Dalton Z-Wave® Enabled Thermostat has a special compatibility mode and is designed to work with
your Z-Wave
® network regardless of the manufacturer of your controller or its date of manufacture. When
programming your thermostat to your controller, if it does not respond to the commands, reprogram it using
the alternate programming method.
The Z-Wave
® Enabled Thermostat is designed to live by your schedule rather than forcing you to live by the
rigid schedule it was programmed with. Now you can program it to the “Away” Scene on a controller such as
the Wireless Gateway and when you leave the house you can activate that Scene from your car to set-back
your thermostat, then when you arrive home, you can activate the “Home” Scene to return the thermostat to
your normal setting.
To begin using Z-Wave
® Home Control technology it is helpful to understand that each Z-Wave® module,
including the Z-Wave® Enabled Thermostat, communicate with each other using a low power radio transmitter
and receiver. Large metal objects, house wiring, walls, furniture, refrigerators, microwaves and similar items
can interfere with communication between the modules to reduce the range or even prevent communication.
Placement of the Z-Wave
® Enabled Thermostat and other Z-Wave® modules is very important to obtain a
reliable network.
A Z-Wave® network is a collection of Z-Wave® modules in a mesh type of network. Each Z-Wave® module,
regardless of manufacturer, communicates with other modules within range to route and repeat the signals
from one device to the next, this creates a highly reliable and robust transmission throughout the home.
A Z-Wave® network can have only one primary controller. The primary controller establishes network security
to ensure your network will not operate a neighbors network and vice-versa. It is a good practice to label
and protect your primary controller since it is the only Z-Wave
® controller that can add modules to or remove
modules from your network. It is easy to add secondary controllers as your network grows. Your Z-Wave
®
Enabled Thermostat can belong to only one network, and therefore only one primary controller, but it can be
added to as many secondary controllers or Scenes as you wish for added convenience.
For more tips and great ideas on how to use and expand your network please visit our web site,
www.wayne-dalton.com/access.
Z-Wave® Enabled Thermostat Basics

TOOLS REQUIRED
PACKAGE CONTENTS
Z-Wave® Enabled Thermostat
User Manual
Wall anchors and
mounting screws
(2 each)
#1 Phillips screwdriver (small)
General Information
General Information
5
Warning
Denition of Symbol
AUTO
ON
FAN
HEAT
COOL
SAVE
ENERGY
NORMAL
RESET
COOL
1
Z-Wave® Enabled
Thermostat
User Manual
for Model WDTC-20
Manage and automate your home’s
climate to maximize energy
conservation and comfort
Thank you for purchasing the Z-Wave®Enabled Thermostat. It was designed to give you many years
of reliable service and easy to use climate control when operated manually or by remote control in a
Z-Wave
®network. Z-Wave® products by Wayne-Dalton allow you to manage and control your home by
remote control for convenience, comfort, safety and energy conservation. Your Z-Wave
®Thermostat
is a great addition to your Z-Wave
®network and can maximize energy conservation and comfort while
minimizing the effort required to maintain the appropriate temperature in your home whether you are
at home or away. In addition to thermostats, indoor and outdoor lighting, security systems, garage door
openers and window shades are just a few of the items you can easily control with additional Z-Wave
®
certified products.
Your new Z-Wave
®Enabled Thermostat is compatible with the complete range of Wayne-Dalton Z-
Wave
® certified controllers. Furthermore, other Z-Wave® controllers, regardless of brand, will also
work with your Wayne-Dalton Z-Wave
® Thermostat. Please consult the user manual and your controller
supplier for more details.
Home Control Basics
Z-Wave
® certified products will allow you to easily control multiple devices in a home with the push of a
button in what is known as a “scene”. Turning on your home’s interior lights from your in-vehicle remote
as you come home is an example of a scene. Dimming the lights and automatically closing your curtains
to watch TV with a single push of a button is another example.
Visit www.wayne-dalton.com/access for more ideas on how to set up and use scenes in your Z-Wave
®
network.
IMPORTANTNOTICE!
Read the enclosed instructions carefully before installing your new Z-Wave®Enabled Thermostat. Pay
close attention to all warnings and notes and carefully follow the installation steps in the order they are
presented to save time and minimize the risk of damaging the thermostat or the system it controls.
This manual should be retained for future reference.
AUTO
ON
FAN
HEAT
COOL
SAVE
ENERGY
NORMAL
RESE
T
COOL
Drill with 3/16” (4.8 mm) drill bit
Pen or Pencil
Hammer
Tape Measure

6
Good
5ft.
(1.5m)
Retrofit or Replacement Installations:
Mount the new thermostat in the same location
as the old one.
New Installations:
Follow the guidelines below and refer to the
diagram:
• Locate the thermostat on an inside wall,
about 5 ft. above the floor, and in a room that is
used often.
• Do not install it where there are unusual
heating conditions, such as in direct sunlight,
near a lamp, radio, television, radiator register,
or fireplace, near hot water pipes in a wall, near
a stove on the other side of a wall.
• Do not locate in unusual cooling conditions
such as on a wall separating an unheated room,
or in a draft from a stairwell, door or window.
• Do not locate in a damp area. This can lead
to corrosion that will shorten the life of the
thermostat.
• Do not locate where air circulation is poor,
such as in a corner or an alcove, or behind an
open door.
• Do not install the thermostat unit until all
construction work and painting has been
completed.
• This thermostat does not require leveling for
proper operation.
Your thermostat is a precise instrument,
handle it with care.
• Turn off electricity to the heating and
air conditioning units before installing
or servicing the thermostat or any part
of the system.
• Do not turn electricity on again until
work is completed.
• Do not short (jumper) across electric
terminals at control on furnace or air
conditioner to test the system. This will
damage the thermostat and void your
warranty.
• All wiring must conform to local
codes and ordinances.
• This thermostat is designed for use
with 24 volt AC systems. The thermostat
should be limited to a maximum of 1.0
amps, higher amperage may cause
damage to the thermostat.
Step 1: Thermostat Location
Installation
CAUTION:
Continued Next Page

7
B
G
W
Wrap wires around
pencil to prevent
wires from falling
into wall opening.
1. Switch electricity to the furnace and air
conditioner OFF by disconnecting the power
supply at the circuit breaker or at each unit.
2. Remove cover from the existing thermostat.
Most are snap-on types and simply pull off.
Some have locking screws on the side or front
and require the screws to be loosened before
removal.
3. Note the letters printed near the terminals.
ATTACH LABELS (enclosed) to each wire for
identification.
Note: It is very important to label all
wires before disconnecting them.
4. Label the wires one at a time. You must
label all the wires before you proceed. With all
wires labeled, remove them from the existing
thermostat. Do not let the wires fall back inside
the wall. Wrapping them around a pencil, as
shown, will keep them from falling.
5. Loosen all screws on the existing thermostat
and its mounting plate and remove it from the
wall. Be careful not to disturb wiring labels.
6. (Optional) Fill wall opening with
non-combustible insulation to prevent drafts.
WARNING: To avoid electrical
shock and to prevent damage to
the furnace, air conditioner, and
thermostat disconnect the power
supply at the circuit breaker or
heater and air conditioner before
beginning work.
CAUTION: Read instructions
carefully before removing any
wiring from existing thermostat.
Wires must be labeled before
they are removed. THERE IS
NO STANDARD COLOR CODE.
When removing wires from their
terminals, ignore the color of the
wires since these may not comply
with any standard.
Step 2: Removing Existing Thermostat
Installation
IMPORTANT:
LABEL ALL WIRES BEFORE
DISCONNECTING THEM!
Continued Next Page
Note: Be careful, do not allow bare
wires to touch, or short, each other.
Wall
Opening

8
Tools required:
Phillips or Slotted Screwdriver
Drill
3/16 inch drill bit
Hammer
Pencil
1. Separate the control unit (front) of the
thermostat from the mounting base (back.)
Grasp the thermostat and pry the control
unit away from the base, lift up to remove
the control unit from the base as shown. Set
aside the control unit.
2. Pull the wires through the wire hole in the
base.
Note: Be careful, do not allow bare
wires to touch, or short, each other.
3. Hold the base against the wall with the
wires coming through the opening below the
terminal block, and position the base for best
appearance. Mark the hole positions with a
pencil or mount directly to the wall with the
two screws provided.
If mounting the base to sheetrock or if using
the existing mounting holes, use the plastic
anchors provided. Drill a 3/16 in (4.8 mm)
hole for the anchors at each screw location.
Use a hammer to tap the screw anchors into
the hole. Mount the base with the two screws
provided.
Note: This thermostat does not require
leveling for proper operation.
4. Be certain all wires are threaded through
the hole in the thermostat base. Leave wires
loose in the opening.
Note: Be careful, do not allow bare
wires to touch, or short, each other.
Step 3: Mounting Thermostat
Installation
Thermostat
Control Unit
Thermostat
Mounting
Base
Lift up Control
unit from Base
Wall Opening
Thermostat
Mounting
Base
Screws
w
G
B
Continued Next Page

9
General wiring guidelines for safe and
secure wire connections:
• Ends of wires should be stripped 3/8 inch
as shown.
• Take care not to damage or lose labels for
each wire during handling.
• Locate and dress wires to come in from
behind the thermostat and turn up into the
terminal area.
• Push excess wiring back into the wall
opening. Do not allow wiring between
thermostat mounting base and wall.
• Connect labeled wires only to a terminal
with a corresponding letter.
Note: Be careful, do not allow bare
wires to touch, or short, each other.
• Use the wiring diagrams on page 12 and
cross reference chart on page 13 for your
exact application as your guide.
• Fan wires out as illustrated in the wiring
diagrams with the Z-Wave® enabled
thermostat mounting base positioned below
the wall opening.
• Insert the wire in the terminal and tighten
the screw securely.
• Set the control unit configuration jumpers
per the Wiring and Jumper configurations
found on pages 14-17, choosing the one that
matches your wiring needs. A needle-nose
pliers may be required to remove the jumper
to modify its position.
Step 4: Wiring Information
Installation
Terminal Block
in Mounting
Base
Wiring Strip
length is 3/8
inch
Note:
Numbered Jumper Locations JP1 -
JP5 are referenced in illustration above
and in the wiring diagrams on the following
pages.
Continued Next Page
JP1
JP2
JP5
JP3
JP4

10
C --
A --
G --
RC --
Y --
W --
RH --
W2 --
C --
G --
O --
B --
W2 --
Y --
RH --
Step 4: Wiring Information (continued)
Installation
C
B
O
A
G
RC
Y
RH
W2
W
Terminal Designation Reference Guide
Conventional Gas/Oil/Electric Heating and Cooling Systems (No Heat Pump):
Common (power or hot) wire from secondary side of heating system transformer. (Note: This wire
is required for thermostat operation. If you do not have a “C” wire, please call customer
support at 1-866-545-5765, e-mail at [email protected], or contact your
HVAC professional to review possible solutions.)
Heat return or 1st stage relay (controls heating system)
2nd Stage heat relay
1st stage compressor contactor (controls air conditioning system)
Power for Heating system (Notes: 1. If there is just one power wire (R or RH) connect it to RH
with jumper 3 ON (most systems are like this.) 2. Never short RH terminal to C terminal as
severe damage to your HVAC system will occur.)
Power for Cooling system.
Fan control relay
3rd wire for 3-wire zoned hot water heating systems
Heat Pump Systems:
Common (power or hot) wire from secondary side of heating system transformer. (Note: This wire
is required for thermostat operation. If you do not have a “C” wire, please call customer
support at 1-866-545-5765, e-mail at [email protected], or contact your
HVAC professional to review possible solutions.)
Changeover valve control (Powered in HEAT) (Note: Never connect B and O terminals together as
severe damage to your HVAC system will occur.)
Changeover valve control (Powered in COOL) (Note: Never connect B and O terminals together as
severe damage to your HVAC system will occur.)
Auxiliary heat/2nd Stage heat relay
1st stage compressor contactor (controls air conditioning system and 1st stage of heat pump)
Power for heat pump. (Notes: 1. If there is just one power wire (R or RH) connect it to RH
with jumper 3 ON (most systems are like this.) 2. Never short RH terminal to C terminal as
severe damage to your HVAC system will occur.)
Fan control relay
Continued Next Page

11
Step 4: Wiring Information (continued)
IMPORTANT!
Additional Wiring Notes:
• For heat pumps with O and B both present, connect O wire to O terminal and B wire to C terminal (NOTE:
This is typically for Trane Heat Pump products only.) Do not connect B wire to B terminal as it may
damage the 24VAC power system.
• For LENNOX Pulse systems, please contact customer support or contact your HVAC professional for specific
information regarding installing the Z-Wave
® Enabled Thermostat with your system.
• Use 18- to 22-gauge thermostat wire.
• Your Z-Wave® enabled thermostat must have a C wire (electrical power) and cannot operate from batteries
alone. Batteries are for back up only.
• If you are unsure of how to connect your system, please call customer support for additional information or
contact an HVAC professional.
• If you have 2 large wires (12 or 14 gauge or if it is bigger than paper clip wire) or know that your system
operates on line voltage, immediately stop, re-install your existing thermostat and contact customer support.
The Wayne-Dalton Z-Wave
® Enabled thermostat operates on 24 Volts AC power only.
Jumper Reference Guide
The number below corresponds to the bubble number above.
JP5 -- Fan Control: a) NO FAN -No fan control even with switch on front of thermostat (RARE.)
(No jumper)
b) ELECT - Fan is controlled from thermostat.
(Jumper on top 4 pins)
c) GAS - Fan is controlled by furnace.
(Jumper on bottom 4 pins)
JP3 -- Heat Pump Type: a) OFF - No heat pump system present (Conventional HVAC System)
( No Jumper)
b) ON - Bypasses heat pump 1st stage and immediately triggers auxiliary heating.
(Eliminates time delay for effectively heating homes located in colder climates.)
(Jumper on top 4 pins)
c) Heat Pump - Normal heat pump setting to activate both stages.
(Jumper on bottom 4 pins)
JP4 -- Power: a) RC-RH Connected - For single transformer systems.
(Jumper on both pins)
b) RC-RH Separate - For systems with a separate transformer for A/C and heat.
(No Jumper)
JP1 -- Celsius/Fahrenheit: a) °C - Thermostat will display in degrees Celsius.
(Jumper on both pins)
b) °F - Thermostat will display in degrees Fahrenheit.
(No Jumper )
JP2 -- Heat Pump Auxiliary Type: a) Fossil fuels - Natural gas, propane, or oil auxiliary system.
(Jumper on both pins)
b) Elect - Electric auxiliary system.
(No Jumper)
Reset -- Reset Button - Always press the reset button after changing jumper settings.
NOTE: Unused jumpers may be stored by attaching them to a single pin.
Reset
Installation
JP2JP1
Continued Next Page
AUTO
ON
FAN
HEAT
COOL
SAVE
ENERGY
NORMAL
RESET
COOL
JP4JP3JP5

12
Step 5: Match Wiring
Installation
FROM
FURNACE
W
RH
G
C
3 Wire Heat + C
Wire C W
RH
G
Match the wiring diagram below with the wires you labeled in Step 3 and proceed to the
page referenced for detailed set-up information for your application.
Note: The C wire (24 Volts AC) is not optional.
Note: If your combination of wires in not shown, go to Step 6 and modify your labeling per
the cross reference chart.
FROM
FURNACE
C
W
R
H
2 Wire Heat + C
Wire CW
RH
FROM
FURNACE
C
W
R
H
Y
G
4 Wire Heat/Cool + C
Wire CW
RH
Y
G
5 Wire Heat/Cool + C
Wire CW
RH
Y
G
RC
FROM
FURNACE
C
W
R
H
Y
G
RC
FROM
FURNACE
C
G
R
H
Y
B
O
or
4 Wire Heat Pump without
Auxilliary Heat + C
Wire C
B
RH
Y
G
Oor
FROM
FURNACE
C
W
R
H
Y
G
W2
1 Stage Cool, 2 Stage Heat + C
Wire C
RH
Y
G
W2
W
FROM
FURNACE
W
R
H
A
C
3 Wire Zoned Hot Water + C
Wire CW
RH
A
Go to Page 14
FROM
FURNACE
C
W2
R
H
Y
G
B
O
or
5 Wire Heat Pump with
Auxilliary Heat + C
Wire C
B
RH
Y
G
O
or
W2
Go to Page 14
Go to Page 15 Go to Page 15
Go to Page 16 Go to Page 16
Go to Page 17 Go to Page 17

13
Step 6: Modify Label Scheme
Installation
If your combination of wires is not shown, refer to the cross reference chart below. Add the
corresponding Wayne-Dalton terminal designation label to your wire’s label and then repeat
Step 5 to match your wiring diagram. If a match is still not successful, contact customer
support at 1-866-545-5765, e-mail at [email protected] or contact your
HVAC professional.
Note: The C wire (24 Volts AC) is not optional. If a C wire is not present, your Z-Wave®
Enabled Thermostat will not operate, contact customer support for options.
Cross Reference Chart
Your Wires
R or V or VR
RH or R4
RC
W
W2
Y
Y2
G or F
C or X
E
L
T
B or
O
B and O
Z-Wave
®
Enabled Thermostat Terminal Designation
RH and Jumper 3 ON - Single power for Heat and Cool
RH and Jumper 3 OFF - Power for Heat
RC and Jumper 3 OFF - Power for Cool
W - Heat Control
W2 - 2nd stage Heat
Y - Cool Control
Do not connect and wrap exposed end with insulating electrical tape (2nd stage cool control
is not supported)
G - Fan Control
C - Common 24 VAC power (to power thermostat)
Do not connect and wrap exposed end with insulating electrical tape (Emergency heat is
supported by placing jumper 2 in the Aux position)
Do not connect and wrap exposed end with insulating electrical tape (System Monitor is not
supported)
Do not connect and wrap exposed end with insulating electrical tape (Outdoor Sensor is not
supported)
B - Heat pump changeover (cool to heat, powered in heat)
O - Heat pump chageover (heat to cool, powered in cool)
If there are both B and O wires (typical of Trane Heat Pumps), DO NOT CONNECT B to B
terminal, Re-label B as C.
Common Designations for Normal Gas, Oil and Electric systems and Heat Pump Systems
Common Designations for
Zoned Hot Water Systems
Your Wires
R
W
Terminal Designation
RH
W
Your Wires
R or V or VR
Y or W or W2
M or Y
G or F
C or X or X2
R or O
Terminal Designation
RH
W2
Y
G
C
O
Your Wires
R
W
Y(3rd Wire)
Terminal Designation
RH
W
A
Your Wires
R
W
Y(3rd Wire)
Terminal Designation
RH
A
W
3 Wire Zoned Hot Water Solenoid Valves
3 Wire Zoned Hot Water Motor Drive Valves
2 Wire Zoned Hot Water
Common Designations for
Lennox Heat Pump Systems
Common Designations for Trane
Systems (American Standard)
Your Wires
B
W or W1
Terminal Designation
C
W2

Step 7: Configuration
14
Installation
C
W
RH G
SEE NOTE
STEP C: On the Control Unit PCB, install jumpers as shown. See the
jumper reference guide on page 11 for jumper number designations.
Black indicates position of jumper, otherwise remove or do not
place jumper. Be certain jumpers are fully seated and in the correct
position.
NOTE: For Electric Heat set jumper JP5 in position A, for Gas
or Oil Heat set jumper JP5 in position B.
O W2
C B
G A
RH RC
W Y
STEP B: Connect your wires to the corresponding
terminals on the thermostat base. Wrap wire around
terminal screw and tighten securely using a Phillips or
slotted screwdriver.
STEP A: Verify your labeled wires match the ones shown in the
box to the left.
NOTE: Do not allow the wires to contact another terminal,
touch each other or touch other parts of the thermostat.
A
C
W
RH
Step D: Go to Page 18 to continue your installation.
JP5
OR
B
C RH W
STEP C: On the Control Unit PCB, install jumpers as shown. See the
jumper reference guide on page 11 for jumper number designations.
Black indicates position of jumper, otherwise remove or do not
place jumper. Be certain jumpers are fully seated and in the correct
position.
NOTE: For Electric Heat set jumper JP5 in position A, for Gas
or Oil Heat set jumper JP5 in position B.
O W2
C B
G A
RH RC
W Y
STEP B: Connect your wires to the corresponding
terminals on the thermostat base. Wrap wire around
terminal screw and tighten securely using a Phillips or
slotted screwdriver.
STEP A: Verify your labeled wires match the ones shown in the
box to the left.
NOTE: Do not allow the wires to contact another terminal,
touch each other or touch other parts of the thermostat.
A
OR
B
C RH W
3 Wire Heat + C Wiring and Jumper Configuration
Step D: Go to Page 18 to continue your installation.
G
SEE NOTE
JP3 JP4 JP2JP1
JP5 JP3 JP4 JP2JP1
2 Wire Heat + C Wiring and Jumper Configuration
Your Labeled Wires
Your Labeled Wires

Step 7: Configuration
15
C
W
RH
RC
Y
G
O W2
C B
G A
RH RC
W Y
STEP B: Connect your wires to the corresponding
terminals on the thermostat base. Wrap wire around
terminal screw and tighten securely using a Phillips or
slotted screwdriver.
STEP A: Verify your labeled wires match the ones shown in the
box to the left.
NOTE: Do not allow the wires to contact another terminal,
touch each other or touch other parts of the thermostat.
C RH W
4 Wire Heat/Cool + C Wiring and Jumper Configuration
Step D: Go to Page 18 to continue your installation.
G
Your Labeled Wires
SEE NOTE
STEP C: On the Control Unit PCB, install jumpers as shown. See the
jumper reference guide on page 11 for jumper number designations.
Black indicates position of jumper, otherwise remove or do not
place jumper. Be certain jumpers are fully seated and in the correct
position.
NOTE: For Electric Heat set jumper JP5 in position A, for Gas
or Oil Heat set jumperJP5 in position B.
O W2
C B
G A
RH RC
W Y
STEP B: Connect your wires to the corresponding
terminals on the thermostat base. Wrap wire around
terminal screw and tighten securely using a Phillips or
slotted screwdriver.
STEP A: Verify your labeled wires match the ones shown in the
box to the left.
NOTE: Do not allow the wires to contact another terminal,
touch each other or touch other parts of the thermostat.
A
OR
B
C
RC W
5 Wire Heat/Cool + C Wiring and Jumper Configuration
Step D: Go to Page 18 to continue your installation.
G
Your Labeled Wires
Y
RH Y
JP5 JP3 JP4 JP2JP1
Installation
STEP C: On the Control Unit PCB, install jumpers as shown. See the
jumper reference guide on page 11 for jumper number designations.
Black indicates position of jumper, otherwise remove or do not
place jumper. Be certain jumpers are fully seated and in the correct
position.
NOTE: For Electric Heat set jumper JP5 in position A, for Gas
or Oil Heat set jumper JP5 in position B.
SEE NOTE
A
OR
B
JP5 JP3 JP4 JP2JP1
C
W
RH
G
Y

16
Step 7: Configuration
STEP B: Connect your wires to the corresponding terminals
on the thermostat base. Wrap wire around terminal screw
and tighten securely using a Phillips or slotted screwdriver.
NOTE: Connect O wire to the O terminal OR B wire to
the B terminal. If you have both O and B, connect O
wire to the O terminal. Do not connect B to B terminal.
See page 10 and call or e-mail customer support.
STEP A: Verify your labeled wires match the ones shown in the
box to the left.
NOTE: Do not allow the wires to contact another terminal,
touch each other or touch other parts of the thermostat.
C RH
B
or
O
4 Wire Heat Pump without Auxiliary Heat + C Wiring and Jumper Configuration
Step D: Go to Page 18 to continue your installation.
G
Your Labeled Wires
SEE NOTE
STEP C: On the Control Unit PCB, install jumpers as shown. See the
jumper reference guide on page 11 for jumper number designations.
Black indicates position of jumper, otherwise remove or do not place
jumper. Be certain jumpers are fully seated and in the correct position.
NOTE: For Gas Auxiliary Heat do not install or remove jumper
on jumper JP2, for Electric Auxiliary Heat set jumper JP2 in
position B.
STEP B: Connect your wires to the corresponding terminals
on the thermostat base. Wrap wire around terminal screw and
tighten securely using a Phillips or slotted screwdriver.
NOTE: Connect O wire to the O terminal OR B wire to the
B terminal. If you have both O and B, connect O wire to
the O terminal. Do not connect B to B terminal. See page
10 and call or e-mail customer support.
STEP A: Verify your labeled wire match the ones shown in the
box to the left.
NOTE: Do not allow the wires to contact another terminal,
touch each other or touch other parts of the thermostat.
C
RH
B
or
O
G
Y
Y W2
STEP C: On the Control Unit PCB, install jumpers as shown. See the
jumper reference guide on page 11 for jumper number designations.
Black indicates position of jumper, otherwise remove or do not
place jumper. Be certain jumpers are fully seated and in the correct
position.
5 Wire Heat Pump with Auxiliary Heat + C Wiring and Jumper Configuration
Your Labeled Wires
JP5 JP3 JP4 JP2JP1
JP5 JP3 JP4 JP2JP1
O W2
C B
G A
RH RC
W Y
C
RH
G
Y
O
B
SEE NOTE
Installation
Step D: Go to Page 18 to continue your installation.
OR
A
B
O W2
C B
G A
RH RC
W Y
C
RH
G
Y
O
B
SEE NOTE
W2

17
Installation
Step 7: Configuration
STEP B: Connect your wires to the corresponding
terminals on the thermostat base. Wrap wire around
terminal screw and tighten securely using a Phillips or
slotted screwdriver.
STEP A: Verify your labeled wires match the ones shown in the
box to the left.
NOTE: Do not allow the wires to contact another terminal,
touch each other or touch other parts of the thermostat.
C RH W
2 Stage Heat and 1 Stage Cool + C Wiring and Jumper Configuration
Step D: Go to Page 18 to continue your installation.
G
Your Labeled Wires
STEP A: Verify your labeled wires match the ones shown in the
box to the left.
NOTE: Do not allow the wires to contact another terminal,
touch each other or touch other parts of the thermostat.
C
A W
3 Wire Zoned Hot Water Heat + C Wiring and Jumper Configuration
Important Operation Note:
For 3 wire hot water system applications, the thermostat must
be used in Heat and Heat Save Energy modes ONLY, in order to maintain power to the solenoid
valves in the OFF position.
Step D: Go to Page 18 to continue your installation.
Your Labeled Wires
Y
RH
STEP C: On the Control Unit PCB, install jumpers as shown. See the
jumper reference guide on page 18 for jumper number designations.
Black indicates position of jumper, otherwise remove or do not
place jumper. Be certain jumpers are fully seated and in the correct
position.
NOTE: For Electric Heat set jumper JP5 in position A, for Gas
or Oil Heat set jumper JP5 in position B.
SEE NOTE
A
OR
B
G
O W2
C B
G A
RH RC
W Y
W2
W
RH
C
Y
W2
O W2
C B
G A
RH RC
W Y
C
W
RH
A
STEP B: Connect your wires to the corresponding terminals on the
thermostat base. Wrap wire around terminal screw and tighten
securely using a Phillips or slotted screwdriver.
NOTE: For a Motor driven Valve connect “W” wire to “W”
terminal and connect the 3rd wire to the “A” terminal. For
a Solenoid valve connect “W” wire to “A” terminal, and
connect the 3rd wire to “W” terminal.
(all 3 wires must be connected)
SEE NOTE
STEP C: On the Control Unit PCB, install jumpers as shown. See the
jumper reference guide on page 11 for jumper number designations.
Black indicates position of jumper, otherwise remove or do not place
jumper. Be certain jumpers are fully seated and in the correct position.
JP5 JP3 JP4 JP2JP1
JP5 JP3 JP4 JP2JP1

18
Installation
Step 8: Control Unit Preparation
Prepare the Z-Wave
® Enabled
Thermostat Control Unit for
Installation:
1. Install 2 AA batteries as shown in
the diagram to the right. The batteries
are required to maintain your target
temperatures during a power outage.
If battery power is lost, or when
changing batteries, you must reset
your target temperatures.
NOTE: Use Alkaline Batteries only,
do not use rechargeable batteries.
NOTE: Replace the batteries if
the low battery indicator icon is
displayed.
OPERATION NOTE: If the batteries
die during a power outage, when
AC power is restored the thermostat
will power up in the OFF state.
2. Press and release the RESET
button on the front of the control unit
to initialize your jumper settings. If
jumper settings are changed, you must
press the RESET button.
Low Battery Icon
Located on Thermostat
LCD Display
AA
+
-
AA
+
-
COOL
HEA TSAVE
SAVE
ENERGY
NORMAL
RESET
Step 9: Control Unit Installation
Install the Z-Wave
® Enabled
Thermostat Control Unit to the
thermostat base mounted to the
wall in Step 3.
1. Install the Thermostat Control
Unit to the thermostat base in the
following manner:
a) Hook the top of the Control Unit
to the thermostat base.
b) Swing the unit down until it
snaps in position.
c) Push firmly on the center of the
Control Unit to ensure the electrical
contacts are mated properly.
NOTE: After handling, the control
unit may require up to one hour to
stabilize to room temperature.
2
1
2
1

19
Installation
Step 10: Installation Verification
Verify you have correctly installed the
Z-Wave
® Enabled Thermostat:
1. Restore Power: Turn on all electrical power
turned off in Step 1.
2. Check Fan:
NOTE: Do this only if during installation
the G wire or the fan relay was connected,
otherwise proceed to 3.
A. Slide fan switch to the ON position.
B. Verify air is blowing from your system.
C. Return to AUTO position for Normal operation.
3. Check Heat:
A. Press and release the HEAT button on the
front of the control unit. The word HEAT will
appear in the display.
B. Press the “+” symbol (Temperature up) button
to raise the temperature to 90 degrees F.
C. Wait 5 minutes, then verify warm air is
blowing from your system.
D. Press and release the HEAT button to shut off
the heat.
4. Check Air Conditioning:
NOTE: Wait 5 minutes after doing the Heat
Check, before proceeding.
A. Press and release the COOL button on the
front of the control unit. The word COOL will
appear in the display.
B. Press the “-”symbol (Temperature down)
button to lower the temperature 5 degrees less
than the current reading.
C. Wait 5 minutes, then verify cool air is blowing
from your system.
D. Press and release the COOL button to shut off
the cooling system.
NOTE: If any of these checks do not function
properly, review your wiring and jumper
conguration. If the problem persists,
contact customer support for assistance.
Installation of your Wayne-Dalton Z-Wave®
Enabled Thermostat is complete. Go to
Page 21 for Operation and Programming
information.
AUTO
ON
FAN
HEAT
COOL
SAVE
ENERGY
NORMAL
RESET
COOL
2A
2C
3A
3D
4A
4D
4B
3B

Celsius/Fahrenheit Readout
20
Advanced Installation Information
Temperature Offset
Your Wayne-Dalton Z-Wave® enabled
Thermostat is very accurate and
comes from the factory calibrated
to +/- 1º of actual temperature.
Temperature Offset can be used
to force the thermostat to match
another thermometer in your home
to a maximum of +/- 6º.
1. Remove Thermostat Control Unit
from the thermostat base.
2. Slide the calibration switch to the
ON position.
3. Press either the + or - button on the
front of the Control Unit until the desired
temperature offset factor is reached.
4. Slide the Calibration switch to the
OFF position.
NOTE: If using this feature,
Temperature Offset must
be adjusted each time the
thermostat is RESET or batteries
are removed.
Example: Display shows +2 degree Offset factor
JP1
ON
OFF
JP1
OR
A
B
Modify your display to read
degrees C or degrees F:
To display degrees Celsius:
1. Install jumper on jumper JP1
position A shown in diagram to the
right.
2. Press and release the RESET
button (using a paper clip or pencil
point) on the front of the control
unit to activate your setting.
To display degrees Fahrenheit:
1. Do not install jumper or remove
jumper on jumper JP1 as shown
on position B in the diagram to the
right.
2. Press and release the RESET
button on the front of the control
unit to activate your setting.
SAVE
ENERGY
NORMAL
RESET
2
3
Calibrate
switch
O
F
F
O
N
2
4
CALIB
/