Kenmore 253 Series Owner's manual

Category
Fridges
Type
Owner's manual
®
Freezer
Use & Care Guide
Congelador
Guia para su uso y cuidado
Cong_lateur
Guide d'utilisation et d'entretien
r
I
Sears, Roebuck and Co., Hoffman Estates, IL 60179 U.S.A.
Sears Canada, Inc.,Toronto, Ontario, Canada M5B 2B8
WWW.S(_aI'S.COm
2169_0200A (0403)
Record Serial/Model Numbers ......... 2
Safety .................................................. 2-3
Warranty .............................................. 3
Canada - Limited Warranty ................. 4
First Steps ........................................... 5-6
Energy Saving Tips ............................. 6
Setting the Temperature Control ......... 6
Freezer Optional Features .................. 7-8
Care and Cleaning .............................. 9-10
Power Failure / Freezer Failure ........... 10
Troubleshooting Guide ......................... 11-12
Sears Service ...................................... 13
Sears Canada Customers ................... 13
READ AND SAVE THESE INSTRUCTIONS
This Owner's Guide provides specific operating instructions
for your model. Use your freezer only as instructed in this
guide.These instructions are not meant to cover every
possible condition and situation that may occur. Common
sense and caution must be practiced when installing,
operating, and maintaining any appliance.
Record Your Model and Serial Numbers
Record the model and serial numbers in the space provided
below.The serial plates are located either on the upper left
wall inside the freezer (upright models), or the left exterior
wall (chest models).
Model Number: 253.
or 970.
Serial Number:
Purchase D_:te:
READ ALL INSTRUCTIONS BEFORE USING THIS
FREEZER.
FOR YOUR SAFETY
Do not store or use gasoline, or other flammable vapors and
liquids in the vicinity of this or any other appliance. Read
product labels for flammability and other warnings.
CHILD SAFETY
Destroy carton, plastic bags, and aey exterior wrapping
material immediately afte r the freezer is unpacked.
Children should never use these items to play. Cartons
covered with rugs, bedspreads, plastic sheets or stretch
wrap may become airtight chambers, and can quickly
cause suffocation.
Remove all staples from the carton. Staples can cause
severe cuts, and destroy finishes if they come in contact
with other appliances or furniture.
An empty, discarded ice box, refrigerator, or freezer is a
very dangerous attraction to children.
Remove and discard any spacers used to secure the
shelves dudng shipping. Small objects are achoke
hazard to children.
Remove the door(s) of any appliance that is not in usa,
even if it is being discarded.
Proper Disposal of Your
Refrigerator/Freezer
Risk of child entrapment.
Child entrapment and suffocation are
not problems ofthe past, Junked or
abandoned refrigerators or freezers
are still dangerous -- even if they will
sit for "just a few days," Ifyou are
getting ridof your old refrigerator or
freezer, please follow the instructions
below to help prevent accidents.
BEFORE YOU THROW AWAY YOUR
OLD REFRIGERATOR/FREEZE R:
Remove
doors.
Leave she_ves
in place so
children may
not easily
climb inside.
ELECTRICAL INFORMATION
These guidelines must be followed to ensure that
safety mechanisms in the design of this freezer will
operate properly.
Refer to the serial pfete for correct electrical rating.
The power cord of the appliance is equipped with a
three-prong grounding p{ug for your protection against
shock hazards. It must be plugged directly into a
properly grounded three-prong receptacle, protected with
a t 5 amp time delay fuse or circuit breaker. The
receptacle must be installed in accordance with local
codes and ordinances. Consult a qualified electrician.
Receptacles protected by Ground Fault Circuit
Interrupters (GFIC) are NOT RECOMMENDED. Do not
use an extension cord or adapter plug.
If voltage varies by t 0% or more, freezer performance
may be affected. Operating freezer with insufficient
power can damage the motor. Such damage is not
covered under the warranty. If you suspect your house
hold voltage is high or low, consult your power company
for testing.
To prevent the freezer from being turned off
accidentically, do not plug unit into an outlet controlled
by a wall switch or pull cord.
Do not pinch, knot, or bend the cord in any manner.
OTHER PRECAUTIONS
To defrost freezer, always unplug unit first.
Never unplug the freezer by pullingon the cord.
Always grip the plug firmly, and pull straight out from
the receptacle.
NOTE:Turning the temperature control to OFF turns off the
compressor, b_t does not disconnect the power to the light
bulb or other electrical components.
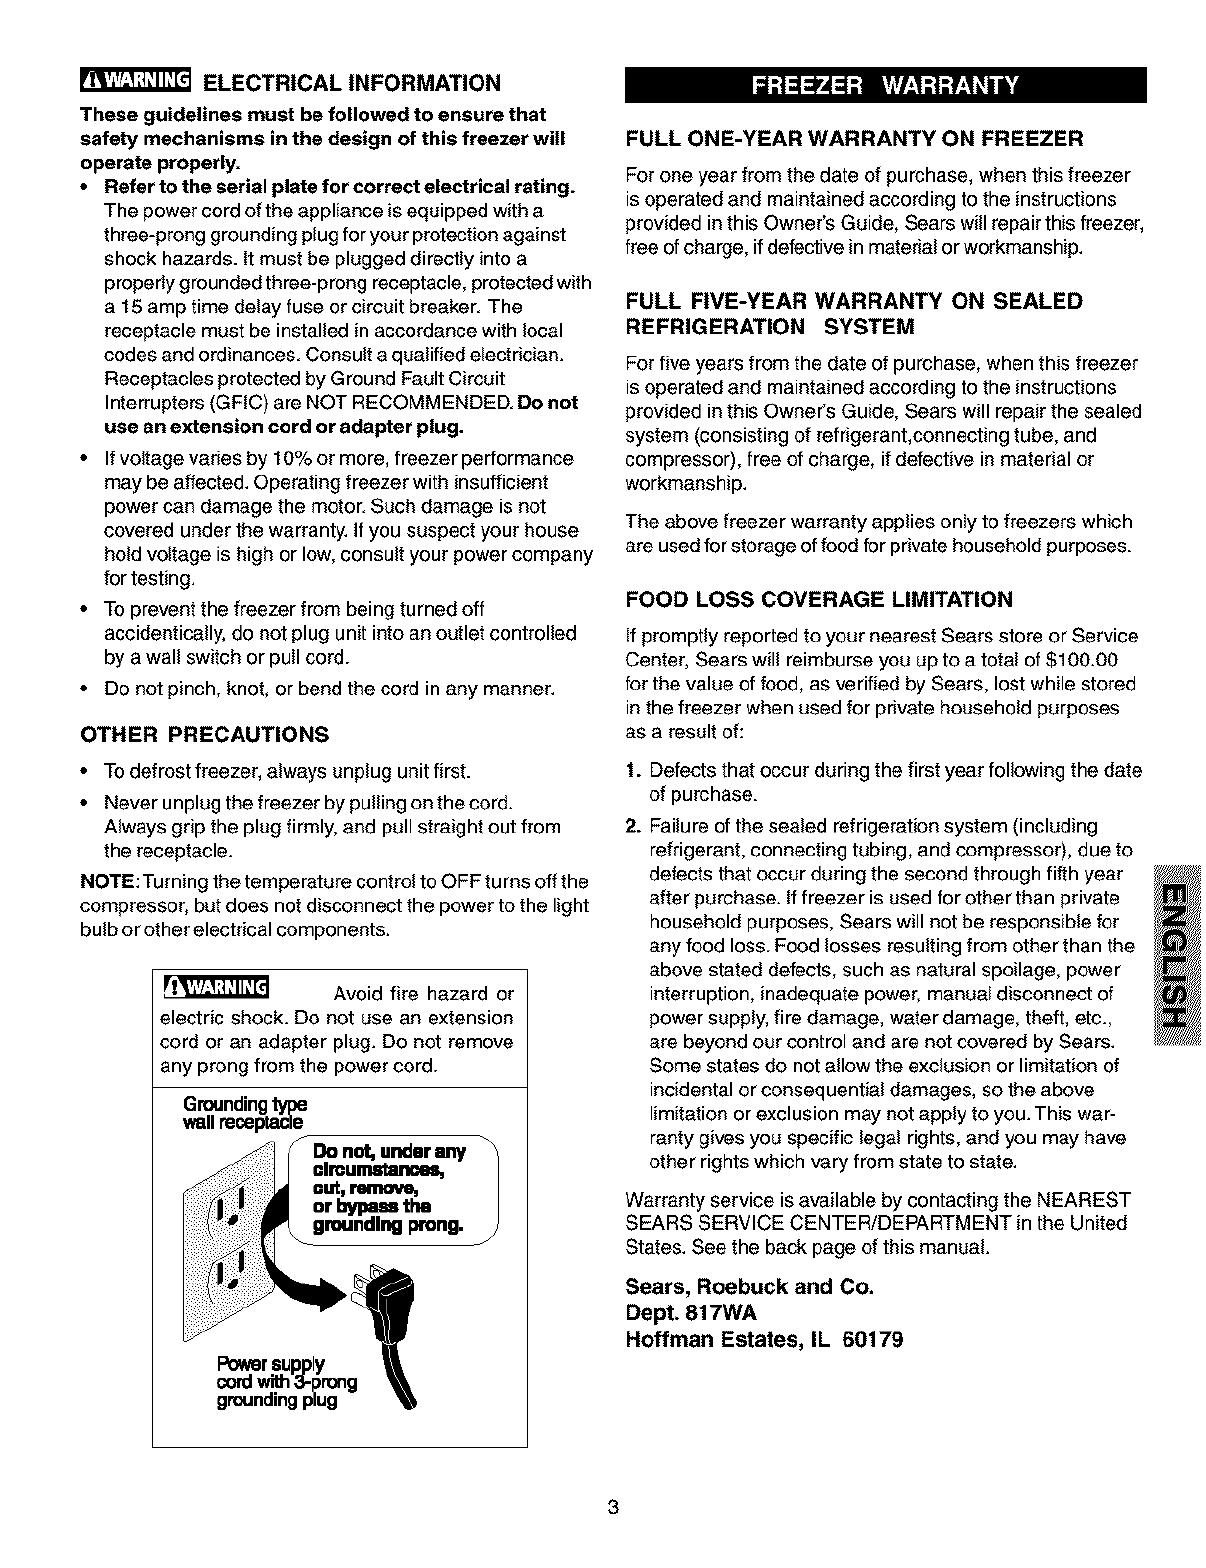
Avoid fire hazard or
electric shock. Do not use an extension
cord or an adapter plug. Do not remove
any prong from the power cord.
Grounding
wall_
F Do not, u_llr any
clmu_
cult,
or bypass the
grounding prong.
Powersup ly
cordwi_ _?rong
grounding p_ug
FULL ONE-YEAR WARRANTY ON FREEZER
For one year from the date of purchase, when this freezer
is operated and maintained according to the instructions
provided in this Owner's Guide, Sears will repair this freezer,
free of charge, if defective in material or workmanship.
FULL FIVE-YEAR WARRANTY ON SEALED
REFRIGERATION SYSTEM
For five years from the date of purchase, when this freezer
is operated and maintained according to the instructions
provided in this Owner's Guide, Sears will repair the sealed
system (consisting of refrigerant,connecting tube, and
compressor), free of charge, if defective in material or
workmanship.
The above freezer warranty applies only to freezers which
are used for storage of food for private household purposes.
FOOD LOSS COVERAGE LIMITATION
If promptly reported to your nearest Sears store or Service
Center, Sears will reimburse you up to a total of $100.00
for the value of food, as verified by Sears, lost while stored
in the freezer when used for private household purposes
as a result of:
1. Defects that occur during the first year following the date
of purchase.
2. Failure of the sealed refrigeration system (including
refrigerant, connecting tubing, and compressor), due to
defects that occur during the second through fifth year
after purchase. If freezer is used for other than private
household purposes, Sears will not be responsible for
any food loss. Food losses resulting from other than the
above stated defects, such as natural spoilage, power
interruption, inadequate power, manual disconnect of
power supply, fire damage, water damage, theft, etc.,
are beyond our control and are not covered by Sears.
Some states do not allow the exclusion or limitation of
inc{dental or consequent{al damages, so the above
limitation or exclusion may not apply to you. This war-
ranty gives you specific legal rights, and you may have
other rights which vary from state to state.
Warranty service is available by contacting the NEAREST
SEARS SERVICE CENTER/DEPARTMENT in the United
States. See the back page of this manual.
Sears, Roebuck and Co.
Dept. 817WA
Hoffman Estates, IL 60179
CANADA --- LIMITED WARRANTY
®
Freezers
Sears Canada Inc., warrants every new Kenmore freezer to be free from defects in material or workmanship. What Sears
will do, free of charge, in case of defect:
The Sealed System
(consisting of refrigerant,
evaporator, condenser
and compressor)
All other parts or
adjustments
FIVE (5) YEARS
ONE (1) YEARS
FIVE (5) YEARS
ONE (1) YEARS
FIVE (5) YEARS
ONE (1) YEARS
Normal Responsibility of the Customer
The following items, since they are not manufacturing defects, are not included in the warranty, but are the responsibilityof
the customer:
1) Damage to finish after delivery.
2) Improper power supply, low voltage, or any defects in the house wiring system or appliance not connected
to electric outlet.
3) Replacement of light bulbs.
4) Damage caused by moving the productfrom its edginal installation.
5) Service required as a result of alteration, abuse, fire, floods, or acts of God.
6) Providing adequate air circulation to the refrigerating system.
7) Proper use and care of product as listed in the customer's manual; proper setting of the controls.
If any service is required under this warranty, simply call 1-800-4-MY-HOME s_ (1-800-469-4663).
This warranty is in addition to any statutory warranty.The above warranty covers Kenmore Freezers sold and operated in
Canada only and shall not apply ifthe freezer is used for other than domestic purposes.
Sears Maintenance Agreement
Maintain the value ofyour Kenmore freezer with a Sears Maintenance Agreement.
SEARS CANADA INC. Toronto, Canada M5B 2B8
PRINTEDINU.SA.
4
ThisOwner'sGuideprovidesspecificoperatinginstructions
foryourmodel.Usethefreezeronlyasinstructedinthis
Owner'sGuide,Before starting the freezer, follow these
important first steps.
INSTALLATION
Choose a place that is near a grounded electrical outlet.
Do Not use an extension cord or an adapter plug.
For the most efficient operation, the freezer should be
located where surrounding temperatures will not exceed
110°F (43°C).Temperatures of 32°F (0°C) and below will
NOT affect freezer operation. Additional compressor
heaters are not recommended.
AIIowspacearoundtheunitforgoodaircirculation.
Leave a 3 inch (75 mm) space on all sides of the freezer
for adequate circulation.
NOTE: The exterior wails of the freezer may become quite
warm as the compressor works to transfer heat from the
inside. Temperatures as much as 30° F warmer than room
temperature can be expected. For this reason if is particu-
larly important in hotter climates to allow enough space for
air circulation around your freezer.
LEVELING
The freezer must have all bottom corners resting firmly on
a solid floor.The floor must be strong enough to support a
fully loaded freezer. NOTE: it is Very Important for your
freezer to be level in order to function properly. If the
freezer is not leveled during insta!lation, the door may be
misaligned and not close or seal properly, causing cooling,
frost, or moisture problems.
To Level Upright Models:
After discarding crating screws and wood base, use a
carpenter's level to level the freezer from front-to-back.
Adjust the plastic leveling feet in front, _/_bubble higher, so
that the door closes easily when left halfway open.
Unpaddngand Leveling- UpdghtModels
To Level Chest Models:
If needed, add metal or wood shims between foot pads and
floor.
CLEANING
Wash any removable parts, the freezer interior, and
exterior with mild detergent and warm water, Wipe dry,
Do not use harsh cleaners on these surfaces.
DOnot use razor blades or other sharp instruments,
which can scratch the appliance surface when removing
adhesive labels, Any glue left from the tape can be
removed with a mixture of warm water and mild deter-
gent, or touch the residue with the sticky side of tape
already removed. Do not remove the serialpate.
_ TOallow doorto
closeand seal properly, CO NOT let
food packages e_lend pa_ the front
ofshelve.
ShelfFront
DOOR REMOVAL (UPRIGHT MODELS)
If door must be removed:
t. Gently layfreezer on its back, on a rug or blanket.
2. Remove two base screws and base panel. Remove
wire from clips on bottom of cabinet. (Figure 1)
3. Unplug connector by holding the cabinet connector in
place, and pulling door connector out. (Figure 1)
4. Remove bottom hinge screws. (Figure 1)
5. Remove plastic top hinge cover.
6. Remove screws from top hinge.
7. Remove top hinge from cabinet.
8. Remove door and bottom hinge from cabinet.
9. To replace door, reverse the above order and securely
tighten all screws to prevent hinge slippage.
Cabinet Connector
F_gure i
Cold Control
The freezer should be located in the coolest area of the
room, away from heat producing appliances or heating
ducts, and out of direct sunlight.
Let hot foods cool to room temperature before placing in
the freezec Overloading the freezer forces the compres-
sor to run longer. Foods that freeze too slowly may lose
quality or spoil.
Be sure to wrap foods properly, and wipe containers dry
before placing them in the freezec This cuts down on
frost build-up inside the freezeE
Freezer shelves should not be lined with aluminum foil,
wax paper, or paper toweling. Liners interfere with cold
air circulation, making the freezer less efficient.
Organize and label food to reduce door openings and
extended searches. Remove as many items as needed
at one time, and close the door as soon as possible.
COOL DOWN PERIOD
For safe food storage, allow 4 hours for the freezer to
cool down completely. The freezer will run continuously
for the first several hours. Foods that are already frozen
may be placed in the freezer after the first few hours of
operation. Unfrozen foods should NOT be loaded into
the freezer until the freezer has operated for 4 hours.
When loading the freezer, freeze only 3 pounds of
fresh food per cubic foot of freezer space at one time.
Distribute packages to be frozen evenly throughout the
freezer. It is not necessary to turn the control knob to a
colder setting while freezing food.
TEMPERATURE CONTROL
The temperature control is located inside the freezer on
upright models, and on the left outside wall on chest
models. The temperature is factory preset to provide
satisfactory food storage temperatures. However, the
temperature control is adjustable to provide a range of
temperatures for your personal satisfaction. If a colder
temperature is desired, turn the temperature control knob
toward COLDEST and allow several hours for temperatures
to stabilize between adjustments.
NOTE:Your freezer may have some, or all of the
features listed below. Become familiar with these
features, and their use and care.
SECURITY LOCK WITH POP=OUT KEY
This security lock fastens the door snugly, ensuring stored
food is secure. To lock or unlock the freezer, push the key
into the lock and turn. The key pops out of the lock after it
has been turned.
POWER ON LIGHT
The yellow Power On indicator light indicates that the freezer is
propedy connected to electrical power. The light glows even
when the temperature control is turned to OFE If the light goes
out, refer to Freezer Does Not Run Section in the Trouble-
shooting Guide. If the freezer appears to be operating, the
light element may be burned out. Call an authorized servicer
for repfecemeot.
TEMP ALARM (ELECTRONIC MODELS)
This feature is designed to provide a warning if the inside
temperatures reach an unsafe level. The Temp. Alarm Feature
operates on household electricity, tt will not function if house-
hold efectrfeity is interrupted. (Battery backup models only: A
battery backup feature will take over the alarm system if the
household electricity is interrupted.)
Up_ightModels
When the freezer is initially plugged in, the red Temp. Alarm
indicator Light blinks. The indicator light will continue to blink
until the freezer has reached a safe freezing temperature, tf a
malfunction causes an unsafe temperature inside the freezer,
the red light will blink and the buzzer wilt sound. To sifence the
buzzer, press the ALARM OFF button. The Indicator Light will
continue to blink until a safe freezing temperature is again
reached. If the problem is not resolved within 12 hours, the
buzzer will turn on again.
If the ALARM OFF button is not pressed, the buzzer will turn
itself off automatically after 48 hours, but the red Tamp Alarm
Light will continue to blink.
Atarm Function Table
YeEE_w _ E Steady on Non.a[ O_Ta_on N_ne
Fl,*hmg [._ / N _ _t _em Replace wlth i_ew 9 w_t ba_y
Red _D Of_ No _a_l_ condition N_ne
Fl_h_ng IndOor _mt/_e too _ess_ mid h_,_d _d_
_D st_ _ashmg
_ eV_l_ 5 po_r [_s_ _ the _ and Wh¢_ po_ _sT_S_Ted, re_
s_,md_ en_or tempeea_e _oo LED fl_he_ _nt_] _n_
(_reen LED Of_ Qmck ffee_e OFF N_ne
On Qm_ _re_ ON N_ne
_ ¢]_ every T_ stop _1_ p_ss _l h_,_d _
HIGH*TEMP ALARM SWITCH (SOME MODELS)
An audible alarm will sound if the freezer temperature reaches
unsafe fevels. The a_arm ope_es on household efectr$cit_ If
the power fails, the aferm will not perform.
An ON/OFF switch allows the high temperature alarm to be
deactivated if desired. NOTE: You must open the freezer door to
view the alarm switch. The freezer is shipped with the switch in
the OFF position. After the freezer has run long enough to
lower the temperature, you may set the switch to the ON
position.
To activate the alarm, set the switch to the ON position.
Todeactivatethealarm, settheswitchtotheOFFposition.
High-Tamp Alarm Switch
B LUE DEFROST BUTTON (SOME CHEST MODELS)
IMPORTANT: It istime to defrost and cfean the freezer when
the blue defrost button is compfetely covered with frost.
QUICK FREEZE (SOME MODELS)
To activate the Quick Freeze feature, push the switch to the ON
position. The green light wilt appear, and the freezer will run
continuously (except when in Flash Defrost), driving freezer
temperature to the coldest possible temperatures. The switch
automatically turns off after 72 hours. Use this feature just prior
to adding Mrge quantities of unfrozen foods (not to exceed 3
pounds per cubic foot of freezer space).
RAPID FREEZE
Rapid freeze allows you to !ower your freezer's temperature
to the lowest possible temperature by pushing the switch
to ON. For maximum benefit, rapid freeze should be
selected 24 hours before placing a large quantity of
unfrozen food into the freezer. Food should then be spread
throughout the freezer compartment to speed up the
freezing process. Rapid freeze must be manually turned off
by pushing the switch to OFE (This will return the
ompressor to the normal operating mode.)
SLIDE-OUT BASKET OR TRIVET (UPRIGHTMODELS)
A Slide-Out Basket (some models) or Trivet (some models),
located at the bottom of the freezer, provides separate
storage space for items that are difficult to store on freezer
shelves. To remove the basket or trivet, pull out and lift up.
Bl_e-l_,t BllHli
SECURITY LOCK WITH POP-OUT KEY
This security lock fastens the door snugly, ensuring stored
food is secure. To lock or unlock the freezer, push the key
into the lock and turn. The key pops out of the lock after it
has been turned.
INTERIOR LIGHT
The light comes on automatically when the door isopened.
To replace the light bulb, turn the temperature control to
OFF and unplug the electrical cord. Replace the old bulb
with a bulb of the same wattage.
TILT-OUT SHELF
This shelf is located inside on the freezer door and provides
additional storage space.To access an item, tilt top of
'basket" shelf down.
_(3ut 8l_lf
DROP FRONT SHELF (UPRIGHT MODELS)
The Drop Front Shelf, located at the bottom of the freezer,
provides a separate compartment for small irregular
shaped items or large, bulky items. Lift the shelf front up
and out to remove.
ADJUSTABLE INTERIOR SHELVES
(UPRIGHT MODELS)
Multi-position adjustable interior shelves can be moved to
any position for larger or smaller packages. The shipping
spacers that stabilize the shelves for shipping may be
removed and discarded.
/_L,r_dj intado__lek_. UpdghtModl_ Ad_mi_e _i.dor Shol',_- Up'tUh_M_m
SLIDE-ASIDE BASKET (SOME CHEST MODELS)
Thisbasket helpsorganizeodd-shapeditems,To reachother
pad4ages in the freezer,sliddthebasketasid_ or liftout.
81ida-AsideBaal_t
FLASH DEFROST (SOME MODELS)
NOTE: The Temp Alarm shouid be turned off when freezer is
being defrosted. The Fl_sh Defrost feature will defrost the
freezer in a fraction of the time usualiy required. To defrost,
remove all food, and follow these steps:
Putl out the Flash Defrost plunger. Leave door open while
defrosting. (Closing the freezer tid/door will push in the
plunger, and the Flash Defrost witl be turned off.)
Push the Flash Defrost plunger in to restart freezer after
defrosting.
Turn on the Temp Alarm _ftar freezer has reached freezing
temperatures.
F_ash Defrost plu_ger . Chest Mode_s
_luhger
F_ash Defrost plunger _ Uplight Mode_s
_] Damp objects stick to
cold metal surfaces. DO not touch
interior metal surfaces with wet or
damp hands,
It is important to defrost and clean the freezer when P_to V=
inch of frost has accumulated. Frost may tend to accumu-
late faster on the upper part of the freezer due to warm,
moist air entering the freezer when the door isopened.
Remove food and leave the door open when defrosting the
freezer.
On upright models with a defrost drain (Figures 1a and
lb), remove the drain plug on the inside floor of the
freezer by pullingstraight out,To access the external
drain tube on models with a base panel, first remove the
two screws from the base panel. Locate the drain tube
near the leftcenter under the freezer. Place a shallow
pan under the drain tube. Defrostwater will drain out.
Check pan occasionally so water does not overflow. A V=
inchgarden hose adapter can be used to drain the
freezer directly intoa floor drain.If your model is not
equipped with an adapter, one can be purchased at most
hardware stores. Replace the drain plug when defrosting
and cleaning are completed. If the drain is left open,
warm air may enter the freezer.
Some upright freezers are frost-free and defrost automati-
cally, but should be cleaned occasionally.
BETWEEN DEFROSTINGS
To avoid frequent defrosting, occasionally use a plastic
scraper to remove frost. Scrape with a pulling motion.
Never use a metal instrument to remove frost.
DEFROSTING
[] CAUTION
Freezer must be unplugged (to avoid electrical hazard)
from power source when defrost ng un t,
U09 Models
Only
CLEANING THE OUTSIDE
Wash the cabinet with warm water and mild liquid deter-
gent. Rinse well and wipe dry with a clean soft cloth.
Replace parts and food.
On chest models with a defrost drain, p{ace a shallow
pan or the Divider/Drain Pan (some models) beneath the
drain outlet (Figure 2). A Y2inch garden hose adapter
can be used to drain the freezer directly into a floor drain
(Figure 3). Pull out the drain plug inside the freezer, and
pull off the outside defrost drain plug (Figure 4).
Defrost water will drain out. Check pan occasionally so
water does not overflow. Replace the drain plugs when
defrosting is completed.
FIl_m 8
On models without a defrost drsin, place towels or
newspapers on the freezer bottom tocatch the frost. The
frost w{llloosenand fall.Removetowelsand/or newspapers.
If the frost is soft, remove it by using a plastic scraper, ff
the frost isg_azodand hard, fil_deep pans with hot water
and place them on the freezer bottom. Close the freezer
door. Frost should soften in about 15 minutes. Repeat
this procedure ifnecessary.
CLEANING THE INSIDE
After defrosting, wash inside surfaces of the freezer with a
solution of two tablespoons of baking soda in one quart
(1,136 litres) warm water. Rinse and dry. Wring excess
water out of the sponge or cloth when cleaning in the area
of the controls, or any electrical parts,
Wash the removable parts and door basket with the baking
soda solution mentioned above, or mild detergent and
warm water. Rinse and dry. Never use metallic scouring
pads, brushes, abrasive aieanera, or alkaline solutions on
any surface. Do not wash removable parts in a dishwashe£
If leaving the freezer
door open while on vacation, make
the freezer and become entrapped.
certain that children cannot get into
VACATION AND MOVING TIPS
Short Vacations:
Leave the freezer operating during vacations of less
than three weeks.
Long Vacations:
If the freezer will not be used for several months:
Remove all food and unplug the power cord.
Clean and dry the interior thoroughly.
Leave the freezer door open slightly, blocking it open if
necessary, to prevent odor and mold growth.
Moving: When moving the freezer, follow these guidelines
to prevent damage:
Disconnect the power cord plug from the wail outlet.
Remove foods, then defrost, and clean the freezer.
Secure all loose items such as base panel, baskets, and
shelves by taping them securely in place to prevent
damage.
In the moving vehicle, secure freezer in an upright
position to prevent movement. Also protect outside of
freezer with a blanket, or similar item.
NOTE: Do not open freezer door
unnecessarily if freezer is off for
several hours.
If a power failure occurs, frozen foods will stay frozen for
at least 24 hours if the freezer is kept closed. If the power
failure continues, pack seven or eight pounds of dry ice into
the freezer every 24 hours. Look in the Yellow Pages under
Dry Ice, Dairies, or Ice Cream Manufacturersfor local dry
ice suppliers. Always wear gloves and use caution when
handling dry ice.
If the freezer has stopped operating, see Freezer Does
Not Run in the Troubleshooting Guide. If you cannot
solve the problem, call an authorized servicer immediately.
If the freezer remains off for several hours, follow the
directions above for the use of dry ice during a power
failure, If necessary, take the food to a local locker plant
until the freezer is ready to operate, Look in the Yellow
Pages under Frozen Food Locker Plants,
10
TROUBLESHOOTING Beforecallingfor service,reviewthislist.Itmaysaveyoutimeandexpense.Thislist
includes common occurences that are not the resu{t of defective workmanship or
GUIDE materials in this appl{ance.
PROBLEM CAUSE I CORRECTION
FREEZER DOES NOT RUN
FPaezer does not run. Freezer isplugged into a circuit * Use another circuit. _fyou are unsure about the oulJet,
that has a ground fault interrupt, have it checked by a certified technician.
Temperature control is in the See Setting the Temperature Control Section.
OFF position.
Freezer may not be p_ugged in, Ensure plug is tightly pushed into outlet.
or plug may be loose.
House fuse blown or tripped Chack/repface fuse with a 15 amp time-dstay fuse. Reset
circuit breaker, circuit breaker.
Power outage. Check house lights. CStl local Electric Company.
FP_ezer tuns too much or too Room or outside weather is hot.
_ong.
Freezer has recently been
disconnected for a period of
time.
Large amounts of warm or hat
food have been stored recently.
Doors are opened too frequently
or too long.
Freezer door may be siightJy
open.
Temperature Control is set too
low.
Freezer gasket is dirty, worn,
cracked, or poorly fitted.
•tt's normal for the freezer to work harder under these
conditions.
tt takes 4 hours for the freezer to cost down complete_
Warm food will cause freezer to run more unti_the
desired temperature is reached.
Warm air entering the freezer causes it to run more.
Open doors less often.
See "DOOR PROBLEMS" Section.
Turn control knob to a warmer settfag. Allow several hours
for the temperafore to stebilize.
Clean or change gasket. Leaks in the door seal w_llcause
freezer to run fonger in order to m_Jctain desired
temperature.
Interior Freezer temperature is Temperature Control is set too Turn the control to a warmer setting. A_{owseveral hours
too cold. low. for the temperature to stabilize.
Temperature Control is set too
warm.
Door is kept open too long or is
opened too frequentl_
Door may not be seating
properl_
Large amoucts of warm or hot
food may have been stored
recenU_
Freezer has recency been
disconnected for a period of
time.
Interior Freezer temperature is
too warm.
Turn control to a colder setting. Allow several hours for the
temperature to stabilize.
Warm air enters the freezer every time the door is
opened. Open the door tess often.
See "DOOR PROBLEMS" Section.
Wait unti_the freezer has had a chance to reach its
selected temperature.
Freezer requires 4 hours to cool down completely.
FP_ezer external surface The external freezer walls can This is norma! while the compressor works to transfer
temperature is warm. be as much as 30_F warmer heat from inside the freezer cabinet.
tha_ room temperature.
SOUND AND NOISE
Louder sound levels whenever Modern freezers have increased This is normst.When the surrounding noise level is low,
fP_.zer is on. storage capacity and more you might hear the compressor running wMle it cools the
stable temperatures.They interior.
require a high eff_stency
compressor.
Longer sound levels when Freezer operates at higher This is normal Sound will leve_off or disappear as freezer
compressor comes on. pressures during the start of the contfaues to run.
ON cyste.
11
PROBLEM [ CAUSE [ CORRECTION
SOUND AND NOISE (Cont.)
Popping or cracking sound Meta_ parts undergo expansion This is normal. Sound will _evel oft or disappear as
when compressor comes on. and contraction, as in hot water freezer continues to run.
pipes.
Bubbling or gurgling sound, Refrigerant (used to cool * This is normal.
like water boiling, freezer) is circulating
throughout the system.
Vibrating or rattling noise. Freezer is not level. It rocks on Level the unit. Refer to "Leveling" in the First Steps
the floor when it is moved Section.
slightly.
Floor is uneven or weak. Ensure floor can adequately support freezer. Level the
Freezer rocks on floor when it freezer by pufting wood or metal shims under part of the
is moved slightly, freezer.
Freezer is touching the wall. Relevel the freezer or move freezer slightly. Refer to
"Leveling" in the First Steps Section.
WATER/MOISTURE/FROST INSIDE FREEZER
Moisture forms on inside Weather is hot and humid, This is normal.
freezer walls, which increases internal rate of
frost build-up.
Door may not be seating See "DOOR PROBLEMS" Section.
properly.
Door is kept open too long, or Open the door _ess often.
is opened too frequently.
WATER/MOISTURE/FROST OUTSIDE FREEZER
Moisture forms on ouside of Door may not be seating See '_DOOR PROBLEMS" Section.
freezer, properly, causing the cold air
from inside the freezer to meet
warm moist air from outside.
ODOR IN FREEZER
Odors in freezer tntedor needs to be cleaned. Clean interior with sponge, warm water, and baking
Foods with strong odors are in soda.
the freezer. Cover the food tightJy.
DOOR PROBLEMS
Door will not cloSe. Freezer is not level. _trocks on This condition can force the cabinet out of square and
the floor when it is moved misalign the door. Refer to "Leveling" in the First Steps
slightly. Section.
Floor is uneven or weak. Level the f_oor by using wood or metal shims under the
Freezer rocks on floor when it freezer or brace floor supporting the freezer.
is moved slightly.
LIGHT BULB IS NOT ON
Light bulb is not on. Light buth is burned out. Follow directions under "thterior Light" in the Freezer
Features Section.
theN°electriCfreezer.Currentis reaching See "FREEZER DOES NOT RUN" Section.
AUTOMATIC ICE MAKER NOT WORKING
Automatic ice maker not Ensure the Wire Signa_ Arm is not in the UP position.
working. (some models) Ice maker should produce 4 to 5 pounds of ice in a 24 hour period.
Water supply is turned off.
Water pressure istoo low.
The freezer is not cold enough.
12
"We Service What We Sell" is our assurance you can
depend on Sears for service ...and Sears service is
nationwide. Your freezer has added value when you
consider that Sears has service units nationwide, staffed
with professional technicians specifically trained on Sears
appliances and having parts, tools and equipment to
ensure that we meet our pledge to you.-"We Service What
We Sell."
SEARSMAINTENANCEAGREEMENT
Maintain the value of your Kenmore@ freezer with a Sears
Maintenance Agreement. Sears freezers are designed,
manufactured, and tested for years of dependable opera-
tion. Yet, any modern appliance may require service from
time to time.
The Sears Maintenance Agreement
Is your way to buy tomorrow's service at today's price.
Eliminates repair bills resulting from normal use.
Allows for as many service calls as required.
Provides for service by professional Sears-trained
technicians.
Offers an annual preventive maintenance check-up at
your request.
This maintenance agreement does not cover original
installation, reinstallation, or damage resulting from
external causes such as acts of God, abuse, theft, fire,
flood, wind, lightning, freezing, power failure, power
reduction, etc. Please ask a salesperson to see the
agreement for all of the terms and conditions.
Dear Customer:
In manufacturing this product, many steps have been taken
to provide you with the highest quality. Unfortunately, errors
or omissions occasionaly occur. In the event you find a
missing or defective part, please contact your nearest
Sears store. (See the back cover for phone numbers.)
If you have any suggestions that would help us to improve
our assembly/operation instructions or this product, please
write them down, including the information listed below and
mail to:
Sears Canada, Inc. Attn: Buyer Dept. 646
222 Jarvis Street
Toronto, Ontario
M5B 2B8
Purchased by:
Name:......................................................................................................................................................................................
Address:........................................................................................................................
City: ......................................................Prov.:.................................................................................
Postal Code: .................................Phone:......................................
Model No.: 970.:...................................................
Serial No,:.........................................
Date of Purchase__../ /.......
Loca ion ofPurchase ........................................................
Comments:
13
14
  • Page 1 1
  • Page 2 2
  • Page 3 3
  • Page 4 4
  • Page 5 5
  • Page 6 6
  • Page 7 7
  • Page 8 8
  • Page 9 9
  • Page 10 10
  • Page 11 11
  • Page 12 12
  • Page 13 13
  • Page 14 14

Kenmore 253 Series Owner's manual

Category
Fridges
Type
Owner's manual

Ask a question and I''ll find the answer in the document

Finding information in a document is now easier with AI