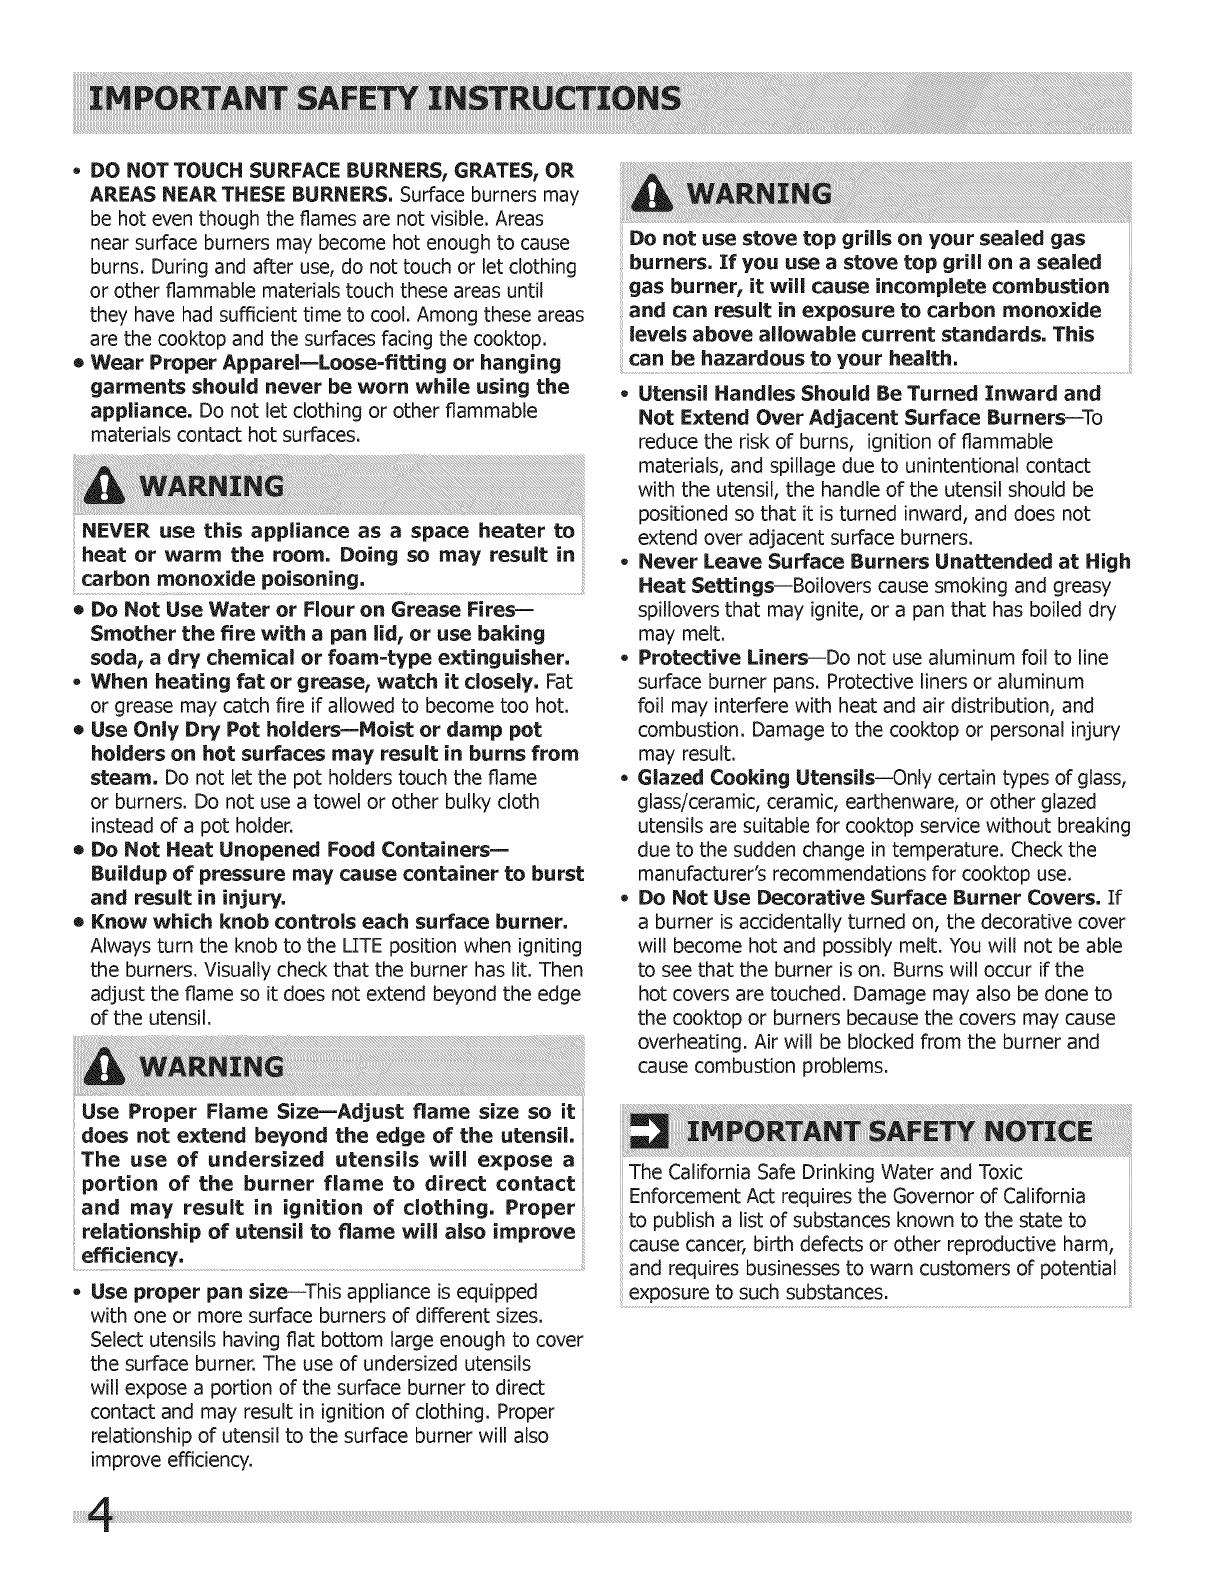
Frigidaire FGGC3065KBA Owner's manual

Category
Cookers
Type
Owner's manual
Welcome & CongratUlations .........
Before Setting Surface Controls,
Setting Surface Controls ..........................
www,frigidaire.com USA 1-800-944-9044 www,frigidaire.ca Canada 1-800-265-8352
........._iiiiiiiiiiiiiiiiiiiiiiiiiiiiiiiiiiiiiiiiiiiiiiiiiiiiiiiiiiiiiiiiiiiiiiiiiiiiiiiiiiiiiiiiiiiiiiiiiiiiiiiiiiiiii
iil
Product Registration
Register Your Product
ThePRODUCT
REGISTRATION CARD
should be filled in completely,
signed and returned to
Electrolux Home Products.
Serial Plate Location
Cooktop Serial
Plate Location
Please record your model and serial numbers
below for future reference,
Model Number:
Serial Number:
ii
Purchase Date:
ii
Congratulations on your purchase of a new appliance! At
Electrolux Home Products, we are very proud of our
product and are completely committed to providing you
with the best service possible. Your satisfaction is our
number one priority.
We know you'll enjoy your new appliance and Thank You
for choosing our product. We hope you consider us for
future purchases.
PLEASE CAREFULLY READ AND SAVE THESE
INSTRUCTIONS
This Use & Care Manual contains general operating
instructions for your appliance and feature information
for several models. Your product may not have all
the described features. The graphics shown are
representative. The graphics on your appliance may not
look exactly like those shown. These instructions are not
meant to cover every possible condition and situation
that may occur. Common sense and caution must be
practiced when installing, operating and maintaining any
appliance.
Please attach sales receipt here for future reference.
Si desea obtener una copia en espa_ol de este Manual
del Usuado, drvase escribir a la direcci6n que se
incluye a continuaci6n. Solicite la P/N 318203658E.
Spanish Use & Care Manual
Electrolux Home Products
R O. Box 212378
© 2009 Electrolux Canada Corp,
All rights reserved
Printed in United States
Read all instructions before using this appliance.
Save these instructions for future reference.
If the information in this manual is not followed
exactly, a fire or explosion may result causing
property damage, personal injury or death.
FOR YOUR SAFETY
-- Do not store or use gasoline or other
flammable vapors and liquids in the vicinity of
this or any other appliance.
-- WHAT TO DO IF YOU SHELL GAS:
Do not try to light any appliance.
Do not touch any electrical switch; do not use
any phone in your building.
= Immediately call your gas supplier from a
neighbor's phone. Follow the gas supplier's
instructions.
= If you cannot reach your gas supplier, call the
fire department.
-- Installation and service must be performed
by a qualified installer, servicer or the gas
supplier.
DEFINITIONS
This isthe safety alert symbol, It is used to alert
you to potential personal injury hazards, Obey all safely
messages that follow this symbol to avoid possible injury
or death,
This symbol wUl help alert you to situations
that may cause serious bodily harm, death or
This symbol will help alert you to situations that
may cause bodily injury or property damage.
* Remove all tape and packaging wrap before
using the cooktop. Destroy the carton and
plastic bags after unpacking the cooktop. Never
allow children to play with packaging material. Do not
remove the model/serial plate attached to the cooktop,
o Proper Installation--Be sure your appliance is
properly installed and grounded by a qualified
technician in accordance with the National Fuel
Gas Code ANSI Z223.1 latest edition and CAN/
CGA B149.2, and the National Electrical Code
ANSI/NFPA No. 70--latest edition, and local
code requirements. Installand/oradjustonlyper
installation instructions provided in the literature
package for this cooktop,
Ask your dealer to recommend a qualified technician and
an authorized repair service, Know how to shut off gas
supply at the meter and disconnect the electrical power
to the cooktop at the circuit breaker or fuse box in case
of an emergency,
- User Servicing--Do not repair or replace
any part of the appliance unless specifically
recommended in the manuals. All other servicing
should be done only by a qualified technician, This may
reduce the risk of personal injury and damage to the
cooktop.
Never modify or alter the construction of a
cooktop by removing panels, wire covers, or any
other part of the product.
Stepping or leaning on this cooktop can result
in serious injuries and may also cause damage
to the cooktop. Do not allow children to climb or
play around the cooktop.
* Storage on Appliance--Flammable materials
should not be stored on the cooktop, near
surface burners, This includes paper, plastic and cloth
items, such as cookbooks, plasticware and towels, as
well as flammable liquids. Do not store explosives,
such as aerosol cans, on the cooktop. Flammable
materials may explode and result in fire or property
damage.
IMPORTANT indicates installation, operation or
maintenance information which is important but not
hazard-related.
Do not store items of interest to children in the
cabinets above the cooktop.
* Do not leave children alone--Children should not
be left alone or unattended in the area where an
appliance is in use. They should never be allowed to
sit or stand on any part of the appliance.
DO NOT TOUCH SURFACE BURNERS, GRATES, OR
AREAS NEAR THESE BURNERS. Surface burners may
be hot even though the flames are not visible. Areas
near surface burners may become hot enough to cause
burns. During and after use, do not touch or let clothing
or other flammable materials touch these areas until
they have had sufficient time to cool. Among these areas
are the cooktop and the surfaces facing the cooktop.
Wear Proper Apparel=Loose=fitting or hanging
garments should never be worn while using the
appliance. Do not let clothing or other flammable
materials contact hot surfaces.
NEVER use this appliance as a space heater to
heal or warm the room. Doing so may result in
carbon monoxide poisoning.
Do Not Use Water or Flour on Grease Fires=
Smother the fire with a pan lid, or use baking
soda, a dry chemical or foam=type extinguisher.
- When heating fat or grease, watch it closely. Fat
or grease may catch fire if allowed to become too hot.
Use Only Dry Pot holders=Moist or damp pot
holders on hot surfaces may result in burns from
steam, Do not let the pot holders touch the flame
or burners. Do not use a towel or other bulky cloth
instead of a pot holder.
Do Not Heat Unopened Food Containers=
Buildup of pressure may cause container to burst
and result in injury.
= Know which knob controls each surface burner.
Always turn the knob to the LITE position when igniting
the burners. Visually check that the burner has lit. Then
adjust the flame so it does not extend beyond the edge
of the utensil.
Use Proper Flame Size=Adjust flame size so it
does not extend beyond the edge of the utensil.
The use of undersized utensils will expose a
portion of the burner flame to direct contact
and may result in ignition of clothing. Proper
relationship of utensil to flame will also improve
efficiency.
= Use proper pan size--This appliance is equipped
with one or more surface burners of different sizes.
Select utensils having fiat bottom large enough to cover
the surface burner. The use of undersized utensils
will expose a portion of the surface burner to direct
contact and may result in ignition of clothing. Proper
relationship of utensil to the surface burner will also
improve efficiency.
Do not use stove Lop grills on your sealed gas
burners. If you use a stove Lop grill on a sealed
gas burner, it will cause incomplete combustion
and can result in exposure to carbon monoxide
levels above allowable current standards. This
can be hazardous to your health. .....................................................................................................................
- Utensil Handles Should Be Turned Inward and
Not Extend Over Adjacent Surface Burners--To
reduce the risk of burns, ignition of flammable
materials, and spillage due to unintentional contact
with the utensil, the handle of the utensil should be
positioned so that it is turned inward, and does not
extend over adjacent surface burners.
- Never Leave Surface Burners Unattended at High
Heat Settings--Boilovers cause smoking and greasy
spillovers that may ignite, or a pan that has boiled dry
may melt.
- Protective Liners--Do not use aluminum foil to line
surface burner pans. Protective liners or aluminum
foil may interfere with heat and air distribution, and
combustion. Damage to the cooktop or personal injury
may result.
Glazed Cooking Utensils--Only certain types of glass,
glass/ceramic, ceramic, earthenware, or other glazed
utensils are suitable for cooktop service without breaking
due to the sudden change in temperature. Check the
manufacturer's recommendations for cooktop use.
- Do Not Use Decorative Surface Burner Covers. If
a burner is accidentally turned on, the decorative cover
will become hot and possibly melt. You will not be able
to see that the burner ison. Burns will occur if the
hot covers are touched. Damage may also be done to
the cooktop or burners because the covers may cause
overheating. Air will be blocked from the burner and
cause combustion problems.
The California Safe Drinking Water and Toxic
Enforcement Act requires the Governor of California
to publish a list of substances known to the state to
cause cancer, birth defects or other reproductive harm,
and requires businesses to warn customers of potential
exposure to such substances.
GROUNDING INSTRUCTIONS
For personal safety, the cooktop must be properly
grounded. For maximum safety, the power cord must be
plugged into an electrical outlet that is correctly polarized
and properly grounded.
DO NOT operate the cooktop using a 2-prong adapter or
an extension cord. If a 2-prong wall receptacle is the only
available outlet, it is the personal responsibility of the
consumer to have it replaced with a properly grounded
3-prong wall receptacle installed by a qualified electridan.
See theINSTALLATION INSTRUCTIONS packaged
withthiscooktopforcompleteinstallationand grounding
instructions.
This appliance is equipped with a 3-prong grounding
plug for your protection against shock hazard and
should be plugged directly into a properly grounded
receptacle. DO NOT cut or remove the grounding
Grounding
type wall
rece
not, under any_"_
circumstances, |
cut,remove, |
or bypass the |
grounding prong/
CONVERSION TO LIQUEFIED PETROLEUM
GAS (OR L,P, GAS)
This natural gas range is designed to allow for conversion
to Liquefied Petroleum (L.P.) Gas.
If L.R conversion is needed, contact the service center
for assistance. The L.P. Conversion Kit is provided with
this cooktop and is located in the literature envelope.
Before installing the kit be sure to follow the L.P.
Installation Instructions carefully.
Personal injury or death from electrical shock may
occur ifthe range is not installed by a qualified installer
or electrician.
Any additions, changes or conversions required in order
for this appliance to satisfactorily meet the application
needs must be made by an authorized Service Center.
Power supply cord with
3=prong grounding plug
Avoid fire hazard or electrical shock. DO NOT use an
adapter plug, an extension cord, or remove grounding
prong from electrical power cord. Failure to follow this
warning can cause serious injury, fire or death.
LOCATIONS OF THE GAS SURFACE
BURNERS
The SIMMER burner is best used for simmering delicate
sauces, etc. This burner is located at the right rear burner
position.
The STANDARD sized burners are used for most surface
cooking needs. This burner is located at the left rear
positions on the 30" & 36" cooktop (and there is one
more standard burner located at the right front position
on the 36" cooktop models).
The POWER burner is best used for bringing large
quantities of liquid rapidly up to temperature or when
preparing larger quantities of food. Those burners are
located at the right and left front positions on the 30"
cooktop (and there is another power burner located at
the center position on the 36" cooktop).
Figure :_- 30" Model
ASSEMBLY OF THE SURFACE BURNER
BURNER CAPS AND BURNER GRATES
It isvery important to make sure that all of the Surface
Burner Caps and Surface Burner Grates are installed
correctly and at the correct locations.
:_ Remove all packing material from cooktop area.
2 Discard all packing material (if applicable).
3 Unpack Burner Grates and position on the cooktop
(see Figure 3 or 4).
REMEMBER-- DO NOT ALLOW SPILLS, FOOD,
CLEANING AGENTS OR ANY OTHER MATERIAL
TO ENTER THE GAS OR:IFTCE HOLDER OPENING,
Always keep the Burner Caps and Burner Heads in place
whenever the surface burners are in use.
(your model may not look exactly like this one)
Figure 3 - 30" Model
Figure 2 - 36" Model
(your model may not look exactly like this one)
Figure 4 - 36" Model
OPERATING THE GAS SURFACE CONTROLS
1 Place cooking utensil on surface burner.
2 Push the surface control knob down and turn
counterclockwise out of the OFF position.
3 Release the knob and rotate to the LITE position (see
figure 1). Note: All four electronic surface ignitors will
spark at the same time. However, only the burner
you are turning on will ignite.
4 Visually check that the burner has a flame.
5 Turn the control knob counterclockwise to the
desired flame size. The control knobs do not have to
be set at a particular setting. Use the knob indicator
settings to adjust the flame as needed. DO NOT
cook with the surface control knob in the LITE
position. (The electronic ignitor will continue to spark
if the knob is left in the LITE position.)
SETTING PROPER SURFACE BURNER
FLAME SIZE
For most cooking - start on the highest control
setting and then turn to a lower one to complete the
process. Use the recommendations below as a guide
for determining proper flame size for various types
of cooking. The size and type of utensil used and the
amount of food being cooked will influence the setting
needed.
For deep fat frying - use a thermometer and adjust the
surface control knob accordingly. If the fat is too coo!, the
food will absorb the fat and be greasy. If the fat is too
hot, the food will brown so quickly that the center will be
under cooked. Do not attempt to deep fat fry too much
food at once as the food will neither brown nor cook
properly.
Do not place plastic items such as salt and
pepper shakers, spoon holders or plastic
wrappings on top of the range when it is in use,
These items could melt or ignite. Pot holders, towels
or wood spoons could catch fire if placed too close to a
flame.
Medium Flame Maintain a slow boil; thicken sauces,
gravies; steaming.
Low Flame Keep foods cooking; poach; stewing.
Do not operate the burner for an extended period
of time without cookware on the grate. The finish
on the grate may chip without cookware to absorb the
heat.
Correct Incorrect
Figure 1
In the event of an electrical power outage, the surface
burners can be lit manually. To light a surface burner,
hold a lit match to the burner head, then slowly turn
the surface control knob to LITE. After burner lights
turn the knob to desired setting. Use caution when
lighting surface burners manually.
Never extend the flame beyond the outer edge of the
utensil. A higher flame simply wastes heat and energy,
and increases the risk of being burned by the gas
flame.
*Note: Settings are based on using medium=
weight metal or aluminum pans. Settings may
vary when using other types of pans, The color
of the flame is the key to proper burner adjustment. A
good flame is clear, blue and hardly visible in a well-
lighted room. Each cone of flame should be steady and
sharp. Clean burner if flame is yellow-orange.
CLEANING VARIOUS PARTS OF YOUR COOKTOP
Before cleaning any part of the cooktop, be sure all controls are turned OFF and the cooktop isCOOL. REMOVE
SPILLOVERS AND HEAVY SOILING AS SOON AS POSSIBLE. REGULARCLEANING WILL REDUCETHE NUMBER OF
MAJOR CLEANING LATER.
Aluminum (Trim Pieces) &
Glass, Painted and Plastic
Control Knobs, Body
Pieces, and Decorative
Trim
Use hot, soapy water and a cloth. Dry with a clean cloth.
Using a soft cloth, clean with mild dish detergent and water or a 50/50 solution of
vinegar and water. Follow by rinsing the area with clean water; dry and polish with a
soft cloth. Glass cleaners may be used if sprayed on a soft cloth first. DO NOT spray
liquids directly on the control pad and display area. Do not use large amounts of
water on the control panel =excess water on the control area may cause damage to
the appliance. Do not use other liquid cleaners, abrasive cleaners, scouring pads, or
some paper towels =they will damage the finish.
Porcelain Enamel
Burner Grates (some models),
Burner Rings (some models),
Cooktop Surface (some
models)
Stainless Steel, Chrome Clean stainless steel with hot, soapy water and a dishcloth. Rinse with clean water
Decorative Trim (some and a cloth. Do not use cleaners with high concentrations of chlorides or
models) chlorine, Do not use harsh scrubbing cleaners. Only use kitchen cleaners that are
especially made for cleaning stainless steel. Always be sure to rinse the cleaners
ii
from the surface as bluish stains may occur during heating that cannot be removed.
Gentle scouring with a soapy scouring pad will remove most spots. Rinse with a
:[:1 solution of clear water and ammonia. If necessary, cover difficult spots with
an ammonia-soaked paper towel for 30 to 40 minutes. Rinse with clean water and
a damp cloth, and then scrub with a soap-filled scouring pad. Rinse and wipe dry
with a clean cloth or paper towel. Remove all cleaners or the porcelain may become
damaged during future heating. DO NOT use spray oven cleaners on the cooktop.
CLEANING THE COOk'TOPr BURNER CAPS
& BURNER GRATES
The cooktop is designed to make cleaning easier. Because
the gas Burners are sealed, deanups are easy when
spillovers are cleaned up immediately.
The cooktop, Burner Heads and Caps should be routinely
cleaned. Keeping the Burner Head Ports clean will
prevent improper ignition and an uneven flame. Refer to
the following instructions:
THE COOl(TOP IS NOT REMOVABLE. Do not
Pay attention to not damage electrodes. Damaged
electrodes may cause a delayed ignition or prevent the
Any additions, changes or conversions required in order
for this appliance to perform satisfactorily must be
made by an authorized Service Center.
Do not remove any parts from the cooktop until they
have completely cooled and are safe to handle. Do
not operate the surface Burners without the Burner
Caps and Burner Heads properly in place.
To Clean the surface Burner Caps and Burner Heads-
Use a soap-filled scouring pad or a mild abrasive cleanserto
clean the surface Burner Caps and Burner Heads. The ports
(or slots) around the Burner Heads must be routinely checked.
If residue still remains in these ports (or slots), use a small-
gauge wire or needle to clean the slots or holes. For proper
flow of gas and ignition of the burner--DO NOT ALLOW
SPILLS, FOOD, CLEANING AGENTS OR ANY OTHER
HATERIAL TO ENTER THE GAS ORIFICE HOLDER
OPENING. ALWAYS keep the surface Burner Caps in place
whenever the gas Burners are in use or not.
To Clean the Burner Grates= Be sure burners and
grates are cool before you place your hand, a pot
holder, cleaning cloths or other material on them. The
cast iron burner grates can be washed in hot soapy
water. Rinse thoroughly and dry the grates with a cloth -
don't put them on the cooktop while still wet. Be sure the
grates are positioned securely over the burners.
To remove burned on food, place the grates in a covered
container or plastic bag. Add 1/4 cup ammonia and soak for
30 minutes. Wash, rinse well and dry. An abrasive cleaner
can be used for stubborn stains.
CERAMIC GLASS COOKTOP CLEANING &
MAINTENANCE
Consistent and proper denning is
essential to maintaining your Ceramic
glass cooktop,
Prior to using your cooktop for the first time, apply the
recommended CERAMA BRYTE® Cleaning Creme to the
ceramic surface. Clean and buff with a non abrasive cloth
or pad. This will make cleaning easier when soiled from
cooking. The special cooktop cleaning cream leaves a
protective finish on the glass to help prevent scratches
and abrasions.
Sliding aluminum or copper clad bottom pans on the
cooktop can cause metal markings on the cooktop
surface. These marks should be removed immediately
after the cooktop has cooled using the cooktop cleaning
cream. Metal marks can become permanent if not
removed prior to future use.
Cookware (cast iron, metal, ceramic or glass) with rough
bottoms can mark or scratch the cooktop surface. Do
not slide anything metal or glass across the cooktop.
Do not use your cooktop as a cutting board or work
surface in the kitchen. Do not cook foods directly on the
cooktop surface without a pan. Do not drop heavy or
hard objects on the glass cooktop, or they may crack it.
CLEANING RECOHHENDATIONS FOR THE
CERAMIC GLASS COOKTOP
Before cleaning the cooktop, be sure the controls are
turned to OFF and the cooktop is COOL.
DO NOT use a cooktop cleaner on a hot cooktop.
The fumes can be hazardous to your health, and can
chemica!ly damage the ceramic g!ass surface: ....................................................................
For light to moderate soil:
Apply a few drops of CookTop® Cleaning Creme directly
to the cooktop. Use a paper towel or use a non=
abrasive plastic type no=scratch pad to clean the
entire cooktop surface. Nake sure the cooktop is cleaned
thoroughly, leaving no residue.
For heavy, burned on soih
Apply a few drops of CookTop® Cleaning Creme directly
to the soiled area. Rub the soiled area using a non=
abrasive plastic type no=scratch pad, applying pressure
as needed. Do not use the pad you use to clean the
cooktop for any other purpose.
Damage to the ceramic glass cooktop may occur if you
use an abrasive type scratch pad. Only use cleaning
products that have been specifically designed for
ceramic glass cooktop.
If soils remain, carefully scrape soils with a metal razor
blade scraper, holding scraper at a 30 degree angle to the
surface. Remove loosened soils, then apply a few drops
of cleaning cream and buff surface clean.
Plastic or foods with a high sugar content"
These types of soils need be removed immediately if
spilled or melted onto the ceramic cooktop surface.
Permanent damage (such as pitting of the cooktop
surface) may occur if not removed immediately. After
turning the surface elements OFF, use a razor blade
scraper or a metal spatula with a mitt and scrape the soil
from the hot surface (as illustrated). Allow the cooktop to
cool, and use the same method for heavy or burned on
soils.
Do not use the following on the ceramic glass
cooktop:
Do not use abrasive cleaners and scouring pads,
such as metal and some nylon pads, They may
scratch the cooktop, making it more difficult to
dean,
Do not use harsh cleaners, such as chlorine
bleach, ammonia or oven cleaners, as they may
etch or discolor the cooktop,
= Do not use dirty sponges, cloths or paper
towels, as they can leave soil or lint on the
cooktop which can burn and cause Special
Caution for Aluminum Foil and Aluminum
Cooking Utensils
®
®
, ,_
Aluminum foil
Use of aluminum foil will damage the cooktop. Do not
use under any circumstances.
Aluminum utensils
Since the melting point of aluminum is much lower
than that of other metals, care must be taken when
aluminum pots or pans are used. Pans that boil dry
may permanently damage cooktop by breaking, fusing
to, or marking it.
CARE AND CLEANING OF STAINLESS STEEL
Some models are equipped with stainless steel exterior
parts. Special care and cleaning are required for
maintaining the appearance of stainless parts. Refer
to the General Care & Cleaning table for detailed
cleaning instructions.
Before you call for service, review this list. It may save you time and expense. The list includes common
occurrences that are not the result of defective workmanship or materials in this appliance.
Surface burners do Surface Control knob has not been completely turned to LITE. Push in and turn the Surface
not light, Control knob to LITE until burner ignites and then turn control to desired flame size.
Be sure gas supply valve isopen.
Burner ports or slots are clogged. With the burner off, use a small-gauge wire or needle to
clean ports or slots.
Power cord is disconnected from outlet (electric ignition models). Be sure cord is plugged
securely into outlet.
....Be_ricai power outage iele_iic ignition modeisi: Burners can be lit manually: See Se_ing
Surface Controls in this Owner's Guide.
Surface burner Burner ports or slots are clogged. With the burner off, clean ports with a small-gauge wire
flame burns half way or needle to clean ports or slots.
around. Moisture is present after cleaning. Lightly fan the flame and allow burner to operate until flame
is full. Dry the burners thoroughly following instructions under General Cleaning.
Surface burner flame Dust particles in main line. Allow the burner to operate a few minutes until flame turns
is orange, blue.
In coastal areas! a slightly orange flame is unavoidable due to salt air. ......
Scratches or Coarse particles such as salt or sand between cooktop and utensil can cause scratches. Be
abrasion on cooktop sure cooktop surface and bottoms of utensils are clean before usage. Small scratches do no
surface, affect cooking and will become less visible with time.
ii
Cleaning materials not recommended for ceramic-glass cooktop have been used. See "To
Clean the Ceramic-glass Cooktop" section under General Cleaning.
Cookware with rough bottom has been used. Use smooth, fit-bottomed cookware.
Metalmarks. Sliding or scraping of metal utensils on cooktop surface. Do not slide metal utensils on cooktop
surface. Use ceramic-glass cooktop cleaning cream to remove the marks. See "To Clean the
.............................................Ceramic-glass Cooktop" section under General Cleaning. ..........
Brown streaks or Boilover are cooked onto surface. Use razor blade scraper to remove soil. See "To Clean the
specks. Ceramic-glass Cooktop" section under General Cleaning.
Areas of Mineral deposits from water and food. Remove using a ceramic-glasscooktop cleaning cream.
discoloration with Use cookware with clean, dry bottoms.
metallic sheen.
Your appliance is covered by a one year limited warranty. For one year from your original date of purchase, Electrolux
will pay all costs for repairing or replacing any parts of this appliance that prove to be defective in materials or
workmanship when such appliance is installed, used and maintained in accordance with the provided instructions.
Exclusions This warranty does not cover the following:
1 Products with original serial numbers that have been removed, altered or cannotbe readily
determined.
2 Product that has been transferred from its original owner to another party or removed outside the
USAorCanada.
3 Rust on the interior or exterior of the unit.
4 Products purchased "as-is" are not covered by this warranty.
5 Food loss due to any refrigerator or freezer failures.
6 Products used in a commercial setting.
7 Service calls which do not involve malfunction or defects in materials or workmanship, or for
appliances not in ordinary household use or used other than in accordance with the provided
instructions.
8 Service calls to correct the installation of your appliance or to instruct you how to use your appliance.
9 Expensesfor making the appliance accessible for servicing, such as removal of trim, cupboards,
shelves, etc., which are not a part of the appliance when it is shipped from the factory.
10 Service calls to repair or replace appliance light bulbs, air filters, water filters, other consumable, or
knobs, handles, or other cosmetic parts.
11 Surcharges including, but not limited to, any after hour, weekend, or holiday service calls, tolls, ferry
trip charges, or mileage expense for service calls to remote areas, including the state of Alaska.
12 Damages to the finish of appliance or home incurred during installation, including but not limited to
floors, cabinets, walls, etc.
13 Damages caused by: services performed by unauthorized service companies; use of parts other than
genuine Electrolux parts or parts obtained from persons other than authorized service companies; or
external causes such as abuse, misuse, inadequate power supply, accidents, fires, or acts of God.
DISCLAIMER OF IMPLIES WARRANTIES; LIMITATION OF REMEDIES
Customer's sole and exclusive remedy under this limited warranty shall be product repair or
replacement as provided herein. Claims based on implied warranties, including warranties of
merchantability or fitness for particular purpose, are limited to one year or the shortest period
ii
allowed by law, but not less than one year. Electrolux shall not be liable for consequential or
ii
incidental damages such as property damage and incidental expenses resulting from any breach
of this written limited warranty or any implied warranty. Some states and provinces do not allow
the exclusion or limitation of incidental or consequential damages, or limitations on the duration of
implied warranties, so these limitations or exclusions may not imply to you. This written warranty
gives you specific legal rights. You may also have other rights that vary from state to state.
ii
If You Keepyour receipt, delivery slip, or some other appropriate payment record to establish the warranty period
Need should service be required. If service is performed, it is in your best interest to obtain and keep all receipts.
Service Service under this warranty must be obtained contacting Electrolux at the addresses or phone numbers
ii
below.
ii
This warranty only applies in the USAand Canada. In the USA, your appliance is warranted by Electrolux Major
Appliances North America, a division of Electrolux Home Products, Inc. In Canada, your appliance is warranted by
Electrolux Canada Corp. Electrolux authorizes no person to change or add to any obligations under this warranty.
ii
Obligations for service and parts under this warranty must be performed by Electrolux or an authorized service
ii
company. Product features or specifications as described or illustrated are subject to change without notice.
USA
1.800.944.9044
Electrolux Major Appliances
North America
P.O. Box 212378
Augusta, GA 30907
Electrolux
Canada
:L800.265.8352
Electrolux Canada Corp.
5855 Terry Fox Way
Hississauga, Ontario, Canada
LSV 3E4
  • Page 1 1
  • Page 2 2
  • Page 3 3
  • Page 4 4
  • Page 5 5
  • Page 6 6
  • Page 7 7
  • Page 8 8
  • Page 9 9
  • Page 10 10
  • Page 11 11
  • Page 12 12

Frigidaire FGGC3065KBA Owner's manual

Category
Cookers
Type
Owner's manual

Ask a question and I''ll find the answer in the document

Finding information in a document is now easier with AI