Page is loading ...

Adam Equipment
Anti-Vibration Table
(P.N.304666011 – Rev B1 November 2011)

© Adam Equipment 2011
1
Thank you for purchasing an AE Adam Anti vibration table, we hope that you will be satisfied with your
purchase, if you have any questions concerning the assembly of your table then please contact your
distributor or nearest AE Adam office, details of which can be found on our website:
www.adamequipment.com
NOTE:
This table is designed to be used on concrete or solid floors. It’s
performance will be severely restricted if used on an unstable floor. It is
important the table is located and leveled in a position such that the
outer frame is not touching any walls or other machinery and the floor
surface is a solid floor that will not move as people walk nearby or
machinery is moved.

© Adam Equipment 2011
2
AVT Assembly Instructions
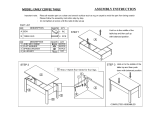
1. Inner Frame Assembly:
Step One: Open the packing box, take out the top, middle, lower packing assemblies
and the accessory bags, See Figure 1.
Inner side rail (right) Granite supporting assembly Inner side rail (left)
Supporting rail (lower)
Lower packing Middle packing Top packing
Figure 1: Inner frame packing
Step Two: Remove the Inner side rail (right) from the lower packing, the granite
supporting rails from middle packing and the inner side rail (left) from the top packing.
Fix them using four M8×40 screws with the hex key provided.
Remove the supporting rail (lower) from the top packing and fix it with two M8 x 40
screws. You can open the 2 side frames a little in order to put the rails inside the frames,
and then tighten the 6 screws as Figure 2 shows.
Please make sure the 2 sides are parallel and even after the screws are tightened.
Now fit the 4 x rubbers as Figure 3 shows.
Lastly fit the granite, please make sure it is centrally positioned. Please see Figure 4.
Figure 5 shows the assembled table.

© Adam Equipment 2011
3
1 x Granite support rails
1 x Inner side rails (left) 1 x Inner side rails (right) 4 x rubbers
1 x Supporting rail (lower) Six M8 x 40 socket screws
Figure 2: Figure 3:
Inner frame assembly Assembled inner frame
Figure 4: Figure 5:
Correct position of the granite Assembled inner frame with granite
2. Outer Frame Assembly
Remove the outer side rail (right) from the lower packing, the table top assembly from the
middle packing and the outer side rail (left) from the top packing (see Figure 6).
Fix them using four M8×40 screws with the hex key provided.
Remove the outer table supporting rail (upper front) from the lower packing and fix it with
four M8 x 40 screws.
Remove the outer table supporting rail (lower) from the top packing and fix it with two M8
x 40 screws. You can open the 2 side frames a little in order to put the rails inside the

© Adam Equipment 2011
4
frames and then tighten the 10 screws as Figure 7 shows.
Make sure the 2 sides are all parallel after the screws are tight.
You can see the assembled view in Figure 8
1 x Outer side rail (right) 1 x table top assembly 1 x Outer side rail (left)
1 x Outer table supporting rail (upper front) 1 x Outer table supporting rail (lower)
Lower packing Middle packing Top packing
Figure 6: Outer frame packing
1x Table top assembly
1 x Outer side rail (left) 1 x Outer side rail (right)
Ten M8 x 40 socket screws 1x Outer table supporting rail (lower)
1 x Outer table supporting rail (upper front)
Figure 7: Outer frame assembly drawing Figure 8: Assembled outer frame

© Adam Equipment 2011
5
3. Final Assembly
Place the outer frame over the inner frame and adjust the feet for the outer and inner
frames so that they are level. Adjust the granite rubbers to ensure the granite is 2-5mm
higher than the table top and that it is firmly positioned. Please see Figure 9.
Figure 9: Final assembly drawing
1 x Granite
1 x Table top
4 x Marble adjusting screws
1 x Outer frame
1 x Inner frame
8 x Feet

© Adam Equipment 2011
6

© Adam Equipment 2011
7
ADAM EQUIPMENT is an ISO 9001:2008 certified global company with more than
35 years experience in the production and sale of electronic weighing equipment.
Adam products are predominantly designed for the Laboratory, Educational,
Medical, retail and Industrial Segments. The product range can be described as
follows:
-Analytical and Precision Balances
-Compact and Portable Balances
-High Capacity Balances
-Moisture analysers / balances
-Mechanical Scales
-Counting Scales
-Digital Weighing/Check-weighing Scales
-High performance Platform Scales
-Crane scales
-Medical Scales
-Retail Scales for Price computing
For a complete listing of all Adam products visit our website at
www.adamequipment.com
© Copyright by Adam Equipment Co. All rights reserved. No part of this publication
may be reprinted or translated in any form or by any means without the prior permission
of Adam Equipment.
Adam Equipment reserves the right to make changes to the technology, features,
specifications and design of the equipment without notice.
All information contained within this publication is to the best of our knowledge timely,
complete and accurate when issued. However, we are not responsible for
misinterpretations which may result from the reading of this material.
The latest version of this publication can be found on our Website.
www.adamequipment.com
/