Page is loading ...

Great Bridge
CHANDELIER
PHFHL1006BN/ORB
1
FOR YOUR SAFETY
WARNING: Be sure the electricity to the wires
you are working on is shut off, either the fuse is
removed or the circuit breaker is shut off. You
don't need special tools to install this fixture. Be
sure to follow the steps in the order given. Under
no circumstances should a fixture be hung on
house electrical wires, nor should a swag type
fixture be installed on a ceiling which contains a
radiant type heating system. Read instructions
carefully, if you are unclear as to how to proceed,
consult a qualified electrician.
CARE INSTRUCTIONS
To clean, wipe fixture with a soft cloth. Clean glass
with a mild soap. Do not use abrasive materials
such as scouring pads or powders, steel wool or
abrasive paper.
SAVE THIS MANUAL: RETAIN FOR CONSUMER’S
USE. READ THESE INSTRUCTIONS COMPLETELY
BEFORE INSTALLING THE PRODUCT:
FOR PRODUCT OR INSTALLATION QUESTIONS
PLEASE CALL CUSTOMER SERVICE AT
1-800-221-3379.
GUARDE ESTE MANUAL: CONSÉ RVELO PARA USO DEL
CONSUMIDOR. LEA ESTAS INSTRUCCIONES POR
COMPLETO ANTES DE INSTALAR EL PRODUCTO: PARA
PREGUNTAS SOBRE EL PRODUCTO O LA INSTALACIÓ
N, LLAME A SERVICIOS AL CLIENTE AL 1-800-221-3379.
CONSERVEZ CE MANUEL : METTEZ-LE À LA
DISPOSITION DES CONSOMMATEURS. LISEZ COMPLÈ
TEMENT CES INSTRUCTIONS AVANT D'INSTALLER LE
PRODUIT : POUR TOUTE QUESTION CONCERNANT LE
PRODUIT OU L'INSTALLATION, VEUILLEZ APPELER LE
SERVICE À LA CLIENTÈ LE AU 1-800-221-3379.
PARA SU SEGURIDAD
ADVERTENCIA: Asegú rese de cortar el suministro
de energía a los cables con los que está
trabajando, ya sea quitando el fusible o cortando
el disyuntor No requiere de herramientas
especiales para instalar este accesorio. Asegú rese
de seguir los pasos en el orden en el que se dan.
Bajo ninguna circunstancia debe colgarse un
accesorio de los cables de electricidad domé sticos,
ni tampoco un accesorio tipo botín que se vaya a
instalar en un techo que contenga un sistema de
calefacció n por radiació n. Lea cuidadosamente
las instrucciones. Si no tiene claro có mo va el
proceso, consulte a un electricista calificado.
INSTRUCCIONES DE CUIDADO
Para limpiar frote el accesorio con un trapo suave.
Limpie el cristal con un jabó n suave. No utilice
materiales abrasivos como fibras o polvos, lana
de acero o papel abrasivo.
POUR VOTRE SÉ CURITÉ
AVERTISSEMENT: Assurez-vous que les fils
é lectriques sur lesquels vous travaillez sont
hors tension, soit en ouvrant le fusible qui leur
correspond, soit en coupant le disjoncteur
gé né ral. L'installation de ce luminaire ne
né cessite aucun outil spé cialisé . Veillez à
bien suivre les é tapes dans l'ordre indiqué .
Ne suspendez jamais un luminaire par les fils
é lectriques. N'installez jamais un luminaire de
style chandelier à un plafond possé dant un
systè me de chauffage de type radiant. Lisez
attentivement les instructions. Si vous ne
savez pas exactement comment procé der,
consultez un é lectricien qualifié .
INSTRUCTIONS D'ENTRETIEN
Pour nettoyer le luminaire, essuyez-le avec un
chiffon doux. Nettoyez le verre avec un savon
doux. N'utilisez pas de maté riaux abrasifs
tels que des tampons à ré curer ou des
poudres, de la laine d'acier ou du papier
abrasif.
Fergusonshowrooms.com
© 2018 Ferguson Enterprises, Inc. 00000 10/2018

(FIG.1)
2
INSTALACIÓN (Fig.1)
1. Ajuste la correa de montaje (B) a la caja
tomacorrientes (F) con dos tornillos (A).
2. Enrosque la boquilla (C) dentro de la correa de
montaje (F) aproximadamente 3/8" y asegú rela con
una arandela de retenció n (G) y una tuerca hexagonal
(H).
3.Conecte el cable de tierra a la correa de montaje (B),
usando un tornillo verde de tierra (F).
4.Conecte el cable de suministro positivo
(generalmente negro o con el lado liso sin marca del
cordó n de dos conductores) a la guía positiva del
accesorio con un giro de tamañ o apropiado en el
conector.
5.Conecte el cable de suministro negativo
(generalmente blanco estriado o con el lado marcado
del cordó n de dos conductores) a la guía negativa del
accesorio con un giro de tamañ o apropiado en el
conector
6. Despué s de conectar los cables, acomó delos
cuidadosamente dentro de la caja tomacorrientes.
7.Deslice el orificio central de la marquesina (D) sobre la
boquilla (C) y deslice la marquesina hacia arriba hasta
que esté contra el techo. Sostenga el accesorio en
posición.
8.
Enrosque el remate decorativo (E) al extremo de la
boquilla (C) y apriete para asegurar el accesorio al
techo.
INSTALLATION (Fig. 1)
1.Fixez la barrette de fixation (B) à la boîte à prises (F)
avec les vis d'origine (A) de la boîte à prises.
2.Vissez l'embout (C) dans la barrette de fixation (F) par
environ 9,5 mm (3/8 po), puis fixez-le avec la rondelle de
blocage (G) et l'é crou hexagonal (H).
3.Raccordez le fil de masse à la barrette de fixation (B) à
l'aide de la vis de borne de terre verte (A.a).
4. Raccordez le fil d'alimentation positif (gé né ralement
le fil noir ou le cô té lisse sans marque du câ ble à deux
fils) au fil d'alimentation positif du luminaire en utilisant
un capuchon de connexion de taille approprié e.
5. Raccordez le fil d'alimentation positif (gé né ralement
le fil noir ou le cô té lisse sans marque du câ ble à deux
fils) au fil d'alimentation positif du luminaire en utilisant
un capuchon de connexion de taille approprié e.
6. Une fois les fils raccordé s, repliez-les soigneusement
dans la boîte à prises.
7.Placez le trou central de la monture (D) sur l'embout
(C) et faites glisser la monture vers le haut jusqu'à ce
qu'elle soit contre le plafond. Maintenez le luminaire en
place.
8. Vissez le faîteau dé coratif (E) sur l'extré mité de
l'embout (C) et serrez-le pour fixer la monture au
plafond.
A
B
C
D
E
F
G
H
A.a
Fergusonshowrooms.com
© 2018 Ferguson Enterprises, Inc. 00000 10/2018
INSTALLATION (Fig.1)
1. Fasten mounting strap (B) to outlet box (F) with
original outlet box screws (A).
2.Thread nipple (C) into mounting strap (F),
approximately 3/8",and secure with lock washer
(G) and HEX NUT (H).
3.Connect ground wire to mounting strap (B),
using green ground screw (A.a).
4.Connect positive supply wire (typically black or
the smooth,umarked side of the two-conductor
cord) to positive fixture lead with appropriately
sized twist on connector.
5. Connect negative supply wire (typically white
or the ribbed, marked side of the two-conductor
cord)to negative fixture lead with appropriately
sized twist on connector.
6.After wires are connected, tuck them carefully
inside outlet box.
7.Slip center hole of canopy (D) over nipple (C)and
slide up till canopy is against ceiling.Hold fixture
position.
8.Thread decorative finial (E) onto end of nipple
(C) and tighten to secure fixture to ceiling.

(FIG.2)
3
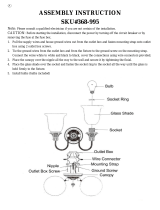
INSTALLATION (Fig.2)
1. Assemble the tubes (T) & (M) together tightly,
then thread the nipple (N) into the coupling (O)
tightly.
2. Install the metal panel (K) and canopy (J) onto
swivel (L) , then secure them with hex nut (I) and
washer (S).
3. Put the glass shade (Q) over the socket (P) and
secure with socket ring (R).
4.Install light bulbs (not provided). Please do not
exceed the maximum wattage capacity
recommended on the socket (P).
We recommend the use of a clear light bulb.
INSTALACIÓN (Fig.2)
1.Assemblez fermement les tubes (T) et (M), puis
vissez le raccord fileté (N) dans le couplage (O).
2. Installez le panneau mé tallique (K) et le socle(J)
sur le pivot (L), puis maintenez-les en place avec l'é
crou hexagonal (I) et la rondelle (S).
3. Placez l'abat-jour en verre (Q) sur la douille (P) et
maintenez-le en place avec l'anneau de douille (R).
4.Installez les ampoules (non fournies). Ne dé
passez pas la puissance maximale recommandé e
sur la prise (P).
Nous vous recommandons d'utiliser une ampoule
transparente.
INSTALLATION (Fig. 2)
1.Ensamble firmemente los tubos (T) y (M) uno al
otro, luego enrosque firmemente la boquilla (N)
dentro del acoplamiento (O).
2. Instale el panel metá lico (K) y la marquesina (J) en
el pivote (L), luego ajú stelos con la tuerca hexagonal
(I) y la arandela (S).
3. Coloque la pantalla de vidrio (Q) sobre el enchufe
(P) y asegú rela con el aro del enchufe (R).
4. Instale las bombillas (no incluidas). No supere la
capacidad má xima de vatios recomendada en el
enchufe (P).
Recomendamos utilizar una bombilla de luz
transparente.
L
O
P
Q
R
I
J
K
M
N
S
T
Fergusonshowrooms.com
© 2018 Ferguson Enterprises, Inc. 00000 10/2018
/