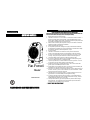
Pelonis HF-0019 Owner's manual
- Category
- Space heaters
- Type
- Owner's manual

OWNER’S MANUAL
Fan Forced
PLEASE READ AND SAVE THESE INSTRUCTIONS
IMPORTANT INSTRUCTIONS
PLEASE READ AND SAVE THESE IMPORTANT SAFETY INSTRUCTIONS
When using electrical appliances, basic precautions should always be followed to reduce the
risk of fire, electric shock, and injury to persons, including the following:
1. Read all instructions before using this heater.
2. This heater is hot when in use. To avoid burns, do not let bare skin touch hot surfaces. If
provided, use handles when moving this heater. Keep combustible materials, such as
furniture, pillows, bedding, papers, clothes, and curtains at least 3 feet (0.9m) from the front
of the heater and keep them away from the sides and rear.
3. Extreme caution is necessary when any heater is used by or near children or invalids and
whenever the heater is left operating and unattended.
4. Always unplug heater when not in use.
5. Do not operate any heater with a damaged cord or plug or after the heater malfunctions,
has been dropped or damaged in any manner. Return heater to authorized service facility
for examination, electrical or mechanical adjustment, or repair.
6. Do not use outdoors.
7. This heater is not intended for use in bathrooms, laundry areas and similar indoor
locations. Never locate heater where it may fall into bathtub or other water container.
8. Do not run cord under carpeting. Do not cover cord with throw rugs, runners, or similar
coverings. Arrange cord away from traffic area and where it will not be tripped over.
9. To disconnect heater, first turn controls to off, then remove plug from outlet.
10. Do not insert or allow foreign objects to enter any ventilation or exhaust opening as this
may cause an electric shock or fire, or damage the heater.
11. To prevent a possible fire, do not block air intakes or exhaust in any manner. Do not use
on soft surfaces, like a bed, where openings may become blocked.
12. A heater has hot and arcing or sparking parts inside. Do not use it in the areas where
gasoline, paint, or flammable liquids are used or stored.
13. Use this heater only as described in this manual. Any other use not recommended by the
manufacturer may cause fire, electric shock, or injury to persons.
14. Avoid the use of an extension cord because the extension cord may overheat and cause a
risk of fire. However, if you have to use an extension cord, the cord shall be No. 14 AWG
minimum size and rated not less than 1875 watts.
15. This heater draws 12.5 amps during operation. To prevent overloading a circuit, do not
plug the heater into a circuit that already has other appliances working.
16. It is normal for the plug to feel warm to the touch; however, a loose fit between the AC
outlet (receptacle) and plug may cause overheating and distortion of the plug. Contact a
qualified electrician to replace loose or worn outlet.
17. The output of this heater may vary and its temperature may become intense enough to
burn exposed skin. Use of this heater is not recommended for persons with reduced
sensitivity to heat or an inability to react to avoid burns.
18.“SAVE THESE INSTRUCTIONS”
Heater
Model HF-0019

OPERATING INSTRUCTIONS
Place the heater on a firm level surface free from obstructions, and at least 3 ft. away from any
wall and any other objects such as furniture, curtains, plants or combustible material.
Insert the power plug into an AC supply socket.
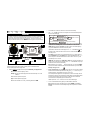
Press the “POWER”button D, the unit will cycle as OFF-Standby-Low-High-Fan-OFF.
OFF— the unit is off and the display is off also;
Standby— the unit is off and the display shows the environment temp. You can set
Timer on.
Low-- the heater operates at low power.
High-- the heater operates at high power.
Fan— The Fan circulates room air only. The heating elements are “OFF”.
If the heater turns on first time, it will be on for two minutes automatically.
The ∧ or ∨ button B and C can be used to adjust Timer and the desired temperature.
Please see the following fig:
How to use the Timer: this heater has a 8-hour-timer, which can automatically turn the
unit ON when it is in Standby mode, or turn the unit OFF when it is LO, HI or FAN mode.
TIMER ON: When the heater is Standby mode (the unit doesn’t work but the display is
on), press the Timer button, the buzzer sounds, the symbol
will illuminate, it shows the time on the display. Press ∧ or ∨ button B and C one time,
the buzzer sounds, and the time add or reduce 0.5 hours. It will be automatically turns on
at the time you set.
For example: it is now 6:00 AM. If you want the heater turns on at 11:30 AM, firstly you
press the POWER button to select Standby mode. Then press Timer button and ∧ or ∨
button to adjust to 5.5. Now the heater will turn on after 5.5 hours. That is to say, it will
automatically be on at 11:30 AM.
TIMER OFF: when the heater is on LOW, HIGH or FAN mode, press the Timer button, the
buzzer sounds, it shows the timer on display. Press∧ or ∨ button B and C to adjust your
desired time to shut off the unit automatically.
Note: If the timer is on, the symbol illuminate. At this time, if you press the POWER
button, the timer will be cancelled and the unit work will be the status as you select OFF,
Standby, Low, High or Fan.
How to set Temperature: If the heater has not any control for over 5 seconds, the display
will show the environmental temperature. At this time, press ∧ or ∨ button to set your
desired temperature. The adjustable range is from 40
o
F to 95
o
F.
If the set temperature is higher than room temperature, the unit works normally; if the set
temperature is lower than room temperature, the display flashes, and the heating element
was turned off automatically, after a few seconds, the fan will be off. The heater will
resume until the room temperature gets lower than set temp.
Note: If press both ∧ and ∨ buttons, the
o
C and
o
F can be interchanged.
To turn on the Oscillation feature (optional), turn the Oscillation switch “ON”.
Note: If the fan was shut off, either because of by pressing POWER to select OFF or
Standby, or the unit was turn off automatically for high room temperature, the oscillation
will be off.
IMPORTANT!
Your heater is equipped with a polarized alternating current line plug (a plug having one blade wider
than the other). This plug will fit into the power outlet only one way. This is a safety feature. If you are
unable to insert the plug fully into the outlet, try reversing the plug. If the plug should still fail to fit,
contact your electrician to replace your outlet. DO NOT defeat the safety purpose of the polarized plug.
A
C
D
E
B
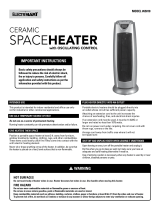
Parts and Name
Oscillation Switch Up Button Down Button
Power Timer
A
B
C
D
E
Timer
Power
Timer Off
ison
Timer On
is on
Upor Down key
Upor Down key
If on
If standby
Thetimer cancelled
Upor Down key Toadjust the desiredtemp
If onLow or High mode
LO HI
Power
Timer
F
C

SERVICE & SUPPORT
In the event of a warranty claim or if service is required for this heater, please contact us at the
following:
Toll Free: 866-876-4332
Email us at: [email protected]
For questions or comments, please write to:
2617 North Great Southwest Parkway
Grand Prairie, TX 75050, USA
For your records, staple your sales receipt to this manual and record the following:
DATE OF PURCHASE: ________________________________
________________________
PLACE OF PURCHASE:________________________________
________________________
SERIAL NUMBER:________________________________
___________________________
(STAPLE SALES RECEIPT HERE)
NOTE: PROOF OF PURCHASE IS REQUIRED FOR ALL
WARRANTY CLAIMS
ADDITIONAL FEATURES
This heater has additional features:
Front Safety Guards - prevent the front grill from touching the floor when the heater is
tipped over forward.
Convenient Carry Handle – allows for easy transport from room to room.
TROUBLESHOOTING
If your heater fails to operate, please follow these instructions:
Ensure your set temperature is higher than the circumstance temperature.
Ensure that your circuit breaker or fuse is working properly.
Be sure the heater is plugged in and that the electrical outlet is working properly.
Check for any obstruction. If you find any obstruction, turn the heater “OFF”. Unplug
the heater and wait a few minutes for it to cool down. Carefully remove the obstruction.
Plug the heater in and turn it on again by referring to the OPERATING INSTRUCTIONS.
NOTE: IF YOU EXPERIENCE A PROBLEM WITH YOUR HEATER, PLEASE SEE THE WARRANTY
INFORMATION FOR INSTRUCTIONS. PLEASE DO NOT ATTEMPT TO OPEN OR REPAIR THE HEATER
YOURSELF. DOING SO MAY VOID THE WARRANTY AND COULD CAUSE DAMAGE OR PERSONAL
INJURY. IF THE PROBLEM STILL PERSISTS, PLEASE CONTACT US BY REFERRING TO THE
SERVICE & SUPPORT INFORMATION ON THE FOLLOWING PAGE.
CLEANING AND STORAGE
It is recommended that the heater be cleaned at least one time during the operating season in
order to provide the optimum level of performance. ALWAYS TURN THE POWER SWITCH OFF
AND UNPLUG THE HEATER BEFORE CLEANING. Be sure to save the box for off-season storage.
Turn the heater “OFF”, unplug it and wait for the heater to cool down.
Use a dry cloth to clean only external surfaces of the heater.
Do not use any cleaning agents or detergents.
Never immerse the heater in water.
Pack the heater in the original carton and store it in a cool and dry place.
SPECIFICATIONS
Model No.: HF-0019
Voltage: 120V, 60Hz
Current: Maximum continuous draw: 12.5 Amps.
Output: 5200 BTUs
Power: Low=900 Watts, Hi=1500 Watts
Tolerances on all specifications: not exceeded than 105%

ONE (1) YEAR LIMITED WARRANTY
Please read all instructions before attempting to use this product.
Please return the Warranty Registration card within fifteen (15) days from the date of
purchasing this product.
PELONIS warrants as limited herein to the original purchaser of retail that each new Pelonis
Fan Forced heater, shall be free of defects in material and workmanship for a period of one (1)
year from the date of original purchase. This one (1) year warranty is limited to the heating
elements, motor, and electric control circuit board.
In the event of malfunctions or failure of your Pelonis Fan Forced heater, simply deliver or send
the heater, postage prepaid along with PROOF OF PURCHASE, within the warranty period of one
(1) year, to PELONIS. PELONIS reserves the right to inspect the claimed defective part or parts
to determine if the defect or malfunction complaint is covered by this warranty. PELONIS shall,
within sixty (60) days after receipt of the product, at its option, repair and/or replace the
defective part or parts free of charge. This warranty shall only cover defects arising from normal
usage. PPELONIS assumes no responsibility whatsoever if the Fan Forced heater should fail
during the warranty period by reason of:
Misuse, negligence, physical damage or accidents.
Lack of maintenance (see instructions for proper maintenance).
Repair by any unauthorized party during the warranty period.
Damage caused by connection to an improper input voltage (see specification label on
your heater).
PELONIS makes no further warranties or representations, express or implied except those
contained herein. No representative or dealer is authorized to assume any other liability
regarding the Fan Forced heater. The duration of the implied warranty granted under State law,
including warranties of merchantability and fitness for particular purpose are limited in duration
should the duration of the express warranty grant it hereunder. PELONIS shall in no event be
liable for direct, indirect, special or consequential damages.
Some states do not allow limitations on how long an implied warranty lasts, and/or the above
limitations or exclusion may not apply to you. This warranty gives you specific legal rights and
you may have other rights which vary from state to state.
-
 1
1
-
 2
2
-
 3
3
-
 4
4


Pelonis HF-0019 Owner's manual
- Category
- Space heaters
- Type
- Owner's manual
Ask a question and I''ll find the answer in the document
Finding information in a document is now easier with AI
Related papers
-
 Pelonis HC-0119A User manual
-
World Marketing of America HC0119A Owner's manual
-
 Pelonis HO-0203D Owner's manual
-
-
-
 Pelonis HC-0125D User manual
-
 Pelonis PHTPU1501 User manual
-
-
-
 Pelonis HC-461 Disc Furnace V User manual


Other documents
-
Comfort Zone CZ499 User manual
-
 ELECTRIMART 65018 Quick start guide
-
Costway EP22613 User manual
-
-
-
-
 Airlogic AW300 User manual
-
 Airlogic AW300 User manual
-
Tayama TF-7322 User manual
-
 CoolBot How to Set Up Your Cooler for the Winter Season Owner's manual


