Page is loading ...

1
PHENOMENAL BRANDS, Phenopatch Products
a division of DAP Products Inc.
2400 Boston Street, Suite 200, Baltimore, Maryland 21224
Phone: 410-675-2100
Revised: 10/20/13
DAP
®
PHENOPATCH
®
Wallboard Joint Compound
For the smooth, high quality finishing of gypsum panel joints
Professional grade
Sands easily
Ready-to-use
Interior use
Packaging: Net Weight 3 lbs, 12 lbs.
Color: White
UPC Numbers: 70798 00111, 00117
Company Identification:
Manufacturer: PHENOMENAL BRANDS, Phenopatch Products, a division of DAP Products Inc., 2400
Boston St., Baltimore, Maryland 21224
Usage Information: 1-888-327-8477 or visit dap.com and click on “Ask the Expert”
Order Information: 1-800-327-3339
Fax Number: 410-558-1068
Also, visit the Phenopatch website at www.phenopatch.com.
Product Description:
DAP
®
PHENOPATCH
®
Wallboard Joint Compound is a ready-to-use, professional-grade compound for
smooth, high quality finishing of gypsum panel joints. It can be used to cover and finish gypsum wallboard
joints, embed reinforcing tape, metal cornerbeads, screw or nail holes. It is easy to apply, has minimal
shrinkage and sands easily. Can also be used to patch and texture interior walls.
Suggested Uses:
For the smooth, high quality finishing of:
Gypsum
Metal
Nailheads
Drywall
Panel joints
Corner beads

2
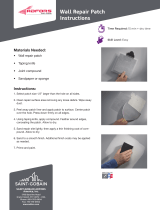
Surface Preparation & Application:
1. Surface should be clean, firm and free of debris and dust particles.
2. Prepare surface by recessing nails into panels 1/32”.
3. Stir thoroughly before use.
4. Apply compound evenly with a clean putty knife. Fill space between panels, covering an area of at least
2-4 inches on either side of joint.
5. Immediately center and embed wallboard joint tape over joint and press into wet compound with a 5”
putty knife.
6. Remove excess and cover embedded tape with a thin layer of compound. Apply compound to all
nailheads and depressions and spread smooth with long strokes parallel to joint.
7. Allow to dry for about 12 hours and wet sand with a damp sponge.
8. Apply a second coat of joint compound with a 10” knife along joints and over nailheads, smoothing out
2” beyond first coat. Wet sand with a damp sponge again after the compound has dried.
9. Apply a third coat, smoothing out 2” beyond the second coat. Let dry and wet sand application again.
10. To finish inside corners, apply joint compound to both sides of corner, fold tape along center crease and
press into position. Embed tape with a 5” putty knife and apply a thin coat of compound over tape.
After compound has dried, wet sand with a damp sponge and apply a second coat of compound over one
side only. Let dry and then cover the other side.
11. To finish outside corners, fasten metal corner bead and apply first coat of compound, smoothing onto
panel surface 4-6”. Allow compound to dry and wet sand application. Apply 2 more coats in the same
manner.
12. For a textured finish, apply ample amount of Wallboard Joint Compound with a paintbrush or roller.
Texture surface immediately using paint rollers, a sponge, stiff-bristled brush or even crumpled paper,
depending on the desired effect. Allow the compound to dry thoroughly before decorating.
13. Wash tools immediately after use with water. Be sure container is closed and tightly sealed. Store in a
cool, dry place away from extreme heat or cold.
For Best Results:
Allow approximately 24 hours between applications before decorating.
Allow compound to dry thoroughly before sanding.
Wiping while wet may leave unwanted smears. Wet sand uneven areas with a damp sponge after
joint compound has dries. Wet sanding is recommended to prevent generating airborne dust.
Typical Physical & Chemical Characteristics:
Consistency: Heavy paste
Vehicle: Polysaccaride
Volatile: Water
Filler: Inert Filler
Odor: Mild
Weight per Gallon: 14.5 +0.5 lbs.
Solids: 67 +3% by weight
Application Temperature Range: Above 50° to 100
o
F
Temperature Service Range: -20°F to150°F
Dry Time: Approximately 12-24 hours, depending on
temperature, humidity and depth of fill
Shelf Life: 12 months
Freeze/thaw stable: No
Painting: Paintable with latex and oil based paints
MSDS: 00079925005

3
Clean Up & Storage:
Wash tools and hands immediately after use with water. Dried compound must be cut, scraped or sanded away.
Be sure container lid is closed and tightly sealed. Store in a cool, dry place away from extreme heat or cold.
Safety:
See product label and Safety Data Sheet (SDS) for safety information. You can request an SDS by visiting
www.phenopatch.com or by calling 1-888-327-8847.
Contains: Calcium carbonate and crystalline silica. May be harmful if inhaled. May cause eye, skin and
respiratory irritation. Harmful if swallowed or absorbed through the skin. Do not breathe vapors or dust. Use
only with adequate ventilation. Prevent build-up of dust and vapor by opening windows and doors or use other
means to ensure fresh air entry during application, drying and sanding. Wet sanding is recommended to reduce
dust exposure. Dry sanding of this product may generate dust. Inhalation of dust may cause lung damage or
other adverse pulmonary and respiratory effects. When sanding, wear a NIOSH-approved dust mask. Follow
dust mask manufacturer’s directions for use. Keep exposure below OSHA permissible exposure limits. Avoid
contact with eyes, skin and clothing. Wear gloves and safety glasses. Close container after use. Wash
thoroughly after handling. WARNING: This product contains chemicals known to the State of California to
cause cancer, birth defects or other reproductive harm. FIRST AID: SKIN: Wash thoroughly. EYE:
Immediately flood with large quantities of water. INHALATION: Remove to fresh air. INGESTION: DO NOT
INDUCE VOMITING. Get medical attention if complications arise from any exposure. For emergencies, call
your poison control center at 1-800-222-1222. See Safety Data Sheet (SDS) for additional information. For an
SDS, contact PHENOMENAL BRANDS at 410-779-3265 or visit www.phenopatch.com. KEEP OUT OF
REACH OF CHILDREN. DO NOT TAKE INTERNALLY
SATISFACTION GUARANTEED:
If product fails to perform when used as directed, return used container and sales receipt to PHENOMENAL
BRANDS, Technical Customer Service, 2400 Boston St., Ste. 200, Baltimore, MD 21224 for replacement
product or sales price refund. PHENOMENAL BRANDS will not be liable for incidental or consequential
damages.
/