Page is loading ...

ENGLISH
9
INSTALLATION
INSTALLATION
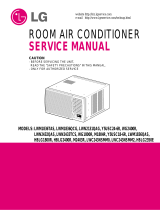
Electrical Data
Power cord may include a current interrupter
device. TEST and RESET buttons are provided
on the plug case. The device should be tested on
a periodic basis by rst pressing the TEST button
and then the RESET button. If the TEST button
does not trip or if the RESET button will not stay
engaged, discontinue use of the air conditioner
and contact a qualied service technician.
for 240 V
RESET
TEST
Use Wall Receptacle Power Supply
Use 15 A, time
delay fuse or 15 A,
circuit breaker.
Standard 240 V, 3-wire
grounding receptacle rated
15 A / 240 VAC / 60 Hz
WARNING
●This appliance should be installed in
accordance with the National Electrical
Code.
●Use of extension cords could cause serious
injury or death.
- Do not use an extension cord with this
window air conditioner.
- Do not use surge protectors or multi-outlet
adapters with this window air conditioner.
●Never push the TEST button during
operation. Doing so can damage the plug.
- Do not remove, modify, or immerse this
plug. If this device trips, the cause should
be corrected before further use.
CAUTION
●The conductors inside this cord are
surrounded by shields, which monitor
leakage current. These shields are not
grounded. Periodically examine the cord
for any damage. Do not use this product
in the event the shields become exposed.
Avoid shock hazard. This unit cannot be
user-serviced. Do not open the tamper-
resistant sealed portion. All warranties and
performance will be voided. This unit is not
intended to be used as an ON/OFF switch.

10
INSTALLATION
Installation Overview
Right curtain
panel
Left curtain
panel
Drain joint pipe
Foam strip
(Non-adhesive)
Foam-PE (2)
(Adhesive backed)
Frame guide (2)
Window locking
bracket
Sill bracket (2)
Support
bracket (2)
Accessories
Type 'A' Screws
(12)
Type 'B' Screws
(7)
Type 'C' Screws
(5)
Type 'D' Screws
(2)
Carriage Bolt
(2)
Lock Nut
(4)
Tools Needed
Phillips-head
screwdriver
Flat-blade screwdriver Adjustable wrench Level
Tape measure Cutting knife Scissors Pencil

ENGLISH
11
INSTALLATION
How to Install the Unit
Window Requirements
● This unit is designed for installation in standard
double hung windows with actual opening
widths from 29" to 41".
The top and bottom window sashes must open
19" from the bottom of the upper sash to the
inside sill.
● The height offset between the inside sill and
outside sill must be less than 1 ¼".
29" to 41"
19" min
NOTE
●
wood, masonry, or metal.
Preparation of Cabinet
1
Remove 4 screws which fasten the cabinet
at both sides and at the back. (Keep the
screws for later use.)
1
To prevent vibration and noise, make sure
the unit is installed securely and firmly.
4
Install the unit slightly tilted so the back is
slightly lower than the front (about 1/2").
This will force condensed water to flow to
the outside.
5
Install the unit with the bottom between
30" ~60" above the floor level.
2
Install the unit where the sunlight dose not
shine directly on the unit.
3
The outside of the cabinet must extend out-
ward for at least 12" and there should be no
obstacles, such as a fence or wall, within 20"
from the back of the cabinet because it will
prevent heat radiation of the condenser.
Restriction of outside air will greatly reduce
the cooling efficiency of the air conditioner.
Shipping
Fence
Awning
Heat
radiation
Cooled air
Screws
2
Slide the unit from the cabinet by gripping
the base pan handle and pulling forward
while bracing the cabinet.
CAUTION
● The unit is heavy. To prevent injury, use
proper lifting techniques when pulling unit
forward from cabinet. Obtain assistance
from another person if possible.
CAUTION
● All side louvers of the cabinet must remain
exposed to the outside of the structure.
3
Cut the window sash seals (Foam-PE)
to the proper length. Peel off the backing
and attach the adhesive-backed foam to
the underside of the window sash and the
bottom of the window frame.
Foam-PE
(Adhesive backed)

12
INSTALLATION
Cabinet Installation
1
Open the window. Mark a line on the center
of the inside sill and extending across the
center of the outside sill.
Loosely attach each sill bracket to a support
bracket using a carriage bolt and a lock nut.
Sill Bracket
Carriage
Bolt
Lock Nut
Support Bracket
2
Carefully place the cabinet in the window
and align the center hole on the cabinet
bottom front with the center line marked on
the window sills. Align the support brackets
with the cabinet track holes and mark the
sill along the sides of each sill bracket.
Remove the cabinet from the window and
attach each sill bracket on the outside sill
between the marks using 2 type B screws.
Sill
Bracket
3
Carefully place the cabinet back in the
window and align the cabinet track holes
with the support brackets. Attach each
support bracket to the cabinet through a
cabinet track hole, using a type D screw
and a lock nut. Use the rst track hole past
the sill bracket on the outer edge of the
window sill. Tighten the lock nuts on the
support brackets to secure them to the sill
brackets. Be sure the cabinet slants down
toward the outside.
Support Bracket
Lock
Nut
4
Insert the lower curtain panel guides into
the bottom of the cabinet. Insert the guides
so that the ange faces to the rear of the
cabinet.
5
Upper Panel Guide
Right Curtain Panel
Left Curtain Panel
Lower Panel
Guide
Insert the top and bottom rails of the curtain
panels into the upper and lower panel
guides.
CAUTION
●The lower panel guides are easily broken.
Be careful with them when installing the
cabinet.
6
Fasten the curtain panels to the unit with 10
type A screws.

ENGLISH
13
INSTALLATION
4
Pull each curtain panel out until it meets the
window sash track. Pull the bottom window
sash down behind the upper panel guide
until they meet.
Front Angle
Sash Track
Upper Panel
Guide
Inside Window Sill
NOTE
●Do not pull the window sash down so
tightly that the movement of the curtain
panels is restricted.
5
Attach the cabinet to the inside sill by
driving 3 type B screws through the cabinet
and into the sill.
Sash Track
Front Angle
NOTE
●Install the cabinet with a very slight
downward tilt toward the outside.
CAUTION
●Do not drill a hole in the bottom pan.
The product is designed to operate with
approximately ½” of water in the bottom
pan.
6
Use a screwdriver or power drill to attach
the curtain panels to the window sashes
by driving type C screws into the sashes
through the cabinet holes shown in the
gure below.
7
With the aid of an assistant, slide the
unit into the cabinet. Reinstall the screws
removed from the cabinet sides in step 1.
CAUTION
●The unit is heavy. Use an assistant to help
lift the unit and set it in place. Lifting and
maneuvering the unit by yourself could
result in injury.
●Hold the unit rmly in place until the window
frame is lowered to meet the top surface of
the unit directly behind the upper guide. If
the unit falls from the window, it could cause
personal injury or property damage.

14
INSTALLATION
8
Cut the non-adhesive foam strip to the
proper length and insert it between the
upper window sash and the lower window
sash.
Foam Strip
(Non-adhesive)
9
Attach the window locking bracket with a
type C screw.
Window Locking Bracket
10
Fold out the vent control lever located to
the left of the control panel, as shown.
11
Connect the wire harness from the front
grille assembly to the air conditioner.
12
Attach the front grille assembly to the
cabinet by inserting the grille tabs into the
slots on the front of the cabinet. Push the
grille in until it snaps into place.
NOTE
● Carefully guide the vent control lever
through the grille as you push the grille in.
13
Open the air inlet grille and secure the
front grille assembly with 2 type A screws
through the both sides of the front grille.
(There are 2 type A screws packed in a
small bag.)
NOTE
● See the 'Electrical Data' section for information
on attaching the power cord to an electrical
outlet.
/