Kichler Lighting 11253NILED User manual

Type
User manual

Kichler Lighting 11253NILED is a dimmable LED flush mount ceiling light fixture that offers energy-efficient illumination for your indoor spaces. With its sleek and contemporary design, it complements various decors, including modern, transitional, and minimalist styles. The fixture provides ample brightness while saving energy, making it an ideal choice for both residential and commercial applications. Installation is easy with the included mounting hardware and step-by-step instructions. Enjoy long-lasting, reliable lighting with Kichler Lighting 11253NILED.

Kichler Lighting 11253NILED is a dimmable LED flush mount ceiling light fixture that offers energy-efficient illumination for your indoor spaces. With its sleek and contemporary design, it complements various decors, including modern, transitional, and minimalist styles. The fixture provides ample brightness while saving energy, making it an ideal choice for both residential and commercial applications. Installation is easy with the included mounting hardware and step-by-step instructions. Enjoy long-lasting, reliable lighting with Kichler Lighting 11253NILED.

Date Issued: 10/12/17 IS-11253LED-CB
We’re here to help 866-558-5706
Hrs: M-F 9am to 5pm EST
CAUTION – RISK OF SHOCK –
Disconnect Power at the main circuit breaker panel or main
fusebox before starting and during the installation.
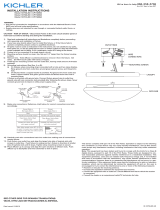
4) Grounding instructions: (See Illus. A or B).
A) Onxtureswheremountingstrapisprovidedwithahole
andtworaiseddimples.Wrapgroundwirefromoutletbox
aroundgreengroundscrew,andthreadintohole.
B) Onxtureswhereacuppedwasherisprovided.Attach
groundwirefromoutletboxundercuppedwasherand
greengroundscrew,andthreadintomountingstrap.
Ifxtureisprovidedwithgroundwire.Connectxtureground
wiretooutletboxgroundwirewithwireconnector.(Notpro-
vided.)Afterfollowingtheabovesteps.Neverconnectground
wiretoblackorwhitepowersupplywires.
5) Makewireconnections.Referencechartbelowforcorrectcon-
nectionsandwireaccordingly.
6) Placextureuptomountingplate.Carefullypushwirecon-
nections[6]insidemountingplateandcanopymakingsureall
connectionsremainsecureandwiresdonotgetpinched.
7) InsertandtightenmountingscrewstosecureFixturetowall.
CLEANING DIFFUSER INSTRUCTIONS:
1) Removescrew[7]fromendcap[8].Slideendcapoutofxture
andsetaside.
2) Slidediffuser[9]outofxturetakingcarenottotouchLED
module[10].
3) Onlyadampclothshouldbeusedtocleandiffuser.Harsh
cleaningproductsmaydamagethenish.
4) Assembleinreverseorder.
WARNING:
Thisxtureisintendedforinstallationinaccordancewiththe
NationalElectricalCode(NEC)andalllocalcodespecications.
Ifyouarenotfamiliarwithcoderequirements,installationbya
certiedelectricianisrecommended.
CLEANING:
Alwaysbecertainthatelectriccurrentisturnedoffbeforecleaning.
Onlyadampclothshouldbeused.Harshcleaningproductsmay
damagethenish.
FCC INFORMATION:
Thisdevicecomplieswithpart15oftheFCCRules.Operationis
subjecttothefollowingtwoconditions:
(1) Thisdevicemaynotcauseharmfulinterference,and
(2) thisdevicemustacceptanyinterferencereceived,including
interferencethatmaycauseundesiredoperation.
Note:Thisequipmenthasbeentestedandfoundtocomplywiththe
limitsforaClassBdigitaldevice,pursuanttopart15oftheFCC
Rules.Theselimitsaredesignedtoprovide
reasonableprotectionagainstharmfulinterferenceinaresidential
installation.Thisequipmentgenerates,usesandcan
radiateradiofrequencyenergyand,ifnotinstalledandused
inaccordancewiththeinstructions,maycauseharmful
interferencetoradiocommunications.However,thereisno
guaranteethatinterferencewillnotoccurinaparticularinstallation.
Ifthisequipmentdoescauseharmfulinterference
toradioortelevisionreception,whichcanbedeterminedby
turningtheequipmentoffandon,theuserisencouragedto
trytocorrecttheinterferencebyoneormoreofthefollowingmea-
sures:
• Reorientorrelocatethereceivingantenna.
• Increasetheseparationbetweentheequipmentandreceiver.
• Connecttheequipmentintoanoutletonacircuitdifferentfrom
thattowhichthereceiverisconnected.
• Consultthedealeroranexperiencedradio/TVtechnicianforhelp.
INSTALLATION:
• Readandunderstandallinstructionsandillustrationscom-
pletelybeforeproceedingwithassemblyandinstallationof
xture.
• Ifyouhaveanydoubtsabouthowtoinstallthisxture,orifthe
xturefailstooperatecompletely,pleasecontactaqualied
electrician.
• Allpartsmustbeusedasindicatedintheinstructions.Donot
substituteanyparts,leavepartsout,oruseanypartsthatare
wornorbroken.Failuretoobeythisinstructioncouldinvalidate
theULlisting,C.S.A.certication,and/orETLlistingofthis
xture.
• Fixtureistobeconnectedtoasinglebranchcircuit.
• Mountingsurfaceshouldbeclean,dry,flatand1/4”largerthan
thexturehousingsurface.
INSTRUCTIONS:
1) Remove(4)MountingScrews[1].
2) Slidemountingplate[2]outofcanopy[3].
3) Attachthemountingplatetotheoutletbox[4]withsupplied
screws[5].
GREEN GROUND
SCREW
CUPPED
WASHER
OUTLET BOX
GROUND
FIXTURE
GROUND
DIMPLES
WIRE CONNECTOR
OUTLET BOX
GROUND
GREEN GROUND
SCREW
FIXTURE
GROUND
A
B
2
4
3
1
5
6
8
9
10
7
Connect Black or Red
Supply Wire to:
Connect White Supply Wire to:
Blac
kW
hite
*Parallel cord (round & smooth)
*Parallel cord (square & ridged)
Clear, Brown, Gold or Black
without Tracer
Clear, Brown, Gold or Black
with Tracer
Insulated wire (other than green)
with copper conductor
Insulated wire (other than green)
with silver conductor
*Note: When parallel wire (SPT I & SPT II)
are used. The neutral wire is square shaped or
ridged and the other wire will be round in
shape or smooth (see illus.)
Neutral Wire
Date Issued: 10/12/17 IS-11253LED-CB
INSTRUCTIONS
For Assembling and Installing Fixtures in Canada
Pour L’assemblage et L’installation Au Canada
Nous sommes là pour vous aider 866-558-5706
Heures : du lundi au vendredi, de 9h à 17h (heure de l’Est)
ATTENTION – RISQUE DE DÉCHARGES ÉLECTRIQUES -
Couper le courant au niveau du panneau du disjoncteur du
circuit principal ou de la boîte à fusibles principale avant de
procéder à l’installation.
WARNING:
Ce luminaire doit être installé conformément aux codes d’électricité
nationaux (NEC) et satisfaire toutes les spécications des codes
locaux. Si vous ne connaissez pas les exigences de ces codes, il
est recommandé de coner l’installation à un électricien certié.
NETTOYAGE:
Toujours veiller à ce que le courant électrique soit coupé avant de
nettoyer. Utiliser uniquement un chiffon doux humidié. Les produits
de nettoyage trop puissants peuvent endommager la nition.
FCC INFORMATION:
Cet appareil est conforme à la section 15 de la réglementation de la
FCC. L’exploitation est soumise aux deux conditions suivantes :
(1) Cet équipement ne doit pas causer d’interférences
nuisibles, et
(2) cet équipement doit accepter toute interférence reçue, y
compris les interférences risquant d’engendrer un fonc-
tionnement indésirable.
Remarque: Des tests ont conrmé que ce matériel respecte les
limites d’un dispositif numérique de catégorie B, en vertu de la sec-
tion 15 de la réglementation de la FCC. Ces limites ont été conçues
pour fournir une protection raisonnable contre le brouillage nuisible
d’une installation résidentielle. Cet équipement génère, utilise et
peut rayonner de l’énergie radiofréquence et, s’il n’est pas installé
et utilisé selon les instructions, peut causer de l’interférence nuis-
ible aux communications de radio. Cependant, il est néanmoins
possible qu’il y ait de l’interférence dans une installation en particu-
lier. Si cet équipement cause du brouillage nuisible à la réception
du signal de radio ou de télévision, ce qui peut être déterminé en
éteignant puis en rallumant l’appareil, l’usager peut essayer de cor-
riger l’interférence en appliquant une des mesures suivantes :
Réorienter l’antenne de réception ou changer son emplace-
ment.
Augmenter la distance séparant l’équipement et le récepteur.
Brancher le matériel dans la prise de courant d’un circuit dif-
férent de celui auquel le récepteur est branché.
Consulter le revendeur ou un technicien radio/télé
d’expérience.
ATTENTION - RISQUE DE CHOCS ÉLECTRIQUES -
Lire et comprendre toutes les instructions et illustrations avant
de procéder au montage et à l’installation du luminaire.
En cas de doute sur l’installation de ce luminaire, ou si le
luminaire ne fonctionne pas correctement, prière de contacter
un électricien agréé.
Utiliser toutes les pièces selon les instructions. Ne pas
substituer de pièces, exclure certaines pièces du montage ou
se servir de pièces usées ou endommagées. Le non-respect
de ces instructions risque d’annuler l’homologation UL, le
certicat C.S.A. ainsi que l’homologation ETL de ce luminaire.
Le luminaire doit être connecté à un circuit dédié.
La surface de montage doit être propre, sèche, plate et plus
grande de 0,6 cm que la surface du boîtier du luminaire.
Instructions
1) Retirer les quatre (4) vis de montage[1].
2) Faire glisser la plaque de montage[2] pour la dégager du
cache[3].
3) Fixer la plaque de montage sur la boîte à prises[4] avec les
vis[5] (fournies).
4) Connecter les ls. Se porter au tableau ci-dessous pour faire
les connexions.
5) Placer le luminaire au niveau de la plaque de montage. Pouss-
er soigneusement les connexions de l [6] à l’intérieur de la
plaque de montage et du cache en s’assurant que toutes les
connexions restent en sécurité et les ls ne sont pas pincés.
6) Insérer et serrer les vis de montage pour xer le luminaire au
mur.
INSTRUCTIONS DE NETTOYAGE DU DIFFUSEUR :
1) Enlever la vis[7] du capuchon d’extrémité[8]. Glisser le capu-
chon d’extrémité du luminaire et mettre de côté.
2) Faire glisser le diffuseur[9] hors du luminaire en prenant soin
de ne pas toucher le module LED[10].
3) Utiliser uniquement un chiffon humidié pour nettoyer le diffu-
seur. Les produits de nettoyage trop puissants peuvent endom-
mager la nition.
4) Assemblage dans l’ordre inverse.
2
4
3
1
5
6
8
9
10
7
Connecter le fil noir ou
rouge de la boite
Connecter le fil blanc de la boîte
A Noir A Blanc
*Au cordon parallèle (rond et
lisse)
*Au cordon parallèle (à angles
droits el strié)
Au transparent, doré, marron, ou
noir sans fil distinctif
Au transparent, doré, marron, ou
noir avec un til distinctif
Fil isolé (sauf fil vert) avec
conducteur en cuivre
Fil isolé (sauf fil vert) avec
conducteur en argent
*Remarque: Avec emploi dʼun fil paralléle
(SPT I et SPT II). Le fil neutre est á angles
droits ou strié et lʼautre fil doit étre rond ou
lisse (Voir le schéma).
Fil Neutre
  • Page 1 1
  • Page 2 2

Kichler Lighting 11253NILED User manual

Type
User manual

Kichler Lighting 11253NILED is a dimmable LED flush mount ceiling light fixture that offers energy-efficient illumination for your indoor spaces. With its sleek and contemporary design, it complements various decors, including modern, transitional, and minimalist styles. The fixture provides ample brightness while saving energy, making it an ideal choice for both residential and commercial applications. Installation is easy with the included mounting hardware and step-by-step instructions. Enjoy long-lasting, reliable lighting with Kichler Lighting 11253NILED.

Ask a question and I''ll find the answer in the document

Finding information in a document is now easier with AI

in other languages