Page is loading ...

1
WARNING: Because of the possible danger to person(s) or
property from accidents which may result from the improper
use of products, it is important that correct procedures be
followed. Products must be used in accordance with the
engineering information specified in the catalog. Proper
installation, maintenance and operation procedures must
be observed. The instructions in the instruction manuals
must be followed. Inspections should be made as necessary
to assure safe operation under prevailing conditions. Proper
guards and other suitable safety devices or procedures as
may be desirable or as may be specified in safety codes
should be provided, and are neither provided by ABB nor
are the responsibility of ABB. This unit and its associated
equipment must be installed, adjusted and maintained by
qualified personnel who are familiar with the construction
and operation of all equipment in the system and the
potential hazards involved. When risk to persons or property
may be involved, a holding device must be an integral part
of the driven equipment beyond the speed reducer output
shaft.
WARNING: To ensure the drive is not unexpectedly
started, turn off and lock-out or tag power source before
proceeding. Failure to observe these precautions could
result in bodily injury.
Installation and Parts Replacement Manual For
No. 188D BIO-DISC Reducer
These instructions must be read thoroughly before installation or operation. This instruction manual was accurate at the time of
printing. Please see baldor.com for updated instruction manuals.
Note! The manufacturer of these products, Baldor Electric Company, became ABB Motors and Mechanical Inc. on
March 1, 2018. Nameplates, Declaration of Conformity and other collateral material may contain the company name of
Baldor Electric Company and the brand names of Baldor-Dodge and Baldor-Reliance until such time as all materials have
been updated to reflect our new corporate identity.
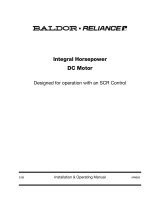
The Bio-Disc reducer can be assembled for right hand or left
hand conguration as shown in Figure 1 and Figure 2 below.
Refer to reference below to determine proper placement of
motor mount, torque arm brackets, oil drain assembly, sight
gage, and breather assembly. See Table 1 for recommended
bolt torques. The Bio-Disc reducer is shipped from the factory
pre-lled with the proper amount of oil for horizontal installation.
If the reducer is mounted on an angle or incline, please
consult Engineering for correct oil level.
BOLT
BOLT
NUT
LOCKWASHER
TORQUE ARM BUSHING
MOTOR PLATE
ASSEMBLY
MOTOR MOUNT BOLT
FULCRUM
OIL DRAIN VALVE ASSEMBLY
LIFTING LUG
PIPE PLUG
SIGHT GLASS
BREATHER ASSEMBLY
TORQUE
ARM
ASSEMBLY
LIFTING
LUG
TORQUE ARM
BRACKETS
MOTOR
HARDWARE
LOCKWASHER
LOCKWASHER
MOTOR MOUNT BOLT
VIEW B
TORQUE ARM
ASSEMBLY
LOCKWASHER
LOCKWASHER
VIEW A
VIEW B
VIEW A
BOLT
LIFTING
LUG
MOTOR PLATE
ASSEMBLY
LOCKWASHER
NUT
ADJUSTING STUD
Figure 1 - Left Hand Reducer Configuration
WARNING: All products over 25 kg (55 lbs) are noted on
the shipping package. Proper lifting practices are required
for these products. Use supplied lifting brackets where
applicable to lift reducer.

2
Reducer Installation
NOTE: This reducer is compatible with the ABB Ability
Smart Sensor that can be installed in the adapter plug
labelled “smart sensor”. The plug and sensor can be
moved to different locations as required by mounting
position.
The Bio-Disc reducer is furnished with severe duty TDNC plated
bushings to t a 4-15/16” diameter driven shaft. Included with
the reducer are two plated bushings, plated hardware, and a
bushing-to-shaft key. Using proper lifting equipment, mount the
reducer on the driven shaft per instructions below.
The driven shaft must extend through the full length of the
reducer. The minimum shaft length, measured from the end
of the shaft to the edge of the driven equipment, should be
18-1/4”. This dimension include 2-7/16” for ease of installing
and removing the bushing screws. The required shaft keyseat
length should be 16”.
Place one bushing, ange end rst, onto the driven shaft and
position 2-7/16” from the face of the driven equipment. This
will allow the screws to be threaded into the bushing and for
future bushing and reducer removal. If the reducer must be
positioned closer to the equipment than 2-7/16”, place the
screws, with washers installed, into the unthreaded holes of
the bushing ange prior to placing the bushing on the shaft and
position as required.
Insert the output key in the shaft and bushing. For ease of
installation, rotate the driven shaft so that the shaft keyseat is at
the top position.
Mount the reducer on the driven shaft and align the shaft key
with the reducer hub keyway. Maintain 2-7/16” from the face of
the driven equipment.
Insert the screws, with washers installed, in the unthreaded
holes in the bushing ange and align with the threaded holes
in the bushing backup plate. If necessary, rotate the bushing
backup plate to align with the bushing screws. Tighten the
screws lightly.
Place the second outer tapered bushing in position on the
shaft and align the bushing keyway with the shaft key. Align the
unthreaded holes in the bushing with the threaded holes in the
bushing backup plate. If necessary, rotate the bushing backup
plate to align with the bushing holes. Insert bushing screws,
with washers installed, in the unthreaded holes in the bushing.
Tighten screws lightly.
Finish tightening both tapered bushings using a two-step
process. Step one, alternate and evenly tighten the screws in
the inner bushing nearest the equipment to 475 lb in. Repeat the
procedure on the outer bushing. Step two, alternate and evenly
tighten the screws in the inner bushing nearest the equipment
to 950 lb in. Repeat the procedure on the outer bushing.
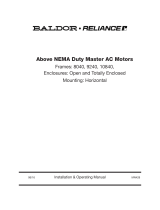
Belt Guard Installation
A universal belt guard assembly is available and can be
congured as either a right hand or a left hand guard. Refer to
Figure 3 for right hand universal belt guard conguration and
Figure 4 for left hand universal belt guard conguration.
Using the appropriate gure below, position and attach the
brackets to the belt guard back plate. Loosely tighten the
brackets onto the back plate using the hardware provided.
Position belt guard back plate to the reducer and loosen the
appropriate reducer housing bolts. Locate the back plate to the
reducer and tighten all housing bolts to 1,600 lb in. Tighten all
belt guard bolts to 225 lb in.
BOLT
BOLT
NUT
LOCKWASHER
TORQUE ARM BUSHING
MOTOR PLATE
ASSEMBLY
MOTOR MOUNT BOLT
FULCRUM
OIL DRAIN VALVE ASSEMBLY
LIFTING LUG
PIPE PLUG
SIGHT GLASS
BREATHER ASSEMBLY
TORQUE ARM
ASSEMBLY
LIFTING
TORQUE ARM
BRACKETS
MOTOR
HARDWARE
LOCKWASHER
LOCKWASHER
MOTOR MOUNT BOLT
VIEW B
TORQUE ARM
ASSEMBLY
LOCKWASHER
LOCKWASHER
VIEW A
LUG
VIEW B
VIEW A
BOLT
LIFTING
LUG
ASSEMBLY
MOTOR PLATE
LOCKWASHER
NUT
ADJUSTING STUD
Figure 2 - Right Hand Reducer Configuration

3
Using the BIO DR KIT, install the large sheave on input shaft
as close to the reducer as practical. Mount the motor on the
adjustable motor plate assembly and install the small sheave on
the motor shaft.
Install the three drive belts included in the BIO DR KIT and
adjust belt tension using the motor mount adjusting nuts.
Verify belts are in-line with the reducer and motor sheaves. Do
not overtighten the three drive belts.
Install the front belt guard cover with provided hardware.
Install torque arm fulcrum on a at and rigid support so that
the torque arm will be approximately at right angles to the
centerline through the driven shaft and the torque arm anchor
screw as shown below.
90º
RIGHT ANGLE
MAY VARY PLUS
OR MINUS 20º
Torque Arm Rod Angle
CAUTION: Unit is shipped with oil however check oil level
prior to operation. If reducer is installed on an angle or
incline, oil may need to be added. If needed, add the
proper amount of Mobil 600XP ISO 150 lubricant before
operating. Failure to observe this precaution could result
in damage to or destruction of the equipment.
BUSHING AND REDUCER REMOVAL
Remove the six (6) bushing screws.
Using the screws removed from the bushings, place two
screws in the threaded holes provided in the bushing anges.
Note the two threaded holes are 180 degrees apart on the
bushing ange. Tighten the screws alternately and evenly until
the bushings are free on the shaft. For ease of tightening the
screws, make sure the screw threads and the threaded holes in
bushing anges are clean and undamaged. If needed, a 5/8-11
UNC tap can be used to chase the bushing threaded holes.
If the reducer was positioned closer than the recommended
distance to the driven equipment, loosen the inboard bushing
screws until they are clear of the bushing ange by 1/8”. Locate
two wedges at 180 degrees between the bushing ange and the
bushing backup plate. Drive the wedges alternately and evenly
until the bushing is free on the shaft.
Follow the procedure above to remove the outer bushing. Once
the outer bushing is removed, using proper lifting equipment,
remove the reducer, the shaft key, and the inboard bushing.
ORDERING PARTS
When ordering parts for reducer, specify reducer size number,
reducer serial number, part name, part number, (where
available) and quantity.
It is strongly recommended in replacing a gear that the mating
gears also be replaced. Hence, for the high speed gear the
input pinion and input countershaft rst reduction gear should
be ordered together.
For the intermediate gears, the R.H. and L.H. spiral second
reduction gears and input countershaft pinion should be
ordered together. And for the low speed gears, the large output
gear and the two output countershaft pinions should be ordered
together.
“D”
“A”
“A”
“B”
“C”
RH BACK PLATE
UNIVERSAL GUARD
“X”
KNOCK OUT HOLES AT
3 POSITIONS MARKED “X”
BRACKET “A” - 2 REQ.
BRACKET “B” - 1 REQ.
BRACKET “C” - 1 REQ.
MOTOR SLOT COVER “D”
1 REQ.
2-0”
1-1/2”
“X”
“X”
Figure 4 - Right Hand Back Plate for Universal Belt Guard

4
If the large gear on the output hub must be replaced it
is recommended that an output hub assembly of a gear
assembled on a hub be ordered to secure undamaged surfaces
on the output hub where the oil seals rub. However, if it is
desired to use the old output hub, press the gear and bearing
off and examine the rubbing surface under the oil seal carefully
for possible scratching or other damage resulting from the
pressing operation. To prevent oil leakage at the shaft oil seals
the smooth surface of the output hub must not be damaged.
If any parts must be pressed from a shaft or from the output
hub, it should be done before ordering parts to make sure that
none of the parts are damaged in removal.
Because old shaft oil seals may be damaged in disassembly it
is advisable to order replacements for these parts.
If replacing a bearing or a shaft it is advisable to order a set of
shims for adjustment of the bearing in the shaft assembly. If
replacing the housing it is advisable to order a set of shims for
each shaft assembly because the adjustment of the bearings in
each shaft assembly is affected.
“X”
“D”
BRACKET “A” - 2 REQ.
BRACKET “B” - 1 REQ.
BRACKET “C” - 1 REQ.
2-0”
1-1/2”
“C”
“A”
“B”
LH BACK PLATE
KNOCK OUT HOLES AT
MOTOR SLOT COVER “D”
3 POSITIONS MARKED “X”
UNIVERSAL GUARD
1 REQ.
“X”
“X”
“A”
Figure 5 - Left Hand Back Plate for Universal Belt Guard
REPLACEMENT OF PARTS
Using tools normally found in a maintenance department, a
BaldorDodge TORQUE-ARM reducer can be disassembled
and reassembled by careful attention to the instruction.
Cleanliness is very important to prevent the introduction of dirt
into the bearings and other parts of the reducer. A tank of clean
solvent, an arbor press, and equipment for heating bearings
and gears, should be available for shrinking these parts on
shafts.
The oil seals are of the rubbing type and considerable care
should be used during disassembly and reassembly to avoid
damage to the surface which the seals rub on.
The keyseat in the input shaft as well as any sharp edges on
the output hub should be covered with scotch tape or paper
before disassembly or reassembly. Also be careful to remove
any burrs or nicks on surfaces of input shaft and output hub
before disassembly or reassembly.

5
Extreme pressure (EP) lubricants are not recommended for
average operating conditions.
Pour point of lubricant selected should be at least 10° F. lower
than expected minimum ambient starting temperature.
NOTE: Horizontal Oil Level Capacity - Approximately 45
quarts. If the reducer is mounted on an angle or incline,
please consult BaldorDodge Engineering for correct oil
level.
Recommended Bolt Torque
Table 1 - Bio-Disc Recommended Bold Torque
Bolt Location Fastener Size Torque (lb in)
Belt Guard Bracket Bolts 3/8-16 225
Tapered Bushings 5/8-11 950
Motor Mount to Housing 3/4-10 1600
Housing Bolts 3/4-10 1600
TA Bracket to Housing 3/4-10 1600
LUBRICATION INSTRUCTIONS
NOTE: Reducer is shipped with oil. With sight gauge installed,
verify correct oil level prior to operation. If reducer is installed
on an angle or incline, oil may need to be added. If needed,
add the proper amount of Mobil 600XP ISO 150 lubricant before
operating. Failure to observe this precaution could result in
damage to or destruction of the equipment.
When changing oil use a Mobil 600XP ISO 150 lubricant or
an equivalent high grade petroleum-base, rust and oxidation
inhibited (R & O) gear oil. See table below for guidelines.
Follow instructions on reducer nameplate, warning tags and
installation manual.
Oil Recommendations for Average Operating Conditions
Ratio and
Output RPM
Room Temp.
°Fahrenheit
Oil
ISO VG
AGMA
Number
170:1-1.5 rpm
0° to 100° 150 4
101° to 125° 220 5
Under average industrial operating conditions, the lubricant
should be changed every year. Intermittent operation requires
increased maintenance at which time lubricant should be
changed every 2500 hours of operation or every 6 months,
whichever occurs rst. Drain reducer and ush with kerosene,
clean magnetic drain plug and then rell unit to proper level
with new lubricant. Mounting position may vary up to +/- 15
degrees on a horizontal shaft without modifying the standard
oil ll of 45 quarts. If installing the reducer on an incline, contact
Baldor•Dodge Engineering for the correct oil ll.
CAUTION: Too much oil will cause overheating and too
little will result in gear failure. Check oil level regularly.

6
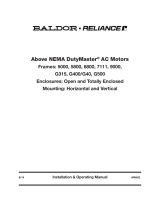
Parts for Number 188D Bio-Disc Reducer
Reference Name of Part
Number
Required
Part Number
2
①
6
8
10
12
14
①
①
16
①
①
HOUSING ASSEMBLY ②
③ Air Vent ④
③ Housing Bolt ⑤
③ Adapter/Motor Mount - Housing Bolt ⑤
③ Adapter/Motor Mount Bolt ⑥
③ Adapter/Motor Mount Bolt ⑥
③ Lockwasher
③ Plain Washer
③ Dowel Pin
③ Pipe Plug
③ Smart Sensor Adapter
③ Magnetic Plug
1
1
12
1
2
1
16
2
2
2
1
1
021835
964366
411542
411499
411268
411496
419016
034017020AB
420132
430035
966907
430064
22
23
24
25
Input Shaft Seal Carrier
Input Shaft Bearing Shim Pack
Carrier and Cover Screws
Lockwasher
1
2 sets ⑦
34
34
021769
389921
032018010CJ
419011
26
28
30
32
33
34
35
125
Input Shaft with Pinion
Input Shaft Key
Input Shaft Seal
Input Shaft V-Ring
Input Shaft Bearing - Left Side
Cone
Cup
Input Shaft Bearing - Right Side
Cone
Cup
Output Seal Wear Sleeve
1
1
1
1
1
1
1
1
2
259162
443053
021771
905261
402275
403103
402276
403103
390000
36
38
40
42
44
INPUT COUNTERSHAFT ASSEMBLY ②
③ Countershaft with Pinion (R.H.)
③ First Reduction Gear
③ Gear Key
③ Countershaft Pinion (L.H.)
③ Pinion Key
1
1
1
1
1
1
021761
021762
443385
021760
443386
46
48
50
52
54
Input Countershaft Spacer
Retaining Ring
Input Countershaft Bearing
Retaining Ring
Input Countershaft Cover - Left Side
2
1
2
3
1
021834
421005
424233
421032
021767
56
57
58
56
60
58
OUTPUT COUNTERSHAFT ASSEMBLY
Left-Hand Spiral ②
③ Countershaft with Pinion
③ L.H. Spiral Second Reduction Gear
③ Key
Right-Hand Spiral ②
③ Countershaft with Pinion
③ R.H. Spiral Second Reduction Gear
③ Key
1
1
1
2
1
1
1
2
021759
249005
301491
021759
021763
248218
64
66
68
Output Countershaft Bearing
Cone
Cup
Output Countershaft Cover - Right Side
Output Countershaft Cover - Left Side (R.H.)
Output Countershaft Cover - Left Side (R.H.)
Output Countershaft Bearing Shim Pack
4
4
2
1
1
4 sets ⑦
402109
403078
247224
021765
021791
389922
70
72
74
OUTPUT HUB ASSEMBLY ②
③ Output Hub
③ Output Gear
③ Key
1
1
1
2
021757
021764
443387
Parts for Number 188D Bio-Disc Reducer
Reference Name of Part
Number
Required
Part Number
76
78
80
82
84
86
87
88
125
Bushing Back-Up Plate
Retaining Ring
Output Hub Seal
Output Hub Seal Carrier
Output Hub Spacer Output
Output Hub Bearing
Cone
Cup
Output Hub Bearing Shim Pack Seal
Wear Sleeve (s)
2
2
2
1
1
2
2
1 set ⑦
⑦
272082HD
421097HD
021733
249221
021772
402160
403110
249139
390000
89
90
91
①
BUSHING ASSEMBLY ②
③ Bushing
③ Bushing Screw
③ Lockwasher
③ Key Bushing to Shaft
1
2
6
6
1
021832TDNC
272080
032018016EK
034017018AB
443388
92
94
96
98
99
100
102
104
106
TORQUE-ARM ASSEMBLY ②
③ Rod End
③ Hex Nut
③ Turnbuckle
③ Extension
③ Hex Nut
③ Fulcrum
③ Fulcrum Screw
③ Lockwasher
③ Hex Nut
1
1
1
1
1
1
1
1
1
021837
407107
272447
021838
965051
272445
411303
03401728AB
407103
108
110
112
114
116
Adapter Plate
Adapter Bushing
Adapter Bolt
Lockwasher
Hex Nut
2
1
1
1
1
249241P
021785
411532
419141
407101
118
120
122
124
Motor Mount Base Plate Assembly
Rod End
Plain Washer
Hex Nut
1
2
4
4
259163
021788
419082
407095
① Not shown on drawing
② Includes parts listed immediately below
③ These parts make up the assemblies under which they are listed
④ Includes bushing and elbow
⑤ Bolts are located on Left Housing half
⑥ Bolts are located on Right Housing half
⑦ If replacing a bearing or a shaft It is advisable to order a set of shims for adjustment
of the bearing in the shaft assembly. If replacing the housing it is advisable to order a
set of shims for each shaft assembly because the adjustment of the bearings in each
shaft assembly is affected.

7
Parts for No. 188D Bio-Disc Reducer
6, 10, 14
118
120, 122,
124
110, 112
114, 116
8, 12, 14
108
6, 10, 14
92
94
96
98
102, 104,
106
100
2
86, 87
90, 91
6, 14
72
4
89
70
74, 75
84
82
24, 25
125
78
76
80
88
80
66, 67
57
58
24, 25
60
64
56
62, 63
50
42
54
44, 45
48
36
55
46
52
40
38
34, 35
18
24, 25
24, 25
26
28
16
23
22
30
32, 33

—
ABB Motors and Mechanical Inc.
5711 R. S. Boreham Jr. Street
Fort Smith, AR 72901
Ph: 1.479.646.4711
Mechanical Power Transmission Support
Ph: 1.864.297.4800
new.abb.com/mechanical-power-transmission
baldor.com
*1672-0220*
All Rights Reserved. Printed in USA.
20/20 Printshop 500
© ABB Motors and Mechanical Inc.
MN1672 (Replaces 499915)
/