Page is loading ...

Laser LAR-200
16 663 09-06
Operating instructions
Mode d’emploi
Instrucciones
E
USA
F
2 - 7
8 - 13
USA
14 - 19
F
E

32
3
3
4
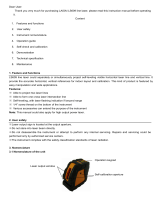
SP1: vertical beam emission aperture
SP2: rotation beam emission aperture
ON/OFF switch
High alert/ automatic level On/Off
LEDs for displaying:
Red LED: low battery or laser overheat
Shockprotection
5/8" thread for connection to tripod
Battery compartment cover
Main components
The STABILA LAR-200 is designed to be an easy to use exterior rotating laser. Its
horizontal rotating and plumb point are self-leveling ( ± 5°) and fully automatic.
The LAR-200 has an operating range of1000 ft ( 300m ) and includes a full function
receiver for long distance and brightlight applications.
Operating instructions
Splitter pentaprism SP:
(4)
4 markings to create a plumb-line laser function
(1)
(3)
(2)
(5a)
(5b)
(6)
(7)
(8)
(9)
(10)
A
Housing:
designed for exterior use: dust and water protected.
Not submergeable ( IP65 )
Green LED: Operating mode ON or READY/ OK
1.800.869.7460 U.S. and Canada
USA
Using - Automatic leveling with high alert mode
For protection, the rotating laser turns itself off completely when in this high alert
mode!
The laser unitcan be turned on by briefly pushing button (3). The laser will now
level automatically. The green LED (5b) lights up and the LED (4) begins to flash.
When the laser spins, itis now level. At this point the LED (4) will continue to flash
for approximately 30 secondsgiving the user time to position the laser unit in
desired position. E.g. to adjust height or set on tripod, etc.. During this 30 second
period, the laser unitwill compensate for minor movements and re-level. After this
30 second period the LED (4) light will go outand the laser unit will switch to high
alert mode .
Operating modes:
Main applications:
Leveling
Set the laser unit on a firm base or a tripod.
TTiipp::
For the most accurate and efficient measuring it is
best to set up rotating lasers towards the center of your
work
Press the button (3), to turn on laser unit. The laser unit
will level automatically. When the unit has self-leveled,
the laser will rotate automatically. Depending on the
surrounding light conditions, you can either use the
laser beam directlyin low light conditions ( always mark
the center of the dot) or use the included receiver in
bright conditions.
Please note thatthe center of laser dot is marked!
NB:
This is a class IIIa laser.
Do not lookdirectly into the laser beam !
The goggles available for these units are
not safety goggles. They enable you to see
the laser beam more clearly in bright light
conditions.
Keep thisproduct away from children !

54
3
3
3
4
4
Automatic level with automatic re-leveled
With many application conditions (e.g. on strong vibrations), it is useful for the
rotating laser unit to automatically re-level itself constantly. After turning laser on
with button (3), the laser can be put in automatic mode by pressing button (4).
Minor bumps and vibrationsare compensated for. Large bumps and vibrations
will cause the laser to stop rotating and re-level automatically. When the laser
re-leveling is complete, the laser will rotate automatically.
High alert mode
Minor bumps or vibrationsare automatically compensated for up to a certain
threshold. If there is a bump or vibration beyond the set threshold, the high alert
will engage. When engaged, the rotation willstop and the laser will not re-level,
the LED (4) flashes, alerting the user of a problem.
Note: with the high alert mode, bumps and vibrations that can cause misaligne-
ment of precise measurementswill not go unnoticed.
To reset laser simply push button (3) to turn off laser, then push button (3) to turn
the laser back on. After the laser has re-leveled, checkand re-align laser to desired
position.
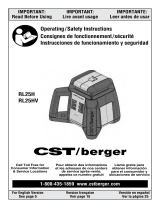
Use as a Plumb-line Laser
The laser unitcan be aligned on a cross hair layout on
ground using the 4 marks (9) on the base to transfer a
plumb point from the floor to the ceiling. The point
where the cross hair layout intersects corresponds to
the SP1 plumb dot.
A correct result can only be obtained in Automatic
mode with the unit seton a level surface!
The LAR-200 rotation laser has been designed for building site use and leaves our
factory perfectly calibrated. Aswith any precision instrument, however, its calibra-
tion must be regularly checked. The unit should be checked before starting any
new tasks, particularly when the unit has been exposed to strong vibrations. After
an impact, the unit should be checked throughout its whole self-levelling range.
Checking the calibration
Horizontal checking
1.
2.
3.
7.
4.
5.
6.
Repeat steps 4 and 5 to obtain Points 3 and 4.
Mark the position of the visible laser dot on the wall (Point 2).
Mark the position of the visible laser dot on the wall - Measurement 1 (Point 1).
Because the diameter ofthe beam depends on the distance, you must always
only use the center of the dot!
Switch the unit on (button 3) and wait for it to level automatically.
Turn the complete unit 90° without altering the height of the laser (i.e. the tripod
must not be altered). Let the unit level automatically again.
If the difference between the 4 control points is less than 1/16" at 25ft
(1mm at 5m) distance and 1/8" at 50ft (2 mm at 10m) distance the permissible
tolerance of ± 1/8" over 100ft (± 0.1 mm/m) is being maintained.
Points 1 and 3 on the unit'sy-axisand points 2 and 4 on the unit's x-axis now
correspond.
Set up the rotation laser on a smooth, level surface or on a tripod 25 ft or 50 ft /
5m or 10m from a wall with the front facing the wall.
50ft
max
1/16”
1/8”
(
)
()
25ft
(
)
( )

76
Unfasten the catch on
the battery compartment
cover: remove the cover
and the batteries. Insert
new batteries following
the instructions in the
battery compartment.
Only use 1.5V mono cells
(size D) !
Or use rechargeables.
Replacing the batteries
Operating status display and error messages
via the LEDs
Illuminated
ggrreeeenn
LED
-> The laser levels itself automatically
-> laser in operation
-> laser in operation
-> battery voltage very low
-> battery replacement required imminently
-> Battery voltage very low
-> The unitis inclined too much
+ is outside the self-leveling range
+ the laser cannot level itself automatically
Illuminated
ggrreeeenn
LED +
laser beam
ffllaasshhiinngg
Illuminated
rreedd
LED
FFllaasshhiinngg rreedd
LED
+ laser beam
ffllaasshhiinngg
-> The unitis inclined too much
+ is outside the self-levelling range
+ the laser cannot level itself automatically
FFllaasshhiinngg ggrreeeenn
LED
+ laser beam
ffllaasshhiinngg
-> The laser levels itself automatically
-> Battery voltage very low
-> Battery replacement required imminently
Illuminated
rreedd
LED
+ laser beam
ffllaasshhiinngg
Tip:
Remove the batteries ifthe unit will not be used for a long period !
Mono, D , LR20
7
1.
2.
< 5 mW, Laser Class IIIa
This product complies with the applicable
requirements of 21CFR parts 1040.10 and 1040.11.
Subject to technical modifications.
Laser type:
Technical data
Self-leveling range:
Output:
Leveling accuracy:
Batteries:
Operating life:
Operating temperature range:
Storage temperature range:
Red diode laser, wavelength 650 nm
ca. ± 5°
± 0,1 mm/m or ± 1/8” over 100 ft
2 x 1,5 V Mono cells Alkaline, Size D, LR20
Approx. 120 hours
-10°C to +60°C or 14°F to +140°F
-20 °Cto +70 °C or -4°F to +158°F
• Dirty lens glass on the beam emitter detracts from the quality of the beam.
It should be cleaned with a softcloth.
• Clean the laser unit with a damp cloth. Do not spray or immerse the unit!
Do not use solvents or thinners!
Care and maintenance
The LAR-200 rotation laser mustbe handled carefully, in the same way as any
precision optical instrument.
Stabila provides a guarantee against deficiencies and faultsin the assured characte-
ristics because of material or manufacturing faults for a period of 24 months from
date of purchase. Any faults will be eliminated atStabila's own discretion either by
repairing or replacing the unit. Stabila accepts no wider claims.
No liability is accepted for any faults due to inappropriate treatment (e.g. damage
caused bythe unit falling, operation with the wrong voltage or type of current, use of
unsuitable current supply sources) or for any autonomous changes made to the unit
by the purchaser or a third party.
Also no claims under guarantee are accepted for natural wear and tear or anysmall
faults that do not significantly affectthe unit's operation.
Any guarantee claimsmust be made via the dealer on the duly completed guarantee
form (see lastpage) to be returned with the unit.
Guarantee terms and conditions

Guarantee form for STABILA LAR 200
Certificado de garantía para el LAR 200 de STABILA
Bon de garantie pour STABILA LAR 200
E
Customer:
Client:
Cliente:
Purchase date:
Date d’achat:
Fecha de compra:
Address:
Adresse:
Dirección:
Dealer (stamp, signature):
Concessionnaire(cachet, signature):
Comerciante (sello y firma):
USA
F

STABILA Inc.
332 Industrial Drive
South Elgin , IL 60177
1.800.869.7460
www.stabila.com
/