Page is loading ...

Models /
Modèles /
Modelos:
PCG 30
PCG 36
PCG 48
For Thermador
Professional
®
Cooktops
CARE AND USE MANUAL
Des tables de cuisson Thermador Professional
®
MANUEL D’UTILISATION ET
D’ENTRETIEN

WARNING:
If the information in this manual is not
followed exactly, a fire or explosion may
result causing property damage, personal
injury or death.
— Do not store or use gasoline or other flam-
mable vapors and liquids in the vicinity of this
or any other appliance.
— WHAT TO DO IF YOU SMELL GAS
■ Do not try to light any appliance.
■ Do not touch any electrical switch.
■ Do not use any phone in your building.
■ Immediately call your gas supplier from a
neighbor’s phone. Follow the gas supplier’s
instructions.
■ If you cannot reach your gas supplier, call the
fire department.
— Installation and service must be performed
by a qualified installer, service agency or the
gas suppler.
AVERTISSEMENT
L’information fournie dans le présent
manuel doit être rigoureusement
respectée, sous peine d’un incendie ou
d’explosion susceptible d’entraîner des
dommages, des blessures ou la mort.
— N’entreposez pas et n’utilisez pas
d’essence ou autres produits inflammables
dans le voisinage de cette cuisinière ou de
tout autre appareil.
— SI VOUS SENTEZ UNE ODEUR DE GAZ
■ N’allumez aucun appareil.
■ Ne touchez pas aux interrupteurs
électriques.
■ N’utilisez pas les téléphones du bâtiment.
■ Appelez immédiatement votre compagnie
de gaz de chez un voisin. Suivez les in-
structions de la compagnie.
■ Si vous n’arrivez pas à contacter votre
compagnie de gaz, appelez les pompiers.
— L’installation et les réparations doivent être
réalisées par un installateur qualifié, un
centre de réparation agréé ou la compagnie
de gaz.
This Thermador Appliance is made by
BSH Home Appliances Corporation
5551 McFadden Ave.
Huntington Beach, CA 92649
Questions?
1-800-735-4328
www.thermador.com
We look forward to hearing from you!

Table of Contents
Introduction ..................................................................1
Gas Type Verification ..................................................1
SECTION ONE: General Safety Instructions
Electrical Requirement and Grounding Instructions ...... 2
Safety Precautions ...................................................3 – 4
SECTION TWO: Before You Begin
Before Using Your Cooktop for the First Time ............... 5
SECTION THREE: Description
Model & Parts Identification – PCG 48 .....................6
Model & Parts Identification – PCG 36 .....................6
Model & Parts Identification – PCG 30 .....................6
SECTION FOUR: Using the Cooktop
Sealed Burners ............................................................7
ExtraLow
®
Burners ......................................................8
Electronic Igniter ..........................................................9
Burner Cap Placement ................................................9
Flame Setting Guidelines ......................................... 10
Cookware Recommendations ..................................11
Specialty Cookware .................................................. 12
Surface Burner Cooking Recommendations .13 – 14
Using the Griddle .............................................. 15 – 16
Griddle Cooking Recommendations ....................... 16
SECTION FIVE: Care and Maintenance
Cooktop Cleaning Recommendations .................17 – 19
SECTION SIX: Before Calling For Service
Do-It-Yourself Maintenance..................................... 20
Before Calling For Service....................................... 21
Data Rating Plate...................................................... 21
Warranty ...............................................................22-23
INTRODUCTION
CAUTION
When connecting the unit to propane gas, make
certain the propane gas tank is equipped with
its own high-pressure regulator in addition to
the pressure regulator supplied with the range.
The pressure of the gas supplied to the appli-
ance regulator must not exceed 14" (34.9 milli-
bars) water column.
TESTED IN ACCORDANCE WITH ANSI
Z21.1, The STANDARD FOR HOUSEHOLD
COOKING GAS APPLIANCES. IN CANADA
TESTED IN ACCORDANCE WITH CAN/
CGA 1.1 - M81, STANDARD for DOMESTIC
GAS RANGES.
Check your local building codes for the proper
method of installation. In the absence of local
codes, this unit should be installed in accordance
with the National Fuel Gas Code No.
Z223.1 /
NFPA 54
current issue and the National
Electrical Code ANSI/NFPA No. 70 current issue
or the Can - B149 Installation Codes for Gas
Burning Appliances and C22.1 Canadian
Electrical Code Part 1.
It is the responsibility of the owner and the
installer to determine if additional requirements
apply in specific installations.
1
Cooktops are shipped by the factory to operate on
natural gas. Verify
that the type of gas being used at
the installation site matches the type of gas used by
the appliance.
If the location/job site requires a conversion from
one type of gas to another, contact the dealer where
the unit was purchased or contact Thermador. The
field conversion kit for this series of Professional
cooktops is Thermador Model PALPKITHC. Field
conversion must be done by qualified service
personnel only.
IMPORTANT
All Cooktops having less than 12" (305 mm)
horizontal clearance between combustible ma-
terials and the back edge of the Cooktop must
be installed with a Thermador Low Back Back-
guard. If more than 12" (305 mm) horizontal
clearance exists, a Thermador Island Trim may
be used instead of the backguard. Before using
the Cooktop, insure that it is equipped with the
appropriate Low Back Backguard or Island Trim.
Refer to the Installation Instructions accompa-
nying this appliance for more information.

ELECTRICAL REQUIREMENTS AND GROUNDING INSTRUCTIONS
CAUTION - ALL MODELS
In Case of an Electrical Failure
If for any reason a gas control knob is turned ON and there is no electric power to operate the
electronic igniters on the cooktop burners, turn OFF the gas control knob and wait 5 min-
utes for the gas to dissipate before lighting the cooktop burner manually.
To light the cooktop burners and grill manually, carefully hold a lighted match to the burner ports
and turn the gas control knob to HI. During a power failure, you can manually light the standard
cooktop burners and grill only, but each must be lit with a match.
DO NOT attempt to light the two left burners manually. These burners are equipped with
the ExtraLow® feature and cannot be lit manually.
See Pages 10 and 20 for additional information on manually lighting the burners.
Section 1: GENERAL SAFETY INSTRUCTIONS
PLEASE READ CAREFULLY
All Cooktop models require an electrical circuit rated
at 120 volts, 60 Hz., 10 Amps, except models with
electric griddle require 15 Amp circuits.
For personal safety, this appliance must be con-
nected to a properly grounded and polarized
electrical power supply.
Always disconnect the electrical plug from the wall
receptacle before servicing this unit.
See Installation Instructions for electrical
requirements and grounding instructions.
DO NOT UNDER ANY
CIRCUMSTANCES CUT OR REMOVE
THE SEPARATE GROUND WIRE OR
THE THIRD (GROUND) PRONG FROM
THE POWER CORD PLUG.
It is the personal responsibility and obligation of you,
the user, to have this appliance connected to the
electrical power supply in accordance with the Na-
tional Electrical Code and/or applicable local codes
and ordinances by a qualified electrician.
It is recommended that a dedicated circuit servicing
this appliance be provided.
2
CAUTION
Safety Precautions

Your new Thermador Professional
®
Cooktop has been designed to be
a safe, reliable appliance when
properly used and cared for. Read
all instructions in this Care and
Use Manual carefully before using
this cooktop.
WARNING: These
precautions will reduce the risk
of burns, electric shock, fire,
and injury to persons. Use
extreme care when using this
restaurant-caliber cooktop
as this appliance provides
intense heat.
When using kitchen appli-
ances, these basic safety pre-
cautions must be followed:
• Insure proper installation and
servicing. Follow the installation
instructions provided with this
product. Have the cooktop in-
stalled and electrically grounded
by a qualified technician.
• Have the installer show you
where the gas supply shut-off
valve is located so that you know
how and where to turn off the gas
to the cooktop.
• If you smell gas:
• Do not try to light any appli-
ance.
• Do not touch any electrical
switch.
• Do not use any phone in your
building.
• Immediately call your gas sup-
plier from a neighbor’s phone.
Follow the gas supplier’s in-
struction.
• If you cannot reach your gas
supplier, call the fire department.
• Installation and service must be
performed by a qualified in-
staller, service agency or the
gas supplier.
• In the event a burner goes out
and gas escapes, turn off the
burner and open a window or a
door. Do not attempt to use the
cooktop until the gas has had time
to dissipate. Wait at least 5 min-
utes before using the cooktop.
• Do not repair or replace any
part of the appliance unless
specifically recommended in this
manual. All other servicing should
be referred to a qualified techni-
cian.
• Children should not be left
alone or unattended in an area
where appliances are in use.
They should never be allowed to
sit or stand on any part of the ap-
pliance. If children are allowed to
use the appliance, they must be
closely supervised.
CAUTION: Do not
store items of interest to chil-
dren above or at the back of
the cooktop. If children should
climb onto the appliance to reach
these items, they could be seri-
ously injured.
• When children become old
enough to operate the appliance,
it is the legal responsibility of the
parents or legal guardians to en-
sure that they are instructed in
safe practices by qualified per-
sons.
• Never use any part of the
cooktop for storage. Flam-
mable materials can catch fire
and plastic items may melt or
ignite.
• If the cooktop is near a window,
be certain the curtains do not
blow over or near the cooktop
burners; they could catch on fire.
• Have an appropriate fire extin-
guisher available, nearby, highly
visible and easily accessible near
the appliance.
• DO NOT USE WATER ON
CAUTION
SAFETY PRACTICES TO AVOID PERSONAL INJURY
Section 1: GENERAL SAFETY INSTRUCTIONS
3
SAVE THESE INSTRUCTIONS
GREASE FIRES. Turn appliance
off and smother fire with baking
soda or use a dry chemical or
foam-type extinguisher.
• Never let clothing, pot hold-
ers, or other flammable materi-
als come in contact with or too
close to any element, burner or
burner grate until it has cooled.
Fabric may ignite and result in per-
sonal injury.
• Use only dry pot holders. Moist
or damp pot holders on hot sur-
faces may cause burns from
steam. Do not use a towel or other
bulky cloth in place of pot hold-
ers. Do not let pot holders touch
hot elements, hot burners, or
burner grates.
• For personal safety, wear
proper apparel. Loose fitting gar-
ments or hanging sleeves should
never be worn while using this ap-
pliance. Some synthetic fabrics
are highly flammable and should
not be worn while cooking.
• Do not use aluminum foil as a
shield against food spills or drip-
pings around the burners or con-
trol panel area. This could ob-
struct the flow of combustion and
ventilation air. This can also dam-
age the finish of the cooktop.
WARNING: The ap-
pliance is for cooking food.
Based on safety considerations,
never use the Cooktop to warm
or heat a room or for other pur-
poses. Such uses can create a
burn or harmful by-product haz-
ard and can damage the Cooktop.
• When using the cooktop: DO
NOT TOUCH THE BURNER
GRATES OR THE IMMEDIATE
SURROUNDING AREAS adja-
cent to the burners, which may be-
come hot enough to cause burns.

• Never leave the cooktop un-
attended when using high flame
settings. Boil-overs cause smok-
ing and greasy spills that may ig-
nite. More importantly, if the
burner flames are smothered, un-
burned gas will escape into the
room. See inside the front cover
regarding gas leaks.
• Only certain types of glass,
heatproof glass-ceramic, ce-
ramic, earthenware or other
glazed utensils are suitable for
cooktop use. This type of utensil
may break with sudden tempera-
ture changes. Use only on low or
medium heat settings according
to the utensil manufacturer’s di-
rections.
• Do not heat unopened food
containers; a buildup of pressure
may cause the container to burst.
• During cooking, set the burner
control so that the flame heats
only the bottom of the pan and
does not extend beyond the
bottom of the pan.
• Use caution to insure that drafts
like those from forced air vents or
fans do not blow flammable ma-
terial toward the flames or push
the flames so that they extend be-
yond the edges of the pot.
• Always use utensils that have
flat bottoms, large enough to
cover the burner. The use of un-
dersized utensils can expose a
portion of the flame and may re-
sult in ignition of clothing.
• Bakeware, such as large cas-
serole pans, cookie sheets, etc.,
should never be used on the
cooktop.
• To minimize the risk of burns, ig-
nition of flammable materials and
unintentional spills, position
handles of utensils inward so
they do not extend over adjacent
work areas, cooking areas or the
edge of the cooktop.
• Hold the handle of the pan to
prevent movement of the utensil
when stirring or turning food.
• Do not use pots or pans on the
grill plate accessory.
• Do not use the grill plate ac-
cessory for cooking exces-
sively fatty meats or products
which promote flare-ups.
• The optional cutting board ac-
cessory must be removed
be-
fore operating the griddle.
• GREASE IS FLAMMABLE. Let
hot grease cool before attempt-
ing to handle it. Avoid letting
grease deposits collect. Clean af-
ter each use.
• For proper lighting and perfor-
mance of the burners, keep the
ports clean. It is necessary to
clean these when there is a boil
over or when the burner does not
light even though the electronic
igniters activate. See Page 17 for
cleaning Star Burner ports.
WARNING
After a spill or boil over, turn off
the burner and clean around
the burner and burner ports.
After cleaning, check for proper
operation.
• Clean the cooktop with cau-
tion. Avoid steam burns; do not
use a wet sponge or cloth to clean
the cooktop while it is hot. Some
cleaners produce noxious fumes
if applied to a hot surface. Follow
directions provided by the cleaner
manufacturer.
• Do NOT obstruct the flow of
combustion or ventilation air.
• Be sure all cooktop controls
are turned off and the cooktop
is cool before using any type of
aerosol cleaner on or around the
cooktop. The chemicals that pro-
duce the spraying action can, in
the presence of heat, ignite or
cause metal parts to corrode.
• Service should only be done by
authorized technicians. Techni-
cians must disconnect the power
supply before servicing this unit.
• To avoid a fire hazard, grease
accumulation must be pre-
vented by frequently cleaning
the ventilation hood and filters.
• In case of fire or when inten-
tionally “flaming” liquor or
other spirits on the cooktop,
follow hood manufacturer’s in-
structions.
• Install a smoke detector in or
near the kitchen.
•
IMPORTANT SAFETY NO-
TICE: The California Safe Drinking
Water and Toxic Enforcement Act re-
quires the Governor of California to
publish a list of substances known to
the state to cause cancer, birth de-
fects or other reproductive harm, and
requires businesses to warn custom-
ers of potential exposure to such sub-
stances.
The burning of gas cooking fuel can
generate some by-products, which
are on the list. To minimize expo-
sure to these substances, always
operate this unit according to the
instructions contained in this
booklet and provide good ventilation.
CAUTION
Section 1: GENERAL SAFETY INSTRUCTIONS
SAVE THESE INSTRUCTIONS
4

Before Using Your Cooktop for the First Time
Section 2: BEFORE YOU BEGIN
1. Check that you have all the items listed for your model, as shown in the table below.
2 . Record the Model and Serial number of your appliance as described on Page 21. This may be used for
any future contacts with your servicer or the factory. Enter this information on the Product Registration
Card included with this product; then mail it to the indicated address.
3. Optional Accessories: Grill Plate, Grill Cover, Griddle Cover, Cast Iron Wok Ring, Chopping Board for
built-in griddle area. A portable griddle and other accessories are available from your Thermador dealer.
4. Ensure that the burner caps are seated correctly on the burner bases. Turn on each burner to check for
proper flame color. See Page 10 for details.
5
BEFORE USING YOUR ELECTRIC GRIDDLE THE FIRST TIME
Clean the surface with hot soapy water. Rinse thoroughly with clear water. Check adjustment of griddle
plate, for slight tilt forward. See INSTALLATION MANUAL. The griddle is now ready to use.
* Backguard or Island Trim must be ordered separately. These are not included with the cooktop.
2
1
4
Description
36” with Griddle
36” 6-Burner
48” with Griddle
4
Star Burner caps
Burner Grates
Center Grate
Control Knobs
Coated Aluminum
Griddle
Product
Registration Card
Backguard
Installation
Instructions
Care and Use
Manual
1
664
233
5
67
11
30” 4-Burner
11
1
*
**
*
1
11
1
1
11
1

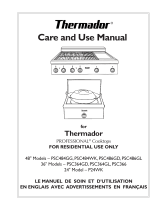
MODEL AND PARTS IDENTIFICATION FOR 36" AND 30" MODELS
1 – 12” Low Back or Island Trim
(ordered separately)
2 – Burner Grates & Burners
3 – Griddle
4 – Control Knobs, ExtraLow
®
Burners
5 – Control Knob, Griddle
Thermostat
6 – Control Knobs, Standard
Burners
7 – Center Grate - shown in top view
Key
4 Burners and Griddle
6 Burners
4 Burners and Griddle
Section 3: DESCRIPTION
MODEL AND PARTS IDENTIFICATION FOR 48" MODEL
Key
1 – 12” Low Back or Island Trim
(ordered separately)
2 – Burner Grates & Burners
3 – Griddle
4 – Control Knobs, Standard
Burners
5 – Control Knob, Griddle
Thermostat
6 – Control Knobs, ExtraLow®
Burners
6 Burners and Griddle
6
4 Burners and Center Grate
1
2
2
3
4
5
6
4
2
7
7
1
3
54
6
2
2

Sealed Burners
Using The Cooktop
Section 4: USING THE COOKTOP
The cooktop features four or six gas surface
burners; each rated at 18,000 BTU/HR (15,000
BTU/ HR using Propane). The burners are
mounted on top of unique-shaped pedestals.
This makes the burner assemblies accessible
for easy cleaning. On all models, the two left
burners have the exclusive ExtraLow feature,
the remaining burners are standard. Each
burner has its own control knob.
Star Brass Burner Base
CONTROL KNOBS
The control knobs for two gas burners, one in
front and one in the rear, are located directly in
front of and below the pair of burners on the
control panel.
The symbol above each control knob identifies
either the burner position on the cooktop or the
griddle control, depending upon your model.
BTU for Standard Burners
• HI is equivalent to 18,000 BTU/HR
(15,000 BTU / HR using Propane).
• SIM is equivalent to 2,100 BTU / HR.
BTU for ExtraLow® Burners
• HI is equivalent to 18,000 BTU/HR
(15,000 BTU / HR using Propane).
• SIM is equivalent to 3,000 BTU / HR.
• XLO is equivalent to 370 BTU / HR.
7
Standard Burner Control Knob
Bezel
Knob
Setting Indicator
OPERATION OF THE BURNERS
• Press in on the knob and turn it counter-
clockwise to the setting on the knob.
• The igniter for the selected burner clicks and
sparks.
• After burner ignition, the igniter stops clicking.
• Rotate the knob to any flame setting between
HI and SIM.
• The blue signal light, between the burner
knobs, will light when adjacent burners are lit.
The light will remain on until the adjacent
burners are turned off.
LEFT REAR LEFT FRONT
Burner: Burner:
CENTER REAR CENTER FRONT
Burner: Burner:
RIGHT REAR RIGHT FRONT
Burner: Burner:
GRIDDLE:

8
ExtraLow® Burners
The controls for the two left burners, front and
rear, have flame settings even lower than the
standard SIM settings.
Section 4: USING THE COOKTOP
ExtraLow Burner Control Knob
Setting Indicator
ExtraLow
®
Range
The drawing shows that the control knob has
an additional range between the SIM and XLO
settings. When the knob is set within this
range, the flame cycles off and on. By varying
the length of time the flame is off and on, the
heat is reduced even further to cook delicate
foods. For example, these very low settings are
suitable for simmering and poaching, melting
chocolate and butter, holding cooked foods at
temperatures without scorching or burning, etc.
Operation of the ExtraLow Burners
• XLO, the very lowest setting, is achieved by
cycling the flame ON for approximately 8
seconds and OFF for 52 seconds of each
minute.
• When the knob is set just below the SIM setting,
the flame will cycle ON for approximately 52
seconds and OFF for 8 seconds of each
minute.
• To vary the amount of low heat to suit the food
and quantity, the control can be set anywhere
within the SIM and XLO range marked on the
knob.
ExtraLow Techniques
• The type and quantity of food affects which
setting to use.
• The pan selected affects the setting. Its size,
type, material, and whether a lid is used, all
affect the consistency of the cooking
temperature.
• To maintain a low or simmer heat, bring food
to a rolling boil. Stir well, then cover the pan
and lower the heat to a setting just below SIM.
• Check periodically to see if the control knob
should be turned to another setting.
• If an over-size pan is used, the simmer action
may occur mainly in the center of the pan. To
equalize the temperature throughout the food,
stir the food around the outer edges of the pan
into the food in the center.
• It is normal to stir food occasionally while
simmering. This is especially important when
simmering for several hours, such as for a
homemade spaghetti sauce or beans.
• When lowering the flame setting, adjust it in
small steps.
• If the setting is too low to hold a simmer, bring
the food back to a boil before re-setting to a
higher heat.
• It is normal not to see simmer bubbles
immediately after the food has been stirred.
• There may be bubbling when the flame cycles
ON and no bubbles when the flame is OFF.
Even when the flame is OFF, there will be
steam and a slight quiver on the liquid’s
surface.

WARNING
To prevent burns, do not touch burner caps or
grates while hot. Turn the cooktop off and allow
the burners to cool.
9
Section 4: USING THE COOKTOP
CAUTION
Do not touch the burners when the
igniters are sparking.
Igniter
Each burner has its own electronic igniter that
sparks when the burner is turned on. Each
burner should light in 4 seconds or less. If a
burner does not light, check to see that the
burner cap is positioned correctly on the burner
base.
If a burner fails to ignite, refer to “Before Calling
For Service” on page 21.
Star® Burner Components
Ports
Burner
Cap
Brass
Burner
Base
Igniter
Burner Cap Placement
The burner caps must be properly placed on the
burner bases for the cooktop to function properly.
If a burner cap is not properly placed, one or more
of the following problems may occur:
• Burner flames are too high.
• Flames shoot out of the burners.
• Burners do not ignite.
• Burner flames light unevenly.
• Burner emits gas odor
WARNING
To prevent flare-ups and avoid creation of harmful
by-products, do not use the cooktop without all
burner caps and all burner grates properly
positioned.
Checking Burner Cap Placement
• Check to make sure there is no gap between the
burner cap and burner base. See figure “Burner
Cap Placement” to see the correct and incorrect
placements of the burner cap.
• You may gently try to move the burner cap from
side to side to check if it is properly placed. If
properly placed, the cap will click from side to
side as the prongs hit the groove ridge.
Correct Burner
Cap Placement
Incorrect Burner
Cap Placement

Flame Color
Secondary Cone
Primary
Light Blue
Dark Blue
10
Section 4: USING THE COOKTOP
FLAME DESCRIPTION
• The burner flame color should be blue with
no yellow on the tips. It is not uncommon to
see orange in the flame color; this indicates
the burning of airborne impurities in the gas
and will disappear with use.
• With propane (LP) gas, slight yellow tips on
the primary cone are normal.
• The flame should burn completely around the
burner cap. If it doesn’t, check that the cap is
positioned correctly on the base and that the
ports are not blocked.
• The flame should be stable with no excessive
noise or fluttering.
WARNING:
The burning of gas cooking fuel can create
small amounts of Carbon Monoxide, Benzene,
Formaldehyde and Soot. To minimize expo-
sure to these substances, the burners should
be adjusted by a certified installer or agency to
ensure proper combustion. Ensure proper
ventilation with an open window or use a
ventilation fan or hood when cooking with Gas.
Always operate the unit according to the
instructions in this manual.
AUTOMATIC RE-IGNITION
If any one or more burners blow out, the
electronic igniter automatically activates to re-
light the flame. Do not touch the burners when
the igniters are active.
Important:
• For proper combustion do not use the cooktop
without the burner grates in place.
• There is a slight sound associated with gas
combustion and ignition. This is a normal
condition.
• On cooktops using propane gas (LP), a slight
“pop” sound may be heard at the burner ports
a few seconds after the burner has been turned
off.
POWER FAILURE
• In the event of a power failure, only the
standard burners can be manually lit. It is
necessary to light each one individually. If the
cooktop is being used when the power failure
occurs, turn all knobs to the OFF position.
• The standard burners can be lit by holding a
match at the ports and turning the control knob
to the position. Wait until the flame is
burning all around the burner cap before
adjusting the flame to the desired height.
• The ExtraLow burners cannot be used during
a power failure. Be sure to turn them off.
• If an ExtraLow burner is on when a power
failure occurs, it cannot be turned back on until
the knob is first turned off.
• The griddle cannot be used during a power
failure.
• If you smell gas, refer to safety precautions in
the front of this manual.
WARNING
In the event of a power failure, all knobs are to
be turned to the OFF Position. Only the
standard burners can be lit manually.
FLAME HEIGHT
• The correct flame height depends on 1) size
and material of pan being used; 2) food being
cooked; and 3) amount of liquid in the pan.
• Never extend the flame beyond the base of
the pan.
• Use a low or medium flame for pan materials
that conduct the heat slowly, such as
porcelain coated steel or glass-ceramic.

Section 4: USING THE COOKTOP
Cookware Recommendations
• Balance is important for stability and even cooking.
The handle must not be heavier than the pan and
tilt it unevenly. A pan must sit level on the grate
without rocking or wobbling.
• Food packaged in aluminum foil should not be
placed directly on the burner grate. Aluminum foil
can melt during cooking.
• Do not let plastic, paper or cloth come in contact
with a hot burner grate. They may melt or catch
fire.
• Never let a pan boil dry. This can damage your
pan and the cooking surface.
Balanced Pan
Base Diameter
Covered Pan
11
WARNING:
To avoid risk of serious injury, damage to appliance or cookware, please observe the following:
(51 mm)
• Bakeware, such as large casserole pans, cookie
sheets, etc. should never be used on the cooktop.
• Placement of large stock pots should be staggered
when used on the cooktop.
• Select the base diameter to match the diameter
of the flame. The diameter of the flame should be
the same size as the pan base or slightly smaller.
Oversize or under size pans sacrifice cooking
performance. A 5
-
1
/2" (140 mm) base size is
generally the smallest recommended.
• Professional quality pans with metal handles are
recommended because plastic handles can melt
or blister if the flame extends up the side of the
pan. Professional quality pans are found at res-
taurant supply stores and gourmet specialty
shops. All cookware should have these charac-
teristics: good heat conductivity, good balance,
correctly sized base diameter, a heavy, flat base,
and a proper fitting lid.
• For best cooking results, the flame should be
contained under the bottom of the pan.
• Aluminum and copper are pan materials that
conduct the heat quickly and evenly. These met-
als are sometimes attached to the base or in the
core between stainless steel.
Flat Base Pan
• A properly fitting lid will shorten cooking time and
make it possible to use lower heat settings.
• A heavy, flat base is more apt to remain flat when
heated. Pan bases that are warped, dented, ridged
or too lightweight will heat unevenly. Heat and cool
pans gradually to avoid sudden temperature
changes which tend to distort cookware. Do not
add cold water to a hot pan.

Section 4: USING THE COOKTOP
Flat-bottom Wok Pan
Specialty Cookware
COOKING
Recommendations
Suggestions for Using the Recommendations
Use the recommendations on Pages 13 and 14 as a
guide. The settings you use will vary depending on
the pans selected and the starting temperature of
the food.
In the recommendations, the “Finish Setting” has
been separated for the standard and ExtraLow
burners. There may or may not be a change between
the two burner settings.
The ExtraLow setting can be either a cooking or a
holding setting.
Raise or lower the flame setting gradually. Allow time
for the pan and the food to adjust to the new setting.
Round-Bottom Wok
in Support Ring
• Woks – Either flat based or round bottom woks
with the accessory ring can be used on models
without a built-in wok burner. Round bottom woks
must be used with a support ring. The porcelain-
coated cast iron wok support ring must be
purchased separately.
• Canners and Stock Pots – Select one with a base
diameter that extends no more than 2 inches
(51mm) beyond the grate.
Standard Size Water Bath Canner
21 to 22 quarts (19.95 to 20.9 liters),
with an 11 to 12 inch base (27.9 to 30.5 cm)
and
a 9 to 11 inch depth (22.9 to 27.9 cm).
Standard Size Pressure Canner
8 to 22 quarts (7.6 to 20.9 liters), with an
8 to 11 inch base (20.3 to 27.9 cm) and
a 6
-1
/2" to 12 inch depth (16.5 - 30.5 cm).
Canning Tips:
• A flat base pan is preferred to one with a con-
cave, convex or rippled base.
• When using two canners at the same time, use
staggered burners. Do not block air to the burn-
ers. A flame needs the right amount of air for
complete combustion.
• Use a cover on a canner when bringing the
contents to a boil.
• Once the contents have reached a boil on HI, use
the lowest flame possible to maintain the boil or
pressure.
• Canning produces a large amount of steam.
Take precautions to prevent burns.
12

Section 4: USING THE COOKTOP
13
Surface Burner Cooking Recommendations
BEVERAGES MED – heat milk SIM – finish heating
XLO
– keep warm, cover*
Cocoa
BREADS MED – preheat skillet SIM to MED – cook Same as for Standard
French Toast, Pancakes, Burners
Grilled Sandwiches
BUTTER SIM – to start melting Allow 5 to 10
Melting minutes to melt
CEREALS HI – cover, bring SIM to MED – Same as for Standard
Cornmeal, Grits, water to a boil, add finish cooking Burners
Oatmeal cereal according to package
directions XLO – to hold, cover*
CHOCOLATE XLO – may be stirred XLO – Allow 10 to 15
Melting to hasten melting minutes to melt
XLO – to hold*
DESSERTS SIM to MED – cook SIM to MED Same as for Standard
Candy following recipe Burners
Pudding and Pie Filling SIM to MED SIM – SIM Same as for Standard
Mix cook according to Burners
package directions
Pudding SIM to MED SIM – SIM Same as for Standard
Bring milk to a boil Burners
EGGS MED HI – cover eggs XLO – cook 3 to 4
Cooked in Shell with water, add lid, minutes for soft cooked;
bring to boil or 15 to 20 minutes for
hard cooked
Fried, Scrambled SIM to MED – melt SIM – finish cooking Same as for Standard
butter, add eggs Burners
XLO – to hold for a
short period*
Poached HI – bring water to SIM to MED – finish Same as for Standard
the boiliong point, cooking Burners
add eggs
MEAT, FISH, POULTRY MED HI – until meat starts SIM to MED – finish Same as for Standard
Bacon, Sausage Patties to sizzle cooking Burners
Braising: Swiss Steak, MED HI – melt fat, then XLO – Simmer until tender
Pot Roast, Stew Meat brown on MED HI,
add liquid, cover
Quick Frying: Breakfast MED HI – preheat MED HI – fry quickly Same as for Standard
Steaks skillet Burners
Frying: Chicken MED HI – heat oil, then SIM – cover, finish Same as for Standard
brown on MED cooking Burners
Deep Frying: Shrimp MED HI – heat oil MED to MED HI – to Same as for Standard
maintain temperature Burners
Pan Frying: Lamb Chops,
MED HI – preheat MED – brown meat Same as for Standard
Thin Steaks, Hamburgers,
skillet Burners
Link Sausage XLO – to hold
Poaching: Chicken, MED HI – cover, bring XLO – to finish cooking
whole or pieces, Fish liquids to a boil
Food Start Setting Finish Setting Finish Setting
Standard Burners ExtraLow (XLO) Burners

Section 4: USING THE COOKTOP
14
Surface Burner Cooking Recommendations
* It is recommended that these foods be stirred occasionally.
Simmering: Stewed HI – cover, bring liquid XLO – to simmer slowly
Chicken, Corned Beef, to a boil XLO – to hold, cover*
Tongue, etc.
PASTAS HI – bring water to a MED to MED HI – to Same as for Standard
Macaroni, Noodles, boil, add pasta
maintain a rolling boil
Burners
Spaghetti
POPCORN (use a heavy, HI – cover, heat until MED HI – finish Same as for Standard
flat bottom pan) kernels start to pop popping Burners
PRESSURE COOKER MED HI to HI – build SIM to MED – Same as for Standard
Meat up pressure maintain pressure Burners
Vegetables HI – build up pressure SIM to MED – Same as for Standard
maintain pressure Burners
RICE HI – cover, bring SIM – to maintain Same as for Standard
water and rice to a boil low boil Burners
Cover and cook until XLO – to hold, cover
water is absorbed.
SAUCES MED HI – cook SIM – to maintain XLO – simmer to thicken
Tomato Base meat/vegetables, simmer sauce, uncovered
follow recipe
White, Cream, Bernaise MED – melt fat, SIM – finish cooking XLO – to hold, cover*
follow recipe
Hollandaise XLO XLO – to hold, lowest
setting for short period,
stir frequently
SOUPS, STOCK HI – cover, bring SIM – to maintain Simmer
liquid to a boil simmer XLO – to hold, cover*
VEGETABLES HI – cover, bring SIM to MED – cook Same as for Standard
Fresh water and vegetables 10 minutes, or until Burners
to a boil tender XLO – to hold, cover
Frozen HI – cover, bring SIM to MED – cook Same as for Standard
water and vegetables according to Burners
to a boil package directions
Deep Frying HI – heat oil MED to MED HI – Same as for Standard
maintain frying Burners
temperature
In Pouch HI – bring water and SIM to MED – cook Same as for Standard
pouch to a boil according to Burners
package directions
Saute MED HI – heat oil or SIM to MED – Same as for Standard
melt butter, add cook to desired Burners
vegetables doneness
Stir Fry HI – heat oil, add MED to MED HI – Same as for Standard
vegetables finish cooking Burners
Food Start Setting Finish Setting Finish Setting
Standard Burners ExtraLow (XLO) Burners

DESCRIPTION
(Available on some models)
The built-in griddle is made of restaurant-quality
aluminum that is coated with a non-stick coating. This
produces a surface with even heat that is easy to
clean. A maple chopping block, stainless steel cover,
and coated-aluminum grill plate are available as
accessories and are purchased separately. The
maple chopping block and stainless steel cover are
sized to fit on top of the surface when the griddle is
not being used. The coated-aluminum grill plate
accessory is designed to replace the griddle plate.
See the instructions that come with the grill plate
accessory for more details.
The maple chopping block and stainless steel cover
must be removed before turning the griddle on.
• The electric griddle element is rated 120 volts AC,
1,600 watts.
PREPARING THE GRIDDLE
The griddle must be tilted slightly forward for
optimum performance. See Installation Manual for
procedure to check and adjust griddle for proper tilt
of griddle plate. During installation, the installer is
responsible for leveling the product. The griddle plate
should be washed with warm soapy water then
rinsed with clear water prior to use.The griddle may
be used without any butter, margarine or oil.
However, a very small amount may be used to flavor
foods.
Any utensil may be used on the griddle surface.
Care should be taken that the surface is not gouged
when utensils are used.
• The griddle is electronically controlled with tem-
peratures marked on the knob from 150°F to
500°F.
• There are no fixed settings on the knob
• Press and turn the knob clockwise to the tem-
perature setting.
About the Griddle
CONTROL KNOB
Griddle Control Knob
Griddle Grease Tray
• Push the tray under the front edge of the griddle
overhang to catch grease or food residue.
• Clean the tray after every use. When removing
the tray, use care when tipping it so that the
contents do not spill (see illustration).
• After cooling, pour the grease into a grease
resistant container for disposal.
To remove tray,
slide back and lift
Griddle Grease Tray
CAUTION:
The griddle element is hot after use. Allow
sufficient time for griddle components to
cool before cleaning.
15
Section 4: USING THE COOKTOP
Griddle
Cooking on the Griddle
1. Check that the grease tray is tucked under the
griddle plate overhang.
2. Turn the knob to the cooking temperature to preheat
the griddle.
3. Preheat 10 to 12 minutes or until the light indicator
goes off.
4. Add butter, margarine, oil or shortening if desired.

Section 4: USING THE COOKTOP
16
GRIDDLE COOKING RECOMMENDATIONS
FOOD
SETTING
Eggs
Bacon, Breakfast Sausage
Toasted Sandwiches
Boneless Chicken Breasts
Boneless Pork Chops,
1" thick
Steaks, 1" thick
Ground Beef Patties (6 ounces)
Hot Dogs
Ham Slices, 1/2" thick
Pancakes, French Toast
Potatoes, Hash Browns
325°F to 350°F (160°C to 180°C)
375°F to 400°F (190°C to 200°C)
350°F to 375°F (180°C to 190°C)
375°F to 400°F (190°C to 200°C)
375°F to 400°F (190°C to 200°C)
400°F to 425°F (200°C to 220°C)
375°F to 400°F (190°C to 200°C)
350°F to 375°F (180°C to 190°C)
350°F to 375°F (180°C to 190°C)
375°F to 400°F (190°C to 200°C)
375°F to 400°F (190°C to 200°C)
NOTICE:
Griddle / Grill performance may vary if there is an
excessive amount of airflow in the vicinity of the
appliance. The excessive airflow could be from an
air-conditioning register or ceiling fan blowing at the
cooktop. This could create longer than normal heat-
up time or it could cause the Griddle / Grill
temperature to be higher or lower than the knob
setting.
Note:
Having a properly installed ventilation hood is not
considered a source of excessive airflow.

Section 5: CARE AND MAINTENANCE
Care and Maintenance
CAUTION
Avoid cleaning any part of the cooktop while it
is hot. Do not clean any removable part of the
cooktop in a self-cleaning oven.
ABOUT
THESE RECOMMENDATIONS
• Always start by selecting the mildest cleaner
according to the kind of soil and the material
soiled. To prevent marring the stainless steel
finish, always apply the cleaners in the direction
of the polish lines. Rinse and dry immediately to
avoid water marks.
• Use clean applicators, i.e. soft cloths, sponges,
paper towels, soap-filled pads, for cleaning and
scouring.
• The use of brand names in these recommenda-
tions is intended only to indicate a type of cleaner.
This does not constitute an endorsement. The
omission of any brand name cleaner does not
imply its inadequacy.
• The brands listed are suggested as examples of
a type of cleaner, such as non-abrasive, mild
abrasive, powder, creme, etc. Use all products in
accordance with the manufacturer’s instructions.
Cooktop Part / Material Suggested Cleaners Important Reminders
COOKTOP CLEANING RECOMMENDATIONS
• Hot sudsy water; rinse and dry
thoroughly.
• Mild Abrasive Cleansers: Bon
Ami
®
, Cameo
®
aluminum and
stainless steel cleaner,
Wright's
®
all purpose brass
polish.
• Liquid cleaners: Kleen King
®
.
• Stiff nylon bristle tooth brush
to clean port openings.
• After cleaning, re-assemble
the burner cap to the burner
base correctly. Make sure the
cap is completely seated when
positioned on the
base.
• Hot sudsy water; rinse and dry
immediately.
Control Knobs
/
Metal
Bezels
/
Chrome
• Do not soak knobs.
• Do not force knobs onto
wrong valve shaft.
17
• Do not scratch or gouge the
port features of the brass
burner base.
Brass Burner Base
And Cast Iron Cap
Burner
Cap
Burner
Base

Section 5: CARE AND MAINTENANCE
Cooktop Cleaning Recommendations
• The grates are heavy; use
care when lifting. Place on
a protected surface.
• Blisters/
crazing/
chips are
common due to the extreme
temperatures on grate
fingers and rapid
temperature changes.
• Acidic and sugar-laden spills
deteriorate the enamel.
Remove soil immediately.
• Abrasive cleaners, used too
vigorously or too often can
eventually mar the enamel.
• Nonabrasive cleaners: Hot
water and detergent,
Fantastic
®
, Formula 409
®
.
Rinse and dry immediately.
• Mild abrasive cleaners: Bon
Ami
®
and Soft Scrub
®
.
• Abrasive cleaners for stubborn
stains: soap-filled steel wool
pad.
• Lestoil
®
or other degreaser.
Grates: /
Porcelain Enamel
on Cast Iron
• Stainless steel resists most
food stains and pit marks
provided the surface is kept
clean and protected.
• Never allow food stains or
salt to remain on stainless
steel for any length of time.
• Rub lightly in the direction
of polish lines.
• Chlorine or chlorine
compounds in some
cleaners are corrosive to
stainless steel. Check
ingredients on label.
• Nonabrasive Cleaners: Hot
water and detergent,
ammonia, Fantastic
®
Formula
409
®
. Rinse and dry
immediately.
• Cleaner Polish: Stainless Steel
Magic
®
to protect the finish
from staining and pitting;
enhances appearance.
• Hard water spots: Household
vinegar.
•
Mild Abrasive Cleaners: Siege
®
Stainless Steel and Aluminum
Cleaner, Kleen King
®
Stainless
Steel liquid cleaner, Wright's
®
All Purpose Brass Polish.
• Heat discoloration: Cameo
®
,
Barkeepers Friend
®
, Zud
®
,
Wright’s
®
All Purpose Brass
Polish.
Cooktop Part / Material Suggested Cleaners Important Reminders
Exterior Finish/Back Guard
Stainless Steel
Griddle Grease Tray
Aluminum with non-stick
coating
• Clean the grease tray(s) after
each use.
• May be placed in dishwasher.
• Wash in detergent and hot
water; rinse and dry.
• Stubborn soil: Soft Scrub
®
• Empty grease tray after
each use.
• Remove tray after grease
has cooled. Be careful not
to fill the tray so full that
tipping to remove it spills the
grease.
18
Lift and slide
back
/