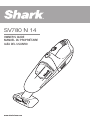
Shark SV780 14 Owner's manual
- Category
- Vacuum cleaners
- Type
- Owner's manual
This manual is also suitable for
Page is loading ...

2 1-800-798-7398
WARNINGS
WHEN USING YOUR SHARK
®
CORDLESS VACUUM,
BASIC SAFETY PRECAUTIONS SHOULD ALWAYS
BE FOLLOWED, INCLUDING THE FOLLOWING:
READ ALL INSTRUCTIONS BEFORE USING YOUR
SHARK
®
CORDLESS VACUUM.
IMPORTANT SAFETY INSTRUCTIONS
For Household Use Only
WARNING:
TO REDUCE THE RISK OF
ELECTRIC SHOCK OR INJURY DO NOT USE OUTDOORS
OR ON WET SURFACES.
1 DO NOT use, charge or store the hand vacuum
outdoors or on wet surfaces. Store the cordless
vacuum indoors. Put vacuum away after use to
prevent accidents.
2 Use only as described in this manual.
3 DO NOT allow to be used as a toy. Close
attention is necessary when used by or near
children. DO NOT leave vacuum unattended
while in use.
4 DO NOT handle plug, charger or appliance with
wethands.
5 Fully assemble hand vacuum before operating. DO
NOT use hand vacuum cleaner without dust cup
filter in place. Use only on dry, indoor surfaces.
6 DO NOT use charger with an extension cord.
Plug charger directly into an electrical outlet.
Use charger only in a standard electrical outlet.
7 DO NOT attempt to use the charger with any other
product nor attempt to charge this product with
another charger. Use only the charger model
ZD6W240026US supplied with this appliance.
8 DO NOT use charger with damaged cord or
plug. If charger or hand vacuum has been
dropped, damaged, left outdoors, or dropped in
water, return it to EURO-PRO Operating LLC for
examination, repair or adjustment.
9 DO NOT abuse the charger cord, pull cord
around sharp edges or corners or close door on
cord. Never carry the charger by the cord or
yank to disconnect from an outlet; instead grasp
the plug and pull to disconnect. Keep charger
cord away from heated surfaces.
10 Use only manufacturer’s recommended
attachments. Always turn off this appliance
before connecting or disconnecting the
motorized nozzle. DO NOT attempt to change
accessories while unit is running.
11 Use extra care when cleaning on stairs.
12 Keep hair, loose clothing, fingers, and all parts
of body away from openings and moving parts.
13 DO NOT put any objects into openings. DO NOT
use with any opening blocked; keep free of
dust, lint, hair and anything that may reduce air
flow.
14 DO NOT use to pick up flammable or
combustible liquids such as gasoline or use in
areas where they may be present. DO NOT pick
up anything that is burning or smoking, such as
cigarettes, matches, or hot ashes.
15 This product includes rechargeable Nickel Metal
Hydride batteries. Batteries must be recycled
or disposed of properly and safely. The battery
must be removed from the appliance before it is
discarded. The appliance must be disconnected
from the supply when removing the battery. Do
not incinerate batteries or expose to high
temperatures, as they may explode.
This manual covers models:
SV780 N 14
SV780SP N 14

3www.sharkclean.com
English
SAVE THESE INSTRUCTIONS
16 DO NOT charge the battery at temperature
below 32°F (0°C). This will degrade the battery
performance, shorten life and cause gas leakage
from venting. Optimum charging efficiancy for
the battery is within temperature range of 50°F
(10°C) and 86°F (30°C).
17 DO NOT charge with the battery polarity
reversed. This will cause battery venting,
swelling or rupture.
18 Leaks from battery cells can occur under
extreme conditions. Improper use of the battery
can cause the safety vent to activate. Small
amounts of liquid (alkaline electrolyte) will leak
from the vent near the terminal. If the liquid gets
on the skin, wash immediately with soap and
water. If the liquid gets into the eyes, flush them
immediately with clean water for a minimum of
10 minutes and seek medical attention.
19 DO NOT use for any purpose other than
described in this user’s guide. Look on your
hand vacuum and follow all label and marking
instructions.
20 This vacuum is intended for household use only.
21 DO NOT charge the unit outdoors.
Warning: Changes or modifications to this unit
not expressly approved by the party responsible for
compliance could void the user’s authority to operate
the equipment.
Note: This equipment has been tested and found to
comply with the limits for a Class B digital device,
pursuant to Part 15 of the FCC Rules. These limits
are designed to provide reasonable protection against
harmful interference in a residential installation. This
equipment generates, uses and can radiate radio
frequency energy and, if not installed and used in
accordance with the instructions, may cause harmful
interference to radio communications.
However, there is no guarantee that interference will
not occur in a particular installation. If this equipment
does cause harmful interference to radio or television
reception, which can be determined by turning the
equipment off and on, the user is encouraged to try to
correct the interference by one or more of the following
measures:
• Re-orient or relocate the receiving antenna.
• Increase the separation between the equipment and
receiver.
• Connect the equipment into an outlet on a circuit
different from that to which the receiver is
connected.
• Consult the dealer or an experienced radio/TV
technician for help.
This device complies with Part 15 of the FCC Rules.
Operation is subject to the following two conditions:
(1) This device may not cause harmful interference,
and (2) this device must accept any interference
received, including interference that may cause
undesired operation.

4 1-800-798-7398
BATTERY PACK REPLACEMENT & DISPOSAL
The cordless hand vacuum is powered by Ni-MH batteries,
which must be recycled or disposed of properly in
accordance with state, federal and local laws. If uncertain as
to how to remove the battery pack, we suggest that you take
your hand vacuum to a reputable small appliance service
technician to have this service performed. Do not attempt
to replace the batteries used in this product with any other
type of battery. Follow these steps when replacement of the
battery pack is required:
1 Using a #1 Phillips head screwdriver, remove the single
screw securing the battery compartment cover located
underneath the unit.
2 To remove the cover, lift up the battery compartment
cover. Never open the battery compartment except to
replace the battery pack. Set the cover and the screw
aside.
3 Slide the battery strap over and lift it out.
4 Carefully lift out the battery pack and disconnect the
terminals.
5 Connect the terminals to the battery pack taking care to
connect the black lead (-) to the negative connector first
and the red lead (+) to the positive connector second.
6 Insert the new battery inside the battery compartment.
7 Take care to tuck the wiring completely in so that the
wiring does not interfere with the battery compartment
cover when it is replaced.
8 Replace the battery strap, the battery compartment cover
and the screw making sure not to over-tighten the screw.
WARNING: Never use ordinary batteries for replacement as
these may leak and damage your vacuum cleaner. Use only the
battery pack XB780N provided by EURO-PRO Operating LLC
for replacement. Call customer service at 1 (800) 798-7398 or
visit our web site at www.sharkclean.com to order replacement
batteries.
CAUTION:
• Use only with battery pack supplied.
• Do not attempt to remove the battery pack from the unit
tocharge.
• Never throw the battery pack or the appliance into a fire
or incinerate it.
• Do not remove or damage the battery casing.
• Do not place the batteries on metal surfaces.
• Do not touch metal parts of the batteries together as the
batteries will overheat.
MAXIMIZING THE LIFE OF YOUR BATTERY
Call customer service at 1 (800) 798-7398 or visit our web site at www.sharkclean.com to order replacement battery packs.

5www.sharkclean.com
English
WARRANTY & PRODUCT REGISTRATION
PRODUCT REGISTRATION
Please visit www.sharkclean.com or call 1 (800) 798-7398 to register your new Shark
®
product within ten (10)
days of purchase. You will be asked to provide the store name, date of purchase and model number along with your
name and address.
The registration will enable us to contact you in the unlikely event of a product safety notification. By registering you
acknowledge to have read and understood the instructions for use, and warnings set forth in the accompanying instructions.
EURO-PRO TWO (2) YEAR LIMITED WARRANTY
EURO-PRO Operating LLC warrants this product to be free from material defects and workmanship for a period of
two (2) years from the date of purchase when utilized for normal household use, subject to the following conditions,
exclusions and exceptions.
The liability of EURO-PRO Operating LLC is limited solely to the cost of the repair or replacement of the unit at our option.
This warranty does not cover normal wear of parts and does not apply to any unit that has been tampered with or used for
commercial purposes. This limited warranty does not cover damage caused by misuse, abuse, negligent handling or damage
due to faulty packaging or mishandling in transit. This warranty does not cover damage or defects caused by or resulting from
damages from shipping or repairs, service or alteration to the product or any of its parts, which have been performed by a
repair person not authorized by EURO-PRO Operating LLC.
Non-durable parts, including, without limitation, filters, brushes and electrical parts which normally require replacement are
specifically excluded from this warranty.
If your appliance fails to operate properly while in use under normal household conditions within the warranty period, you may
return the complete appliance and accessories with proof of purchase and date, freight prepaid. For customer service support,
call 1 (800) 798-7398 or visit our web site at www.sharkclean.com.
If the appliance is found by EURO-PRO Operating LLC to be defective, in EURO-PRO Operating LLC’s sole discretion, we
will repair or replace it free of charge. Proof of purchase date and check made payable to EURO-PRO Operating LLC in the
amount of $12.95 to cover the cost of return shipping and handling must be included.
This warranty is extended to the original purchaser of the unit and excludes all other legal, implied and/or conventional
warranties. The responsibility of EURO-PRO Operating LLC if any, is limited to the specific obligations expressly assumed
by it under the terms of this Limited Warranty. In no event is EURO-PRO Operating LLC liable for incidental or consequential
damages to anyone of any nature whatsoever. Some states do not permit the exclusion or limitation of incidental or
consequential damages, so the above may not apply to you.
This Limited Warranty gives you specific legal rights, and you may also have other rights which vary from state to
state or province to province.
*IMPORTANT: Carefully pack item to avoid damage in shipping. Be sure to include proof of purchase date and
to attach a tag to item before packing including your name, complete address and phone number with a note
giving purchase information, model number and what you believe is the problem with the item. We recommend
you insure the package (as damage in shipping is not covered by your warranty). Mark the outside of your
package “ATTENTION CUSTOMER SERVICE”. We are constantly striving to improve our products, therefore the
specifications contained herein are subject to change without notice.
Page is loading ...
Page is loading ...
Page is loading ...
Page is loading ...
Page is loading ...
Page is loading ...
Page is loading ...
Page is loading ...

14 1-800-798-7398
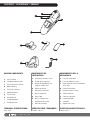
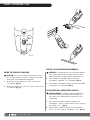
VACUUM COMPONENTS
a On/Off Switch
b Charging Indicator Light
c Dust Cup Release Button
d Motor Housing
e Dust Cup Container
f Motorized Brush
g Crevice Tool
h Dusting Brush
i Charging Adapter
j Charging Stand
ASSEMBLY • ASSEMBLAGE • ARMADO
COMPOSANTS DE
L’ASPIRATEUR
a Interrupteur marche / arrêt
b Témoin de chargement
c Bouton de dégagement du
récipient à poussière
d Boîtier du moteur
e Récipient à poussière
f Brosse motorisée
g Suceur plat
h Brosse à épousseter
i Adaptateur de charge
j Socle de recharge
COMPONENTES DE LA
ASPIRADORA
a Llave de encendido
b Luz indicadora de carga
c Botón para destrabar el recipiente
de la tierra
d Cubierta del motor
e Recipiente para la tierra
f Cepillo eléctrico
g Cabezal esquinero
h Cepillo limpiador
i Cargador
j Soporte de Carga
TECHNICAL SPECIFICATIONS:
Volts: 10.8
SPÉCIFICATIONS TECHNIQUES :
Tension : 10,8 V
ESPECIFICACIONES TÉCNICAS:
Voltaje: 10,8 V
a
b
c
e
f
i
g
h
d
j

15www.sharkclean.com
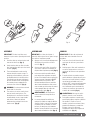
ASSEMBLY
IMPORTANT: The dust cup filter must
always be in place when operating the hand
vacuum.
1 Push the dust cup release button and
remove the dust cup. (fig. 1)
2 Verify that the dust cup filter is inside,
then reattach the dust cup to the hand
vacuum. (fig. 2)
3 The motorized brush can be used to
vacuum short pile carpets or rugs. To
attach the motorized brush, make sure
the On/Off switch is in the Off position.
Then firmly insert the motorized brush
into the air-intake nozzle, ensuring that
the contact pins are engaged in the
connector slots of the unit. (fig. 3)
WARNING: Do not touch the motorized
brush while it is in motion.
4 The crevice tool can be used to clean
narrow, hard to reach places. The
dusting brush is used for the furniture,
venetian blinds, books, lamp shades
and shelves. Attach the desired
attachment by pushing it into the air-
intake nozzle. (fig. 4)
ASSEMBLAGE
IMPORTANT : Le filtre du récipient à
poussière doit toujours être en place lorsque
vous utilisez l’aspirateur portatif.
1 Appuyez sur le bouton de dégagement
du récipient à poussière et retirez
celui-ci. (fig. 1)
2 Assurez-vous que le filtre à poussière
se trouve à l’intérieur et réinstallez le
récipient dans l’aspirateur portatif. (fig. 2)
3 La brosse motorisée peut être utilisée
pour nettoyer des moquettes ou tapis à
poil ras. Pour installer la brosse motorisée,
assurez-vous que l’interrupteur ON/OFF
(marche/arrêt) est en position « Off ».
Insérez fermement la brosse motorisée
dans l’embout d’admission d’air, tout en
vous assurant que les broches de contact
soient engagées dans les orifices du
connecteur de l’unité. (fig. 3)
AVERTISSEMENT: Ne touchez pas
la brosse motorisée lorsqu’elle est en
mouvement.
4 Le suceur plat peut être utilisé pour
nettoyer les endroits en angle et difficiles
d’accès. d’accès. La brosse à épousseter
est utilisée pour les meubles, les stores,
les livres, les abat-jours et les tablettes.
Installez l’accessoire désiré en le poussant
dans l’embout d’admission d’air. (fig. 4)
ARMADO
IMPORTANTE: El filtro del recipiente de
la tierra debe estar instalado al usar la
aspiradora.
1 Presione el botón de liberación del
recipiente de la tierra y remuévalo.
(fig. 1)
2 Verifique que el filtro esté instalado en
su interior, luego vuelva a colocar el
recipiente de la tierra en la aspiradora.
(fig. 2)
3 El cepillo eléctrico se puede usar para
aspirar alfombras o tapetes de pelo corto.
Para colocar el cepillo eléctrico, verifique
que la llave de encendido esté en la
posición “OFF”. Luego inserte firmemente
el cepillo eléctrico sobre la entrada de
aire, verificando que los terminales de
contacto se inserten en las ranuras de
conexión de la unidad. (fig. 3)
ADVERTENCIA: No toque el cepillo
giratorio cuando se esté moviendo.
4 La boquilla esquinera se puede usar
para limpiar lugares angostos y difíciles
de acceder. El cepillo se usa en
muebles, persianas venecianas, libros,
pantallas de lámparas y estanterías.
Coloque el accesorio deseado
empujándolo dentro de la boquilla de
entrada de aire. (fig. 4)
Fig. 1 Fig. 2 Fig. 3 Fig. 4

16 1-800-798-7398
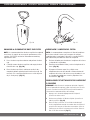
CHARGING • CHARGEMENT • CARGA
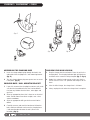
ASSEMBLING THE CHARGING BASE
1 Insert the charge adapter plug through the hole in the
underside of the charging base / wall mounting bracket .
(fig. 5)
2 Turn the charge adapter plug one quarter turn to secure
it into place. (fig. 5)
CHARGING BASE / WALL MOUNTING BRACKET
1 If you wish to mount the charging base onto a wall, make
sure that the intended wall area that is to be drilled is
free from any hidden electrical wires, water pipes and
gas lines.
2 Select an appropriate place that is close to an electrical
outlet. Do not mount near direct sunlight, near a heat
source or outdoors.
3 Select an appropriate drill type for the material to be
drilled.
4 Carefully measure and mark the location of all bracket
holes and then drill holes and screw the charging base
/ wall mounting bracket onto the wall. (Screws not
included.) (fig. 6)
CHARGING YOUR HAND VACUUM
1 Plug the charger into the wall outlet. Place the unit in the
charging base. The charging indicator light will illuminate
to show that the vacuum is being charged. (fig. 7, fig. 8)
2 Before first using the hand vacuum, make sure that the
On/Off switch is in the “Off” position and charge it for 20
hours.
3 After the initial charge, the charge time is 16 hours.
4 Always unplug the unit when the charge time is complete.
Fig. 5
Fig. 7
Fig. 6
Fig. 8
Page is loading ...

18 1-800-798-7398
USAGE • UTILISATION • USO
USING THE CORDLESS VACUUM
CAUTION: The air-intake nozzle and attachments must
be free of obstructions at all times, otherwise the motor
will overheat and could become damaged.
1 To start the vacuum, push the “On/Off” switch to the
“On” position. (fig. 9)
2 To turn the vacuum “Off”, push the “On/Off” switch to the
“Off” position. (fig. 9)
USO DE LA ASPIRADORA INALÁMBRICA
CUIDADO: La entrada de aire y los accesorios no deben
tener ninguna obstrucción en ningún momento, de lo
contrario el motor se sobrecalentará y podría dañarse.
1 Para encender la aspiradora, deslice la llave de
encendido a la posición “On” (encendido). (fig. 9)
2 Para apagar la aspiradora, deslice la llave de encendido
a la posición “Off” (apagado). (fig. 9)
UTILISATION DE L’ASPIRATEUR SANS FIL
AVERTISSEMENT : L’embout d’admission d’air et les
accessoires doivent être exempts de tout débris en
tout temps car le moteur pourrait surchauffer et être
endommagé.
1 Pour mettre en marche l’aspirateur, appuyez sur
l’interrupteur « On/Off » (marche/arrêt) et faites-le glisser
à la position « On ». (fig. 9)
2 Pour éteindre l’aspirateur, appuyez sur l’interrupteur «
On/Off » et faites-le glisser à la position « Off ». (fig. 9)
OFF
ON
Fig. 9

19www.sharkclean.com
CARE AND MAINTENANCE • SOINS ET ENTRETIEN • CUIDADO Y MANTENIMIENTO
CHANGING & CLEANING THE DUST CUP FILTER
NOTE: It is recommended that the dust cup filter be replaced
every three (3) months to ensure peak performance of the
vacuum. See PARTS section for information on ordering
replacement filters.
1 Press the dust cup release button and pull out the dust
cup.
2 Carefully remove the dust cup filter and empty the dust
from the dust cup. (fig. 10)
3 Rinse the dust cup filter in cold water and let it dry
completely before replacing back into the dust cup. Do
not wash it in a washing machine or use a hair dryer to
dry it. Air dry only! (fig. 11)
REMPLACEMENT ET NETTOYAGE FILTRE DU RÉCIPIENT
À POUSSIÈRE
REMARQUE : Afin d’assurer le rendement optimal de l’appareil,
il est recommandé de remplacer le filtre à poussière tous les trois
(3) mois. Consultez la section PIÈCES pour plus d’informations
concernant la commande de filtres de rechange.
1
Appuyez sur le bouton de dégagement du récipient à
poussière et retirez celui-ci.
2
Retirez avec précaution le filtre du récipient à poussière et
videz la poussière.
(fig. 10)
3
Rincez le filtre à poussière à l’eau froide et attendez qu’il
sèche complètement avant de le remettre dans le récipient à
poussière. Ne lavez pas le filtre dans une machine à laver et
n’utilisez pas un séchoir à cheveux pour le sécher. Séchez le
filtre à l’air libre seulement!
(fig. 11)
REEMPLAZO Y LIMPIEZA DEL FILTRO
NOTA: Le recomendamos reemplazar el filtro del recipiente
de la tierra cada 6-9 meses para asegurar el máximo
rendimiento de la aspiradora. Consulte la sección PARTES
por información para ordenar filtros de reemplazo.
1 Presione el botón para destrabar el recipiente de la tierra
y sáquelo de la aspiradora.
2 Remueva con cuidado el filtro y vacíe el recipiente de la
tierra. (fig. 10)
3 Enjuague el filtro con agua fría, y déjelo secar
completamente antes de volverlo a colocar dentro del
recipiente de la tierra. No lo lave en una lavadora ni use
un secador de cabello para secarlo. ¡Séquelo al aire
únicamente! (fig. 11)
Fig. 10 Fi g. 11

20 1-800-798-7398
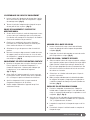
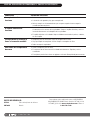
TROUBLESHOOTING GUIDE & REPLACEMENT PARTS
REPLACEMENT PARTS
XF769 Dust Cup Filter
XB780N Battery pack
To order additional parts for your Shark
®
CORDLESS HAND
VACUUM models SV780C 14 go to www.sharkclean.com
or call 1-800-798-7398.
PROBLEM SUGGESTED SOLUTION
The hand vacuum will not
operate
• Batteries need to be recharged.
• Batteries are dead and need to be replaced.
• There is no power in the electrical outlet being used while charging. Try to charge
using a different electrical outlet.
Motorized brush will not
work
• The metal contact pins on the motorized brush are not in contact with the
connector slots on the vacuum. Remove the motorized brush and re-insert firmly
into the air-intake nozzle.
• The motorized brush is blocked. Carefully remove all the lint, hair, etc. from the
motorized brush.
Hand vacuum will not pick up
or suction is weak
• Dust cup is full. Empty the dust cup.
• Dust cup filter needs cleaning or replacement. Clean or replace the dust cup
filter.
• Vacuum needs to be recharged.
Dust is escaping from the
hand vacuum
• Empty the dust cup container.
• The dust cup filter is not installed correctly. Remove it and re-insert it.
• The dust cup filter has a hole or a puncture in it. Replace it with a new one.
Page is loading ...
Page is loading ...

23www.sharkclean.com
NOTES • REMARQUES • NOTAS

Euro-Pro Operating LLC
US: Newton, MA 02459
CAN : Ville St-Laurent, QC H4S 1A7
1-800-798-7398
www.sharkclean.com
Copyright / Droits d’auteur / Derechos reservados © Euro-Pro Operating LLC 2014
Euro-Pro and Shark are trademarks of Euro-Pro Operating LLC.
Euro-Pro et Shark sont des marques de commerce d’Euro-Pro Operating LLC.
Euro-Pro y Shark son marcas registradas de Euro-Pro Operating LLC.
Illustrations may differ from actual product.
Les illustrations peuvent différer du produit réel.
El dibujo puede ne ser igual al producto real.
SV780 N_EN_FR_SP_140321_1
-
 1
1
-
 2
2
-
 3
3
-
 4
4
-
 5
5
-
 6
6
-
 7
7
-
 8
8
-
 9
9
-
 10
10
-
 11
11
-
 12
12
-
 13
13
-
 14
14
-
 15
15
-
 16
16
-
 17
17
-
 18
18
-
 19
19
-
 20
20
-
 21
21
-
 22
22
-
 23
23
-
 24
24


Shark SV780 14 Owner's manual
- Category
- Vacuum cleaners
- Type
- Owner's manual
- This manual is also suitable for
Ask a question and I''ll find the answer in the document
Finding information in a document is now easier with AI
in other languages
- français: Shark SV780 14 Le manuel du propriétaire
- español: Shark SV780 14 El manual del propietario
Related papers
-
Shark SV66 N Cordless Hand Vacuum User manual
-
-
-
-
 Euro-Pro SV1100 User manual
-
Shark SV780 14 User guide
-
 Euro-Pro SV1106 User manual
-
-
-


Other documents
-
 Euro-Pro SV736K User manual
-
 Euro-Pro SHARK CORDLESS SV70 User manual
-
Brandt ASB11R Owner's manual
-
-
Water Tech 12001645 Owner's manual
-
Kenmore 10341 Owner's manual
-
-
 Pool Blaster 14101AL Owner's manual
-
Belson HBD-14A Use And Care Book Manual
-
 Water Tech SPEED VAC TURBO User manual


