Hotpoint BD 241 I Owner's manual
- Category
- Fridge-freezers
- Type
- Owner's manual

Refrigerator
Installation and use
Réfrigérateur
Installation et emploi
Kühlschrank
Installation und Gebrauch
Koelkast
Installatie en gebruik

GB
F
D
NL
Two-door refrigerator/freezer 1
Instructions for installation and use
Réfrigérateur-congélateur 2 portes 10
Instructions pour l'installation et l'emploi
Kühl-Gefrierkombination mit 2 Türen 19
Installation- und Gebrauchshinweise
2 Deurs koel-vrieskombinatie 29
Gebruiksaanwijzingen voor plaatsing en gebruik
BD 241 I
To maintain the EFFICIENCY and SAFETY of this appliance, we recommend:
- call only the Service Centers authorized by the manufacturer
- always use original Spare Parts
Pour garantir l’efficacité et la sécurité de ce produit:
- adressez-vous exclusivement aux Centres d’assistance technique agréés
- demander toujours l’utilisation de pièces détachées originales
Um die Leistungsfähigkeit und Sicherheit dieses Gerätes zu gewährleisten,
bitte folgendes beachten:
- wenden Sie sich ausschließlich an unsere autorisierten Service-Stellen
- verlangen Sie, daß nur Original-Ersatzteile verwendet werden
Om de doelmatigheid en veiligheid van dit toestel te garanderen raden wij u aan:
- voor reparaties alleen de Service Centers te bellen die door de fabrikant gemachtigd zijn
- altijd gebruik te maken van originele onderdelen

1
GB
into your mouth because they could stick to your mouth
and cause burns.
7. Never clean or perform maintenance on the appliance
without first removing the plug from the socket; in fact,
turning the knob for adjusting the temperature to the ·
setting is not sufficient to eliminate all electrical contact with
the mains.
8. Before having your old refrigerator picked up for disposal,
remove or make inoperable any locking devices to prevent
children who might play in or around the appliance from
being locked inside.
9. Before calling for service/assistance in the case of mal-
function, consult the chapter entitled “Is There a Problem?
to determine whether it is possible to eliminate the prob-
lem. do not try to repair the problem by trying to access the
internal components of the appliance.
10. If damaged, the power supply cord on this appliance
must necessarily be replaced by our service centre because
special tools are required for replacement.
11. Do not use electric appliances inside the compartment
for food storage, if these are not those recommended by
the manufacturer.
12. At the end of the functional life of your appliance –
containing cyclopentane gas in the insulation foam and
perhaps gas R600a (isobutane) in the refrigeration circuit –
the latter should made safe before being sent to the dump.
For this operation, please contact your dealer or the Local
Organisation in charge of waste disposal.
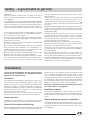
Installation
To ensure that the appliance operates properly and to
reduce energy consumption, it is important that the
appliance is installed correctly.
Ventilation
The compressor and condenser generate heat and, there-
fore, need to be ventilated properly. Rooms with less than
perfect ventilation are not very suited for installation of the
appliance. Therefore, it should be installed in a room with
an opening (window or French window) that provide the
appropriate amount of air re-circulation. It is also important
that the room not be too humid.
During installation, make sure not to cover or obstruct the
grates that allow for proper ventilation of the appliance.
Away from Heat
Avoid positioning the appliance in a place where it is directly
exposed to sunlight or near an oven, cook top or the like.
Electrical Connection and Earthing
Before proceeding with the electrical connection, make sure
that the voltage indicated on the rating plate, located at the
bottom left near the vegetable crisper, corresponds to the
mains voltage in your home and that the socket is fitted
with a standard earthing wire in accordance with safety
standards for 46/90 systems. If the socket is not fitted with
an earthing wire, the manufacturer will not be held liability
for any damages and or injuries arising out of the use of the
appliance. Do not use multiple sockets or adapters.
Position the appliance in such a way that you can access
the socket where it is plugged in.
Insufficient power?
The electrical socket must be able to handle the maximum
power load of the appliance, which is indicated on the rat-
ing plate located at the bottom left next to the vegetable
crisper.
Before making the electrical connection ...
After the appliance has been delivered, place it in the verti-
cal upright position and wait at least 3 hours before insert-
ing the plug into the socket in order to ensure that it func-
tions properly.
ATTENTION
Read your manual carefully since it contains instructions
which will ensure safe installation, use and maintenance of
your appliance.
Your Refrigerator is built to International safety standards
(EN60) and has been awarded the European approval mark
(IMQ) for compliance with UK electrical safety requirements.
It also meets the EC standards on the prevention and elimi-
nation of radio interference (EC directive 87/308 - 02.06.89).
Safety - a good habit to get into.
1. This appliance must not be installed outdoors - not even
in an area protected by a roof. It is extremely dangerous to
leave it exposed to rain or storms.
2. It must only be used by adults and exclusively to refriger-
ate and freeze foodstuffs, following the instructions for use
contained in this manual.
3. Do not ever touch or handle the appliance with bare feet
or with wet hands or feet.
4. It is highly recommended that you do not use extension
cords or multiple socket adapters. If the refrigerator is in-
stalled between cabinets, make sure that the cord is not
bent or dangerously pinched or compressed.
5. Never pull on the cord or the refrigerator to remove the
plug from the wall socket - this is very dangerous.
6. Never touch the cooling components within the appli-
ance, especially with wet hands because this could result in
injury. Never put ice cubes just removed from the freezer

2
GB
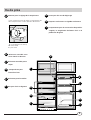
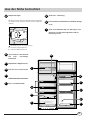
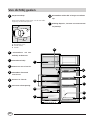
A closer look
A
A
Thermostat knob for regulating
the temperature
Use this knob to regulate the temperature of the
refrigerator. The following settings are available:
The refrigerator is off;
1 less cold;
5 colder
B
Removable door shelves with
egg tray and lidded butter
dish
C
Removable miscellaneous
shelf
D
Compartment for a 2 litre
bottle
E
Removable door shelf for
bottles
F
Fruit and vegetable drawer
G
Drain for defrost water
H
Removable height adjustable shelves
I
Compartment for storing frozen foods, freezing
fresh foods and making ice
H
A
I
D
E
F
G
B
C
C

3
GB
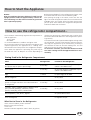
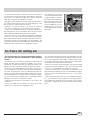
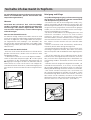
How to Start the Appliance
NOTICE
After the appliance has been delivered, stand it in the
upright position and wait approximately 3 hours be-
fore connecting it to the electrical outlet to guarantee
that it operates properly.
Before placing foodstuffs in the refrigerator or freezer, clean
the interior well with warm water and baking soda.
After putting the plug in the socket, make sure that the
light is on inside the appliance and then turn the thermostat
knob (A) to the “3” setting. After a few hours have passed,
you can place fresh food in the refrigerator compartment
and frozen foods into the freezer.
The thermostat automatically regulates the temperature in-
side the appliance
1 = less cold
5 = colder
It is recommended that a medium setting be used.
To increase the amount of space, optimize arrangement and
improve appearance, this appliance has a “cooling area”
located within the back panel of the refrigerator compart-
ment. When the appliance is operating, this panel may be
covered with frost or droplets of water depending on
How to use the refrigerator compartment...
Storing Food in the Refrigerator Compartment
Food Storage Time Location in the Refrigerator
Wrapped meat and cleaned fish
(use plastic wrap or pack in plastic bags)
2 or 3 days
On the shelf above the vegetable crisper
(which is the coldest area).
Fresh cheese 3 or 4 days
On the shelf above the vegetable crisper
(which is the coldest area).
Eggs 1 month In special egg rack on door.
Butter, margarine On any shelf.
Cooked or precooked food
(placer in air-tight containers and when cool store
in refrigerator)
3 or 4 days On any shelf.
Sausages, salami, sandwich meats in general, fresh
pasta, custards,puddings, chocolates, cream
pastries, bread, dry pastries, red tomatoes
3 or 4 days On any shelf.
Bottled products, milk, drinks, yoghurt On special door shelves.
Fruits and legumes In vegetable crisper.
What Not to Store in the Refrigerator
Garlic (transmits odour), onions and leeks.
Bananas (they will turn black).
Citrus fruits.
Potatoes and root vegetables (store in dark, dry places).
whether the compressor is operating or not at a given time.
Do not be concerned about this! The refrigerator is operat-
ing normally.
If the thermostat knob is positioned on higher settings while
the refrigerator is heavily filled and the ambient tempera-
ture high, the appliance may run continuously, resulting in
the formation of frost on the back cooling area. This will
lead to an increase in energy consumption.
To avoid this situation, just turn the thermostat knob
to a lower setting so that the appliance defrosts auto-
matically.

4
GB
- Within the refrigerator compartment, the air circulates natu-
rally, with the colder air falling because it is heavier. This is
the reason why meat and cheeses should be placed above
the vegetable crisper.
- Please follow our instructions carefully on maximum stor-
age time: any food, even the freshest, will not remain edible
for any extended amount of time.
- Contrary to popular belief, cooked foods do not store any
longer than raw food.
- Do not place liquids in containers without covering them
because this will lead to an increase in the level of moisture
within the refrigerator, causing the formation of frost.
- Remember to cool hot food before storing otherwise the
temperature inside the appliance will increase, causing the
compressor to work harder and use more energy.
- Be careful not to place containers (plastic or glass), food or
other objects in direct contact with the cooling area of the
back wall of the refrigerator. This could harm the food, in-
crease energy consumption and facilitate the formation of
condensate (on food, containers, etc.).
- For the preparation of food to be frozen, please con-
sult a specialized manual.
- Food that has be thawed, even partially, must not be re-
frozen: you must cook it in order to consume it (within 24
hours) or to freeze it once again.
- Fresh foods that you intend to freeze must not be placed
in contact with those that are already frozen or those that
have been fast-frozen. Rather, they must placed atop the
grate in the freezer compartment, in contact with the walls
of the compartment (back or side) if possible. Please keep in
mind that proper conservation of frozen foods depends on
the speed with which they are frozen.
- During the freezing process, avoid opening the door of the
freezer.
- The maximum daily quantity of food that can be frozen is
indicated on the rating plate located to the left of the veg-
etable crisper.
- In order to freeze and then thaw foods optimally, it is rec-
ommended that you divide food into small portions so that
they freeze quickly and uniformly. The packages should be
clearly marked with the content and the date they were
frozen.
- Do not open the freezer door in the event of a power
failure or malfunction. This will help maintain the tempera-
ture inside the freezer, ensuring that foods are conserved
for longer.
- Do not place full bottles in the freezer: they could easily
burst because all liquids increase in volume when they freeze.
- Fill the ice cube trays about 3/4 full.
- If the ambient temperature remains below 14°C for an
extended period of time, the temperature needed for ex-
tended storage of food in the freezer will not be reached,
resulting in reduced storage life of the food.
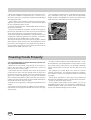
Freezing Foods Properly
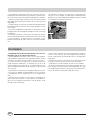
Fig. 1
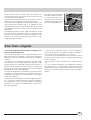
- The refrigerator compartment is equipped with conven-
ient, removable shelves (Fig. 1) which can be adjusted for
height using the shelf guides. This allows you to place even
large containers and foodstuffs in the refrigerator.

5
GB
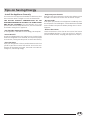
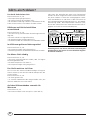
Tips on Saving Energy
- Install the Appliance Correctly
This means that the appliance should be installed away from
heat sources or direct sunlight in a well ventilated room.
THE ACTUAL ENERGY CONSUMPTION OF THE
APPLIANCE DEPENDS ON THE WAY THE SAME IS USED
AND ON ITS LOCATION. The consumption tests were
performed in 560mm deep column units, the most common
installation setting for this appliance.
- Use the Right Temperature Setting
A setting which is too cold increases energy consumption.
- Do not Overfill
To conserve food properly, the cold air must circulate freely
within the refrigerator. If it is overfilled, this will prevent proper
air circulation, forcing the compressor to work continuously.
- Close the Doors
Open your refrigerator as little as possible because each time
you do so you loose much of the cold air. To raise the tem-
perature to the proper level again, the motor must work for
a long time, consuming energy.
- Keep an Eye on the Seals
Keep the seals clean and make sure that they adhere well to
the door. This alone will ensure that no cold air escapes.
- No Hot Foods
A hot pot or pan placed in the refrigerator immediately raises
the temperature several degrees. Let hot cookware and food
cool to ambient temperature before placing them in the re-
frigerator.
- Defrost the Freezer
Check the thickness of the frost on the walls of the freezer
and immediately defrost it if the layer of frost is too thick.
(see the section entitled, “Keeping your Appliance in Shape”).

6
GB
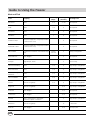
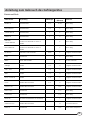
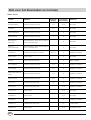
Guide to Using the Freezer
Meat and Fish
Food Wrapping
Tenderising
(days)
Storage
(months)
Thawing Time
Beef Roast Tinfoil 2 / 3 9 / 10 Not required.
Lamb Tinfoil 1 / 2 6 Not required.
Pork Roast Tinfoil 1 6 Not required.
Veal Roast Tinfoil 1 8 Not required.
Veal/Pork Chops
Each piece wrapped in cling wrap and then
in tinfoil (4 to 6 slices)
6 Not required.
Veal/Lamb Cutlets
Each piece wrapped in cling wrap and then
in tinfoil (4 to 6 slices)
6 Not required.
Minced Meat
In aluminium containers covered with cling
wrap.
Freshly
minced
2 Slowly in refrigerator.
Heart and Liver Plastic Baggies 3 Not required.
Sausages Cling Wrap or Tinfoil 2 As necessary.
Chicken and Turkey Tinfoil 1 / 3 9 Very slowly in refrigerator.
Duck and Goose Tinfoil 1 / 4 6 Very slowly in refrigerator.
Pheasant, Partrige and
Wild Duck
Tinfoil 1 / 3 9 Very slowly in refrigerator.
Hare and Rabbit Tinfoil 3 / 4 6 Very slowly in refrigerator.
Venison Tinfoil or Cling Wrap 5 / 6 9 Very slowly in refrigerator.
Large Fish Tinfoil or Cling Wrap 4 / 6 Very slowly in refrigerator.
Small Fish Plastic Baggies 2 / 3 Not required.
Crustaceans Plastic Baggies 3 / 6 Not required.
Shellfish
Store in salted water in aluminium
containers or plastic containers.
3 Very slowly in refrigerator.
Boiled Fish Tinfoil or Cling Wrap 12 In hot water.
Fried Fish Plastic Baggies 4 / 6 Directly in pan.

7
GB
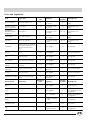
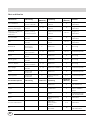
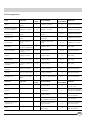
Fruits and Vegetables
Food Preparation
Blanching
Time
Wrapping
Storage
(months)
Thawing Time
Apples and Pears Peel and cut into slices. 2’
In Containers (cover
with syrup)
12
In refrigerator very
slowly.
Apricots, Peaches,
Cherries and Plums
Peel and pit. 1’ / 2’
In Containers (cover
with syrup)
12
In refrigerator very
slowly.
Strawberries
Blackberries and
Raspberries
Rinse and fry.
In Containers (cover
with sugar)
10 / 12
In refrigerator very
slowly.
Cooked Fruit Cut, cook and strain.
In Containers (add
10% sugar)
12
In refrigerator very
slowly.
Fruit Juice Wash, cut and crush.
In Containers (sugar
to taste)
10 / 12
In refrigerator very
slowly.
Cauliflower
Remove leaves, cut head into
small pieces and blanch in
water and a little lemon
juice.
2’ Plastic Baggies 12 Not required.
Cabbage and Brussel
Sprouts
Wash and cut into small
pieces.
1’ / 2’ Plastic Baggies 10 / 12 At room temperature.
Peas Shell and wash. 2’ Plastic Baggies 12 Not required.
French Beans Wash and slice if required. 2 Plastic Baggies 10 / 12 Not required.
Carrots, Peppers and
Turnips
Peel, wash and slice if
necessary.
3’ / 4’ Plastic Baggies 12 Not required.
Mushrooms and
Asparagus
Wash, peel and cut up. 3’ / 4’
Plastic Baggies or
Containers
6 At room temperature.
Spinach Wash and mince. 2’ Plastic Baggies 12 At room temperature.
Vegetable for Soups
Wash and cut up in small
pieces.
3’
Plastic Baggies or
Containers
6 / 7 Not required.
Various Foods Preparation
Blanching
Time
Wrapping
Storage
(months)
Thawing time
Bread Plastic Baggies 4
At room temperature
and in the oven.
Cakes Plastic Baggies 6
About 10 minutes at
room temperature, cook
at 100/200°C.
Cream Plastic Containers 6
At room temperature or
in refrigerator.
Butter
In original wrapping
or tinfoil
6 In refrigerator.
Boiled Food or
Vegetable Soup
Plastic or Glass
Containers
3 / 6
At room temperature or
in hot water.
Eggs
Freeze without shells
in small containers
10
At room temperature or
in refrigerator.

8
GB
Keeping Your Appliance in Shape
Cleaning and maintenance
Always unplug the appliance from the mains before
cleaning.
- Your appliance is manufactured with hygienic odourless
materials. To preserve these characteristics, always use sealed
containers for strong smelling foods to avoid the formation
of odours that are difficult to remove.
- Use only a water and bicarbonate solution: Clean the
internal and exterior of your appliance with a sponge soaked
with a warm water and sodium bicarbonate solution, which
is also a good disinfectant. If you do not have any sodium
bicarbonate at home, use neutral detergent.
- What not to use: Do not use abrasive detergents, bleach or
detergents containing ammonia. Never use solvent based
products.
- Dishwashable: All the removable parts can be cleaned by
soaking in hot soapy water or detergent. If you own a
dishwasher, you may wash these parts in the dishwasher.
Remember to dry thoroughly before replacing them.
- Discontinued use of the appliance: If the appliance is not in
use for any length of time, remember to clean the interior
and dry thoroughly, leaving the doors open to prevent the
formation of bad odours and mould.
- Replacing the light bulb. The bulb for lighting the interior
of the appliance is located at the back of the thermostat
box. Unscrew the burnt bulb and replace it with another
bulb of no more than 15 Watt, follow the instructions
illustrated in fig. 3.
Before doing any cleaning, disconnect the appliance
from the electricity (by pulling out the plug or turning
off the general switch in your home).
Defrosting
WARNING: do not damage the refrigeration circuit.
Do not use mechanical devices or other tools to speed
up the defrosting process, unless they have been rec-
ommended by the manufacturer.
How to Defrost the Refrigerator
This appliance defrosts automatically and the water is
channeled to the back toward the drain installed for this
purpose (fig. 2). Here, the heat produced by the compressor
will make it evaporate. The only thing you must do is to
periodically check and clean the hole of the drain, which is
located behind the vegetable crispers, so that the water
drains properly.
How to Defrost the Freezer
- Every so often, remove the frost with the scraper provided
with the appliance (do not use knives or metal objects).
- If the frost is more than 15 mm thick, the freezer must be
defrosted.
Proceed as follows: turn the thermostat knob (A) to the ·
setting . Then wrap all the frozen and fast-frozen food in
newspaper, placing it either in the refrigerator or in a cool
place. Leave the freezer door open so that the frost thaws
completely. You can speed this process by placing contain-
ers of warm water in the compartment.
Fig. 2
Fig. 3

9
GB
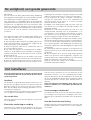
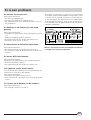
Is There a Problem?
The refrigerator does not function.
Have you checked whether:
• The main switch for the electricity to the apartment or
home has been turned off;
• The plug is properly inserted in the outlet;
• The outlet is adequate; try inserting the plug into another
outlet in the room.
The refrigerator and the freezer do not cool
properly.
Have you checked whether:
• The doors do not close well or the seals are faulty;
• The doors are left open too long;
• The thermostat knob is not on the proper setting;
• The refrigerator or freezer is overfilled.
The food in the refrigerator becomes too cold.
Have you checked whether:
• The thermostat knob is on the proper setting;
• The food is in contact with the back wall - which is the
coldest part.
The motor runs continuously.
Have you checked whether
• The doors are not closed well or have remained open too
long;
• The ambient temperature is too high;
• The thermostat knob is not on the proper setting.
The appliance makes too much noise.
The gas refrigerant produces a slight noise even when the
compressor is not running (this is not a defect).
Have you checked whether:
• The refrigerator is level.
• The appliance was installed between cabinets or objects
that vibrate and make noise.
There is water on the bottom of the refrigerator.
Have you checked whether:
• The hole for draining the water from the frost is clogged
(see fig. 2).
Never call on unauthorized technicians and always
refuse spare parts which are not originals.
Mod.
RG 2330
TI
Cod.
93139180000 S/N 704211801
220 - 240 V- 50 Hz 150 W
W
Fuse
A
Max 15 w
Total
Gross
Bruto
Brut
Compr.
Kompr.
Syst.
R 134 a
kg 0,090
Gross
Bruto
Brut
340
Net
Util
Utile
Gross
Bruto
Brut
Freez. Capac
Poder de Cong
75
Made in Italy 13918
Test
P.S-I.
Pressure
HIGH-235
LOW 140
kg/24 h
4,0
Class
Clase
N
Classe
If after all the checks, the appliance still does not operate or
the problem persists, call the nearest Service Centre and in-
form them of: the type of problem, the abbreviation of the
model name (Mod.) and the relative numbers (S/N) written
on the rating plate located at the bottom left next to the
vegetable crisper (see example in the figure below).

10
F
vous blesser. Ne portez jamais à la bouche des glaçons à
peine sortis du freezer, vous risqueriez de vous brûler.
7. Ne procédez à aucune opération de nettoyage ou
d’entretien sans avoir auparavant débranché la fiche de
l’appareil; il ne suffit pas, en effet, d’amener la manette de
réglage de la température sur la position pour éliminer
tout contact électrique.
8. Avant d’envoyer votre ancien réfrigérateur à la déchetterie,
rendez sa serrure inutilisable. Vous éviterez ainsi que des
enfants en jouant, ne restent enfermés à l’intérieur.
9. En cas de panne et avant de faire appel au service après-
vente, consultez le chapitre «Quelque chose ne va pas?»
pour vérifier si vous pouvez vous-même résoudre le problème.
Ne tentez pas de réparer la panne en essayant d’accéder
aux parties internes.
10. En cas de changement du câble d’alimentation, adres-
sez-vous à nos Services après-vente. Dans certains cas, les
connexions sont réalisées au moyen de bornes spéciales, dans
d’autres, un outil spécial est indispensable pour accéder aux
raccordements.
11. Ne pas utiliser d’appareils électriques à l’intérieur du
compartiment de conservation des aliments s’ils n’appartiennent
pas aux catégories recommandées par le fabricant.
12. Avant d’envoyer votre appareil hors d’usage à la déchetterie,
veillez à le rendre sûr car sa mousse isolante contient du gaz
cyclopentane et son circuit réfrigérant peut contenir du gaz R600a
(isobutane). Pour cette opération, adressez-vous à votre revendeur
ou au Service local prévu à cet effet.
Installation
Pour garantir le bon fonctionnement de votre appareil
tout en réduisant sa consommation d’électricité, il faut
qu’il soit installé correctement.
L’aération
Le compresseur et le condenseur produisent de la chaleur et
exigent par conséquent une bonne aération. Les pièces mal
ventilées sont par conséquent déconseillées. L’appareil doit
donc être installé dans une pièce munie d’une ouverture
(fenêtre ou porte-fenêtre) qui permette de renouveler l’air
et qui ne soit pas trop humide.
Attention, lors de son installation, à ne pas boucher les grilles
d’aération de l’appareil.
Loin de toute source de chaleur
Evitez d’installer votre appareil dans un endroit exposé à la
lumière directe du soleil ou près d’une cuisinière électrique
ou autre.
Raccordement électrique et mise à la terre
Avant de procéder à tout raccordement électrique, contrô-
lez si le voltage indiqué sur la plaquette des caractéristiques,
placée en bas à gauche à côté du bac à légumes, corres-
ATTENTION
Lire attentivement les avertissements contenus dans ce li-
vret car ils fournissent des indications importantes pour la
sécurité de l’installation, de l’utilisation et de l’entretien.
Ce réfrigérateur a été construit conformément aux normes
internationales de sécurité qui ont pour but de protéger le
consommateur. Cet appareil a en effet obtenu le label IMQ
que les techniciens de l’Institut Italien de Qualité n’accor-
dent qu’aux appareils conformes aux normes du CEI: Co-
mité Electrotechnique Italien.
1. Cet appareil ne doit pas être installé à l’extérieur, même à
l’abri d’un appentis, il est extrêmement dangereux de le lais-
ser exposé à la pluie et aux orages.
2. Il ne doit être utilisé que par des adultes et uniquement
pour conserver et congeler des aliments, conformément à
ce mode d’emploi.
3. Ne touchez jamais ni ne manoeuvrez l’appareil pieds nus
ou avec les mains ou les pieds mouillés.
4. Nous déconseillons d’utiliser des rallonges ou des prises
multiples. Si le réfrigérateur est installé entre des meubles,
veillez par soucis de sécurité à ce que le cordon d’alimenta-
tion ne soit ni plié ni comprimé.
5. Ne tirez jamais sur le cordon ou le réfrigérateur pour dé-
brancher la fiche de la prise murale: c’est extrêmement dan-
gereux.
6. Ne touchez pas aux parties intérieures réfrigérantes sur-
tout avec les mains mouillées, vous pourriez vous brûler ou
pond bien à celui de votre installation et contrôlez si la prise
est dotée d’une mise à la terre conforme, comme prescrit
par la loi 46/90 sur la sécurité des installations. S’il n’y a pas
de mise à la terre, le Fabricant décline toute responsabilité.
N’utilisez ni prises multiples ni adaptateurs.
Installez l’appareil de manière à ce que la prise à
laquelle il est connecté soit parfaitement accessible.
La puissance est insuffisante?
La prise électrique doit être en mesure de supporter la charge
maximum de puissance de l’appareil, indiquée sur la pla-
quette des caractéristiques placée en bas à gauche à côté
du bac à légumes.
Avant de le raccorder électriquement
Après le transport, pour que votre appareil fonctionne bien,
placez-le à la verticale et attendez au moins 3 heures avant
de le brancher à la prise.
La sécurité, une bonne habitude

11
F
Vu de près
A
Manette pour le réglage de la température
Cette manette permet de régler la température des
deux compartiments sur des positions différentes
le réfrigérateur est éteint;
1 moins froid;
5 plus froid.
B
Balconnet amovible avec
casier à œufs et beurrier
C
Balconnet amovible porte-
objets
D
Compartiment pour
bouteille 2 litres
E
Balconnet pour bouteilles
F
Bac pour fruits et légumes
G
Convoyeur de l'eau de dégivrage
H
Clayettes coulissantes et réglables en hauteur
I
Compartiment pour la conservation de produits
surgelés, la congélation d’aliments frais et la
production de glace
H
A
I
D
E
F
G
B
C
C

12
F
Ce qu'il ne faut pas mettre dans le réfrigérateur
L’ail (il transmet les odeurs), les oignons et les poireaux
Les bananes (elles noircissent)
Les agrumes (il vaut mieux les conserver au frais sur le balcon)
Les pommes de terre et les tubercules (un endroit sec et obscur est préférable)
Guide au rangement et à la conservation des aliments dans le réfrigérateur
Aliments
Durée de
conservation
Rangement à l'intérieur de
réfrigérateur
Viande et poisson vidé (mettre sous sachets ou
envelopper dans des feuilles plastique
2 ou 3 jours
Au-dessus du bac à légumes
(zone la plus froide du réfrigérateur)
Fromages frais 3 ou 4 jours
Au-dessus du bac à légumes
(zone la plus froide du réfrigérateur)
Oeufs 1 mois
Dans le casier correspondant de la
contre-porte
Beurre et margarine Dans le balconnet de la contre-porte
Aliments cuits ou précuisinés (enfermer dans des
récipient étanches et introduire après refroidissement)
3 ou 4 jours Sur une clayette quelconque
Charcuterie crue, pain de mie, pâtes fraîches, crème,
flans, chocolats, gâteaux à la crème, lard, gâteaux secs,
tomates
3 ou 4 jours Sur une clayette quelconque
Bouteilles, lait, boisson, yaourt
Dans le balconnet correspondant de la
contre-porte
Fruits et légumes Dans le bac à légumes
Comment mettre en marche l'appareil
ATTENTION
Après le transport, pour que votre appareil fonctionne
bien, placez-le à la verticale et attendez au moins 3
heures avant de le brancher à la prise de courant.
Avant d’introduire les aliments dans le réfrigérateur ou dans
le freezer, nettoyez bien l’intérieur de l’appareil avec de l’eau
tiède et du bicarbonate.
Après avoir branché la fiche à la prise de courant, contrôlez
si la lumière à l’intérieur est bien allumée puis tournez la
manette pour le réglage de la température “A” jusqu’à la
position “3” , au bout de quelques heures vous pouvez com-
mencer à introduire les aliments frais dans le compartiment
réfrigérateur et les aliments congelés dans le freezer..
Comment utiliser au mieux le compartiment réfrigérateur
Le thermostat règle automatiquement la temperature ù l’in-
terne de l’appareil.
1 = moins froid
5 = plus froid
Une position intermédiaire est de toute manière conseillée.
Pour augmenter la place disponible et améliorer l’aspect
esthétique, la «partie réfrigérante» de cet appareil est si-
tuée à l’intérieur de la paroi arrière du compartiment réfri-
gérateur. En cours de fonctionnement, cette paroi sera par
conséquent recouverte de givre ou de gouttelettes d’eau
suivant que le compresseur est en marche ou pas. Ne vous
en faites pas! Votre réfrigérateur fonctionne tout à fait nor-
malement.
Si vous réglez la manette sur des chiffres plus élevés, en
emmagasinant des quantités importantes de nourriture et
avec une température ambiante élevée, votre appareil ris-
que de fonctionner sans interruption favorisant ainsi la for-
mation de givre sur la paroi arrière réfrigérante tout en con-
sommant beaucoup plus d’électricité.
Pour résoudre cet inconvénient il suffit de déplacer la
manette du thermostat vers des chiffres plus bas permet-
tant ainsi un dégivrage automatique de l’appareil.

13
F
Suivez attentivement nos conseils quant à la durée maxi-
mum de conservation: tout aliment, pour frais qu’il soit, ne
reste pas intact très longtemps..
Contrairement à ce que l’on pense, les aliments cuits ne se
conservent pas plus longtemps que les aliments crus.
Le compartiment réfrigérateur est équipé de clayettes amo-
vibles extrêmement pratiques (Fig. 1) et réglables en hau-
teur grâce à des glissières spéciales. Vous pouvez ainsi intro-
duire de grands récipients et des aliments particulièrement
volumineux.
N'introduisez que des aliments froids ou tièdes en évitant
d'y placer ceux qui sont encore chauds: ils augmenteraient
tout de suite la température interne en obligeant le com-
presseur a un surplus de travail qui représenterait un gas-
pillage d'énergie électrique.
Fig. 1
N’introduisez pas de liquides
dans des récipients ouverts,
ils entraîneraient une aug-
mentation de l’humidité à
l’intérieur du réfrigérateur et
donc la formation de givre.
- Lors de la préparation des aliments à congeler, con-
sultez un manuel spécialisé.
- Un aliment décongelé, ne serait ce que partiellement, ne
doit jamais être remis à congeler : il faut le faire cuire pour le
consommer (dans les 24 heures) ou bien pour le congeler à
nouveau.
- Les aliments frais à congeler ne doivent pas être rangés
tout contre des aliments déjà congelés ou surgelés, ils doi-
vent être posés sur la clayette du compartiment freezer et, si
possible, contre les parois (latérales et arrière). N’oubliez pas,
en effet, que la bonne conservation des aliments congelés
dépend de leur vitesse de congélation.
- En cours de congélation, évitez d’ouvrir la porte du freezer.
- La quantité maximum pouvant être congelée, par jour, est
indiquée sur la plaquette des caractéristiques située à gau-
che du bac à légumes.
- Pour obtenir une congélation et une décongélation parfai-
tes, il vaut mieux congeler de petites portions d’aliments,
leur congélation n’en sera que plus rapide et homogène.
Indiquez sur vos sachets ou barquettes leur contenu et la
date de congélation.
- N’ouvrez pas la porte du freezer en cas de coupure de
courant ou de panne. Les produits surgelés et congelés se
conserveront ainsi plus longtemps sans s’altérer.
- Ne mettez jamais de bouteilles pleines dans votre freezer:
elle pourraient se briser car tous les liquides augmentent de
volume en gelant.
- Ne remplissez les bacs à glaçons qu’aux 3/4 de leur hau-
teur.
- Si l’on a pendant longtemps une température ambiante
plus froide que 14°C, les températures indispensables à une
longue conservation ne pourront être atteintes à l’intérieur
du freezer et la durée de conservation sera par conséquent
réduite.
Pour bien congeler

14
F
Quelques conseils pour faire des économies
- Installez-le bien
Autrement dit loin de sources de chaleur, de la lumière directe
du soleil, dans une pièce bien ventilée et en respectant les
distances signalées dans le paragraphe «Installation/L’aération».
LA CONSOMMATION D’ENERGIE DE L’APPAREIL DEPEND
DE SES CONDITIONS D’UTILISATION ET DE SON
EMPLACEMENT. Les essais sur la consommation ont été
effectués sur des appareils montés dans des éléments colonnes
de 560 mm de profondeur, condition d’installation la plus
courante.
- Le froid nécessaire
Un froid excessif entraîne une augmentation de la consom-
mation d’électricité.
- Ne le remplissez pas trop
Pour bien conserver les aliments, il faut que le froid puisse
circuler librement à l’intérieur du réfrigérateur. Si vous le rem-
plissez trop, vous gênerez cette circulation et obligerez le
compresseur à fonctionner sans arrêt.
- Portes fermées
Ouvrez votre réfrigérateur le moins souvent possible car cha-
que fois que vous le faites, de l’air froid s’échappe. Pour
rétablir la température voulue, le moteur doit fonctionner
longtemps en consommant beaucoup d’électricité.
- Attention aux joints
Veillez à ce qu’ils soient toujours propres et en bon état pour
bien adhérer aux portes; ce n’est qu’ainsi qu’ils empêche-
ront toute fuite d’air froid.
- Jamais d’aliments chauds
Une casserole chaude mise au réfrigérateur entraîne auto-
matiquement une hausse de la température de plusieurs
degrés, laissez-la refroidir à température ambiante avant de
l’introduire dans le réfrigérateur.
- Du givre dans le freezer
Contrôlez l’épaisseur du givre sur les parois du freezer et
procédez immédiatement au dégivrage si la couche est trop
épaisse (Voir plus bas “Comment le garder en forme”).

15
F
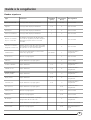
Guide à la congélacion
Viandes et poisson
Type Confection
Faisandage
(jours)
Conservation
(mois)
Décongélation
Rôti et boeuf bouilli Enveloppé dans du papier aluminium 2 / 3 9 / 10 Pas nécessaire
Agneau Enveloppé dans du papier aluminium 1 / 2 6 Pas nécessaire
Rôti de porc Enveloppé dans du papier aluminium 1 6 Pas nécessaire
Veau rôti ou blanchi Enveloppé dans du papier aluminium 1 8 Pas nécessaire
Biftecks et côtelettes
de porc ou de veau
Par tranche enveloppée une par une dans
une feuille de polythéne puis dans du papier
aluminium, pas plus de 4 à 5 morceaux
ensemble
6 Pas nécessaire
Tranches et côtelettes
d'agneau ou de boeuf
Chaque tranche enveloppée dans une feuille
de polythéne puis dans du papier aluminium,
pas plus de 4 à 5 morceaux ensemble
6 Pas nécessaire
Viande hachée
Dans des bacs aluminium recouverts d'une
feuille de polypropylène
Très fraîche 2
Lentement dans le
réfrigérateur
Coeur et foie Sachets en polypropylène 3 Pas nécessaire
Saucisses Papier aluminium ou polypropylène 2 Selon l'emploi
Poulets et dindons Papier aluminium 1 / 3 9
Lentement dans le
réfrigérateur
Canards et oies Papier aluminium 1 / 4 6
Lentement dans le
réfrigérateur
Canards sauvages
faisans, perdrix
Papier aluminium 1 / 3 9
Lentement dans le
réfrigérateur
Lapins, lièvres Papier aluminium 3 / 4 6
Lentement dans le
réfrigérateur
Chevreuil, cerf Papier aluminium ou polypropylène 5 / 6 9
Lentement dans le
réfrigérateur
Gros poissons Papier aluminium ou polypropylène 4 / 6
Lentement dans le
réfrigérateur
Petits poissons Sachets en polypropylène 2 / 3 Pas nécessaire
Crustacés Sachets en polypropylène 3 / 6 Pas nécessaire
Mollusques
Dans des bacs aluminium ou plastique
plongés dans du sel et de l'eau
3
Lentement dans le
réfrigérateur
Poissons cuits Papier aluminium ou polypropylène 12 Dans de l'eau chaude
Poissons frits Sachets en polypropylène 4 / 6
Directement dans la
poêle

16
F
Fruits et légumes
Type Préparation Cuisson Confection
Conserv.
(mois)
Décongélation
Pommes et poires
Peler et couper en
morceaux
2’
Dans des bacs, couvrir avec
du sirop
12
Lentement dans le
réfrigérateur
Abricots pêches
cerises, prunes
Ôter les noyaux et peler 1' / 2'
Dans des bacs, couvrir avec
du sirop
12
Lentement dans le
réfrigérateur
Fraises, mûres et
myrtilles
Nettoyer, laver et laisser
sécher
Dans des bacs, couvrir avec
du sucre
10 / 12
Lentement dans le
réfrigérateur
Fruits cuits Couper, cuire et passer
Dans des bacs, ajouter 10%
de sucre
12
Lentement dans le
réfrigérateur
Jus de fruit Laver, couper et écraser
Dans des bacs, sucre à
discrétion
10 / 12
Lentement dans le
réfrigérateur
Choux-fleurs
Couper en morceaux et
blanchir à l'eau additionnée
de jus de citron
2' Sachets en polythène 12 Pas nécessaire
Choux, choux de
Bruxelles
Nettoyer, laver et couper 1' / 2' Sachets en polythène 10 / 12 À température ambiante
Petits pois Écosser et laver 2' Sachets en polythène 12 Pas nécessaire
Haricots verts
Laver et couper en
morceaux
2' Sachets en polythène 10 / 12 Pas nécessaire
Carottes, poivrons,
navets
Couper en lamelles, peler et
laver
3' / 4' Sachets en polythène 12 Pas nécessaire
Champignons et
asperges
Laver et couper 3' / 4' Sachets ou bacs 6 A température ambiante
Epinards Laver et hacher 2' Sachets en polythène 12 À température ambiante
Légumes assortis
pour potage
Laver et couper en
morceaux
3'
En petites portions dans des
sachets
6 / 7 À température ambiante
Denrées diverses Préparation Cuisson Confection
Conserv.
(mois)
Décongélation
Pain Sachets en polythène 4
À température ambiante
et dans le four
Gâteaux Feuilles de polythène 6
À température ambiante
et cuire à 100/200°C
Crème fraîche Bacs en plastique 6
À température ambiante
ou dans le réfrigérateur
Beurre
Dans son papier original
enveloppé dans du papier
aluminium
6 Dans le réfrigérateur
Denrées cuites,
soupe de légumes
Partagés dans des bacs verre
ou plastique
3 / 6
À température ambiante
ou dans de l'eau chaude
Oeufs
Congeler sans coquille dans
de petits bacs
10
À température ambiante
ou dans le réfrigérateur

17
F
Nettoyage et entretien particulier
- Les matériaux de fabrication utilisés pour votre appareil
sont hygiéniques et inodores mais pour conserver ces pro-
priétés il faut que les aliments soient toujours bien protégés
et enfermés, pour éviter toute formation de taches difficiles
à enlever ou la formation de mauvaises odeurs.
- De l’eau et du bicarbonate: c’est tout. Pour nettoyer l’inté-
rieur et l’extérieur, utilisez une éponge, de l’eau tiède et du
bicarbonate de soude qui est entre autre un excellent désin-
fectant. Si vous n’en avez pas chez vous, utilisez du savon
neutre (du savon de Marseille, par exemple).
- Ce qu’il ne faut jamais utiliser: des produits abrasifs, de
l’eau de Javel, de l’ammoniaque. Les solvants et autres pro-
duits semblables sont absolument interdits.
- Tout ce qui est amovible peut être mis tremper dans de
l’eau chaude avec du savon ou du liquide vaisselle. Avant
de remettre ces pièces en place, rincez-les et essuyez-les bien.
- Quand il est inutilisé pendant de longues périodes. En été.
si vous décidez d’arrêter votre réfrigérateur, nettoyez-le à
l’intérieur et laissez les portes ouvertes, vous éviterez ainsi
toute formation de mauvaises odeurs et de moisissures.
- Eclairage intérieur: comment changer la lampe. Cette der-
nière est située dans la partie arrière de la boîte du thermos-
tat. Pour la changer, débranchez l’appareil de la prise de
courant, dévissez la lampe grillée et remplacez-la par une
autre d’une puissance ne dépassant pas 15 W., procédez
comme illustré figure 3.
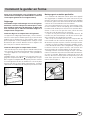
Comment le garder en forme
Avant tout nettoyage de votre réfrigérateur, coupez
l’alimentation électrique (en débranchant la fiche ou
l’interrupteur général de votre appartement).
Dégivrage
ATTENTION: ne pas endommager le circuit réfrigérant.
Attention: n’utilisez ni dispositifs mécaniques ni outils
pour accélérer l’opération de dégivrage, en dehors de
ceux conseillés par le fabricant.Comment dégivrer le
compartiment réfrigérateur.
Comment dégivrer le compartiment réfrigérateur.
Cet appareil est à dégivrage automatique, l’eau est achemi-
née vers l’arrière par un conduit spécial (fig. 2) où la chaleur
produite par le compresseur la fait évaporer. Vous n’avez
qu’une opération à faire périodiquement: nettoyer le trou
d’évacuation qui se trouve derrière les bac à légumes afin
que l’eau puisse s’écouler normalement.
Comment décongeler le compartiment freezer
- Eliminez de temps en temps le givre à l’aide du racloir fourni
avec l’appareil (jamais de couteaux ou d’objets métalliques).
- Si le givre dépasse 5 mm d’épaisseur, il faut procéder au
dégivrage.
Procédez comme suit: positionnez la manette pour le ré-
glage des températures A sur ; enveloppez tous les pro-
duits surgelés et congelés dans du papier journal et mettez-
les au réfrigérateur ou dans un endroit frais. Laissez la porte
ouverte pour que le givre fonde complètement, accélérez
l’opération en introduisant des récipients pleins d’eau tiède.
Fig. 2
Fig. 3

18
F
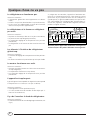
Quelque chose ne va pas
Le réfrigérateur ne fonctionne pas.
Avez-vous contrôlé si:
• l’interrupteur général de votre appartement est décon-
necté;
• la fiche n’est pas bien branchée dans la prise de courant;
• la prise n’est pas endommagée; essayez de la brancher
dans une autre prise de l’appartement.
Le réfrigérateur et le freezer ne réfrigèrent
pas assez.
Avez-vous contrôlé si:
• les portes ne ferment pas bien ou si les joints sont abîmés;
• les portes restent trop longtemps ouvertes;
• la manette de réglage de la température n’est pas bien
positionnée;
• le réfrigérateur ou le freezer ont été excessivement rem-
plis.
Les aliments à l’intérieur du réfrigérateur
gèlent trop.
Avez-vous contrôlé si:
• la manette de réglage de la température est bien position-
née;
• les aliments touchent à la paroi arrière qui est la plus froide.
Le moteur fonctionne sans arrêt.
Avez-vous contrôlé si:
• les portes sont bien fermées ou si elles sont restées ouver-
tes trop longtemps;
• la température extérieure est trop élevée;
• la manette de réglage de la température n’est pas bien
positionnée.
L’appareil est trop bruyant.
Il gaz réfrigérant interne produit un léger bruit même quand
le compresseur est à l’arrêt (ce n’est pas un défaut).
Avez-vous contrôlé si:
• le réfrigérateur est bien positionné à plat;
• s’il a été installé entre des meubles ou des objets qui vi-
brent en faisant du bruit;
Il y a de l’eau dans le fond du réfrigérateur.
Avez-vous contrôlé si:
• le trou d’évacuation de l’eau de dégivrage est bouché (voir
fig. 2).
Ne faites jamais appel à des techniciens non agréés et
refusez toujours des pièces détachées non originales.
Si, malgré tous ces contrôles, l’appareil ne fonctionne tou-
jours pas et l’inconvénient persiste, faites appel au service
après-vente le plus proche de chez vous en indiquant: le
type de panne, le sigle du modèle (Mod.) ainsi que les chif-
fres (S/N) indiqués sur la plaquette des caractéristiques si-
tuée en bas, à gauche, à côté du bac à légumes (voir exem-
ple dans la figurer suivante).
Mod.
RG 2330
TI
Cod.
93139180000 S/N 704211801
220 - 240 V- 50 Hz 150 W
W
Fuse
A
Max 15 w
Total
Gross
Bruto
Brut
Compr.
Kompr.
Syst.
R 134 a
kg 0,090
Gross
Bruto
Brut
340
Net
Util
Utile
Gross
Bruto
Brut
Freez. Capac
Poder de Cong
75
Made in Italy 13918
Test
P.S-I.
Pressure
HIGH-235
LOW 140
kg/24 h
4,0
Class
Clase
N
Classe
Page is loading ...
Page is loading ...
Page is loading ...
Page is loading ...
Page is loading ...
Page is loading ...
Page is loading ...
Page is loading ...
Page is loading ...
Page is loading ...
Page is loading ...
Page is loading ...
Page is loading ...
Page is loading ...
Page is loading ...
Page is loading ...
Page is loading ...
Page is loading ...
Page is loading ...
Page is loading ...
-
 1
1
-
 2
2
-
 3
3
-
 4
4
-
 5
5
-
 6
6
-
 7
7
-
 8
8
-
 9
9
-
 10
10
-
 11
11
-
 12
12
-
 13
13
-
 14
14
-
 15
15
-
 16
16
-
 17
17
-
 18
18
-
 19
19
-
 20
20
-
 21
21
-
 22
22
-
 23
23
-
 24
24
-
 25
25
-
 26
26
-
 27
27
-
 28
28
-
 29
29
-
 30
30
-
 31
31
-
 32
32
-
 33
33
-
 34
34
-
 35
35
-
 36
36
-
 37
37
-
 38
38
-
 39
39
-
 40
40


Hotpoint BD 241 I Owner's manual
- Category
- Fridge-freezers
- Type
- Owner's manual
Ask a question and I''ll find the answer in the document
Finding information in a document is now easier with AI
in other languages
- français: Hotpoint BD 241 I Le manuel du propriétaire
- Deutsch: Hotpoint BD 241 I Bedienungsanleitung
- Nederlands: Hotpoint BD 241 I de handleiding
Related papers
-
Whirlpool BO 1614 I Owner's manual
-
-
-
-
-
Hotpoint-Ariston BTS 1614 I Owner's manual
-
-
Indesit C133 User guide
-
-
Hotpoint B 339 NF P (UK) User guide
Other documents
-
-
Whirlpool BAA 12 (NL).9 Owner's manual
-
-
Ariston Fridge/Freezer Combined User manual
-
-
-
-
-
-