Duerkopp Adler 281 User manual

Category
Car kits
Type
User manual

Duerkopp Adler 281 is a multi-function pushbutton that can replace the existing pushbutton on your sewing machine, offering enhanced functionality and ease of use. It comes with a power adapter and all the necessary components for installation. The multi-function pushbutton features an intuitive interface with various buttons and a digital display, providing quick access to a range of sewing functions and settings. It allows you to easily select and adjust stitch patterns, change needle positions, and control other sewing operations.

Duerkopp Adler 281 is a multi-function pushbutton that can replace the existing pushbutton on your sewing machine, offering enhanced functionality and ease of use. It comes with a power adapter and all the necessary components for installation. The multi-function pushbutton features an intuitive interface with various buttons and a digital display, providing quick access to a range of sewing functions and settings. It allows you to easily select and adjust stitch patterns, change needle positions, and control other sewing operations.

版本 / Edition:
08/2012
Conversion instructions for the multi-function pushbutton
零件号 / Part No.:
0791 281702
修订索引
Rev. index: 00.0
页码:
Sheet: 1 of 12
Printed in Germany
1 Components in the kit
The kit comprises the following components:
Material number QuantityDescription
9850 001313 1 Power adaptor
9880 281000 1 Multi-function pushbutton
Figure 1: Components in the kit
2 Replacing the power adaptor
2.1 Opening the housing
Figure 2: Opening the housing
1. Loosen the screw holder (1) until the control can be removed.
2. Remove the control.
3. Loosen the front panel screws (3).
4. Remove the front panel (2).
5. Loosen the adaptor cover screws (4).
6. Remove the adaptor cover.
1
2
(1) - Power adaptor
(2) - Multi-function pushbutton
Danger to life due to electric shock.
The power adaptor may only be replaced by a qualified electrician.
Switch off the sewing machine and disconnect the power plug before
you replace the power adaptor.
Make sure the power plug cannot be unintentionally reinserted.
DANGER
1
2
2
3
4
4
(1) - Screw holder
(2) - Front panel of the control
(3) - Front panel screws
(4) - Adaptor cover screws
Retrofit kit 0281 590114
Conversion instructions for the multi-function pushbutton
Printed in Germany
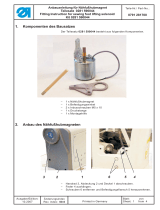
2.2 Replacing the power adaptor
Figure 3: Removing the present power adaptor
1. Loosen the connecting screws (3).
2. Disconnect the connecting cable (2) from the connection.
3. Remove the present power adaptor (1) from the bottom part of the housing (4).
4. Make sure that the metal connection jacks (5) remain inserted in the housing.
Figure 4: Inserting the new power adaptor
5. Insert the new power adaptor in the bottom part of the housing.
Important: All 5 pins on the plug (1) must be plugged in the openings of the socket (2).
6. Place the sewing lamp cable into the housing opening (3) and connect it up.
7. Place the connecting cable into the housing opening (4) and connect it up on the board:
Input cable (brown) to line in (5)
Neutral conductor cable (blue) to neutral conductor input (6)
Ground cable (yellow/green) to one of the ground inputs (7)
2.3 Installing the housing
Figure 5: Creating the opening for sewing lamp cable
1. Push in a predetermined breaking point (1) in the adaptor cover using pliers or knife to create
an opening for the sewing lamp cable.
1
4
2
3
5
(1) - Power adaptor
(2) - Connecting cable
(3) - Connecting screws
(4) - Bottom part of housing
(5) - Metal connection jacks
3
1
2
4
5
6
7
(2) - Socket
(3) - Housing opening for sewing lamp cable
(4) - Housing opening for connecting cable
(5) - Line in: L (IN)
(6) - Neutral conductor input: N (IN)
(7) - Ground inputs: PE
1
(1) - Predetermined breaking point for sewing lamp cable
Retrofit kit 0281 590114
版本 / Edition:
08/2012
修订索引
Rev. index: 00.0
页码:
Sheet: of 122
零件号 / Part No.:
0791 281702
(1) - Board plug
Conversion instructions for the multi-function pushbutton
零件号 / Part No.:
0791 281702
页码:
Sheet: 3
Printed in Germany
Figure 6: Installing the housing
2. Screw down the adaptor cover using the adaptor cover screws (4).
3. Fit the front panel (2).
4. Screw down the front panel screws (3).
5. Insert the control.
6. Screw down the control using the screw holders (1).
3 Replacing the multi-function pushbutton
3.1 Removing the present pushbutton
Figure 7: Removing the sewing foot and needle
1. Fully unscrew the sewing foot screw (1).
2. Remove the sewing foot (2).
3. Fully unscrew the needle screw (4).
4. Remove the needle (3).
1
2
2
3
4
4
(1) - Screw holder
(2) - Front panel of the control
(3) - Front panel screws
(4) - Adaptor cover screws
Danger to life due to electric shock.
The multi-function pushbutton may only be replaced by a qualified
electrician.
Switch off the sewing machine and disconnect the power plug before you
replace the multi-function pushbutton.
Make sure the power plug cannot be unintentionally reinserted.
DANGER
1
2
4
3
(1) - Sewing foot screw
(2) - Sewing foot
(3) - Needle
(4) - Needle screw
Retrofit kit 0281 590114
版本 / Edition:
08/2012
修订索引
Rev. index: 00.0
of 12
Conversion instructions for the multi-function pushbutton
Printed in Germany
Figure 8: Removing the present pushbutton
5. Fully unscrew the two screws (2) on the fixing plate (1).
Important: Keep the screws for fastening the multi-function pushbutton.
Figure 9: Removing the control panel and rear arm cover
6. Fully unscrew the screws (2) on the control panel holder.
7. Remove the control panel (1).
8. Fully unscrew the arm cover screws (4).
9. Remove the rear arm cover (3).
Figure 10: Removing the cable holder
10. Fully unscrew the screw (3) on the cable holder (4).
11. Remove the cable holder (4).
12. Cut through the cable tie (2).
13. Bring the cable (1) far enough out of the machine arm such that there is sufficient play to undo
the plug connection.
1
2
3
(1) - Fixing plate
(2) - Screws
(3) - Present pushbutton
1
3
4
2
(1) - Control panel
(2) - Control panel holder screws
(3) - Rear arm cover
(4) - Arm cover screws
1
3
4
2
(1) - Cable
(2) - Cable tie
(3) - Screw
(4) - Cable holder
Retrofit kit 0281 590114
版本 / Edition:
08/2012
修订索引
Rev. index: 00.0
页码:
Sheet: of 124
零件号 / Part No.:
0791 281702
版本 / Edition:
08/2012
Conversion instructions for the multi-function pushbutton
零件号 / Part No.:
0791 281702
修订索引
Rev. index: 00.0
页码:
Sheet: 5
Printed in Germany
Figure 11: Removing the present pushbutton
14. Disconnect the plug (1).
15. In a downward direction, remove the present pushbutton (3) together with the fixing plate (2).
3.2 Installing the multi-function pushbutton
Figure 12: Fitting the multi-function pushbutton
1. Guide the multi-function pushbutton with the two openings (3) over the needle bar and sewing
foot bar and position it against the machine from the bottom to the top.
Important: Guide the cable for the thread clamp (1) through the cable slot (2) in doing so.
1
3
2
(1) - Plug
1
(2) - Fixing plate
(3) - Present pushbutton
2
1
3
(2) - Cable slot
(3) - Openings on the multi-function pushbutton
Retrofit kit 0281 590114
of 12
(1) - Cable for the thread clamp
Conversion instructions for the multi-function pushbutton
Printed in Germany
Figure 13: Tightening the multi-function pushbutton
2. Screw down the multi-function pushbutton with the first screw in the lower screw hole (3) next
to the needle bar and sewing foot bar.
3. Screw down the multi-function pushbutton with the second screw in the upper screw hole (4)
on the machine arm.
4. Insert the plug (1) in the slot position (2) of the multi-function pushbutton.
Figure 14: Laying the cable
5. Lay the cable (1) in the machine arm such that moving parts will not be hampered.
6. Hold together the cable loops with cable tie (2).
7. Cut off the extending end of the cable tie (2).
Figure 15: Fitting the covers
8. Screw down the cable holder (2) using screw (1).
9. Screw down the rear arm cover (5) using screws (6).
10. Screw down the control panel (3) using screws (4).
(1) - Plug (2) - Slot position (4) - Upper screw hole
(3) - Lower screw hole
1
2
(1) - Cable
(2) - Cable tie
1
3
4
5
6
2
(1) - Screw
(2) - Cable holder
(3) - Control panel
(4) - Control panel holder screws
(5) - Rear arm cover
(6) - Arm cover screws
Retrofit kit 0281 590114
版本 / Edition:
08/2012
修订索引
Rev. index: 00.0
页码:
Sheet: of 126
零件号 / Part No.:
0791 281702
  • Page 1 1
  • Page 2 2
  • Page 3 3
  • Page 4 4
  • Page 5 5
  • Page 6 6
  • Page 7 7
  • Page 8 8
  • Page 9 9
  • Page 10 10
  • Page 11 11
  • Page 12 12

Duerkopp Adler 281 User manual

Category
Car kits
Type
User manual

Duerkopp Adler 281 is a multi-function pushbutton that can replace the existing pushbutton on your sewing machine, offering enhanced functionality and ease of use. It comes with a power adapter and all the necessary components for installation. The multi-function pushbutton features an intuitive interface with various buttons and a digital display, providing quick access to a range of sewing functions and settings. It allows you to easily select and adjust stitch patterns, change needle positions, and control other sewing operations.

Ask a question and I''ll find the answer in the document

Finding information in a document is now easier with AI