Page is loading ...

Betriebsanleitung
Operating instructions
Mode d’emploi
COOPER Crouse-Hinds GmbHCOOPER Crouse-Hinds GmbH
COOPER Crouse-Hinds GmbHCOOPER Crouse-Hinds GmbH
COOPER Crouse-Hinds GmbH
Neuer Weg - Nord 49
D 69412 Eberbach / Germany
Fone +49 (0) 6271/806 - 500
Fax +49 (0) 6271/806 - 476
Internet: http://www.CEAG.de
E-Mail: [email protected]
Betriebsanleitung
Explosionsgeschützter Handscheinwerfer
Operating instructions
Explosion protected portable searchlight
Mode d’emploi
Projecteur portatif pour
atmosphère explosive
SEB 8, SEB 8 L, SEB 8 ADRSEB 8, SEB 8 L, SEB 8 ADR
SEB 8, SEB 8 L, SEB 8 ADRSEB 8, SEB 8 L, SEB 8 ADR
SEB 8, SEB 8 L, SEB 8 ADR
SEB 8 DIN, SEB 8 L DINSEB 8 DIN, SEB 8 L DIN
SEB 8 DIN, SEB 8 L DINSEB 8 DIN, SEB 8 L DIN
SEB 8 DIN, SEB 8 L DIN
3 1147 000 165(E)

2 Cooper Crouse-Hinds GmbH
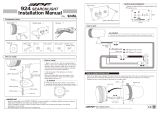
Montagebilder / Funktionsbilder / Maßbilder
Illustrations for mounting / Functional illustrations / Dimensional drawings
Illustrations du montage / lIlustrations du fonctionnement / Plans cotés
1
2
37
4
LED blinkt
Pulsing LED
LED clignotant
LED, LED
rot/red/rouge grün/green/verte
ca. 00 – 020%
ca. 21 – 040%
ca. 41 – 060%
ca. 61 – 080%
ca. 81 – 100%
Ladezustand
Charging level
Niveau de charge
3a
1
3b
(+)
2
4
(-)
5
3
6
87
1
ca. 100°
9
4
β
χ
ca. 100
ca. 112
ca. 119
ca. 109
ca. 325
ca. 146,5
2
Ladezustand/Charging level/Niveau de charge
Betriebsdauer/Operation duration/Autonomie
Hauptlampe/Main lamp/Phare
Nebenlampe/pilot lamp/Veilleuse
Nebenlampe/pilot lamp/Veilleuse
gelb/
yellow/
jaune

Cooper Crouse-Hinds GmbH 7
1. Safety instructions
For skilled electricians and trained
personnel in accordance with national
legislation, including the relevant
standards and, where applicable, in
acc. with EN/IEC 60079-17 on electrical
apparatus for explosive atmospheres.
U The portable searchlight must not be
used in zone 0/20 hazardous areas!
U The temperature class marked on the
portable searchlight is to be
observed!
U The portable searchlight may only be
opened or charged outside of "hazardous
areas”!
U Modifications to the lamp or changes
of its design are not permitted!
U The searchlight shall only be used for
its intended purpose and in perfect
condition!
U For replacing components, only genuine
Cooper Crouse-Hinds GmbH (CCH)/
CEAG spare parts may be used!
U Repairs that affect the explosion
protection, may only be carried out by
CCH/CEAG or a qualified “electrician”!
U Prior to initial operation, the portable
searchlight must be charged in
accordance with the instructions
included in section 6!
U Lamps fitted with NiCd accumulators
must not be stored without a recharge
for more than 6 months!
U Pull the mains plug prior to opening the
lamp (only SEB 8 L/ SEB 8 L DIN)!
Observe the national safety rules and
regulations for prevention of
accidents as well as the following
safety instructions which are marked
with an ( ) in these operating
instructions!
2. Conformity with standards
This explosion protected portable searchlight is
conform to the standards specified in the
EC-Declaration of conformity, DIN 14642 (fire brigade
standard; only SEB 8. DIN) , the EC directive
"Equipment and protective systems intended for use
in potentially explosive atmospheres" 94/9 EC and
“Electromagnetic compatibility” (2004/108/EEC) as
well as 72/245/EEC and 95/54/EC
EC-Type Approval Sign: e1*023025
It has been designed, manufactured and tested
according to the state of the art and to
EN ISO 9001:2000.
This portable searchlight is suitable for use in
zone 1, 21, 2 and 22 hazardous areas acc. to
IEC 60079-10.
3. Technical data
EC type sample test
certificate: BVS 08 ATEX E116
Category of application:
II 2 G Ex e ib IIC T4
II 2 D Ex tD A21 IP66 T85°C
Lamps to be fitted
SEB 8/SEB 8 L/SEB 8 ADR
Main lamp (halogen lamp
with double bulb): 5.5V/5.5W BA 15 d cap
Order No.: 1 2061 000 040
SEB 8 DIN/SEB 8 L DIN
Xenon-Lamp 4.8 V 4 W, BA 15 d cap
Order No.: 1 2061 001 400
Pilot lamp: 4.8V/1.5W, BA 9s cap
Order No.: 1 2041 000 450
Rated voltage for
charging 230 – 250 V ± 10%,
of the SEB 8 L lamp: 50/60Hz
(with integrated
charging connection)
Duration
Main lamp: apx. 5.5 h
Main beam flashlight: apx. 23 h
Pilot light: apx. 22 h
Battery
SEB 8/SEB 8 L/SEB 8 ADR: 4 NC- 4,8 V 7 AH (only
type 2 1147 701 000)
SEB 8 DIN/SEB 8 L DIN 4 NC- 4,8 V 5 AH (only
type 2 1147 512 000)
Indication of the charging
state and capacity: see fig. 3
Recharge period for
rated duration: up to 14 h, dependent
on the residual
capacity
Permissible
ambient temperatures:
in general: -20°C to +40°C
Specified data kept at
battery temperature: -5°C to +30°C
Storage in original
packing: -40°C to +60°C
Protection category to
EN 60529 (IEC 60529): IP 65
Insulation class to EN 60598 during
the charging process: II
with battery operation: III
Geometrical data of the lamp:
Dimensions (mm): see fig. 7
Weight: SEB 8 L apx. 2.5 kg
SEB 8/SEB ADR apx. 2.0 kg
SEB 8 DIN apx. 1,6 kg*
SEB 8 L DIN apx. 2,2 kg*
(* without accessoires)
4. Description and application
There are two versions of the explosion protected
portable searchlight available.
The SEB 8/SEB 8 ADR/SEB 8 DIN searchlight is
designed for charging in the LG 443 charger (Order
No.: 1 1540 000 443) or in the motor vehicle charger
90 (Order No.: 1 1145 000 792).
The SEB 8 L and SEB 8 L DIN seachlights contains an
additional charger unit inside of the lamphead and
can be charged useing the built-in line cord directly at
230 V supply.
The portable searchlight is composed of two
functional units:
1. Lamphead (fig. 1)
2. Battery container (fig. 2).
The lamphead is hinged to the battery container and
can therefore be swivelled.
A rotary switch (fig. 1, item 1) with 5 switch positions
is arranged below the carrying handle.
= service
⊗ = pilot light (bypass)
0 = OFF
⊗ = main beam
= flashing main beam
An LED indicating the charging state and capacity (fig.
1, item 2) is laterally arranged on the lamphead.
A swivelling pocket containing the slip-on filters is
locked in on the back of the lamphead (fig. 1, item 3/5).
By turning the pocket, the charging lead is accessible
(fig. 1, item 4).
Max. three slip-on filters (diffusing lenses) can be
kept in the pocket.
On the bezel ring there are located spring-loaded
cams (fig. 1, item 7) into which one slip-on filter can
be inserted (Mind: Insert from one side only).
By turning the bezel ring (apx. 2 turns), the light beam
can be adjusted from short to long range (fig. 1, item
6). The swivelling lamphead can be adjusted through
apx. 100° (fig. 1).
In order to increase the stability of the portable
searchlight, a slide provided on the bottom of the
battery container can be backwards pulled out (fig. 2,
item 1).
Safety functions of the portable searchlight:
The series SEB 8 portable searchlights feature some
functions that make their use simple and safe.
Check in case of a broken filament - main lamp:
Should the main lamp fail during operation or when
being switched on, there will be an automatic
changeover to the pilot lamp.
The selected function of the switch position (steady
light or flashing light) and the diode display are
maintained.
Check of the pilot lamp:
While switching on the main beam lamp, the
searchlight checks the pilot lamp’s state.
Should the latter be defective, the red LED will pulse
for some seconds (apx. 4 to 5 times).
Then the normal charge indication will appear.
If the pilot lamp is defective and the switch is in “pilot
light” position, the main beam lamp will be operated
with a lower current so as to obtain the luminous
intensity of the pilot lamp.
Deep discharge protection:
When the battery is nearly exhausted, there is an
automatic changeover to pilot light.
Should the battery’s discharge be continued, also the
pilot lamp will be switched off.
Thus the battery’s deep discharge will be prevented
and the battery be protected.
Mind! This mode will be a enabled in switch positions
"main beam" and "flashing main beam". In position
"pilot lamp" the deep discharge protection will be
disabled by the bypass mode (see bybass)
Bypass:
With the switch in “pilot light position, the electronics
will be bridged.
Due to this safety measure, the pilot lamp’s operation
will be ensured even in the event of a failure.
Attention!
In this mode of operation the lamp should not
be switched on unattended, since the deep
discharge protection in the interest of personal
protection “will not operate”.
Reset:
Should the electronics be affected by external
influences (e. g. extremely strong electromagnetic
radiation lying above the permissible EMC level), the
processor will automatically effect a reset.

8 Cooper Crouse-Hinds GmbH
5. Taking into operation
U Prior to ooperation, check ist correct functioning
and perfect condition in accordance with these
operating instructions and other applicable
regulations!
U The portable searchlight may be opened or
charged outside of hazardous areas only!
U Make sure that the mains plug is clean and dry!
U Initial use of charging:
Observe the operating instructions for the CCH/
CEAG charger that is used!
The type SEB 8 L/SEB 8 L DIN portable searchlight
can be charged either directly from the mains
(230 – 250 V ± 10 %, 50/60 Hz), or by means of the
LG 443 charger or the motor vehicle holder 90.
The type SEB 8 searchlight may only be charged in
the LG 443 charger or in the motor vehicle charger
90.
Mind:
For safety reasons, the battery is delivered
“uncharged”!
Prior to the initial use, the searchlight is to be
charged in “service” switch position in accordance
with para. 6., Maintenance/Servicing.
In order to obtain the whole useful battery capacity,
the battery will have to be submitted to at least 3
charging/discharging cycles.
For electrochemical reasons the battery’s charge
cannot be ensured at temperatures below -5°C.
At temperatures >30°C, a full charge of the battery
will not be possible for electrochemical reasons.
Recommendation:
Prior to charging, the battery should be preheated to
obtain room temperature (apx. 20°C). Should the LED
continue to pulse after the run down of 14 hours’
recharge period (fig. 4), the ambient temperature will
not permit a full charge of the battery. The charging
process will be continued as soon as the temperature
admits so.
Note:
Irrespective of whether the switch is in “main beam”
or “flashing main beam”position, the lighting function
is switched off during the charging process.
With the switch in “pilot lamp on” position, the pilot
lamp will light whereby the recharge period is
prolonged.
Should the mains supply be interrupted, either the
main beam or the flashlight will be switched on
(emergency light function in case of a mains failure).
The battery being fully charged, the right-hand LED
changes from pulsing light to steady light (fig. 5).
Should, after completion of the charging process at
room temperature, not all LED’s light up, that means
that the battery has aged or is defective and will
have to be replaced. (see Service safety function in
para. 6, Maintenance/Servicing).
Should the portable searchlight be stored in charging
position, the battery will automatically be recharged
with the energy used up by self-discharge.
The charging process will be completed when all
LED’s light steadily. Should none of the LED’s light
when a discharged battery is being recharged, the
charger will have to be checked (e. g. by means of
another portable searchlight).
6. Maintenance/Servicing
As far as the maintenance, servicing and
test of electrical apparatus for explosive
atmospheres are concerned, the respective
national regulations in conjunction with the relevant
standards will be applicable (EN 60079-17)!
Mind:
Because of the self-discharge of NiCd batteries, the
indication of the battery capacity should be checked
after 4 to 6 weeks and recharged to secure the
funktion of the capacity indication.
“Service” safety function:
The service function serves for recording the battery
state and balancing the battery state’s display by the
electronics.
This process takes apx. 36 hours. In case full
capacity at any time is required, we recommend to
perform this service test at 6 months' intervals. The
test should be carried out at about 15°C to 25°C in
order to ensure an accurate calibration of the display.
The display of the battery’s charging state (LED’s) can
extinguish.
The desired function of the searchlight is
reestablished by turning the switch to 0 “Off” and
then back to the desired function.
Now the light emitting diodes again indicate the
current charging state.
Note: By means of the bypass function, a long-time
failure can be bridged.
Check of the charging state (service):
Check of the charging function means that the
battery is charged/discharged and charged.
Thereat the electronics will establish the actual
battery’s state affected by ageing.
This function ensures an optimum charge of the
battery, while the indication of the charging state is
calibrated (see safety function “Service” in para. 6,
Maintenance/Servicing).
Special Features of the SEB 8 ADR
EC Type Approval pursuant to Directive 94/55/EC
(Directive on the approximation of the laws of the
Member States with regard to the transport of
dangerous goods by road)
This lamp version with the warning lamp according
to the Road Traffic Licensing Regulations is supplied
with a special orange slip-on filters on the rear
mount.
Removing the orange slip-on filter from the mount
To do this, swivel the supporting foot of the slip-on
filter towards the handle and then pull it out and up
(Fig. 1)
Use as warning lamp with flashing functionUse as warning lamp with flashing function
Use as warning lamp with flashing functionUse as warning lamp with flashing function
Use as warning lamp with flashing function
To use the filter on the lamp-head, turn the threaded
focusing ring so that the marking groove is under
the handle (Fig. 2 “top”).
Then, the slip-on filter can be inserted in the filter
mount from below (Fig. 2) when the lamp-head is
pivoted. The supporting foot of the slip-on filter
must then completely cover the sleeve of the lower
fixing screw.
Now the switching functions have been changed by
the two integrated magnets:
When the lamp-head has been pivoted, all switching
functions are decommissioned. When the lamp-
head is put in a horizontal position (light exit parallel
to the road surface), the flashing function is
automatically switched on. It is not possible to
switch this setting off.
To switch off, the lamp-head must be pivoted again
or the filter must be removed.
Inserting the slip-on filter in the rear filter
compartment
The slip-on filter inserted in the filter compartment
engages in the left-hand or right-hand stop of the
mount. It must therefore be used as the first filter,
other slip-on filters must be inserted behind it -
viewed from the lamp-head.
Mounting the belt hook (only SEB 8 DIN/SEB 8 L DIN)
The enclosed belt hook (Fig. 4) is to be fixed to the
lamp handle using 4 fixing screws (self-cutting)
including the washers (Fig. 4 A-B)
The information signs with the permitted lamps are
visible after the threaded ring has been unscrewed.
The information sign with the permitted battery
types is visible after the battery housing has been
opened.
fig 1 remove slip-on filter
fig. 2 insert filter
top
top
Bild 3 lamp is flashing
cover screw
A
B
B
fig. 4 mounting the belt hook

Cooper Crouse-Hinds GmbH 9
Performance of the service:
1.Put the searchlight on charge.
2.Turn the rotary switch to “service” position.
Automatic run of the following processes:
3.The searchlight’s battery will be charged.
The display of the charging state (LED’s) shows a
travelling light from left to right.
4.Charging being completed, the searchlight will
undergo a controlled discharge via the main beam
lamp. The display of the charging state (LED’s)
shows a travelling light from right to left.
5.The battery state will be memorized.
6.The battery will again be recharged.
Thereat, the display of the charging state (LED’s)
(fig. 3) indicates a normal charging process.
Note:
The more often a service is performed, the lower the
deviation of the charging state’s display will be.
Attention:
Should the service run be interrupted, e. g. because
of: a defective main bulb, a mains failure, changing
the rotary switch position (display: green LED’s will
light, red LED will pulse), eliminate the fault (e. g.
replace main bulb) and re-initiate the service run.
Lamp replacement:
Lamp replacement may only be performed in a “non-
hazardous area”!
The sign lables with permissible lamps will be visable
after removing the brezel ring
1.Switch off the searchlight and disconnect the plug
from the mains supply.
2.Unscrew the hexagon socket head screw (fig. 1,
item 7) on the lamphead.
3.Then remove the bezel ring by turning it left (fig. 1,
item 8).
4.Lift the bulb out of the bayonet holder (main beam
lamp: press - turn left - pull) (fig.1, item 9) (pilot
lamp: press - turn right - pull) (fig.1, item 9).
5.Fit in the new bulb and close the lamphead in
inverse order.
Note:
For focussing the main bulb, there are 3 lock-in
positions provided in the holder.
Mind:
Take care that the gasket is clean and undamaged.
Check the firm fit of the hexagon socket head screw.
Battery replacement:
Battery replacement may only be performed in
a “non-hazardous area”!
The sign lable with permissible batteries will be
visable after opening the battery container
1. Switch off the searchlight and disconnect the
plug from the mains supply.
2. The slide on the bottom of the battery container
is pushed back so that the hexagon socket in
the drill hole of the slide becomes visible (fig. 2,
item
3. Using the screw driver joined, unscrew the
hexagon socket head screw and pull off the
battery container.
Attention:
Avoid short-circuiting!
4. Detach the blue (-) and the yellow (+) battery
lead (fig.2, item 3a/b) as well as the plug
connection (fig. 2, item 4) and remove the
battery set.
5. Fit in the new battery set and connect the
leads, observing the polarity. Blue (-) (fig. 2,
item 3a) and yellow (+) battery lead (fig. 2, item
3b).
Caution: Do not squeeze leads!
6. Close the searchlight in inverse order.
Mind: Check the tight fit of the hexagon socket
head screw.
7. Perform a service run as described in para. 6.
Note:
Observe the national regulations on waste disposal.

10 Cooper Crouse-Hinds GmbH
Switch Main beam Flashg. Pilot light LED display Cause Measure
position on main beam on
Pilot lamp
⊗⊗
⊗⊗
⊗ dimmed pulsing red Defect. Replace pilot
pilot lp. lamp
Pilot lamp
⊗⊗
⊗⊗
⊗ none Function ok None
Main lamp
⊗⊗
⊗⊗
⊗ Acc. to batt. Defect. Replace
capacity main lamp main lamp
Main lamp
⊗⊗
⊗⊗
⊗ Acc. to batt. Function ok None
capacity
Main lamp
⊗⊗
⊗⊗
⊗ only red LED Deep discharge Recharge
or none protection active
function ok
Flashing
⊗⊗
⊗⊗
⊗ flashing Acc. to batt. Function ok None
mean beam capacity
Flashing
⊗⊗
⊗⊗
⊗ flashing Acc. to batt. Defect. Replace
main beam capacity main lamp main lamp
7. Operation and fault analysis
Operation
Charging
OFF Acc. to batt. Charging None
cap. or leading completed
LED pulsing
OFF
⊗⊗
⊗⊗
⊗
⊗⊗
⊗⊗
⊗
⊗⊗
⊗⊗
⊗ None Defective Searchlight
electronics to be passed
for repair
Main lamp Acc. to batt. Function ok None
capacity or
pulsing LED
Flashing Acc. to batt. Function ok None
main lamp capacity or
pulsing LED
Pilot lamp
⊗⊗
⊗⊗
⊗ Acc. to batt. Recharge None or switch
capacity or period extended to OFF pos.
pulsing LED to 28 hours
Subject to alteration or supplement of the product series.

Cooper Crouse-Hinds GmbH 15
Notizen
Notes
Remarques
/