
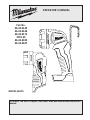
OPERATOR'S MANUAL
WORKLIGHTS
Cat. No.
49-24-0145
49-24-0146
49-24-0171
2735-20
49-24-0185
49-24-0187
TO REDUCE THE RISK OF INJURY, USER MUST READ AND UNDERSTAND OPERATOR'S
MANUAL.

2
• Read and understand all the instructions before
using the appliance.
• To reduce the risk of injury, close supervision is
necessary when an appliance is used near children.
• Warning - The lens gets very hot during use. To
reduce the risk of burns, do not touch hot lens.
• Never insert bulbs other than MILWAUKEE
bulbs in the bulb socket. Bulbs other than
MILWAUKEE bulbs may cause short circuit of
battery and personal injury.
• Store idle work light out of reach of children.
Warm work lights can become hazardous in the
hands of children.
• Do not use outdoors.
• For a rechargeable appliance - Use only the char-
ger supplied by the manufacturer to recharge.
• For an appliance with a replaceable lamp - always
unplug or remove battery pack before replacing the
lamp. See "Specications" for replacement bulbs.
• Know your work light. Read this manual carefully
to learn your work light's applications and limitations
IMPORTANT SAFETY INSTRUCTIONS
as well as potential hazards associated with this
type of tool.
• Batteries must be recharged only with the char-
ger specied by the manufacturer. A charger that
may be suitable for one type of battery may create
a risk of re when used with another battery.
• Use work light only with specically designated
battery pack. Use of any other batteries may create
a risk of re.
• When battery pack is not in use, keep it away
from metal objects like: paper clips, coins, keys,
nails, screws, or other small metal objects that
can make a connection from one terminal to
another. Shorting the battery terminals together may
cause sparks, burns, or a re.
• Maintain labels and nameplates. These carry
important information. If unreadable or missing,
contact a MILWAUKEE service facility for a free
replacement.
Before using the work light, read this operator's manual, your battery pack and charger operator's manual,
and all labels on the battery pack, charger and work light.
SAVE THESE
INSTRUCTIONS
SPECIFICATIONS
WARNING READ AND UNDERSTAND ALL INSTRUCTIONS. When using
electric appliances, basic precautions should always be followed, including the following:
SYMBOLOGY
1
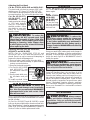
FUNCTIONAL DESCRIPTION
1. Bezel
assembly
2. On/Off
button
3. Magnet
4. Hook
5. Pivot head
2
4
3
5
5
2
Cat. No. Volts DC Replacement Bulbs For use with Battery Packs:
49-24-0185 28 49-81-0040 48-11-2830 28 V Li-Ion or equivalent
49-24-0187 28 n/a * 48-11-2830 28 V Li-Ion or equivalent
49-24-0171 18 49-81-0030 Use only MILWAUKEE M18™ Li-Ion battery packs.
2735-20 18 n/a * Use only MILWAUKEE M18™ Li-Ion battery packs.
49-24-0145 12 49-81-0020 Use only MILWAUKEE M12™ Li-Ion battery packs.
49-24-0146 12 n/a * Use only MILWAUKEE M12™ Li-Ion battery packs.
ASSEMBLY
Inserting/Removing Battery Pack
Insert the battery pack by sliding battery pack into
the body of the tool. Insert the battery pack until
the battery latches lock.
To remove the battery pack, press in both battery
latches and slide the battery pack off of the tool.
WARNING To reduce the
risk of injury, do not look directly into the light
when the work light is on.
WARNING Recharge only
with the charger specied for the battery.
For specic charging instructions, read the
operator’s manual supplied with your charger
and battery.
*LED worklights do not require replacement parts.
Volts
Direct Current
Underwriters Laboratories, Inc.
United States and Canada
Underwriters Laboratories, Inc.

3
Adjusting the Pivot Head
Cat. No. 2735-20, 49-24-0145 and 49-24-0146 -
The pivot head can pivot to a range of 90°; with
detents every 15° (every 10° for the 2735-20).
Pivot head to desired position. Allow the detent
to snap into place. Do not forcibly pivot the head.
Cat. No. 49-24-0171,
49-24-0187, and
49-24-0185 - The pivot
head can pivot to a range
of 135°; with detents
every 10°. Pivot head to
desired position. Allow
the detent to snap into
place. Do not forcibly
pivot the head.
WARNING To reduce the
risk of injury and damage, never insert bulbs
other than the recommended MILWAUKEE
replacement bulb in the bulb socket. Other
bulbs will over heat!
WARNING To reduce the
risk of injury, DO NOT operate work light
without bezel assembly in place. Bulb does
get hot. Always remove battery pack before
changing or removing bulbs. Always allow
the work light to cool for at least 10 minutes
before replacing the bulb.
OPERATION
To turn on the work light, press the ON/OFF but-
ton. To turn off the work light, press the ON/OFF
button again.
Hook
Cat.No. 2735-20,
49-24-0185,
49-24-0187 and
49-24-0171)
To use the hang-
ing hook, press in
the hook joint. Pull
the hook out.
Replacing the Bulb (Cat. No. 49-24-0145,
49-24-0171, and 49-24-0185)
NOTE: Cat. No. 49-24-0146, 2735-20, and
49-24-0187 use an LED bulb that cannot be re-
placed. Bezel can not be removed. Attempting to
remove the bezel will damage tool.
1. Remove battery pack before changing bulb.
2. Unscrew the bezel assembly on pivot head by
turning counterclockwise.
3. Remove the bezel assembly.
4. For Cat. No. 49-24-0185
and 49-24-0171, pull
the aluminum heat sink
forward.
5. Gently rotate bulb coun-
ter clockwise and pull
out.
To install new bulb, follow
above directions in reverse.
Cleaning
Keep tool handles clean, dry and free of oil or
grease. Use only mild soap and a damp cloth to
clean the tool, battery pack and charger since cer-
tain cleaning agents and solvents are harmful to
plastics and other insulated parts. Some of these
include gasoline, turpentine, lacquer thinner, paint
thinner, chlorinated cleaning solvents, ammonia
and household detergents containing ammonia.
Never use flammable or combustible solvents
around tools.
Maintain Work Light
Keep your work light, battery pack and charger in
good repair by adopting a regular maintenance
program. If the work light does not work properly,
return the work light to a MILWAUKEE service
facility for repairs.
MAINTENANCE
WARNING To reduce the
risk of injury, always unplug the charger and
remove the battery pack from the charger
or tool before performing any maintenance.
Never disassemble the tool, battery pack or
charger. Contact a MILWAUKEE service facility
for ALL repairs.
WARNING To reduce the risk
of personal injury and damage, never immerse
your tool, battery pack or charger in liquid or
allow a liquid to ow inside them.
ACCESSORIES
WARNING Always remove
battery pack before changing or removing
accessories. Only use accessories speci-
cally recommended for this tool. Others may
be hazardous.
Pull
out
Press
Bulb
Aluminum
heat sink
Pull
forward
Cat. No.
49-24-0185,
49-24-0171
NOTE: Use a soft cloth when installing bulbs. Direct
contact with oils or other contamination can shorten
the life of bulbs.
On Cat. No. 49-24-0171 and 49-24-0185, a spare
bulb can be stored behind the aluminum heat sink.
See “Specications” chart for proper replacement
bulbs. See your nearest MILWAUKEE Retailer or
Service Center to obtain replacement bulbs.

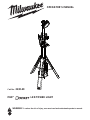
Cat. No. 2130-20
M18™
LED TOWER LIGHT
OPERATOR'S MANUAL
WARNING To reduce the risk of injury, user must
read and understand operator's manual.

IMPORTANT SAFETY
INSTRUCTIONS
WARNING Read and understand all
instructions. When using electric appliances, basic
precautions should always be followed, including
the following:
• Before using, read this operator’s manual, your
battery pack and charger operator’s manual, and
all labels on the battery pack, charger and light.
Learn your light’s applications and limitations as well
as potential hazards associated with this type of tool.
• Read and understand all the instructions before
using the appliance.
• To reduce the risk of injury, close supervision is
necessary when an appliance is used near children.
• Warning - The lens may get hot during use. To reduce
the risk of burns, do not touch hot lens.
• Store idle light out of reach of children. Warm lights
can become hazardous in the hands of children.
• Suitable for rain and wet locations. Store indoors.
• Batteries must be recharged only with the charger
specied by the manufacturer. A charger that may be
suitable for one type of battery may create a risk of re
when used with another battery.
• Use light only with specically designated battery
pack. Use of any other batteries may create a risk of re.
• When battery pack is not in use, keep it away from
metal objects like: paper clips, coins, keys, nails,
screws, or other small metal objects that can make
a connection from one terminal to another. Shorting
the battery terminals together may cause sparks, burns,
or a re.
• Maintain labels and nameplates. These carry impor-
tant information. If unreadable or missing, contact a
MILWAUKEE service facility for a free replacement.
SAVE THESE
INSTRUCTIONS
SYMBOLOGY
Volts
Direct Current
C
US
UL Listing for Canada and U.S.
1. 2.
Always extend legs before raising the
poles.
Keep hands clear of housing when
collapsing the extension poles.
Read operator’s manual.
SPECIFICATIONS
Cat. No. .................................................... 2130-20
Volts .............................................................18 DC
Use only MILWAUKEE M18™ Li-Ion battery packs
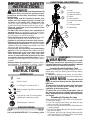
FUNCTIONAL DESCRIPTION
1
3
4
2
6
8
9
5
7
1. Head
2. Extension poles
3. Extension latches
4. Switch
5. Upper handle
6. Leg release button
7. Legs
8. Carrying handle
9. Battery bay
ASSEMBLY
WARNING Recharge only with
the charger specied for the battery. For specic
charging instructions, read the operator’s manual
supplied with your charger and battery.
Inserting/Removing Battery Pack
Insert the battery pack by sliding battery pack into the
battery bay. Insert the battery pack until the battery
latches lock.
To remove the battery pack, press in both battery
latches and slide the battery pack out of the battery bay.
WARNING To reduce the risk of
injury, do not look directly into the light when the
light is on.
To reduce the risk of injury, always fully extend and
lock legs into position before raising the poles.
Light may tip and cause injury.
To reduce the risk of injury, keep hands clear of
the housing area when collapsing the extension
poles. Head may descend rapidly, pinching hands
and ngers.
Extending/Collapsing the Legs
Always extend and lock legs before raising the poles.
1. Stand light upright.
2. Press the Leg Release Button and slide the legs
down using the Carrying Handle.
3. Lift up on the Upper Handle while sliding down the
Carrying Handle.
4. Lift until the Battery Bay lifts off the oor and the
legs lock into place.
5. To collapse, press the Leg Release Button and slide
in the legs using the Carrying Handle. Keep hands
clear of the legs as they collapse.

Extending/Collapsing the Extension Poles
Extend or collapse the two poles to set the light at the
desired height.
1. Extend and lock the legs.
2. Open the top extension latch and raise the head out
of the housing. Extend the pole to the desired height.
3. Fully close top extension latch.
4. If more height is needed, fully extend rst pole and
close latch before opening bottom latch.
5. Continue to raise the head to the desired height.
6. Fully close bottom extension latch.
7. Rotate the head to the desired angle.
OPERATION
Use the switch to cycle through High, Medium, Low,
and OFF. Press and hold to turn OFF from any setting.
MAINTENANCE
WARNING To reduce the risk
of injury, always unplug the charger and remove
the battery pack from the charger or tool before
performing any maintenance. Never disassemble
the tool, battery pack or charger. Contact a
MILWAUKEE service facility for ALL repairs.
Maintaining Light
Keep your light, battery pack and charger in good
repair by adopting a regular maintenance program. If
the light does not work properly, return the light to a
MILWAUKEE service facility for repairs.
Tightening
To increase the holding
Hand-tighten
Screws
force of the poles, tight-
en the extension latch-
es. Open the latches
and hand-tighten the
screw inside. Do not
over tighten, it will dam-
age the latches. Never
use power tools.
WARNING To reduce the risk of
personal injury and damage, never immerse your
tool, battery pack or charger in liquid or allow a
liquid to ow inside them.
Cleaning
Keep tool handles clean, dry and free of oil or grease.
Use only mild soap and a damp cloth to clean the tool,
battery pack and charger since certain cleaning agents
and solvents are harmful to plastics and other insulated
parts. Some of these include gasoline, turpentine,
lacquer thinner, paint thinner, chlorinated cleaning
solvents, ammonia and household detergents contain
-
ing ammonia. Never use ammable or combustible
solv
ents around tools.
When it comes to quality work lights, Milwaukee is the brand you can depend on.
-
 1
1
-
 2
2
-
 3
3
-
 4
4
-
 5
5
-
 6
6


Milwaukee 49-24-0185 User manual
- Type
- User manual
- This manual is also suitable for
Ask a question and I''ll find the answer in the document
Finding information in a document is now easier with AI
Related papers
-
Milwaukee 49-24-0187 User manual
-
-
-
Milwaukee 2130-20 User manual
-
-
-
Milwaukee M18 DFC User manual
-
-
Milwaukee 48-11-2402 User manual
-