Gigabyte GV-NX65128D User manual
- Category
- Graphics cards
- Type
- User manual
This manual is also suitable for
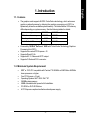
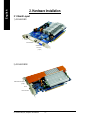
Gigabyte GV-NX65128D, a powerful graphics accelerator powered by NVIDIA GeForce 6500 with TurboCache Technology GPU, offers enhanced graphics performance by dynamically sharing the available system memory. Supporting the latest PCI Express x16 interface and DirectX 9.0c, it features AV/S-Video and HDTV outputs, D-Sub and DVI-I connectors, delivering versatile connectivity options for a variety of displays.
Gigabyte GV-NX65128D, a powerful graphics accelerator powered by NVIDIA GeForce 6500 with TurboCache Technology GPU, offers enhanced graphics performance by dynamically sharing the available system memory. Supporting the latest PCI Express x16 interface and DirectX 9.0c, it features AV/S-Video and HDTV outputs, D-Sub and DVI-I connectors, delivering versatile connectivity options for a variety of displays.


-
 1
1
-
 2
2
-
 3
3
-
 4
4
-
 5
5
-
 6
6
-
 7
7
-
 8
8
-
 9
9
-
 10
10
-
 11
11
-
 12
12
-
 13
13
-
 14
14
-
 15
15
-
 16
16
-
 17
17
-
 18
18
-
 19
19
-
 20
20
-
 21
21
-
 22
22
-
 23
23
-
 24
24
-
 25
25
-
 26
26
-
 27
27
-
 28
28
-
 29
29
-
 30
30
-
 31
31
-
 32
32
-
 33
33
-
 34
34


Gigabyte GV-NX65128D User manual
- Category
- Graphics cards
- Type
- User manual
- This manual is also suitable for
Gigabyte GV-NX65128D, a powerful graphics accelerator powered by NVIDIA GeForce 6500 with TurboCache Technology GPU, offers enhanced graphics performance by dynamically sharing the available system memory. Supporting the latest PCI Express x16 interface and DirectX 9.0c, it features AV/S-Video and HDTV outputs, D-Sub and DVI-I connectors, delivering versatile connectivity options for a variety of displays.
Ask a question and I''ll find the answer in the document
Finding information in a document is now easier with AI
Related papers
-
Gigabyte GV-N68T256DH-N Owner's manual
-
-
-
-
Gigabyte GV-NX66128DP-SI Owner's manual
-
Gigabyte GV-N595U-GT User manual
-
Gigabyte GV-N56X128D-P User manual
-
-
-
Gigabyte GV-N57128D User manual