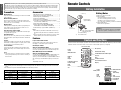
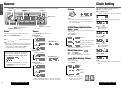
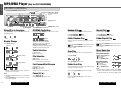
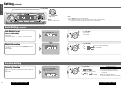
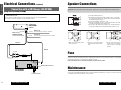
Panasonic CQC3100W is a car audio system that offers a wide range of features to enhance your driving experience. With its large-sized volume control, you can easily adjust the volume to your desired level. The system also features a CD player that supports playback of MP3 and WMA files. Additionally, you can connect an optional CD changer to expand your music options. The CQC3100W also includes a radio tuner with presets for your favorite stations, as well as a remote control for convenient operation.
Panasonic CQC3100W is a car audio system that offers a wide range of features to enhance your driving experience. With its large-sized volume control, you can easily adjust the volume to your desired level. The system also features a CD player that supports playback of MP3 and WMA files. Additionally, you can connect an optional CD changer to expand your music options. The CQC3100W also includes a radio tuner with presets for your favorite stations, as well as a remote control for convenient operation.


-
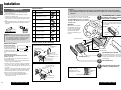
 1
1
-
 2
2
-
 3
3
-
 4
4
-
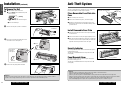
 5
5
-
 6
6
-
 7
7
-
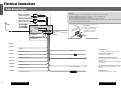
 8
8
-
 9
9
-
 10
10
-
 11
11
-
 12
12
-
 13
13
-
 14
14
-
 15
15
-
 16
16


Panasonic CQC3100W Operating instructions
- Category
- CD players
- Type
- Operating instructions
Panasonic CQC3100W is a car audio system that offers a wide range of features to enhance your driving experience. With its large-sized volume control, you can easily adjust the volume to your desired level. The system also features a CD player that supports playback of MP3 and WMA files. Additionally, you can connect an optional CD changer to expand your music options. The CQC3100W also includes a radio tuner with presets for your favorite stations, as well as a remote control for convenient operation.
Ask a question and I''ll find the answer in the document
Finding information in a document is now easier with AI
Related papers
-
Panasonic CQDP383W Operating instructions
-
-
-
-
-
-
-
-
-