Page is loading ...

FR-NL
SCD710/SCD711
SCD713/SCD715


English
1 2 3 4
98765
10
1
6
English

Introduction
Go to www.philips.com/welcome to register your product and to read the
detailed user manual.
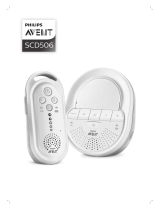
Display of the parent unit (Fig. 1)
1 Signal strength indicator
2 Eco Max indicator
3 Mute symbol
4 Battery status indicator
5 Microphone sensitivity indicator
6 Lullaby symbol
7 Nightlight symbol
8 Timer symbol
9 Temperature symbol
10 Navigation arrow
Preparing for use
IMPORTANT: Read the safety instructions carefully before you use the
baby monitor and keep them for future reference.
Baby unit
We advise you to use the baby unit connected to the mains. To guarantee
automatic power backup in case of mains failure, you can insert four 1.5V AA
alkaline batteries (not included).
Do not use rechargeable batteries. The baby unit does not have a charging
function and rechargeable batteries discharge slowly when they are not in
use.
Parent unit
The parent unit runs on two rechargeable batteries that are supplied with
the baby monitor. Charge the parent unit before you use it for the first time
and when the batteries are low.
Please note that for the SCD710/SCD711/SCD713, you have to charge the
parent unit for the full 10 hours to have a cordless operating time of 18
hours. (For the SCD715: the charging time is 14 hours and the operating
time is 25 hours.
Note: When you start using the baby monitor, it takes 4 charge and
discharge cycles before the rechargeable batteries reach their full capacity.
7
English

Using the baby monitor
Positioning the baby monitor
Keep the baby unit out of the reach of the baby. Never place the
baby unit inside the baby’s bed or playpen.
-
Because the cord of the baby unit presents a potential strangulation
hazard, make sure that the baby unit and its cord are at least 1 metre/3.5
feet away from your baby.
-
To prevent a high-pitched sound from one or both units, make sure that
the parent unit is at least 1 metre/3.5 feet away from the baby unit.
Linking parent unit and baby unit
1 Press and hold the button on the baby unit for 2 seconds until the
power-on light goes on.
2 Press and hold the button on the parent unit for 2 seconds until the
display lights up. The 'link' light on the parent unit starts flashing red and
the message 'LINKING' appears on the display.
When the parent unit and baby unit are linked, the 'link' light turns solid
green. The signal strength indicator and the message 'LINKED' appear on
the display.
If no connection is established, the message 'NOT LINKED' is displayed
and the parent unit starts and the parent unit starts to beep.
What to do if no link is established
-
If the parent unit is out of range, place it closer to the baby unit, but not
closer than 1 metre/3.5 feet.
-
If the baby or parent unit is too close, <2m/6.5 ft away from another
DECT appliance (e.g. a cordless phone), switch off this appliance or move
the unit away from this appliance.
-
If the baby unit is switched off, switch it on.
Operating range
-
The operating range is 330 metres/1000 feet outdoors and up to 50
metres/150 feet indoors.
-
The operating range of the baby monitor varies depending on the
surroundings and factors that cause interference. Wet and moist
materials cause so much interference that the range loss is up to 100%.
For interference from dry materials, see the table below.
Dry materials Material thickness Loss of range
Wood, plaster, cardboard,
glass (without metal, wires
or lead)
< 30cm (12in) 0-10%
Brick, plywood < 30cm (12in) 5-35%
Reinforced concrete < 30cm (12in) 30-100%
8
English

Dry materials Material thickness Loss of range
Metal grilles or bars < 1cm (0.4in) 90-100%
Metal or aluminium sheets < 1cm (0.4in) 100%
Functions and feedback on the baby unit
Nightlight
The nightlight produces a soft glow that comforts your baby.
1 Press the button on the baby unit to switch the nightlight on or off.
Lullaby function
1 Press the button on the baby unit to play the last selected lullaby. The
selected lullaby repeats for 15 minutes.
2 Press the button to select another lullaby from the list.
3 To adjust the sound level of the lullaby, press the volume + or the volume
– button the baby unit.
Note: You can only set the loudspeaker volume on the baby unit when a
lullaby is playing. If you set the volume for the lullaby higher, the sound
will also be louder when you use the talk function on the parent unit.
4 To stop lullaby playing, press the button on the baby unit.
Paging the parent unit
If you have lost the parent unit, you can use the FIND button on the baby
unit to locate the parent unit. This function only works when the parent unit
is switched on and within range.
9
English

1 Press FIND on the baby unit. The parent unit produces a paging alert
tone.
2 To stop the paging alert tone, press FIND on the baby unit again or press
any button on the parent unit. The paging alert tone stops automatically
after 2 minutes.
Battery status light
1 The battery status light is solid green when the baby unit is operating on
battery power and the batteries contain enough energy.
2 The battery status light flashes red quickly when the batteries run low
while the baby unit is operating on battery power. Replace the batteries
when they run low.
Functions and feedback on the parent unit
Volume
The volume can be set if the menu is not active. There are seven volume
levels and a 'volume off' setting.
Setting the volume level
1 Press the + button or the - button once.
The current volume level appears on the display.
2 Press the + button to increase the volume or press the - button to
decrease the volume.
If no button is pressed for more than 2 seconds, the volume level
indication disappears from the display and the volume setting is saved.
Volume off
Below the lowest volume setting, there is a 'volume off' setting.
1 Press the + button or the - button once.
The current volume level appears on the display.
2 Press and hold the - button for more than 2 seconds to set the volume to
off.
The message 'MUTE' and the mute symbol appear on the display. Only
the sound level lights show that the baby produces sounds.
10
English

Talk function
1 If you want to comfort your baby, press TALK on the parent unit and talk
clearly into the microphone on the front from a distance of 15-30cm
(0.5-1ft).
The 'link' light starts flashing green and 'TALK' appears on the display.
Note: If you have set the volume of the lullaby higher on the baby unit,
the sound will also be louder when you use the talk function on the
parent unit.
2 Release TALK when you have finished talking.
Battery status indications
Battery low
When the rechargeable batteries are low, 'BATTERY LOW' appears on the
display, the status indicator is empty and flashes, and the parent unit beeps.
The remaining operating time is at least 30 minutes.
Battery empty
1 If the rechargeable batteries are almost empty, the battery status light
flashes red quickly.
2 If you do not connect the parent unit to the mains, it switches off.
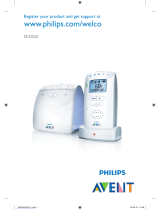
Menu of the parent unit
Navigating the menu
Note: Some menu functions only work when the baby unit and the parent
unit are linked.
1 Press the MENU button to open the menu and to make the first menu
option appear.
11
English

2 Use the + button to go to the next option or the - button to go to the
previous option. The arrow on the display indicates in which direction
you can navigate.
3 Press OK to confirm your selection.
Note: Press the MENU button if you want to leave the menu without making
any changes. If there is no input in the menu for more than 20 seconds, the
menu closes automatically.
Sensitivity
This option in the parent unit menu allows you to set the microphone
sensitivity of the baby unit.
The microphone sensitivity determines what noise level the baby unit picks
up, e.g. you will want to hear when your baby cries, but you may be less
interested in its babbling.
1 Select ‘Sensitivity’ in the menu with the + and - buttons and press OK to
confirm.
2 Use the + and - buttons to increase or decrease the microphone
sensitivity. The number of filled segments shows the sensitivity level
selected. Press OK to confirm the setting.
Sensitivity levels and indications
Icon Sensitivity Description
highest Hear everything from your baby.
The speaker of the parent unit is
continuously on.
high Hear all sounds from soft
babbling and louder. If your
baby does not make any sound,
the speaker of the parent unit is
off.
medium Hear sounds from soft cries and
louder. If your baby makes softer
sounds, the speaker of the
parent unit does not go on.
12
English

low The speaker of the parent unit
only goes on if the baby makes
loud sounds, for instance
because it is crying.
Eco Max mode
Smart Eco is a standard feature on this baby monitor. It automatically
reduces the DECT signal from the baby unit to save energy. To save even
more energy, activate the Eco Max mode. In this mode, the DECT signal of
the baby unit is switched off as long as the baby does not make a sound.
Caution: In Eco Max mode, the parent unit receives feedback from the
baby unit with a delay. When your baby makes a sound, the baby unit first
has to reactivate radio transmission before it can send feedback to the
parent unit.
Please note the following:
-
In Eco Max mode you do not receive feedback when the parent unit is
out of range of the baby unit. You can check the link by pressing any
button on the parent unit.
-
The Eco Max mode cannot be activated if the microphone sensitivity is
set to the highest level.
Activating Eco Max mode
1 Select 'Eco Max' in the menu with the + and - buttons and press OK to
confirm.
2 When the display shows 'Turn On', press OK to switch on the Eco Max
mode.
3 The warning message 'No alert if out of range, OK' appears on the
display. Press OK to confirm.
Note: The warning message scrolls across the display twice. If you do not
press OK, the parent unit leaves the menu and the Eco Max mode
remains off.
4 The Eco Max indication flashes on the display. The 'link' light flashes
green slowly when the baby unit does not transmit any signals to the
parent unit.
5 When the parent unit receives a signal from the baby unit because radio
transmission has been reactivated, the 'link' light turns solid green.
Deactivating Eco Max mode
1 Press the MENU button.
2 Use the + and - buttons to select ‘Eco Max’ and press OK to confirm.
3 When the display shows ‘Turn Off’, press OK to confirm.
Nightlight
1 To switch the nightlight on the baby unit on, select 'Nightlight' in the
menu with the + and - buttons and press OK to confirm.
2 Press OK to choose 'Turn On'. The nightlight symbol appears on the
display.
13
English

3 When the nightlight is on and you want to switch it off, select 'Nightlight'
in the menu and press OK to choose 'Turn Off'. The nightlight symbol
disappears from the display.
Lullaby
1 To play one or more lullabies on the baby unit, select 'Lullaby' in the
menu with the + and - buttons. Press OK to confirm.
2 Press OK again to play the first lullaby. Use the + and - buttons to select
one of the lullabies or 'Play all'.
The display shows the lullaby symbol and the number of the lullaby that
is playing. The selected lullaby repeats continuously for 15 minutes,
unless you select 'stop' in the menu.
If you select 'Play all', all pre-stored lullabies are played for 15 minutes.
The display shows the number of the lullaby that is playing.
3 To stop playing, select 'Stop' in the menu and press OK to confirm.
Feed timer
You can set the feed timer to alert you that it is time to feed your baby. The
timer can be set from 1 minute to 23 hours and 59 minutes.
1 To open the feed timer submenu, select 'Feed Timer' in the menu. Press
OK to confirm.
2 Select 'Set Timer' in the feed timer submenu. Press OK to start setting the
timer.
3 Set the hour and the minutes and press OK to confirm.
4 To start the feed timer, select 'xx:xx Start' in the feed timer submenu.
Press OK to confirm. The timer symbol appears on the display and the
timer starts counting down.
5 When the timer has reached 00:00, the feed timer alert goes off, the
timer symbol starts flashing on the display and the message 'TIMER END'
scrolls across the display.
6 To stop the timer, select 'Stop & Reset' in the feed timer submenu and
press OK to confirm.
Setting the feed timer repeat
1 To make the feed timer go off after the same set time, select ‘Timer
repeat’ in the feed timer submenu after you have set the timer. Press OK
to confirm.
2 Choose ‘Repeat ON’ or ‘Repeat OFF’ and press OK to confirm. The timer
repeat symbol appears on the display.
3 If ‘Repeat ON’ is set, the feed timer starts counting down again after you
stop the alert.
14
English

Room temperature
A baby sleeps comfortably at a temperature between 16°C / 61°F and 20°C
/ 68°F. You can set a minimum and a maximum temperature range. You can
also set a temperature alert.
1 To open the temperature submenu, select 'Temperature' in the menu.
Press OK to confirm.
2 Select 'Temp Range' in the temperature submenu and press OK to
confirm.
3 Use the + and - buttons to set the minimum temperature range between
10°C / 50°F and 19°C / 66°F and the maximum temperature range
between 22°C / 72°F and 37°C / 99°F. Press OK to confirm.
4 Select 'Alert' in the temperature submenu. Press OK to confirm.
5 Select 'Alert ON' or or 'Alert OFF'. Press OK to confirm.
6 Select 'Temp Scale' in the temperature submenu. Press OK to confirm.
7 Select 'Celsius' or 'Fahrenheit' and press OK to confirm. The temperature
in the set scale appears on the display.
If the temperature is outside the set range, the temperature alert symbol
on the display flashes and the message 'TOO COLD' or 'TOO HOT'
appears on the display. If you set the alert to 'ON', the parent unit also
beeps.
Clock
The default setting for the clock is hidden. You can choose to show the clock
and set the clock time in the menu of the parent unit.
1 Select 'Clock' in the menu with the + and - buttons. Press OK to confirm.
2 Select 'Show Time' and press OK to confirm.
3 Select 'Set Time' and press OK to confirm.
4 Set the hour and the minutes and press OK to confirm.
The clock time alternates with other indications in the message field of
the display.
Language
You can use this menu option to change the language setting.
1 Select 'Language' in the menu with the + and - buttons. Press OK to
confirm.
2 Use the + and - buttons to select your language and press OK to confirm.
Warranty and support
If you need information or support, please visit www.philips.com/support or
read the international warranty leaflet.
15
English

< >
< >
< >
>
<
< >
>
<
>
<
< > >
<
<
Sensitivity
Eco Max
Feed Timer
Temperature
Set Clock
Language
Press OK = < =
Turn ON
Turn OFF
xx:xx Start
Set Timer
Repeat
Temp Range
Temp Alert
Temp Scale
Show/Hide
Set Time
English
Русский
<
<
<
<
<
<
<
>
>
>
>
>
>
>
>
Minimum x
!No alert if…
Hr 00:00
Hr 00:00
Repeat ON
Repeat OFF
Alert ON
Alert OFF
>
< >
< >
< >
<
Play 1
Play 2
...
Play 5
Play All
Celsius
Fahrenheit
Show Clock
Hide Clock
Maximum y
00:30 Min
00:00 Min
>
< >
Nightlight
Menu
Lullaby
Turn ON
Turn OFF<
>
SCD710
/
SCD711
/
SCD713
/
SCD715
(
EN
)
> =
16
English

Eesti
1 2 3 4
98765
10
1
17
Eesti

Sissejuhatus
Oma toote registreerimiseks ja põhjaliku kasutusjuhendi lugemiseks minge
aadressile www.philips.com/welcome.
Vanemaseadme ekraan (joonis 1)
1 Signaali tugevuse näidik
2 Eco Max-näidik
3 Vaigistatud heli sümbol
4 Aku oleku näidik
5 Mikrofoni tundlikkuse näidik
6 Hällilaulu sümbol
7 Öötule sümbol
8 Taimeri sümbol
9 Temperatuuri sümbol
10 Liikumisnool
Kasutamiseks valmistumine
TÄHTIS! Enne beebimonitori kasutamist lugege ohutusjuhised hoolikalt
läbi ja hoidke need edaspidiseks alles.
Beebiseade
Soovitame kasutada beebiseadet võrgutoitel. Võrgutoite rikke korral saab
beebiseadme automaatse toite tagada, kui sisestate neli 1,5 V AA-tüüpi
leelispatareid (ei ole komplektis).
Ärge kasutage laetavaid patareisid. Beebiseadmel puudub
laadimisfunktsioon ja laetavad patareid tühjenevad mittekasutamise korral
tasapisi.
Vanemaseade
Vanemaseade töötab beebimonitori komplekti kuuluva kahe laetava
patareiga. Laadige vanemaseadet enne selle esmakordset kasutamist ja kui
patareid on tühjad.
Pange tähele, et mudeli SCD710/SCD711/SCD713 korral peate 18-tunnise
juhtmeta tööaja tagamiseks laadima vanemaseadet kokku 10 tundi.
Mudeli SCD715 korral on laadimisaeg 14 tundi ja tööaeg 25 tundi.
Märkus. Beebimonitori kasutuselevõtmisel kulub 4 laadimis- ja
tühjendamistsüklit enne, kui laetavad patareid saavutavad oma
täismahtuvuse.
18
Eesti

Beebivahi kasutamine
Beebimonitori paigutamine
Hoidke beebiseade eemal beebi käeulatusest. Kunagi ei tohi
panna beebiseadet beebi voodisse ega mänguaeda.
-
Beebiseadme juhe võib põhjustada lämbumisohu, seetõttu palun
veenduge, et beebiseade ja selle juhe on beebist vähemalt 1 meetri
kaugusel.
-
Selleks, et ühes või mõlemas seadmes ei tekiks kiledat heli, veenduge, et
vanemaseade on vähemalt 1 meetri kaugusel beebiseadmest.
Vanemaseadme ja beebiseadme sidumine
1 Vajutage ja hoidke nuppu beebiseadmel 2 sekundit all, kuni süttib
sisselülitatud toite märgutuli.
2 Vajutage ja hoidke nuppu vanemaseadmel 2 sekundit all, kuni ekraani
valgustus süttib. Vanemaseadmel hakkab punaselt vilkuma ühendamise
märgutuli ja ekraanile ilmub teade „LINKING”.
Kui vanema- ja beebiseade on seotud, põleb seadmete sidumise
roheline märgutuli. Ekraanil on signaali tugevuse näidik ja teade
„LINKED”.
Kui ühendust ei õnnestu luua, ilmub ekraanile teade „NOT LINKED” ja
vanemaseade hakkab piiksuma.
Mida teha, kui sidumine ei õnnestunud?
-
Kui vanemaseade on tööraadiusest väljas, pange see beebiseadmele
lähemale, kuid mitte lähemale kui 1m.
-
Kui beebi- või vanemaseade on mõnele teisele DECT-seadmele (nt
juhtmeta telefonile) lähemal kui 2 m, lülitage see seade välja või
paigutage beebi- või vanemaseade sellest eemale.
-
Kui beebiseade on välja lülitatud, lülitage see sisse.
Tööraadius
-
Tööraadius on vabas õhus 330 meetrit ja hoones kuni 50 meetrit.
-
Beebimonitori tööraadius sõltub ümbruskonnast ja muudest häireid
põhjustavatest teguritest. Märg ja niiske materjal võib põhjustada nii suuri
häireid, et tööraadius väheneb kuni 100%. Kuiva materjali põhjustatud
häirete info on esitatud allpool tabelis.
Kuivad materjalid Materjali paksus Tegevusraadiuse vähenemine
Puit, kipsplaat, kartong,
klaas (metallita, traatideta
või raamideta).
<30cm (12 tolli) 0-10%
Telliskivi, vineer <30cm (12 tolli) 5-35%
Armatuuriga betoon <30cm (12 tolli) 30-100%
Metallvõred või trellid <1cm (0,4 tolli) 90-100%
19
Eesti

Kuivad materjalid Materjali paksus Tegevusraadiuse vähenemine
Metall- või
alumiiniumplaadid
<1cm (0,4 tolli) 100%
Funktsioonid ja tagasiside beebiseadmes
Öötuli
Öötuli tekitab maheda kuma, mis rahustab teie beebit.
1 Öötule sisse- või väljalülitamiseks vajutage beebiseadmel nuppu .
Hällilaulufunktsioon
1 Valitud hällilaulu mängimiseks vajutage beebiseadmel nuppu . Valitud
hällilaulu korratakse 15 minuti vältel.
2 Vajutage nuppu , kui soovite loendist mõne teise hällilaulu valida.
3 Hällilaulu helitugevuse seadistamiseks vajutage beebiseadme
helitugevuse nuppe + või −.
Märkus. Beebiseadme kõlari helitugevust saate seadistada ainult
hällilaulu esitamise ajal. Kui seadistasite beebiseadmel hällilaulu heli
valjemaks, on heli valjem ka vanemaseadme kõnefunktsiooni kasutamise
korral.
4 Hällilaulu mängimise lõpetamiseks vajutage beebiseadmel nuppu .
Vanemaseadme otsimine
Kui olete vanemaseadme kaotanud, saate selle asukoha
kindlaksmääramiseks kasutada nuppu FIND beebiseadmel. See
otsingufunktsioon töötab ainult siis, kui vanemaseade on sisse lülitatud ja
tööraadiuses.
20
Eesti

1 Vajutage nupule FIND beebiseadmel. Vanemaseade hakkab andma
otsingu helisignaali.
2 Otsingu helisignaali lõpetamiseks vajutage uuesti nupule FIND
beebiseadmel või mistahes nupule vanemaseadmel. Otsingu helisignaal
lõpeb automaatselt 2 minuti pärast.
Patarei laetuse märgutuli
1 Patarei laetuse märgutuli põleb roheliselt, kui beebiseade töötab
patareitoitel ja patareides on piisavalt energiat.
2 Patarei laetuse märgutuli vilgub kiiresti punaselt, kui beebiseadme
patareitoitel töötamise ajal hakkavad patareid tühjenema. Vahetage
patareid välja, kui need hakkavad tühjenema.
Funktsioonid ja tagasiside keskseadmes
Helitugevus
Helitugevust saab seadistada, kui menüü ei ole aktiivne. Kokku on seitse
helitugevuse taset ja seadistus „volume off”.
Helitugevuse taseme seadistamine
1 Vajutage üks kord nuppu + või −.
Ekraanil näidatakse kehtivat helitugevuse taset.
2 Helitugevuse suurendamiseks vajutage nuppu + ja helitugevuse
vähendamiseks vajutage nuppu −.
Kui rohkem kui 2 sekundi jooksul ei ole vajutatud ühtegi nuppu, siis
helitugevuse taseme näidik kaob ekraanilt ja helitugevuse seadistus
salvestatakse.
Heli väljalülitatud
Kõige väiksemast helitugevusest järgmine seadistus on „volume off”.
1 Vajutage üks kord nuppu + või −.
Ekraanil näidatakse kehtivat helitugevuse taset.
2 Helitugevuse väljalülitamiseks vajutage ja hoidke vähemalt 2 sekundit all
nuppu.
Ekraanile ilmub teade „MUTE” ja vaigistatud heli sümbol. Beebi
häälitsemisest annavad märku vaid helitugevuse märgutuled.
21
Eesti

Kõnefunktsioon
1 Kui soovite beebit rahustada, vajutage vanemaseadme kõnenuppu TALK
ja rääkige selgelt otse mikrofoni 15−30cm kauguselt.
Roheline ühenduse märgutuli hakkab vilkuma ja ekraanile kuvatakse
teade „TALK”.
Märkus. Kui seadistasite beebiseadmel hällilaulu heli valjemaks, on heli
valjem ka vanemaseadme kõnefunktsiooni kasutamise korral.
2 Kui olete rääkimise lõpetanud, vabastage kõnenupp TALK.
Patarei laetuse näidikud
Patarei tühjeneb
Kui vanemaseadme laetavad patareid hakkavad tühjaks saama, ilmub
ekraanile teade „BATTERY LOW”, laetuse näidik on tühi ja vilgub ning
vanemaseade piiksub. Järelejäänud tööaeg on vähemalt 30 minutit.
Patarei on tühi
1 Kui laetavad patareid peaaegu täiesti tühjad, vilgub patareid laetuse
punane märgutuli kiiresti.
2 Kui te ei ühenda vanemaseadet elektritoitega, lülitub see välja.
Vanemaseadme menüü
Menüüs liikumine
Märkus. Mõned menüü funktsioonid on kasutusel ainult siis, kui beebi- ja
vanemaseade on seotud.
1 Menüü avamiseks vajutage nuppu MENU. Ilmub esimene menüüsuvand.
22
Eesti

2 Järgmise suvandi juurde liikumiseks kasutage nuppu + ja eelmise juurde
liikumiseks nuppu –. Nool ekraanil näitab, millises suunas saate liikuda.
3 Valiku kinnitamiseks vajutage OK.
Märkus. Kui soovite menüüst lahkuda muudatusi tegemata, vajutage nuppu
MENU. Kui 20 sekundi jooksul midagi ei sisestata, sulgub menüü
automaatselt.
Tundlikkus
See suvand vanemaseadme menüüs võimaldab teil seadistada
beebiseadme mikrofoni tundlikkust.
Mikrofoni tundlikkus määrab, millise mürataseme beebiseade tuvastab, nt
soovite kuulda beebi nuttu, kuid tema lalinast olete ehk vähem huvitatud.
1 Valige menüüs „Sensitivity” tundlikkus nuppude + ja − abil ja vajutage
kinnitamiseks nuppu OK.
2 Mikrofoni tundlikkuse suurendamiseks või vähendamiseks kasutage + ja
– nuppe. Täidetud segmentide arv näitab valitud tundlikkuse taset.
Seadistuse kinnitamiseks vajutage nuppu OK.
Tundlikkuse tasemed ja näidikud
Sümbol Tundlikkus Kirjeldus
suurim Kuulete kõiki hääli beebi juures.
Vanemaseadme kõlar on
pidevalt sisse lülitatud.
kõrge Kuulete kõiki helisid vaiksest
lalinast valjema hääleni. Kui
beebi häält ei tee, on
vanemaseadme kõlar välja
lülitatud.
keskmine Kuulete helisid vaiksest nutust
valjema hääleni. Kui beebi teeb
vaiksemaid hääli, ei lülitu
keskseadme kõlar sisse.
23
Eesti
/