Sealey LP69C Operating instructions

Type
Operating instructions

Sealey LP69C is a versatile and powerful 2-in-1 cordless/corded space heater that delivers warmth and comfort in various settings. With its adjustable heat output ranging from 30,000 to 68,000 BTU/hr, it can efficiently heat large areas up to 350 cubic meters.

The heater boasts a fan-assisted design that ensures even distribution of heat, making it ideal for workshops, garages, construction sites, and outdoor events. Its durable paint finish and robust construction ensure longevity and withstand harsh conditions.

The LP69C operates on propane gas, providing a clean and efficient fuel source. It comes with an approved propane gas regulator and hose for safe and easy connection to the gas cylinder. Additionally, the heater features a piezoelectric ignition system for hassle-free starting and a safety solenoid to prevent gas leakage without electrical ignition.

30,000-68,000BTU/HR (9-20KW) 2-IN-1
CORDLESS/CORDED SPACE WARMER®
PROPANE HEATER
MODEL NO: LP69C
Thank you for purchasing a Sealey product. Manufactured to a high standard, this product will, if used according to these
instructions, and properly maintained, give you years of trouble free performance.
IMPORTANT: PLEASE READ THESE INSTRUCTIONS CAREFULLY. NOTE THE SAFE OPERATIONAL REQUIREMENTS, WARNINGS & CAUTIONS. USE
THE PRODUCT CORRECTLY AND WITH CARE FOR THE PURPOSE FOR WHICH IT IS INTENDED. FAILURE TO DO SO MAY CAUSE DAMAGE AND/OR
PERSONAL INJURY AND WILL INVALIDATE THE WARRANTY. KEEP THESE INSTRUCTIONS SAFE FOR FUTURE USE.
1. SAFETY
This product is not suitable for primary heating purposes.
1.1. ELECTRICAL SAFETY
WARNING! It is the user’s responsibility to check the following:
1.1.1. Check all electrical equipment and appliances to ensure that they are safe before using. Inspect power supply leads, plugs and
all electrical connections for wear and damage. Sealey recommend that an RCD (Residual Current Device) is used with all electrical
products. You may obtain an RCD by contacting your local Sealey stockist.
1.1.2. If the product is used in the course of business duties, it must be maintained in a safe condition and routinely PAT (Portable
Appliance Test) tested.
Electrical safety information, it is important that the following information is read and understood.
1.1.3. Ensure that the insulation on all cables and on the appliance is safe before connecting it to the power supply.
1.1.4. Regularly inspect power supply cables and plugs for wear or damage and check all connections to ensure that they are secure.
Important: Ensure that the voltage rating on the appliance suits the power supply to be used and that the plug is tted with the
correct fuse - see fuse rating in these instructions.
8 DO NOT pull or carry the appliance by the power cable.
8 DO NOT pull the plug from the socket by the cable.
8 DO NOT use worn or damaged cables, plugs or connectors. Ensure that any faulty item is repaired or
is replaced immediately by a qualied electrician.
This product is tted with a BS1363/A 3 pin plug.
If the cable or plug is damaged during use, switch o the electricity supply and remove from use.
Ensure that repairs are carried out by a qualied electrician.
Replace a damaged plug with a BS1363/A 3 pin plug. If in doubt contact a qualied electrician.
a) Connect the GREEN/YELLOW earth wire to the earth terminal ‘E’.
b) Connect the BROWN live wire to the live terminal ‘L’.
c) Connect the BLUE neutral wire to the neutral terminal ‘N’.
Ensure that the cable outer sheath extends inside the cable restraint and that the restraint is tight.
Sealey recommend that repairs are carried out by a qualied electrician.
1.1.5. If an extension reel is used it should be fully unwound before connection. A reel with an RCD fitted is preferred since any appliance
plugged into it will be protected. The cable core section is important and should be at least 1.5mm2, but to be absolutely sure
that the capacity of the reel is suitable for this product and for others which may be used in the other output sockets, we recommend the
use of 2.5mm2 section cable.
1.2. GENERAL SAFETY
WARNING! Disconnect heater from mains electrical supply and gas cylinder before servicing or performing maintenance. Replace or
repair damaged parts. Use genuine parts only. Unauthorised parts may be dangerous and will invalidate the warranty.
WARNING: DO NOT use for heating of habitable areas of domestic premises or for use in public buildings, refer to national regulations.
WARNING: DO NOT use in basements or areas below ground.
9 Use only in a well ventilated area and away from combustible materials.
9 Store gas cylinders in accordance with regulations applicable to such appliances.
9 Ensure that nothing stands or passes in front of the heater. Mandatory minimum distance from the heater is 2 metres at the front.
9 Only use the propane gas pressure regulator and hose assembly supplied with the heater, without alteration.
9 Only use outdoors or in well ventilated surroundings in a well ventilated area away from combustible materials.
9 Ensure continuous ventilation is provided to the heater operating area. A ventilation opening must run to the outside of the premises where the
heater is to be operated. The opening must be 100cm2 for every kW and must also be set at an equal distance from the upper and lower parts of the
heater operating area.
WARNING: If the heater is used for prolonged periods at maximum power, ice may form on the propane cylinder. This is because of
excessive evaporation. In such a case DO NOT use the heater to de-ice the cylinder.
WARNING: If the smell of gas is present, isolate the gas cylinder immediately and investigate the reason before re-connecting it.
8 DO NOT use the heater if damaged. Take immediate action to repair or replace damaged parts. Use an authorised service agent only.
8 DO NOT use the heater for residential use or in recreational vehicles.
8 DO NOT allow untrained persons to ignite the heater.
LP69C Issue 3 (3) 01/11/21
Original Language Version
© Jack Sealey Limited
Refer to
instructions
Hot surfaces
Replacement fuse
rating: 3A
Electric shock
Hazard
Do Not cover Keep Dry
8 DO NOT operate the heater without the cover.
8 DO NOT use a naked flame to try and ignite the heater.
8 DO NOT use the heater near flammable, combustible or explosive materials - liquids, solids or gases.
8 DO NOT leave the heater unattended whilst in use.
8 DO NOT obstruct the air inlet and outlet sections of the heater. Keep immediate area clean and tidy.
8 DO NOT point the heater towards the gas cylinder.
8 DO NOT cover the heater whilst in use or immediately afterwards if not cooled off.
9 Keep children and vulnerable people away from the heater.
9 Keep the heater clean and in good working order.
9 Ensure that the heater is correctly turned off and the gas source isolated when not in use.
9 When not in use for any length of time, store heater in a safe, dry, childproof location.
NOTE: This appliance can be used by children aged from 8 years and above and persons with reduced physical, sensory or mental
capabilities or lack of experience and knowledge if they have been given supervision or instruction concerning use of the appliance
in a safe way and understand the hazards involved. Children shall not play with the appliance. Cleaning and user maintenance
shall not be made by children without supervision.
2. INTRODUCTION
Many users have found the advantages of propane heaters far outweigh the small additional running costs, as the fuel is more completely
burned and does not leave an oily residue as experienced with paran, kerosene or diesel heaters. There is no odour, except for the few
seconds during start-up and the units run a little more quietly since they do not need a compressor to drive the fuel to the burner. Durable
paint nish. Fan assisted, tted with a piezoelectric ignition system for trouble-free starting and features a direct gas head assembly. Features
safety solenoid preventing the unit from leaking gas without rst being electrically started. Supplied with an approved propane gas regulator
and hose. To run cordless requires compatible 20V battery and mains charger, sold separately. CP20VBP4 (4Ah), CP20VBP6 (6Ah),
CP20VMC (Mains Charger). Tested and certied to CE/EN standards. Manufactured to BS EN 1596.
3. SPECIFICATION
MODEL NO. ................................................................LP69C
Output ....................................................30,000-68,000Btu/hr
Airow ........................................................................ 294cfm
Heated Area: ................................................................ 350m3
Fuel consumption ............................................ 0.65-1.45kg/hr
Fuel: ..........................................................................Propane
Running Time (hrs): ................................. 4Ah - 6.5, 6Ah - 10
Supply ..............................................................................20V
Electrical fuse rating ...........................................................3A
4. INSTALLATION
NOTE: If a small gas cylinder is used, the heater may not operate at maximum efficiency. It is recommended to use two or more
cylinders linked in parallel, to achieve maximum continuous efficiency.
4.1. CONNECTIONS
4.1.1. Check heater and gas cylinder to ensure that they are both in good condition. If not, stop and contact your supplier immediately.
4.1.2. Site the heater and gas cylinder in the location to be heated.
4.1.3. Connect the heaters mains charger to an electrical supply outlet, ensuring that both units are earthed correctly or insert battery.
4.1.4. Connect the gas supply hose to the pressure regulator, and connect the regulator to the gas cylinder. Note: Left hand threads are used
on these fuel gas fittings.
4.1.5. Connect the other end of the gas supply hose to the heater’s gas inlet connection (fig.2). Ensure all connections are tight.
4.1.6. Gradually open the tap of the gas cylinder. Check hose and all fittings for gas leaks. Close gas tap if gas is present.
WARNING! DO NOT USE A NAKED FLAME to check for leaks, we recommend the use of a foamy soap solution.
4.2. Locate heater such that the rear intake is at least 2.5m from the nearest obstruction, there is at least 2m space on each side and a
minimum of 3.5m of space in front of it (g.1)
IMPORTANT: To ensure continuous ventilation to the heater area, a ventilation opening must connect to the outside of the premises where the heater is to
operate. The opening must be 100cm2 for every kW, and must be set at an equal distance from the upper and lower parts of heater operating area.
Original Language Version
© Jack Sealey Limited
g.1
Min 3.5m Min 2.5m
Min 2.0m
Min 2.0m Min 2.0m
g.2
LP69C Issue 3 (3) 01/11/21
5. OPERATION
5.1. SWITCHING THE HEATER ON
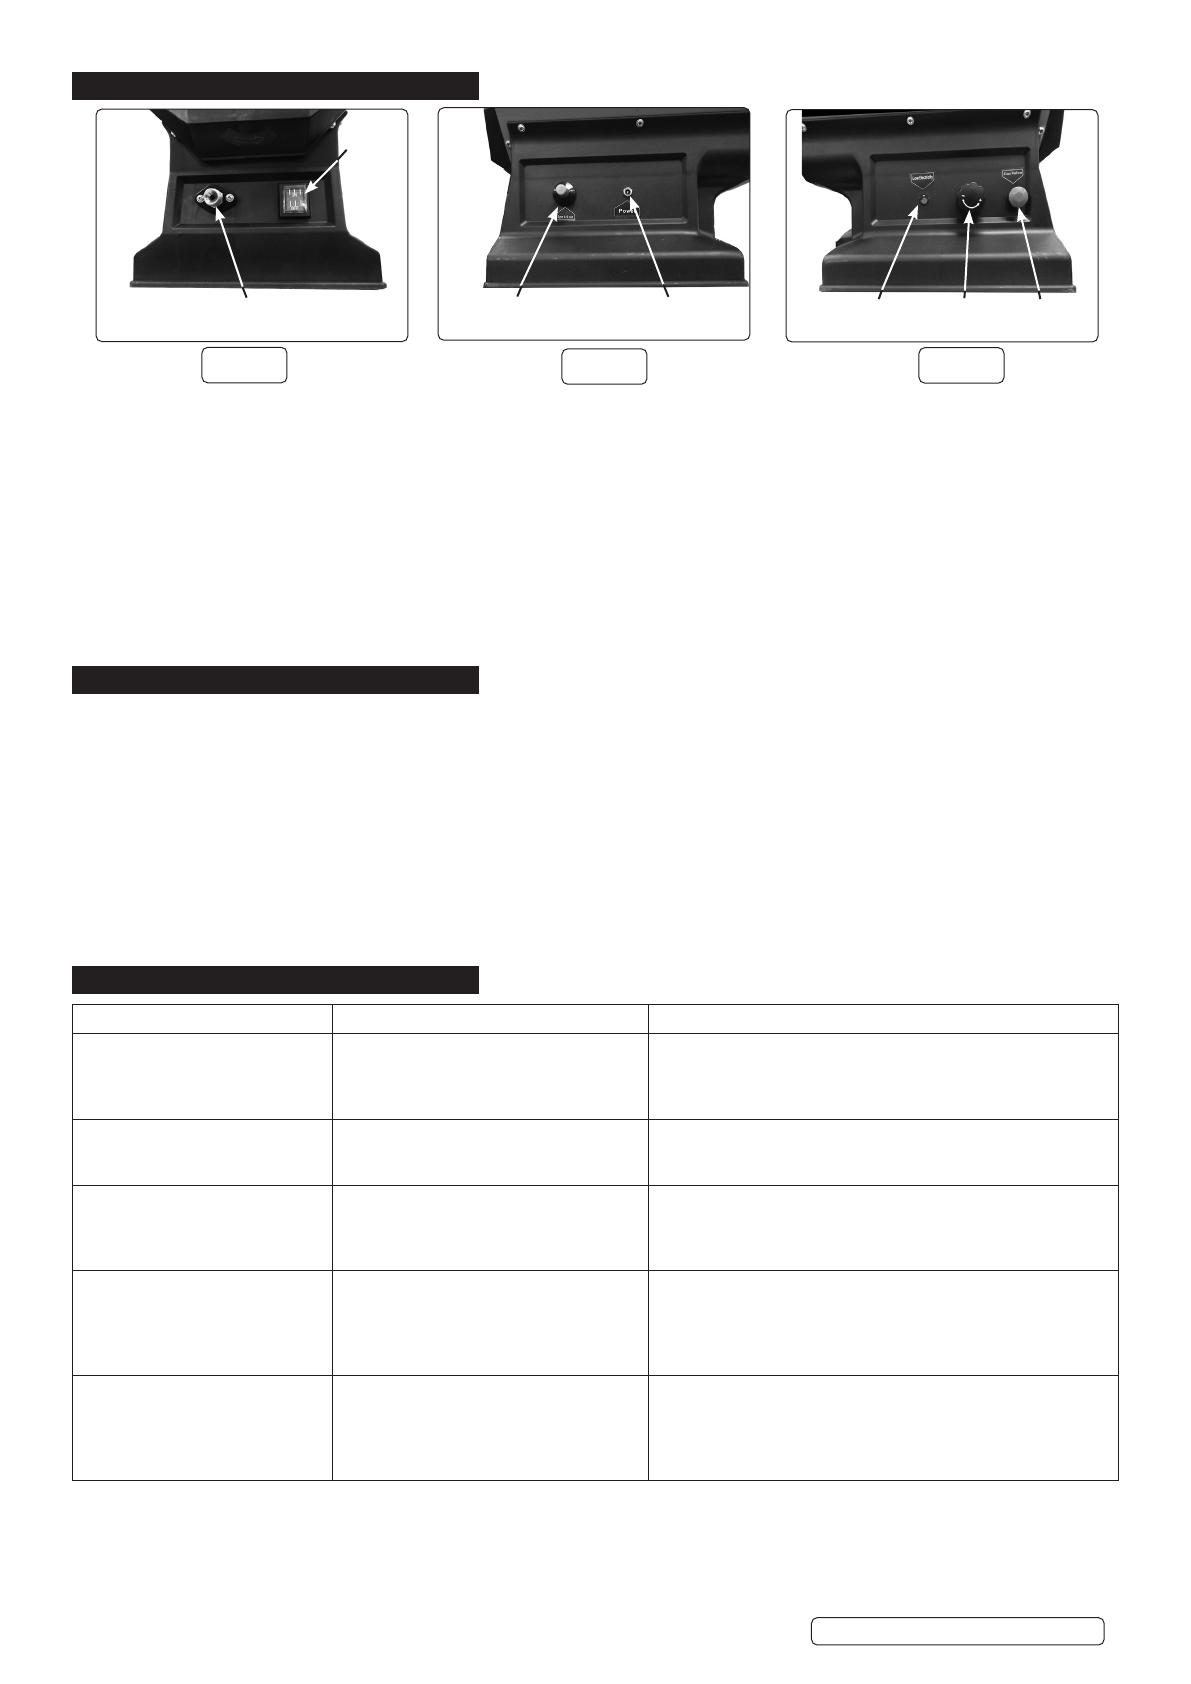
5.1.1. Switch on/off switch (fig.3) to ‘On’. Check that the fan is running.
5.1.2. With the gas supply on (Section 4.1.6) and the Gas Valve (fig.5) depressed, click the peizo igniter button (fig.4) repeatedly until the gas is heard
to ignite.
5.1.3. After ignition, keep the gas valve button depressed for at least 10 seconds and then release.
5.1.4. The flame should stay lit at this point. If it does not hold, repeat from 5.1.2.
5.2. SWITCHING THE HEATER OFF
5.2.1. Close the tap on the gas bottle to isolate the gas supply.
5.2.2. Allow the fan to run for at least 30 seconds after the ame has extinguished before switching o.
5.2.3. When the heater is not in use, disconnect it from electrical and gas supply and store it in a safe, dry, childproof location.
WARNING! If the flame shuts down during operation, before repeating the ignition sequence, make sure that the fan is not jammed, and
the air inlet and outlet are completely free of obstructions. If it is due to overheating, the cause of the problem must be determined and
corrected before repeating the ignition procedure.
6. MAINTENANCE
WARNING Before commencing service or maintenance, disconnect the heater from the electrical and gas supplies and allow to cool
fully. Use authorised parts only. Unauthorised parts may be dangerous and will invalidate the warranty.
Should the heater require service or maintenance, a suitably qualified engineer should carry this out or contact your local Sealey
service agent.
6.1. Check the gas supply hose and gas regulator condition regularly, change if necessary using only original spare parts.
6.2. Clean the heater with a damp cloth, DO NOT use abrasive or solvent or abrasive cleaners.
WARNING: AIR CONTAMINANTS
Air contaminants taken into the heater will damage the unit, cause health problems and safety issues.
For example: Body shop filler dust and overspray dust will clog the burner diffuser, contaminate the combustion chamber and
damage the internal parts of the heater. If contaminants are present the heater must be supplied with ducted clean air.
Please note that any parts damaged by filler dust or overspray dust will not be covered by warranty. Additionally a cleaning
charge will be made for any heaters damaged by filler dust or overspray dust.
7. TROUBLESHOOTING
Original Language Version
© Jack Sealey Limited
On/O
Gas Connection Piezo Starter Power Socket Low Power
Warning
Volume
Control
Gas Valve
g.3 g.4 g.5
PROBLEM POSSIBLE CAUSE SOLUTION
Fan motor does not work. 1. There is no electrical supply.
2. The motor has locked.
3. Fan blades bent or in contact with
housing.
1. Check mains power supply, mains charger, wire, plug, fuse.
2. Unlock the motor with an appropriate tool.
3. Check housing for damage, straighten blades.
Ignitor does not spark. 1. Electrode has the wrong gap.
2. Faulty connection.
3. Corroded electrode.
1. Check and reset the electrode gap to 4mm.
2. Inspect and connect correctly the ignitor and the electrode.
3. Replace ignition electrode.
No gas flow to the burner. 1. The cylinder gas tap is closed.
2. The cylinder is empty.
3. Gas leaks from the supply.
1. Open the gas tap.
2. Replace with a full cylinder.
3. Remove and clean the nozzle, check for leaks by using a
foamy soap only - DO NOT USE FLAME to find leak.
The burner starts, but stops as
the gas control knob is released.
1. The thermocouple is not warm enough.
2. The safety override has activated
because the fan does not work.
1. Repeat the ignition sequence, keeping the control knob
pushed in for a longer time.
2. See above - Fan motor does not work.
The heater stops during operation 1. Excessive gas supply.
2. Insufficient gas due to ice formation
on the cylinder.
3. Temperature inside heater is too high.
4. Dust or debris accumulated in heater.
1. Check the pressure regulator, replace if necessary.
2. Check and if necessary use a larger gas cylinder or multiple
cylinders connected in parallel.
3. Keep area around heater inlet clear of obstructions.
4. Clean inside of heater.
LP69C Issue 3 (3) 01/11/21
Sealey Group, Kempson Way, Suffolk Business Park, Bury St Edmunds, Suffolk. IP32 7AR
01284 757500 01284 703534 sales@sealey.co.uk www.sealey.co.uk
ENVIRONMENT PROTECTION
Recycle unwanted materials instead of disposing of them as waste. All tools, accessories and packaging should be sorted, taken to
a recycling centre and disposed of in a manner which is compatible with the environment. When the product becomes completely
unserviceable and requires disposal, drain any fluids (if applicable) into approved containers and dispose of the product and fluids
according to local regulations.
WEEE REGULATIONS
Dispose of this product at the end of its working life in compliance with the EU Directive on Waste Electrical and Electronic Equipment
(WEEE). When the product is no longer required, it must be disposed of in an environmentally protective way. Contact your local solid
waste authority for recycling information.
Note: It is our policy to continually improve products and as such we reserve the right to alter data, specifications and component parts without prior
notice.
Important: No Liability is accepted for incorrect use of this product.
Warranty: Guarantee is 12 months from purchase date, proof of which is required for any claim.
Original Language Version
© Jack Sealey Limited LP69C Issue 3 (3) 01/11/21
Model identier(s):
Indirect heating functionality: Yes No
Direct heat output: (kW) Indirect heat output: (kW)
Fuel
Select fuel type: Gaseous Liquid Specify: [mg/kWh
input
] (GCV)
Item Symbol Value Unit Item Symbol Value Unit
 Heatoutput Usefuleciency(NCV)
Nominal heat output P
nom
kW Useful eciency at nominal
th,nom
%
heat output
Minimum heat output (indicative)* P
min
kW Useful eciency at minimum
th,min
%
heat output (indicative)*
Auxiliaryelectricityconsumption Typeofheatoutput/roomtemperaturecontrol(selectone)
At nominal heat output el
max
kW Single stage heat output, no room Yes No
temperature control
At minimum heat output el
min
kW Two or more manual stages, no room Yes No
temperature control
In standby mode el
SB
kW With mechanical thermostat room Yes No
temperature control
With electronic room temperature control Yes No
plus day timer
With electronic room temperature control Yes No
plus week timer
 Othercontroloptions(multipleselectionspossible)
Room temperature control, with presence Yes No
detection
Room temperature control, with open Yes No
window detection
With distance control option Yes No
With adaptive start control Yes No
With working time limitation Yes No
With black bulb sensor Yes No
Informationrequirementsforgaseous/liquidfuellocalspaceheaters
Theseasonalspaceheatingenergyeciencyƞs
Item Symbol Value Unit
The seasonal space heating Energy efficiency in active mode ƞ
s,on
%
The seasonal space heating energy efficiency ƞs ƞs %
Energyefficiencyclasses
Contact details: Sealey Group, Kempson Way, Suolk Business Park, Bury St Edmunds, Suolk, IP32 7AR. www.sealey.co.uk
ERP Table 1
Space heating emissions
NO
x
nitrogen oxides
 Permanentpilotamepowerrequirement
Pilot ame power required P
pilot
kW
(if applicable)*
* Enter gure or NA
20.0
9.0
100
N/A
N/A
N/A
0.0
100
116.35
91.0
A
G30
LP69C.V1
N/A
100.0
v1
  • Page 1 1
  • Page 2 2
  • Page 3 3
  • Page 4 4
  • Page 5 5

Sealey LP69C Operating instructions

Type
Operating instructions

Sealey LP69C is a versatile and powerful 2-in-1 cordless/corded space heater that delivers warmth and comfort in various settings. With its adjustable heat output ranging from 30,000 to 68,000 BTU/hr, it can efficiently heat large areas up to 350 cubic meters.

The heater boasts a fan-assisted design that ensures even distribution of heat, making it ideal for workshops, garages, construction sites, and outdoor events. Its durable paint finish and robust construction ensure longevity and withstand harsh conditions.

The LP69C operates on propane gas, providing a clean and efficient fuel source. It comes with an approved propane gas regulator and hose for safe and easy connection to the gas cylinder. Additionally, the heater features a piezoelectric ignition system for hassle-free starting and a safety solenoid to prevent gas leakage without electrical ignition.

Ask a question and I''ll find the answer in the document

Finding information in a document is now easier with AI