Keypad P/N 044373 REV A
English
Please read before installing.
Limited Warranty:
For warranty information, please see the warranty enclosed with the
product, or visit www.lutron.com/resiinfo
For FCC/IC information:
Please visit: www.lutron.com/fcc-ic
)Lutron,
Lutron, RadioRA, Claro, Satin Colors, Sunnata and Pico are
trademarks or registered trademarks of Lutron Electronics Co., Inc. in
the US and/or other countries.
App Store is a service mark of Apple Inc., registered in the U.S. and
other countries.
All other product names, logos, and brands are property of their
respective owners.
©2020 Lutron Electronics Co., Inc.
OFF
WARNING: ELECTRIC SHOCK HAZARD.
May result in Serious Injury or Death. Turn off
power at circuit breaker or fuse before installing.
1 Turn power OFF at circuit breaker
2 Prepare wires
IMPORTANT
Codes: Install in accordance with all local and
national electrical codes.
Environment: Ambient operating temperature:
32 °F to 104 °F (0 °C to 40 °C), 0 to 90%
humidity, non-condensing. Indoor use only.
Wallplates: Use only Lutron wallplates with
these keypads. The mechanical design of the
keypad MAY NOT be compatible with non-Lutron
wallplates. Non-Lutron wallplates MAY NOT sit
flush against the wall. Claro and Satin Colors
wallplates are designed for best color match
and clean aesthetic appearance. Do not paint
controls, buttons, or wallplates.
Cleaning: For disinfecting keypad, please refer
to App Note #758 (048758). See RA3 Support
Center link in Help Section.
Wallboxes: All keypads require a U.S. wallbox.
3 ` in (89 mm) deep recommended, 2 1 in
(57 mm) deep minimum.
RF Device Placement: For reliable performance
in a system, this device should be placed
within 25 ft (7.6 m) of two additional compatible
wireless devices, such as RadioRA 3 Sunnata
products and the RadioRA 3 processor. For more
information and a full list of compatible wireless
devices please refer to the Wireless Setup guide,
which can be found in the RA3 Support Center
link in the HELP Section.
System Programming: Programming and
activation (addressing) must be accomplished
through the RadioRA 3 software.
Raise / Lower Default: Raise / lower the last
button pressed.
English
Help
When making wire connections, follow the
recommended strip lengths and combinations
for the supplied wire connectors. Note: Wire
connectors provided are suitable for copper
wire only.
AWG
12 & 14 AWG
(2.5 & 1.5 mm2)
3/8 in (10 mm)
18 AWG (0.75 mm2) 7/16 in (11 mm)
Symptom Cause Action
LEDs on the keypad don’t
light up when buttons on
it are pressed.
Power not present at keypad Circuit breaker OFF. Turn ON breaker
Incorrect wiring Wire the keypad according to the Installation section
A specific dimmer, switch
or shade / drapery is not
controlled when a button
is pressed on the keypad.
The dimmer, switch or shade / drapery
is not assigned to the keypad
Refer to the RadioRA 3 programming software and ensure the device is
assigned to the keypad. Perform a transfer and make sure it is successful
Failure has occurred on the lamp(s)
controlled by the dimmer/switch
Replace the lamp(s)
There is no power to the dimmer,
switch, shade/drapery
Ensure that the device is powered and that the FASS switch is pushed in
Devices are out of range Ensure this device is placed within 25 ft (7.6 m) of two additional
compatible wireless devices, such as RadioRA 3 Sunnata products and the
RadioRA 3 processor
Dimmer, switch or
shade / drapery does not
go to the desired level or
position when a button on
the keypad is pressed.
The button was not programmed
correctly
Refer to the RadioRA 3 programming software and ensure the device is
assigned to the keypad. Perform a transfer and make sure it is successful
Devices are out of range Ensure this device is placed within 25 ft (7.6 m) of two additional
compatible wireless devices, such as RadioRA 3 Sunnata products and the
RadioRA 3 processor
All LEDs on the keypad
flash when any button is
pressed.
The keypad is in the Factory Settings
mode and has not been configured to
work in a system
Refer to the RadioRA 3 programming software and ensure the device is
assigned to that keypad.
Perform a transfer and make sure it is successful
Note: Refer to the system setup guide for additional troubleshooting suggestions.
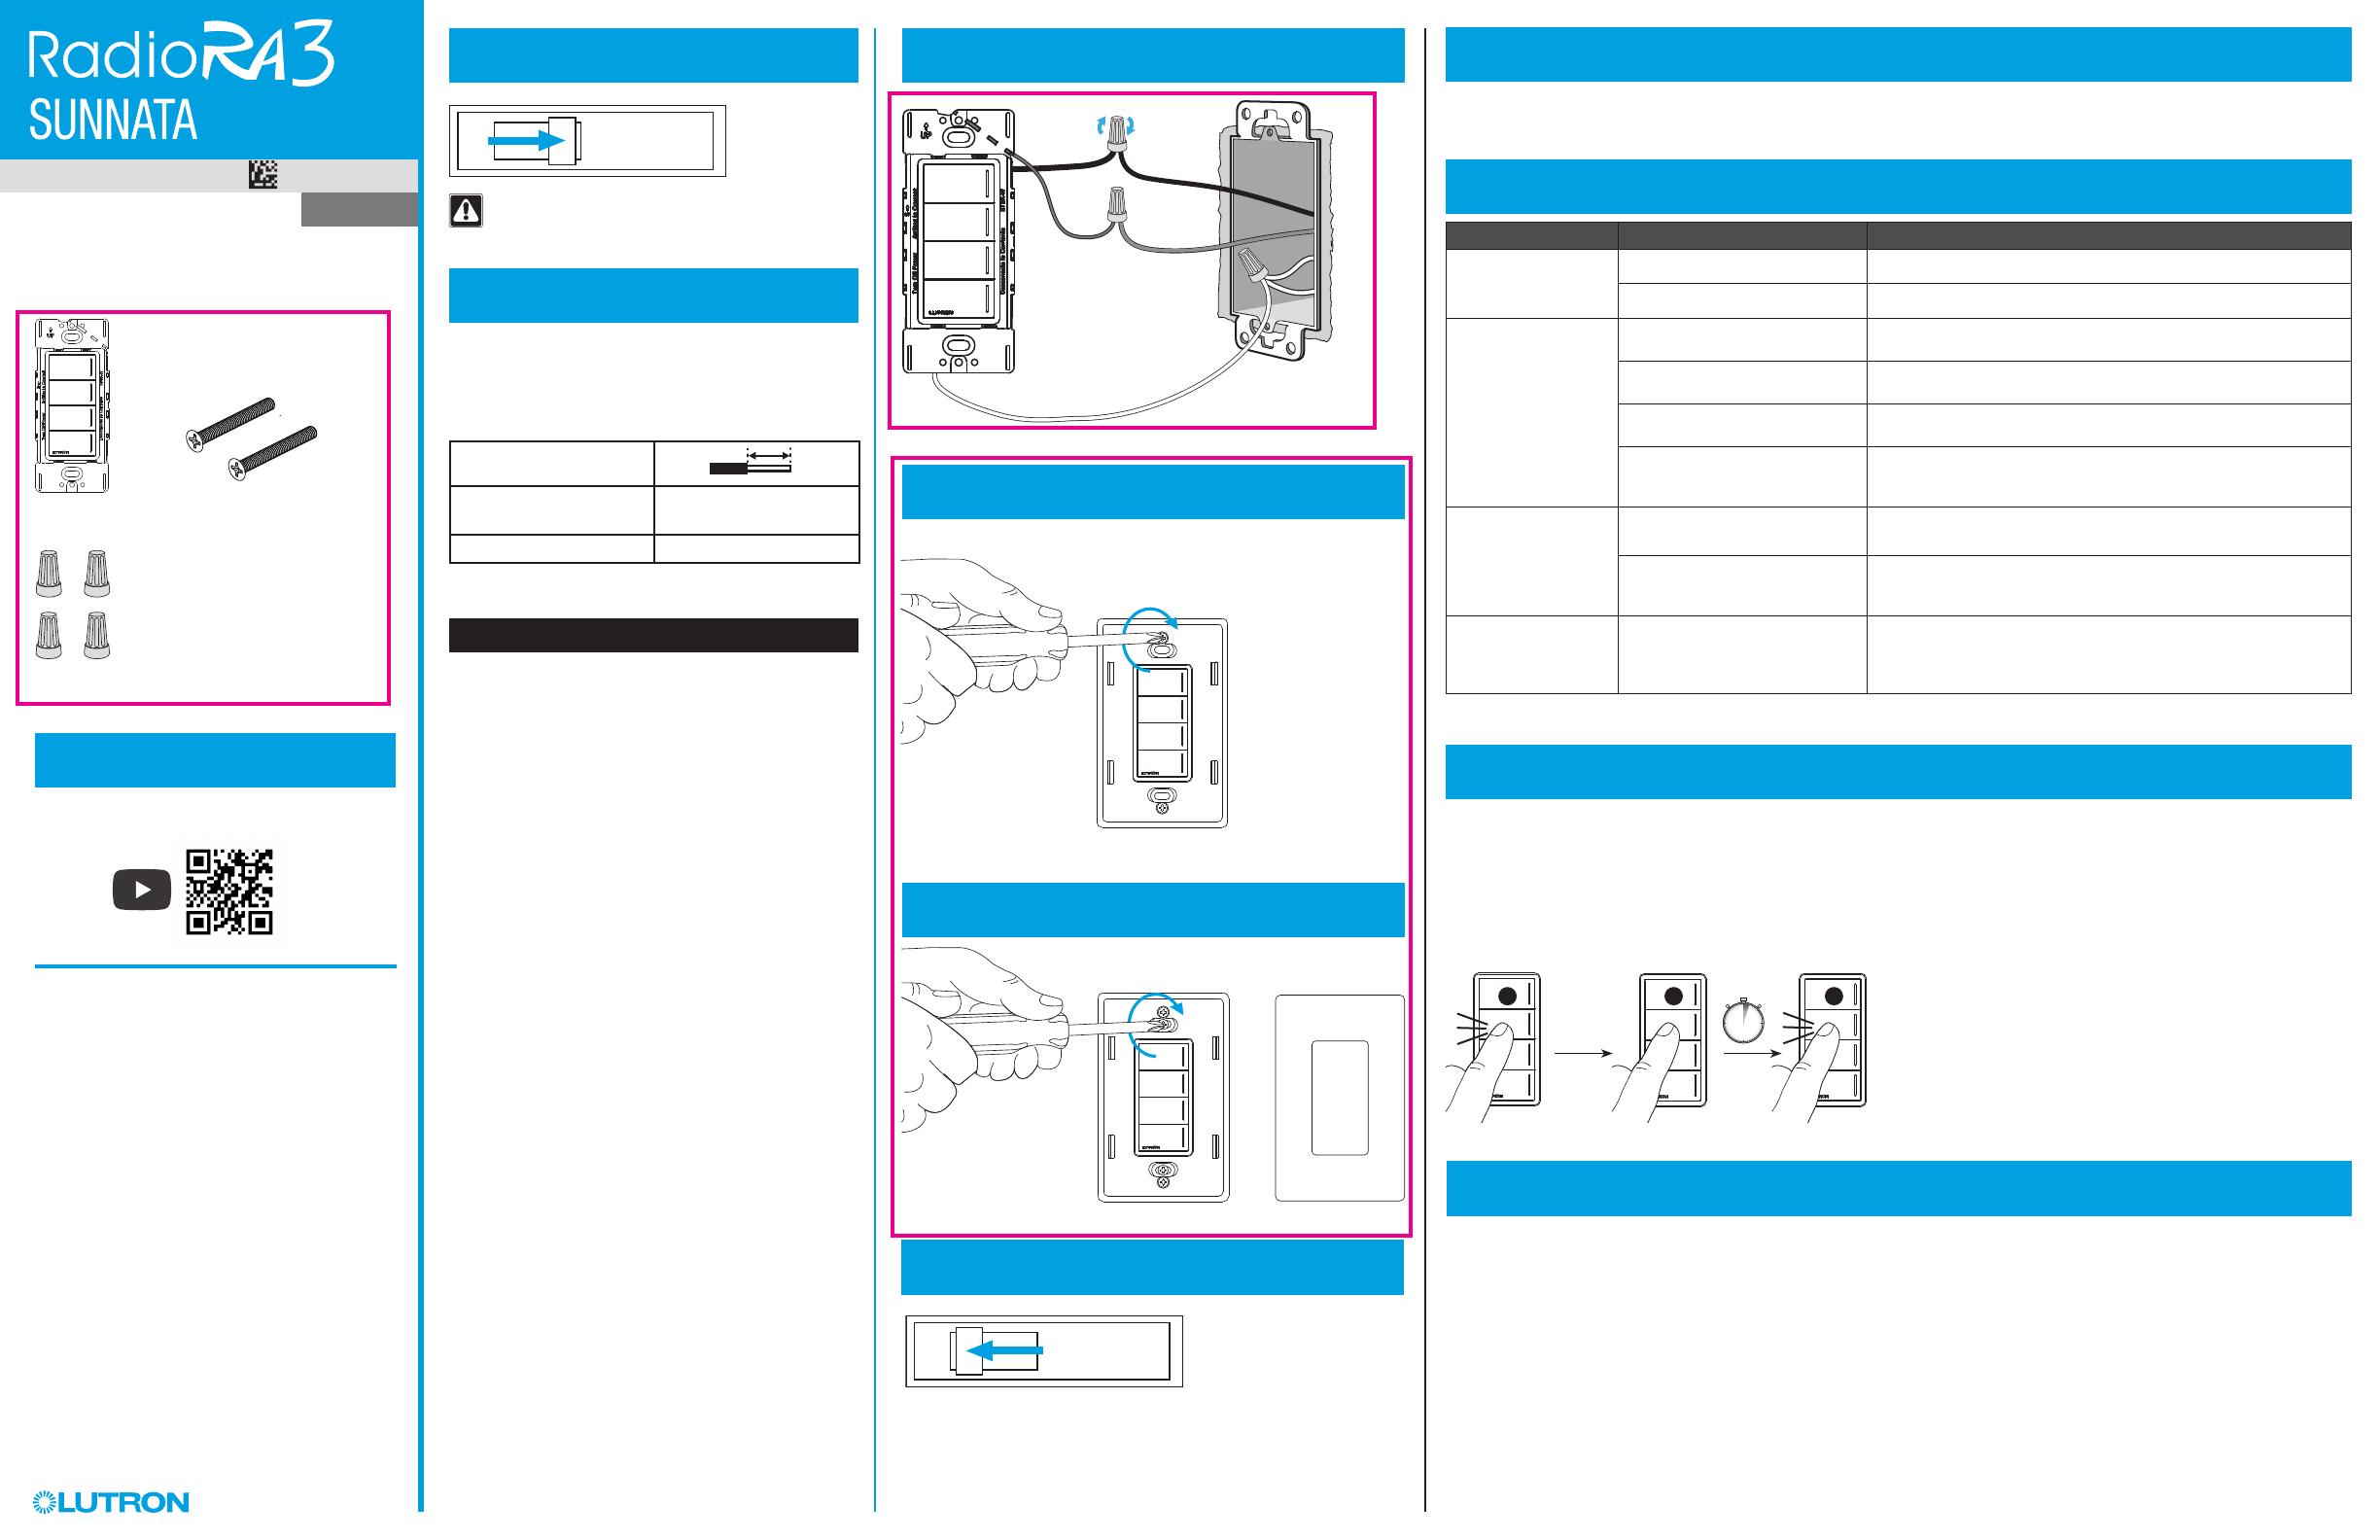
3 Wire control
ON
6 Turn power ON at circuit breaker
Return to factory settings
7 System setup
Note: Returning a keypad to its factory settings will remove the keypad from the system and erase all programming.
Step 1: Triple tap any button on the keypad (except raise / lower). DO NOT release after third tap.
Step 2: Keep the button pressed on the third tap until all the status LEDs start to flash slowly (approximately
3 seconds).
Step 3: Immediately release the button and triple tap the button again. The status LEDs on the keypad will
flash quickly.
The keypad has now been returned to its factory settings.
This keypad must be used in a RadioRA 3 system with a main repeater for control of dimmers, switches, and shades.
Use the RadioRA 3 programming software to setup the system (training required to access the software).
Troubleshooting
Bare
Ground
Hot/Live Black
Insert and twist
to tighten
Neutral
5 Mount keypad and attach wallplate
+
RRST-W2B, RRST-W3RL & RRST-W4B
120–277 V~ 50 / 60 Hz 0.25 A
Included Components
Keypad Mounting Screws
Wire Nut (x4)
4 Mount wallplate adapter
3 sec
TT T
Sunnata Support Center
For additional support in installing, programming,
and troubleshooting
lutron.com/RA3support
Call us:
U.S.A. | Canada | Caribbean
1.844.LUTRON1 (588.7661) (24/7)
Mexico
+1.888.235.2910
Others
+1.610.282.3800
This device complies with part 15 of the FCC Rules and Industry Canada license-exempt RSS standard(s). Operation is subject to the following two conditions:
(1) This device may not cause interference, and
(2) This device must accept any interference, including interference that may cause undesired operation. Modifications not expressly approved by Lutron ElectronicsCo., Inc. could
void the user’s authority to operate this equipment.
NOTE: This equipment has been tested and found to comply with the limits for a Class B digital device, pursuant to part 15 of the FCC Rules. These limits are designed to
provide reasonable protection against harmful interference in a residential installation. This equipment generates, uses and can radiate radio frequency energy and, if not installed
and used in accordance with the instructions, may cause harmful interference to radio communications. However, there is no guarantee that interference will not occur in a
particular installation. If this equipment does cause harmful interference to radio or television reception, which can be determined by turning the equipment off and on, the user is
encouraged to try to correct the interference by one or more of the following measures:
• Reorient or relocate the receiving antenna
• Increase the separation between the equipment and receiver
• Connect the equipment into an outlet on a circuit different from that to which the receiver is connected
• Consult the dealer or an experienced radio/TV technician for help.
This equipment complies with FCC radiation exposure limits set forth for an uncontrolled environment. The user should avoid prolonged exposure within 20cm of the antenna,
which may exceed FCC radio frequency exposure limits.
This Class B digital apparatus complies with Canadian ICES-003.
FCC/IC/IFT Information


