WARNING
LED Landscape Lighting — Hardscape Lights
MODEL OD-HSB201
PLEASE READ INSTRUCTION BEFORE COMMENCING INSTALLATION AND RETAIN FOR FUTURE REFERENCES.
Electrical products can cause death or injury, or damage to property.
If in any doubt about the installation or use of this product, consult a competent electrician.
INSTALLATION GUIDE
WARNING — THE INSTALLATION MUST BE CARRIED OUT BY
A QUALIFIED ELECTRICIAN.
1. This LED Hardscape light is intended for installation in accordance with the National Electric Code
(NEC) and local code specifications
2. DO NOT use this LED Hardscape Light other than its intended purpose
3. LED Hardscape Light can only be installed by a qualified electrician
4. The operating voltage range is 10V-14V AC/DC
Instruction Manual
1-888-543-6473
1-888-541-6474
13376 Comber Way
Surrey BC V3W 5V9
www.ortechindustries.com
375 Admiral Blvd
Mississauga, ON L5T 2N1
CAUTION
Application Notice
TO REDUCE THE RISK OF ELECTRIC SHOCK, OR INJURY TO PERSONS, READ THE INSTRUCTIONS BELOW:
1. Make sure the main power supply is turned OFF
2. Install the fixtures at least 10 feet (3.05m) or more from a pool, spa, or fountain
3. All parts MUST be used as indicated in this instruction manual. DO NOT substitute any parts, leave parts out, or use any worn out or
broken parts. Failure to follow the instructions could invalidate the UL listing of this fixture
4. Use approved / listed wire connection devices suitable for the applications
Materials
Please make sure the following items
are included when opening the box:
Fixture Bracket Instruction
Manual
Spare part
(2 setsP)
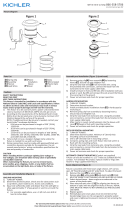
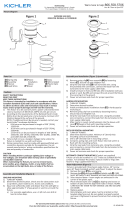
Installation in Brick or Masonry Wall
1. Turn OFF the supply power
2. Determine the desired location for each fixture.
Mark the location of the two screw holes and drill the holes for
the plastic anchors with an appropriate drill bit for the material
you are drilling into.
Place the plastic anchors in the holes
3. Put stainless steel mounting bracket and fixture in between layers
of hardscape material. Screw the 2 screws into the anchors
through the holes on the bracket, securing the fixture
4. Route the fixture wire through the wall to the main low voltage
supply cable using standard masonry procedures
5. Connect fixture wire to LOW VOLTAGE power supply
Installation in Brick or Hardscape Wall
(most common use)


