ACV EVO S Operating instructions

Type
Operating instructions

ACV EVO S is a versatile and efficient boiler system designed for residential and commercial use. With its advanced features, it offers reliable heating solutions tailored to your specific needs. The EVO S range provides high-performance heating with outputs ranging from 40 to 70kW, making it suitable for a variety of property sizes. Equipped with a user-friendly interface and a range of accessories like low loss headers and plate heat exchangers, the EVO S offers flexible installation options and enhanced energy efficiency.

ACV EVO S is a versatile and efficient boiler system designed for residential and commercial use. With its advanced features, it offers reliable heating solutions tailored to your specific needs. The EVO S range provides high-performance heating with outputs ranging from 40 to 70kW, making it suitable for a variety of property sizes. Equipped with a user-friendly interface and a range of accessories like low loss headers and plate heat exchangers, the EVO S offers flexible installation options and enhanced energy efficiency.

EVO S
Frame and Header Kit
40, 60, 70
40P, 60P, 70P
When replacing any part on this
appliance, use only spare parts that you
can be assured conform to the safety
and performance specification that we
require. Do not use reconditioned or
copy parts that have not been clearly
authorised by ACV.
For the very latest copy of literature for
specification and maintenance practices
visit our website www/acv/com/gb
where you can download the relevant
information in PDF format.
Instructions
03/2023
UIN 236070 A01
2
40 - 70 kW Frame and Header Kits Manual
Evo S 40, 60 & 70 using both Natural Gas and Propane
This kit is suitable for the following boilers:
CONTENTS
1 Introduction .....................................................................3
2 General Description Of Systems...................................4
3 System Components ...................................................... 6
4 Installation Procedure .................................................... 8
5 Installation Drawings For Boiler Systems..................14
6 Electrical Connections & Wiring Diagram ..................16
7 Commissioning and Testing ........................................ 17
IMPORTANT
THESE KITS CAN BE USED IN CONJUNCTION WITH
LOW LOSS HEADERS & PLATE HEAT EXCHANGERS
SUPPLIED AS PART OF THE OPTIONS RANGE
3
40 - 70 kW Frame and Header Kits Manual
1 INTRODUCTION
This technical data contains information for
dimensioning and assembly of a cascade system kit
for the Evo S ranges.
These 40-70kW kits are supplied with gas and
water header kits designed for use with a low loss
header system.
They are based around a 1 wide and 2 wide system
which can be combined to create up to a 4 wide
cascade, along with all the necessary mounting
holes to enable the tting of the header kits and
frame securing bolts.
This manual contains all the technical and
dimensional data required to install these kits.
GENERAL DESCRIPTION OF FRAME AND
HEADER KITS
These systems are adapted to incorporate the use
of low loss headers, plate heat exchangers and
optional sequencer control systems.
All these kits are supplied with the relevant
number of necessary parts needed to connect
these kits to the separately purchased appliances.
Boiler pumps are an accessory, and must be
selected for either low loss headers or plate heat
exchangers.
The ue congurations for the range of appliances using these system kits are C13, C33 & B23 (See appliance manual).
All headers and pipe work should be insulated in accordance with the Non Domestic Building Services Compliance Guide.
To ensure compliance with the maximum heat loss criteria, insulation thickness should be calculated according to BS EN
ISO 12241 using standardised assumptions.
4
40 - 70 kW Frame and Header Kits Manual
Available Rig
Congurations
Total Output
Required (KW)
Number of
boilers and
Frames
Footprint Size
WxDxH (mm)
Header Kit
Range Size
Prod No.
Single Frame Congurations 40 - 70 1 500 x 685 x 1418 DN50 XB150005
Twin Frame Congurations 80 - 140 2 1000 x 685 x 1418 DN50 XB150006
Triple Frame Congurations 120 - 210 3 1500 x 685 x 1418 DN50 XB150007
Quad Frame Congurations 160 - 280 4 2000 x 685 x 1418 DN50 XB150008
Available Appliances
kW Product No.
Evo S 40 100008264200
Evo S 60 100008264300
Evo S 70 100008265900
Low Loss Header Accessories (Mixing Header)
DN50
XB150029
Note.
All boilers need to be sized in accordance to the total required heat load and the modulation capabilities of the appliances.
A one wide system is dened as tting one pipe kit with a single frame and one boiler.
A two wide system is two boilers on two separate frames bolted together with a pipe kit which serves the two wide system.
These one and two wide systems can be combined in any permutation to create up to a four wide cascade.
2.1 FRAME AND HEADER KIT DESIGN OPTIONS
2 GENERAL DESCRIPTION OF SYSTEMS
1. These water headers and pumps (accessory) are designed for use with a low loss header system (option), or plate heat
exchangers only (option).
2. Appliances are not provided with these kits and will be required to be purchased separately.
5
40 - 70 kW Frame and Header Kits Manual
2.2 MULTIPLE BOILER INSTALLATIONS
When sizing multiple appliance installations, the minimum and maximum system heat load requirements need to be matched to
the minimum and maximum appliance load capabilities.
These water header & pump kits are design to supply the optimum water ow around the appliance water circuit only and must
be used in conjunction with a suitably sized low loss header (mixing header) or plate heat exchanger.
2.3 HYDRONIC ISOLATION: LOW LOSS HEADER & PLATE HEAT EXCHANGER
A low loss header allows ow separation within a hydronic system.
This allows two ow circuits to operate with their own ow and pressure drop environments whilst eectively transferring heat to
its adjoined water circuit.
This enables the modern high resistant, high eciency boilers to operate under their optimum conditions, while the main heating
circuit operates to its own controlled optimum requirements.
2.4 OUTPUT CONTROL
All pumps (optional) controls should be designed to be wired to the appliance to allow a controlled pump over run.
If using an external pump control system the capability of a timed pump over run signal provided by the appliance must be
maintained at all times.
2.5 GAS SUPPLY
The water header kits are supplied with a 2” gas header, associated components and hoses to make the connection to the
appliance
Note: Test points are provided at each end of the 2” gas header. The test point nearest to the gas inlet is intended to be used as
the appliance inlet pressure point.
2.6 ASSEMBLY
The frames must be located in a suitable place that aords a at and level oor area of suitable load bearing capacity. Care must
be taken when locating the frames that space is available for the servicing, installation and maintenance of the appliance and all
of the associated connections and equipment. (See Appliance manuals)
When using multiple frames they must be bolted together and secure to the oor.
2.7 SAFE HANDLING
Installation may require 2 or more operatives to move it to its installation site, remove it from its packaging base and during movement
into its installation location. Manoeuvring may include the use of a sack truck and involve lifting, pushing and pulling.
Caution should be exercised during these operations.
Operatives should be knowledgeable in handling techniques when performing these tasks and the following precautions should be
considered:
Grip the boiler at the base.
Be physically capable.
Use personal protective equipment as appropriate, e.g. gloves, safety footwear.
During all manoeuvres and handling actions, every attempt should be made to ensure the following unless unavoidable and/or
the weight is light.
• Keep back straight.
Avoid twisting at the waist.
Avoid upper body/top heavy bending.
Always grip with the palm of the hand.
• Use designated hand holds.
• Keep load as close to the body as possible.
Always use assistance if required.
6
40 - 70 kW Frame and Header Kits Manual
2” gas header with inlet test points
All the associated safety controls, pipes and ttings
required to connect the water and gas header to the
appliances are supplied. Dierent pumps are available as
options.
3.1 MAIN WATER HEADERS
The main water header consists of un-insulated water ow and
return pipes incorporating location and frame mounting brackets
sized to cater for the range of products available for use with
these kits.
The Single unit water header is a DN50 pipe system with
threaded connections. (Threaded anges are provided with
DN50 40 - 70 kW Low loss header kit).
3.2 GAS HEADER
The gas header consists of a 2” manifold tailored to t the two,
three or four unit versions available and is located in the cradle
incorporated in the water header bracket structure.
All the pipe work and connections are provided to connect the
header to the required appliance.
Test points are provided at each end of the 2” gas header. The
test point nearest to the gas inlet is intended to be used as the
appliance inlet pressure point.
3.3 LOW LOSS HEADERS (MIXING
HEADERS)
All variants of these kits (optional) must be tted to suitably sized low
loss header.
Note; Bespoke low loss headers may not be able to connect
directly to these headers due to the change in pitch and position
of the header pipe work used in these kits. (See frame t low loss
header)
ACV recommend:- DN50 – XB150029.
3.4 BOILER PUMP
Pump kits and External pump controls (sold separately) are
designed to provide the optimum ow around the appliance
water circuit ensuring the maximum ow rates are contained
within the design constrains of the appliance.
It is not recommended to t additional pumps directly to the
appliance circuit unless they have been designed to ensure the
maximum permissible appliance ow rate is not exceeded.
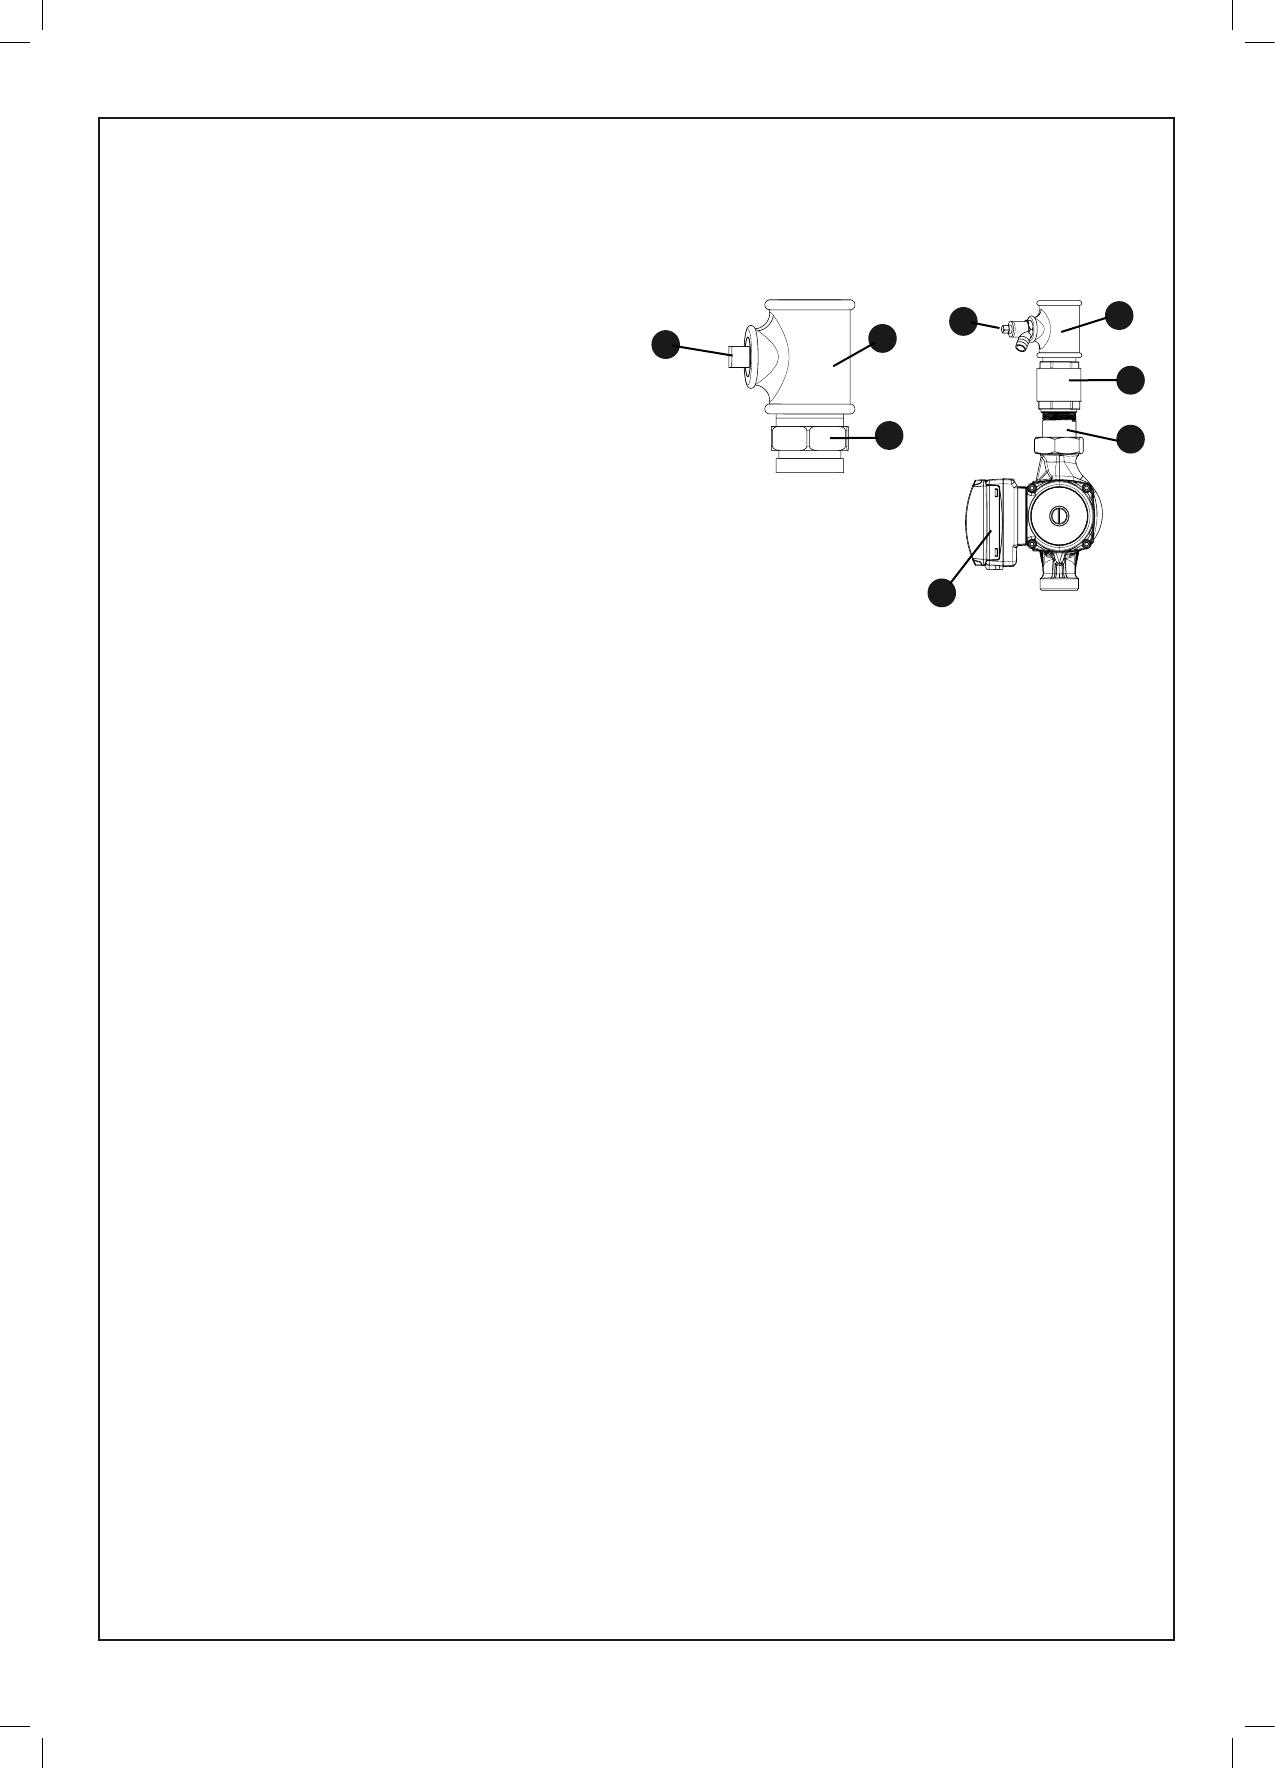
3.5 BOILER CONNECTION KITS
These boiler connections are un-insulated and contain the
following:
LEGEND
1. 1 ¼” x 1 ¼” x ¾” Tee
2. 3/4" Taper plug
3. 1 ¼” Male Parallel/Taper Hex Nipple
4. 1 ¼” x 1 ¼” x ½” Tee
5. Drain cock
6. Non return valve
7. Pump union
8. Pump inc. gaskets (optional)
Note. For boiler connection assembly, refer to Frame 4.4
3.6 FREE-STANDING FRAMES
The low height frames are designed to provide a compact
oor mounted structure capable of having any of the range of
appliances tted to them.
Incorporating all the required mountings and assembly systems
to bolt up to four frames together in a side by side format and
mount the relevant water and gas heater kits.
Provision is also provided to allow the frames to be bolted to the
oor.
Note: Floor mounting bolts are NOT provided.
3.7 INSTALLATION AREA AND
DIMENSIONS
Care must be taken to ensure adequate access for boiler /
cascade system installation and servicing.
A minimum of 450mm clearance must be provided from the
front of the installed boilers to facilitate boiler servicing.
Additional clearance must also be considered in the event of
boiler replacement.
Consideration to connecting heating ow and return pipework,
gas supply and condensate drainage must be given. Routing
of the condensate drain must be made to allow a minimum fall
of 1 in 20 away from the installed boilers, throughout its length.
Adequate room above the boilers must be provided to install
and service the boiler ue system. Further information with
respect to ue and condensate drain connection is provided in
the installation and servicing instructions provided within the
boilers packaging carton.
3 SYSTEM COMPONENTS
Note. Isolating Valves
are tted to water
header along with
exible connecting
pipes.
FLOW RETURN
2
3
1
54
6
7
8
7
40 - 70 kW Frame and Header Kits Manual
IMPORTANT POINTS
Before commencing installation:
If Wall mounting;
Ensure wall is capable of supporting the weight of boilers to
be mounted
Mark drill points of header using the frame as a guide.
Mark height on to the wall from the oor to the top of the
boiler
Ensure oor is at and level and is of suitable load bearing
capacity
If Frame mounting;
The frames must stand on a at and level oor of suitable
load bearing capacity.
If using a pipekit the header must be bolted to the frame
before the hoses are connected to the boiler.
MOUNTING FRAME MUST BE SECURED TO THE FLOOR
WITH BOLTS
These Installations refer to perpendicular wall and oor. If
walls are not perpendicular, it is recommended that a pipekit be
used.
Allowances must be made for installation where skirting boards
or other features are in place that may aect the nominal
installation conditions.
8
40 - 70 kW Frame and Header Kits Manual
4 INSTALLATION PROCEDURE
4.1 WALL MOUNTED SIDE BY SIDE OPTION
Ensure wall is capable of supporting the weight of boilers to be mounted. Note. boiler weights can found in the boiler
Installation Instructions.
1. Cut the sides o the cardboard wall mounting template/s (found in the boiler packaging) to create the 50mm side clearance
required.
2. Mark the height on to the wall from the oor to the top of the boiler as shown in Section 4.1.
3. Tape the template/s to the wall ensuring the 50mm side clearance per boiler requirement is adhered to.
5
4. Drill the required holes in the wall to t the wall mounting plate plugs. (See boiler Installation Instructions for details)
5. Screw the wall mounting plate(s) to the wall.
continued . . . . .
9
40 - 70 kW Frame and Header Kits Manual
4.1 WALL MOUNTED SIDE BY SIDE OPTION CONT'D............
1388 10
GAS
360
HEADER
505
All dimensions in mm
Careful consideration MUST be given to the installation tolerances. See Section 3.7.
if these are not adhered to, hoses may become kinked or connections may not t.
SIDE VIEW PLAN VIEW
10
40 - 70 kW Frame and Header Kits Manual
4.2 SIDE BY SIDE FRAME KIT MOUNTING PROCEDURE
1. Place the frame kit sections in the required position and bolt them together at the top and bottom with the bolts, nuts and
washers provided.
2. Drill and t the required oor bolt's (not provided) through the hole provided in the front of the frame feet. (Note, this must
be done before tting water headers)
IMPORTANT: MOUNTING FRAME MUST BE SECURED TO THE FLOOR WITH BOLTS
2
1
11
40 - 70 kW Frame and Header Kits Manual
4.3 BOILER MOUNTING
1
1. As appropriate mount the boilers onto either the wall plates or the side by side frame kit.
1. Attach ow connection assembly to the boiler ow
connection using suitable jointing compound.
2. Fit condensate trap and pipework (See appliance
instruction, pipe runs must have 1:20 slope away from the
appliance).
3. Fit one half of gas union to the boiler gas connection using
Gas Safe approved jointing compound.
4. Attach ow connection assembly to the boiler return
connection using suitable jointing compound, ensuring that
the drain port location is in a suitable position.
5. Install the drain cock into the tee (if tted to the return
assembly before the drain will fall foul of the boiler casing).
6. Attach pump to the pump union on the return assembly
using the sealing gaskets provided.
4.4 BOILER ASSEMBLY
2
1
4
3
6
5
4
12
40 - 70 kW Frame and Header Kits Manual
4.6 HEADER ASSEMBLY 4.7 FITTING THE GAS HEADER
1. Locate header into required position on the frame legs.
2. Align bolt holes and t bolts (loosely).
3. Attach the return hose to the lower side of the pump
using the sealing gasket provided.
4. Attach the ow hose to the ow connection assembly
using the sealing gasket provided.
5. Check isolation valves are operational.
6. Fit water header blanking anges using the gaskets
and bolts provided.
1. Fit the blanking cap to the required end of the gas
header.
2. Place the gas header in the pre-cut cradle on the main
header.
3. Fit the gas hose into the gas header valve using Gas
Safe approved jointing compound.
4. Fit the gas hose union to the union attached to the
boiler gas connection ensuring a gas tight seal.
3
1 2
6
4
5
3
1
4.5 HEADER KIT ASSEMBLY (OPTIONAL ACCESSORY)
FITTING MIXING HEADER AND BLANKING FLANGES
1. Fit the mixing header and blanking anges in the chosen positions.
Note. Mixing header can be located either LHS or RHS of the headers.
Mixing Header
Blanking Flange
NOTE: Blanking
plates supplied
with 3/4" BSP
hole for header
drain o point.
A
A
13
40 - 70 kW Frame and Header Kits Manual
4.8 ASSEMBLE HEADER ONTO FRAME
1. Four threaded PN6 anges are provided with the low
loss header DN50 kit to enable its connection to the
DN50 water header.
2. Fit low loss header to the water header using the
bolts and four gaskets provided.
3. Wire pumps to boiler termination (see appliance
instructions).
NOTE:
In multi boiler applications the pumps should remain
on until the switched demand to the appliance is met, it
is from this point the 4 minute pump over run time will
commence.
The switch demand is normally control by associated
control / sequencers.
1. Tighten the header bolts onto the frame.
2. Ensure that the test points on the gas header are
accessible.
Note: The test point nearest the inlet to the rigs is deemed
as the appliance pressure test point for the appliances
tted).
3. Test all gas joints to ensure they are gas tight and safe.
2
1
4.9 FIT LOW LOSS HEADER (NOT SUPPLIED WITH FRAME & HEADER KIT)
1
1
2
4
14
40 - 70 kW Frame and Header Kits Manual
5 INSTALLATION DRAWINGS FOR BOILER SYSTEMS
5.1 GENERAL
The boiler and pipekit systems are available in side by side format:
1 to 4 boilers in a linear conguration, mounted on a free-standing frame.
These boiler and cascade systems are sized to provide a ow and return dierential of 20º∆T.
5.2 INSTALLATION DRAWING WITH 1 40-70 kW BOILER (LOW LOSS HEADERS OR
PLATE HEAT EXCHANGERS
5.3 INSTALLATION DRAWING WITH 2 40-70 kW BOILERS (LOW LOSS HEADERS OR
PLATE HEAT EXCHANGERS)
500 250
480 480
20
1000
197
SYSTEM RETURN
DN50 PN6 FLANGE
SYSTEM FLOW
DN50 PN6 FLANGE
NOTE: LOW LOSS HEADER AND GAS CONNECTIONS CAN BE LOCATED
EITHER ON THE LH OR RH SIDE OF THE ASSEMBLY TO SUIT THE
REQUIREMENT OF THE INSTALLATION
613
(TOP OF FRAME)1418
(TOP OF BOILER)1390
300
396
541
685
120
450
1418 TOP OF FRAME
TOP OF BOILER1390
541
685
450
120
613
147
500
SYSTEM FLOW
DN50 PN6 FLANGE
SYSTEM RETURN
DN50 PN6 FLANGE
NOTE: LOW LOSS HEADER AND GAS CONNECTIONS CAN BE LOCATED
EITHER ON THE LH OR RH SIDE OF THE ASSEMBLY TO SUIT THE
REQUIREMENT OF THE INSTALLATION
396
300
All dimensions in mm
15
40 - 70 kW Frame and Header Kits Manual
5.4 INSTALLATION DRAWING WITH 3 40-70 kW BOILERS (LOW LOSS HEADERS OR
PLATE HEAT EXCHANGERS)
5.5 INSTALLATION DRAWING WITH 4 40-70 k
W BOILERS
(LOW LOSS HEADERS OR PLATE HEAT EXCHANGERS)
500 500 250
197
480 480 480
20 20
1500613
(TOP OF FRAME)1418
NOTE: LOW LOSS HEADER AND GAS CONNECTIONS CAN BE LOCATED
EITHER ON THE LH OR RH SIDE OF THE ASSEMBLY TO SUIT THE
REQUIREMENT OF THE INSTALLATION
SYSTEM FLOW
DN50 PN6 FLANGE
SYSTEM RETURN
DN50 PN6 FLANGE
396
541
685
120
450
(TOP OF BOILER)1391
300
ZONE REVISION REV.BY ECN No. DATE
ALL DIMENSIONS IN MM
DO NOT SCALE, IF IN DOUBT - ASK.
DRAWING VOID IF AMENDED MANUALLY
MATERIAL DRAWN BY
CHECKED BY
ECN No.
FINISH DATE
SCALE NTS
SB22593A
1 23456
500
480 480
20
(TOP OF FRAME)1418
(TOP OF BOILER)1390
SYSTEM RETURN
DN50 PN6 FLANGE
SYSTEM FLOW
DN50 PN6 FLANGE
NOTE: LOW LOSS HEADER AND GAS CONNECTIONS CAN BE LOCATED
EITHER ON THE LH OR RH SIDE OF THE ASSEMBLY TO SUIT THE
REQUIREMENT OF THE INSTALLATION
396
541
685
120
450
500 500 250
197
20
480 480
20
2000
300
All dimensions in mm
16
40 - 70 kW Frame and Header Kits Manual
6 ELECTRICAL CONNECTIONS & WIRING DIAGRAM
Refer to the Wiring Connection section in the boiler Installation Instructions for wiring details.
IMPORTANT: Ensure the boiler pumps are wired to the boiler in order to ensure the boiler pump overrun facility is provided.
Tape back
1 2 3 4 5 6 13 14 15 16 17 187 8 9 10 11 12 33 3424 25 26 27 28 2919 20 21 22 23
230V 50Hz
PELV
N
L
PE
L
IN
N
L3
/L3
PE
N
L
Modbus
CL+
LPB
P1
H1
GND
OpenTherm
AUX2
BX3
BX2
B9
B3
BSB
PE
H5
QX1
QX2
QX3
AUX1
PE
N
L2
PE
N
L1
IN
PWM
GND
DB
MB
UPMXXL
CL-
G+
A+
A-
REF
40 41 423635 37 38 3930 31 32
17
40 - 70 kW Frame and Header Kits Manual
7 COMMISSIONING AND TESTING
1. Electrical and gas safety checks must be carried out on
completion of installation as with individual boiler commissioning.
2. Pump setting - follow the instructions supplied with the pump,
referring to the installation manual.
UPMXXL
18
NOTES
40 - 70 kW Frame and Header Kits Manual
19
NOTES
40 - 70 kW Frame and Header Kits Manual
ACV pursues a policy of continuing improvement in the design and performance
of its products. The right is therefore reserved to vary specication without notice.
ACV U.K. Limited
St. David’s Business Park,
Dalgety Bay
Fife, Scotland
KY11 9PF
Tel: 0044 (0)1383 820100
www.acv.com/gb
  • Page 1 1
  • Page 2 2
  • Page 3 3
  • Page 4 4
  • Page 5 5
  • Page 6 6
  • Page 7 7
  • Page 8 8
  • Page 9 9
  • Page 10 10
  • Page 11 11
  • Page 12 12
  • Page 13 13
  • Page 14 14
  • Page 15 15
  • Page 16 16
  • Page 17 17
  • Page 18 18
  • Page 19 19
  • Page 20 20

ACV EVO S Operating instructions

Type
Operating instructions

ACV EVO S is a versatile and efficient boiler system designed for residential and commercial use. With its advanced features, it offers reliable heating solutions tailored to your specific needs. The EVO S range provides high-performance heating with outputs ranging from 40 to 70kW, making it suitable for a variety of property sizes. Equipped with a user-friendly interface and a range of accessories like low loss headers and plate heat exchangers, the EVO S offers flexible installation options and enhanced energy efficiency.

Ask a question and I''ll find the answer in the document

Finding information in a document is now easier with AI